Table of Contents
Advertisement
Available languages
Available languages
ºC
ECO
Z
SYST
ON
PROG
TIMER
OFF
MASTER
1
2
3
4
5
6
7
2
4
6
10
12
18
20
8
14
16
SET
PROG
COPY
DAY
INFO
ECO
CLEAR
FRESH
24
22
MADEL Air Technical Diffusion, S. A.
C/ Pont de les Bruixes, P-5 Pol. Ind. La Gavarra
P.O. Box nº5 E-08540 Centelles (Barcelona)
Tel. (34) 93 889 80 91
Fax (34) 93 889 82 19
E-mail: info@madel.com
http://www.madel.com
Cronotermostato ZOE
Manual del usuario
Timer-thermostat ZOE
User Manual
Chronothermostat ZOE
Manuel de l'utilisateur
Cronotermostato ZOE
Manuale utente
Advertisement
Chapters
Table of Contents

Subscribe to Our Youtube Channel
Related Manuals for Madel ZONING ZOE

Summary of Contents for Madel ZONING ZOE
- Page 1 COPY Manuale utente INFO CLEAR FRESH MADEL Air Technical Diffusion, S. A. C/ Pont de les Bruixes, P-5 Pol. Ind. La Gavarra P.O. Box nº5 E-08540 Centelles (Barcelona) Tel. (34) 93 889 80 91 Fax (34) 93 889 82 19 E-mail: info@madel.com...
-
Page 3: Table Of Contents
Cronotermostato ZOE Presentación del sistema ............3 Características técnicas ............3 Ubicación de los termostatos (fig. 1) ........3 Cambio de pilas (fig. 2) ............3 Teclas e indicadores (fig. 3) ........... 4 Utilización ................4 Localización de averías ............6 Configuración básica (SE1, fig. - Page 4 Manual del usuario Manual del usuario V 03/16...
-
Page 5: Presentación Del Sistema
Temperatura de funcionamiento: 0 ºC a 55ºC. • Temperatura de almacenamiento: -10 ºC a 60 ºC. Por medio de la presente MADEL ATD declara que los equipos KRCPLUS / KSP / KFCPLUS cumplen con los requisitos esenciales y cualesquiera otras disposiciones aplicables o exigibles de la Directiva 1999/5/CE. -
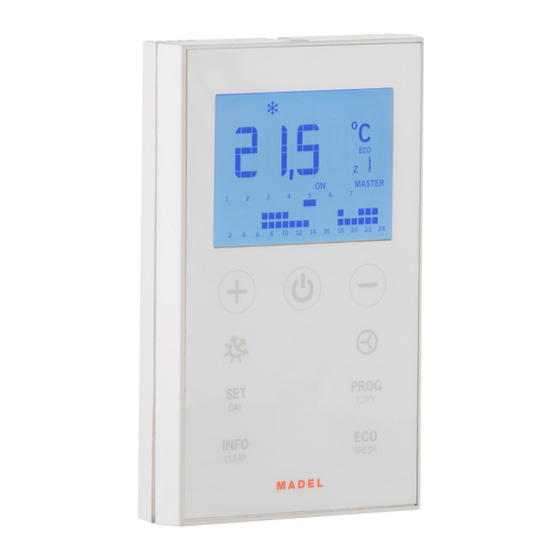
Page 6: Teclas E Indicadores (Fig. 3)
Manual del usuario Teclas e indicadores (fig. 3) Temperatura de consigna / ambiente Indicador velocidad ventilador Indicador reloj Indicador desgaste pilas Indicadores Zona y Master Indicador día de la semana ºC Indicador tramos horarios Tecla bajar temperatura PROG TIMER SYST MASTER Tecla “FAN”... - Page 7 Cronotermostato ZOE Ajuste de la hora (SE3, fig. 4) Es necesario ajustar la hora para poder realizar la 2 Con las teclas +/- seleccione la hora (al mantener programación semanal. Se realiza de la manera siguiente pulsado avanza rápido) y confirme pulsando “ON/OFF”. (siga el diagrama de la figura 4): 3 Con la tecla +/- seleccione el día de la semana y 1 Con el termostato encendido, pulse la tecla “SET”...
-
Page 8: Localización De Averías
Manual del usuario ºC ºC ºC PROG PROG TIMER TIMER SYST SYST MASTER MASTER PROG PROG TIMER TIMER SYST SYST MASTER MASTER PROG PROG TIMER TIMER SYST SYST MASTER MASTER PROG PROG TIMER TIMER SYST SYST MASTER PROG COPY ON/OFF ºC ºC ºC... -
Page 9: Configuración Básica (Se1, Fig. 6), A Realizar Sólo Por Un Instalador Acreditado
Cronotermostato ZOE H Configuración básica (SE1, fig. 6), a realizar sólo por un instalador acreditado Antes de utilizar el cronotermostato, es necesario realizar 1 Con el termostato encendido, presione “SET”, a la configuración básica. Esta configuración dispone de 4 continuación “+” (el display muestra SE1) y a continuación “ON/OFF”... - Page 10 Manual del usuario 4 Mediante las teclas “+” y “-”, elija la opción deseada 8 Mediante las teclas “+” y “-”, elija la temperatura mínima (“HC03” / “HC02” / “HC01” / “HC00” / ) y pulse “ON/OFF” para el modo calor y pulse “ON/OFF” para confirmar. para confirmar.
- Page 11 Cronotermostato ZOE System presentation ............11 Technical characteristics ............. 11 Location of the thermostats (fig. 1) ........11 Battery change (fig. 2) ............11 Keys and indicators (fig. 3) ..........12 Use ..................12 Troubleshooting ..............14 Basic configuration (SE1, fig. 6), to be carried out only by an accredited installer ....
- Page 12 Manual del usuario Manual del usuario V 03/16...
-
Page 13: System Presentation
Operating temperature: 0 ¬½C to 55¬½C. • Storage temperature: -10 ¬½C to 60 ¬½C. MADEL ATD hereby declares that the KRCPLUS / KSP / KFCPLUS units comply with the essential requirements and any other applicable or obligatory provisions of Directive 1999/5/EC. -
Page 14: Keys And Indicators (Fig. 3)
User Manual Keys and indicators (fig. 3) Setpoint/ambient temperature Fan speed indicator Clock indicator Battery use indicator Zone and Master indicators Day of the week indicator ºC Timeslots indicator Reduce temperature key PROG TIMER SYST MASTER "FAN" key, fan speed 10 "PROG"... - Page 15 Timer-thermostat ZOE Setting the time (SE3, fig. 4) Time must be set in order to carry out weekly programming. 2 Use the +/- keys to select the time (keeping fast forward This is carried out as follows (follow the diagram in figure 4): pressed down) and confirm by pressing "ON/OFF".
-
Page 16: Troubleshooting
User Manual ºC ºC ºC PROG PROG TIMER TIMER SYST SYST MASTER MASTER PROG PROG TIMER TIMER SYST SYST MASTER MASTER PROG PROG TIMER TIMER SYST SYST MASTER MASTER PROG PROG TIMER TIMER SYST SYST MASTER MASTER PROG COPY ON/OFF ºC ºC ºC... -
Page 17: Basic Configuration (Se1, Fig. 6), To Be Carried Out Only By An Accredited Installer
Timer-thermostat ZOE H Basic configuration (SE1, fig. 6), to be carried out only by an accredited installer Basic configuration must be completed before using the 1 With the thermostat on, press "SET", then "+" (the timer-thermostat. This configuration has 4 menus: display shows SE1) followed by "ON/OFF"... - Page 18 User Manual 5 Use the "+" and "-" keys to choose the required option 9 Use the "+" and "-" keys to choose the maximum ("Pr01" / "Pr00") and press "ON/OFF" to confirm. temperature for heat mode, and press "ON/OFF" to confirm.
- Page 19 Cronotermostato ZOE Présentation du système ............. 19 Caractéristiques techniques ..........19 Emplacement des thermostats (fig. 1) ........ 19 Changement de piles (fig. 2) ..........19 Touches et indicateurs (fig. 3) ..........20 Utilisation ................20 Localisation de pannes ............22 Configuration basique (SE1, fig.
- Page 20 Manual del usuario Manual del usuario V 03/16...
-
Page 21: Présentation Du Système
Température de fonctionnement : 0 ºC à 55ºC. • Température d'entreposage : -10 ºC à 60 ºC. À travers le présent document, MADEL ATD déclare que les équipements KRCPLUS / KSP / KFCPLUS remplissent les conditions essentielles et l'ensemble des dispositions applicables ou exigibles de la Directive 1999/5/CE. -
Page 22: Touches Et Indicateurs (Fig. 3)
Manuel de l'utilisateur Touches et indicateurs (fig. 3) Température de consigne / ambiante Indicateur vitesse ventilateur Indicateur horloge Indicateur usure piles Indicateurs Zone et Master Indicateur jour de la semaine ºC Indicateur tranches horaires Touche baisser température PROG TIMER SYST MASTER Touche “FAN”... - Page 23 Chronothermostat ZOE Réglage de l'heure (SE3, fig. 4) Il faut ajuster l'heure afin de pouvoir effectuer la 2 Avec les touches +/-, sélectionnez l'heure (en appuyant programmation hebdomadaire. La séquence à suivre est la pendant quelques secondes sur les touches, les valeurs suivante (suivez le diagramme de la figure 4) : avancent rapidement) et confirmez en appuyant sur “ON/OFF”.
-
Page 24: Localisation De Pannes
Manuel de l'utilisateur ºC ºC ºC PROG PROG TIMER TIMER SYST SYST MASTER MASTER PROG PROG TIMER TIMER SYST SYST MASTER MASTER PROG PROG TIMER TIMER SYST SYST MASTER MASTER PROG PROG TIMER TIMER SYST SYST MASTER PROG COPY ON/OFF 2 2 2 ºC ºC... -
Page 25: Configuration Basique (Se1, Fig. 6), À Réaliser Uniquement Par Un Installateur Certifié
Chronothermostat ZOE H Configuration basique (SE1, fig. 6), à réaliser uniquement par un installateur certifié Avant d'utiliser le chronothermostat, il faut effectuer la 1 Avec le thermostat allumé, appuyez sur “SET”, puis sur configuration basique. Cette configuration possède 4 “+” (l'écran affiche SE1) et ensuite sur “ON/OFF” pour confirmer. - Page 26 Manuel de l'utilisateur 4 Avec les touches “+” et “-”, choisissez l'option désirée 9 Avec les touches “+” et “-”, choisissez la température (“HC03” / “HC02” / “HC01” / “HC00” / ) et appuyez sur maximale pour le mode chaud et appuyez sur “ON/ “ON/OFF”...
- Page 27 Cronotermostato ZOE Presentazione del sistema ........... 27 Caratteristiche tecniche ............27 Ubicazione dei termostati (fig. 1) ........27 Sostituzione delle batterie (fig. 2) ........27 Tasti indicatori (fig. 3) ............28 Utilizzo ................... 28 Individuazione dei guasti ............. 30 Programmazione basilare (SE1, fig. 6), eseguibile solo da un installatore qualificato ....
- Page 28 Manual del usuario Manual del usuario V 03/16...
- Page 29 Temperatura di funzionamento: da 0 ºC a 55 ºC. • Temperatura di stoccaggio: da -10 ºC a 60 ºC. Con la presente MADEL ATD dichiara che i dispositivi KRCPLUS / KSP / KFCPLUS sono conformi ai requisiti essenziali e a qualunque altra disposizione applicabile o esigibile della Direttiva 1999/5/CE.
- Page 30 Manuale utente Tasti indicatori (fig. 3) Temperatura di setpoint / ambiente Indicatore velocità ventilatore Indicatore orologio Indicatore esaurimento batterie Indicatore Zona e Master Indicatore giorno della settimana ºC Indicatore fasce orarie Tasto per abbassare la temperatura PROG TIMER SYST MASTER Tasto “FAN”...
- Page 31 Cronotermostato ZOE Impostazione dell'ora (SE3, fig. 4) È n e c e s s a r i o i m p o s t a r e l ' o r a p e r e f f e t t u a r e l a 2 Selezionare l'ora con i tasti +/- (mantenendoli premuti, i programmazione settimanale.
- Page 32 Manuale utente ºC ºC ºC PROG PROG TIMER TIMER SYST SYST MASTER MASTER PROG PROG TIMER TIMER SYST SYST MASTER MASTER PROG PROG TIMER TIMER SYST SYST MASTER MASTER PROG PROG TIMER TIMER SYST SYST MASTER MASTER PROG COPY ON/OFF ºC ºC ºC...
- Page 33 Cronotermostato ZOE H Programmazione basilare (SE1, fig. 6), eseguibile solo da un installatore qualificato Prima di usare il cronotermostato, è necessario eseguire 1 Con il termostato acceso, premere “SET”, poi “+” (sul u n a p r o g r a m m a z i o n e b a s i l a r e .
- Page 34 Manuale utente 4 Con i tasti “+” e “-”, selezionare l'opzione richiesta 9 Con i tasti “+” e “-”, impostare la temperatura massima (“HC03” / “HC02” / “HC01” / “HC00”) e premere “ON/ per la modalità caldo e premere “ON/OFF” per OFF”...
- Page 35 WARRANTY MADEL ATD garantie ses produits contre les défets de MADEL ATD products have a warranty of two (2) years from the fabrication pour un période de deux (2) ans à compter à partir de date of expedition of the goods to the DISTRIBUTOR. The la date de livraison au DISTRIBUTEUR.
- Page 36 MADEL Air Technical Diffusion, S. A. C/ Pont de les Bruixes, P-5 Pol. Ind. La Gavarra P.O. Box nº5 E-08540 Centelles (Barcelona) Tel. (34) 93 889 80 91 Fax (34) 93 889 82 19 E-mail: info@madel.com http://www.madel.com...
Need help?
Do you have a question about the ZONING ZOE and is the answer not in the manual?
Questions and answers