Table of Contents
Advertisement
Quick Links
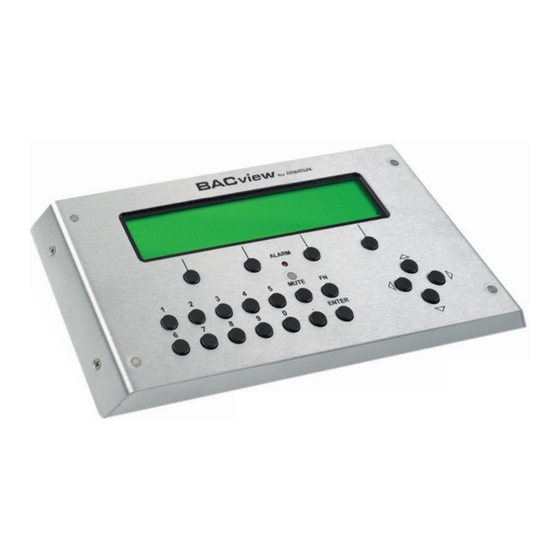
General instructions for Bacview connection and use.
All ALC controllers are programmed to allow a Bacview service tool to be plugged in for monitoring and service
purposes. The Bacview will display information about the unit including: status of all inputs, limit switch status,
countdown of time delays, and in some cases run time logs. The Bacview will also allow adjustment of all adjustable set
points.
The Bacview can be connected to the ALC controller in one of two ways.
1. Service Cable. For quick connection the service cable is the easiest way to hook to multiple units. The service
cable will connect to the 4 pin plug on the back of the Bacview. The service cable will hook up as follows to the
Bacview:
+12 = Red wire
Rnet‐ = Blue wire
Rnet+ = White wire
Gnd = Black wire
The plug on the other end of the service cable will plug into the local access pins on the left side of the ALC
controller.
2. Hard Wired. On the back of the Bacview is a 4 pin plug. This plug is labeled +12v, Rnet‐, Rnet +, & Gnd. A 4 pin
plug identical to this (labeled Rnet local access) is located on the left side of the ALC controller. These two plugs
can simply be hard wired together. If a RSpro t‐stat is already connected to the Rnet plug you can simply
connect the bacview in parallel.
Advertisement
Table of Contents

Summary of Contents for Hydro-Temp Bacview
- Page 1 General instructions for Bacview connection and use. All ALC controllers are programmed to allow a Bacview service tool to be plugged in for monitoring and service purposes. The Bacview will display information about the unit including: status of all inputs, limit switch status, countdown of time delays, and in some cases run time logs. The Bacview will also allow adjustment of all adjustable set points. The Bacview can be connected to the ALC controller in one of two ways. 1. Service Cable. For quick connection the service cable is the easiest way to hook to multiple units. The service cable will connect to the 4 pin plug on the back of the Bacview. The service cable will hook up as follows to the Bacview: +12 = Red wire Rnet‐ = Blue wire Rnet+ = White wire Gnd = Black wire The plug on the other end of the service cable will plug into the local access pins on the left side of the ALC controller. 2. Hard Wired. On the back of the Bacview is a 4 pin plug. This plug is labeled +12v, Rnet‐, Rnet +, & Gnd. A 4 pin plug identical to this (labeled Rnet local access) is located on the left side of the ALC controller. These two plugs can simply be hard wired together. If a RSpro t‐stat is already connected to the Rnet plug you can simply connect the bacview in parallel. ...
- Page 2 The screen shots shown in this are samples; each unit will have different information available. Welcome screen. Home / Welcome will come up when the BACView is plugged in. If the display is blank you must press any of the four navigation keys directly under the display, this will illuminate the screen. The home Screen will display the system Program number and version. To navigate between the screens, press the soft touch navigation button under the screen you want to go to. For example, the arrow is pointing to the set point button. To navigate to the set point screen press the set point button. If any screen has more than 4 lines of display you will need to press the arrow keys to scroll up and down the screen. ...
- Page 3 Status screen This is a status screen only. Edits cannot be made on this screen. ...
- Page 4 Setpoint screen To navigate the set point screen press the arrow keys to move the quotes up or down the screen. (the example above shows quotes on all set points, when your running live on a system only the set point your navigated to will have a quote) navigate to the set point you want to edit then press the enter button to edit the point. When your in the edit mode the soft touch keys will change to allow edit of the set point. The first button will change to OK, second button Cancel, third button Decrease, and forth button Increase. After desired set point is selected press the OK button or Enter button to save to module. ...
- Page 5 Delay Screen (System Critical Delays) Run Time Screen (accumulative run time) ...
- Page 6 Network Settings. The following only applies to systems with the I/O flex 6126 controller. This problem does not exist with the I/O zone 583 controller. Most of the time when a system is tested in our factory the network settings are automatically cleared so the system will search for the next available network. This allows the customer’s MS/TP network to be connected and read / write to the controller with no additional steps to be taken except the proper setting of the dip switches. If MS/TP communication cannot be established you may have to manually erase the existing network numbers. This can be done with a Bacview plugged into the Rnet local access port. While at any of the above screens you can press and hold down the FN (Function) key plus the 9 key. This will bring up the Network screen. Press the arrow keys to scroll to Arc156. Press enter to edit the existing Arcnet network number. This number needs to be set to zero, and then press enter. Next scroll to the MS/TP network number and change it to your expected MS/TP network number. If you are not sure about your network number you can increase the value to 1 and press enter to save it to the controller. This will force the I/O Flex 6126 to begin searching the MS/TP network port for an available network. Advance network Information. To view more network information you can press and hold down the Fn key plus the 8 key. This will display and give an option to change the Bacnet device instance and Base Bacnet Device ID. ...
Need help?
Do you have a question about the Bacview and is the answer not in the manual?
Questions and answers