Table of Contents
Advertisement
Advertisement
Table of Contents

Summary of Contents for Clemsa mutan-II
- Page 1 EXTERIOR RECEIVER 12V - 230V RN 42 / RN 44 TECHNICAL www.clemsa.es MANUAL...
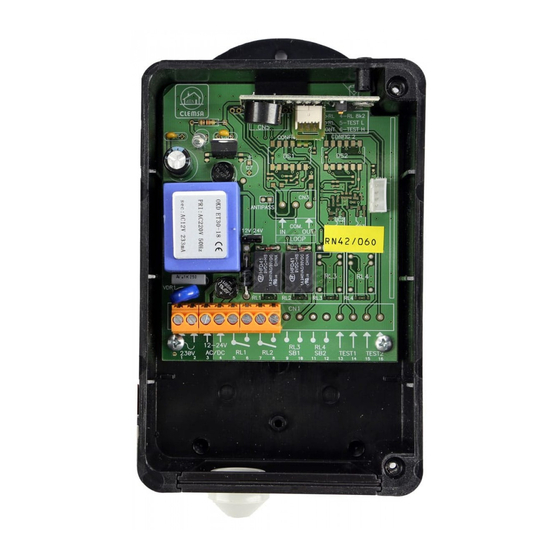
- Page 2 LOCATION OF MAIN COMPONENTS Program Output LEDs Button OUTPUTS 1 2 3 4 Antenna Buzzer TM 400 Connector Port for Auxiliary Cards Auxiliar TRF1 y Card Voltage Selector 24Vac 12Vac 24Vdc Switch – + VDR1 Voltage Selector Connection Switch Terminals 230Vac 12-24V AC/DC...
-
Page 3: Table Of Contents
INDEX Page 1. DESCRIPTION ..........2. -
Page 4: Description
1. DESCRIPTION Thank you for trusting CLEMSA for your home automation remote control system needs. Exterior Receivers Rn 42 and RN 44 are versatile receivers in the MUTAN II family with relay outputs, with power source options for 230Vac or 12V to 24V. -
Page 5: Connection
3. CONNECTION RN 42 RN 44 1-2: 230Vac Power 3-4: 12 to 24V ac/dc power according to switch setting. 5-6: NO Contact, receiver port 1 7-8: NO Contact, receiver port 1 9-10: NO Contact, receiver port 1 11-12: NO Contact, receiver port 1 4. - Page 6 2.- Once in programming mode you can authorize the desired transmitters by pressing any button on each transmitter; for each transmitter programmed a short beep will sound. (Fig. 3) 3.- To exit programming mode you may do the following: (Fig. 4) - Wait 30 seconds for the Receiver to leave programming mode on its own.
-
Page 7: Use
5. USE Once the transmitters are programmed in the Receiver, pressing a channel will activate the corresponding Receiver outputs. WARNING, once working, with the Installation Key, the Memory Card will be linked to the receiver and can only be reused in a new Receiver through the use of the programmer. See its instructions. -
Page 8: Enable Radio-Supervised Authorization
Fig. 8 beeep beeep beeep Fig. 8 Fig. 7 Fig. 9 beep beeep Fig. 10 5.3. ENABLE RADIO-SUPERVISED AUTHORIZATION Standard the receivers only have the button authorization option; if you want to change the type of authorization to Supervised or Direct, you can use the Programmer or manually enable the Supervised Authorization mode in the following manner: With the receiver connected and working, extract the TM 400 memory card (Fig. -
Page 9: Deleting Transmitters
5.4. DELETING TRANSMITTERS To delete all users from your Receiver, press its program button and hold it down for 10 seconds; you will hear 6 double beeps indicating the memory has been erased. If you only wish to erase one particular user, you must use a compatible programmer. 5.5. -
Page 10: Programming Quick Guide
8. PROGRAMMING QUICK GUIDE PROGRAMMING SEQUENCE OUTPUT CONFIGURATION OR ENABLING SUPERVISED AUTHORIZATION bip bip beeep beeep beeep beep beeep... -
Page 11: Declaration Of Conformity
9.DECLARATION OF CONFORMITY... - Page 12 VALENCIA Sequía Calvera, 5-B (P. I. de Sedaví) - 46910 Sedaví (Valencia) - Tel. 963 186 166 - Fax 963 755 683 - ventas.valencia@clemsa.es SEVILLA La Red Quince, nº 2 (P. I. La Red Sur) - 41500 Alcalá de Guadaira (Sevilla) - Tel. 955 631 006 - Fax 955 630 547 - ventas.sevilla@clemsa.es...
Need help?
Do you have a question about the mutan-II and is the answer not in the manual?
Questions and answers