Table of Contents
Advertisement
Quick Links
Relay User Manual
Updated January 27, 2021
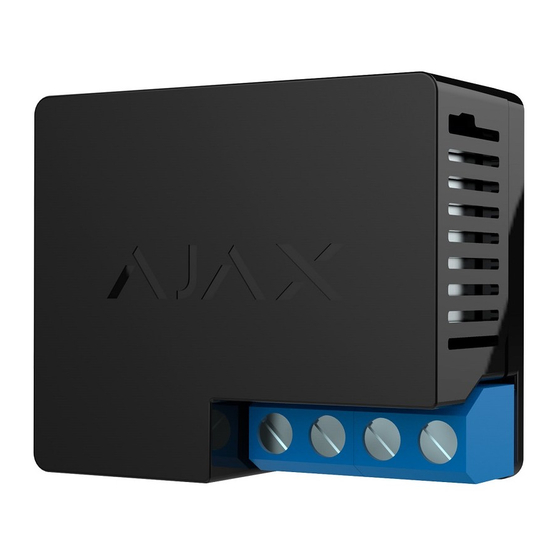
Relay is a wireless, low-voltage relay featuring potential-free (dry) contacts. Use
Relay to remotely switch on/off appliances powered by a 7–24 V DC source. Relay
can operate both in pulse and bistable mode. The device communicates with a hub
via
Jeweller
radio protocol. In the line of sight, the communication distance is up to
1,000 m.
Regardless of the type of electrical circuit, only a qualified electrician should install Relay!
The Relay contacts are not galvanically connected to the device itself, so they can
be connected to the input control circuits of various equipment to imitate a button,
toggle switch, etc.
Advertisement
Table of Contents

Summary of Contents for AJAX Systems Relay
- Page 1 Updated January 27, 2021 Relay is a wireless, low-voltage relay featuring potential-free (dry) contacts. Use Relay to remotely switch on/off appliances powered by a 7–24 V DC source. Relay can operate both in pulse and bistable mode. The device communicates with a hub Jeweller radio protocol.
-
Page 2: Functional Elements
Relay is compatible only with Ajax hubs and does not support connecting via uartBridge ocBridge Plus Use scenarios to program actions of automation devices (Relay, WallSwitch or Socket) in response to an alarm, Button press or schedule. A scenario can be created remotely in the Ajax app. -
Page 3: Operating Principle
Relay terminals — output potential-free terminals. Operating Principle Do not connect Relay power supply input terminals to a voltage exceeding 36 V or alternate current sources. It creates a risk of fire and will damage the device! Regardless of the type of electrical circuit, only a qualified electrician should install Relay! Relay is powered by a 7–24 V DC source. - Page 4 Relay operation modes: Bistable — Relay opens or closes contact and remains in this state. Pulse — Relay opens or closes contacts for a pre-set time (from 0.5 to 255 seconds) then switches back to the initial state. Connecting to the hub Before connecting the device: 1.
- Page 5 (at the same object). The connection request is transmitted only at the moment of switching on the device. If the device failed to pair, wait 30 seconds and then retry. Relay will appear in the list of hub devices.
- Page 6 Connection Connection status between the hub and the relay Displays the status of using the ReX range Routed Through ReX extender Active State of the relay contacts (closed / open) Voltage The current input voltage Displays the status of the device: active or...
-
Page 7: Functionality Testing
85°С inside Relay is reached. Indication The Relay light indicator can light green depending on the device status. When not paired with the hub, the light indicator blinks periodically. When the functional button is pressed, the light indicator lights up. -
Page 8: Installation Of The Device
2. Connect the grid wire to the Relay terminals according to the following scheme: When installing Relay in the box, lead out the antenna and place it under the plastic frame of the socket. The bigger the distance between the antenna and metal structures, the lower the risk of interfering (and impairment) of the radio signal. -
Page 9: Maintenance
During the installation and operation of Relay, follow the general electrical safety rules and the requirements of electrical safety regulatory acts. It is strictly forbidden to disassemble the device. Do not use the device with damaged power cables. Do not install the relay: 1. -
Page 10: Complete Set
24 V DC and to 8 A at 230 V AC! Complete Set 1. Relay 2. Connecting wires — 2 pcs 3. Quick Start Guide Warranty Warranty for the “AJAX SYSTEMS MANUFACTURING” LIMITED LIABILITY COMPANY products is valid for 2 years after the purchase. - Page 11 If the device does not work correctly, you should first contact the support service — in half of the cases, technical issues can be solved remotely! The full text of the warranty User Agreement Technical support: support@ajax.systems...
Need help?
Do you have a question about the Relay and is the answer not in the manual?
Questions and answers