Table of Contents
Advertisement
Available languages
Available languages
Quick Links
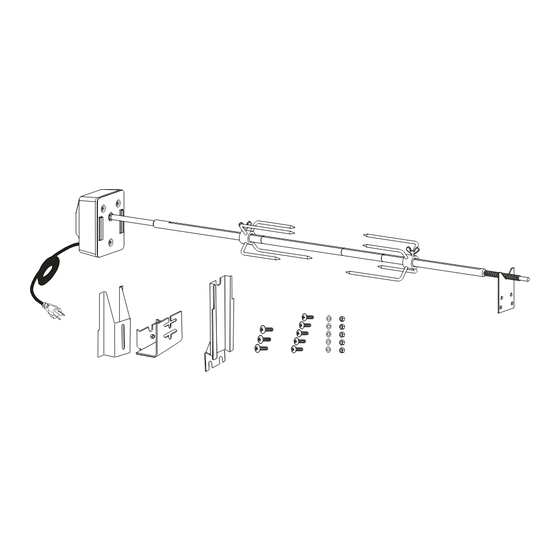
UNIVERSAL ROTISSERIE
ROTISSERIE UNIVERSAL
OWNER'S MANUAL
MANUAL DEL PROPIETARIO
ASSEMBLY AND OPERATING INSTRUCTIONS
INSTRUCCIONES DE ARMADO Y OPERACIÓN
WARNING
READ AND FOLLOW ALL
WARNINGS AND
INSTRUCTIONS IN THIS
MANUAL TO AVOID PERSONAL
INJURY, INCLUDING DEATH OR
PROPERTY DAMAGE.
SAVE THIS MANUAL FOR
FUTURE REFERENCE
ADVERTENCIA
LEA Y SIGA TODAS LAS
ADVERTENCIAS E
INSTRUCCIONES EN ESTE
MANUAL PARA EVITAR LESIONES
PERSONALES, INCLUSO MUERTE
O DAÑOS MATERIALES.
GUARDE ESTE MANUAL
PARA REFERENCIA FUTURA
Advertisement
Table of Contents

Related Manuals for Charmglow Charmglow Universal Rotisserie

Summary of Contents for Charmglow Charmglow Universal Rotisserie
- Page 1 UNIVERSAL ROTISSERIE ROTISSERIE UNIVERSAL OWNER’S MANUAL MANUAL DEL PROPIETARIO ASSEMBLY AND OPERATING INSTRUCTIONS INSTRUCCIONES DE ARMADO Y OPERACIÓN WARNING READ AND FOLLOW ALL WARNINGS AND INSTRUCTIONS IN THIS MANUAL TO AVOID PERSONAL INJURY, INCLUDING DEATH OR PROPERTY DAMAGE. SAVE THIS MANUAL FOR FUTURE REFERENCE ADVERTENCIA LEA Y SIGA TODAS LAS...
-
Page 2: Important Safety
WE WANT YOU TO ASSEMBLE AND USE YOUR ROTISSERIE AS SAFELY AS POSSIBLE. THE PURPOSE OF THIS SAFETY ALERT SYMBOL TO POSSIBLE HAZARDS AS YOU ASSEMBLE AND USE YOUR ROTISSERIE. WHEN YOU SEE THE SAFETY ALERT SYMBOL PAY CLOSE ATTENTION TO THE INFORMATION WHICH FOLLOWS! READ ALL SAFETY WARNINGS AND INSTRUCTIONS CAREFULLY BEFORE ASSEMBLING AND OPERATING YOUR ROTISSERIE. -
Page 3: Assembly Instructions
ASSEMBLY INSTRUCTIONS READ ALL SAFETY WARNINGS & ASSEMBLY INSTRUCTIONS CAREFULLY BEFORE ASSEMBLING OR OPERATING YOUR ROTISSERIE. READ THE OWNERS MANUAL TO THE GRILL BEFORE ASSEMBLING OR USING THIS ROTISSERIE. THE FOLLOWING TOOLS ARE REQUIRED TO ASSEMBLE THIS UNIVERSAL ROTISSERIE: • Phillips &... - Page 4 ASSEMBLY STEPS Most Charmglow ® grill models will use motor mount bracket (Step 1 - Step 6), if your grill is model 810-7400-S or 810-7500-S, use motor mount bracket and skip to Step 7. Step 1 Open grill hood and remove cooking grills.
- Page 5 Motor Socket STEPS 7 - 11 ARE FOR MODELS 810-7400-S & 810-7500-S Step 7 Open grill hood and remove cooking grills. Refer to your original grill owner’s manual. Step 8 Attach motor mount bracket the left hand side of the grill using two M6 X 10mm screws.
- Page 6 Note: Erratic noises from the motor are a sign of an unbalanced spit rod. Which could cause severe damage to motor gears. WARNING: Always use oven mitts/gloves to protect your hands. Metal parts become hot during use. Use extreme caution when handling spit rod and forks.
-
Page 7: Cleaning And Maintenance
ROTISSERIE COOKING CONTINUED: When food is done, use oven mitts/gloves to remove spit rod from motor assembly. Loosen fork set screws and remove meat by sliding off the end of the spit rod. GRILLING TO PROPER TEMPERATURE: • Use a meat thermometer to be sure food has reached a safe internal temperature. - Page 8 IMPORTANTES DE SEGURIDAD ES NUESTRO DESEO QUE ARME Y UTILICE SU ASADOR ESTILO ROTISSERIE EN LA EL PROPÓSITO DE ESTE SÍMBOLO DE ALERTA DE SEGURIDAD PRESTE ATENCIÓN A LOS POSIBLES PELIGROS CUANDO ARME Y UTILICE SU ASADOR ¡CUANDO VEA ESTE SÍMBOLO DE ALERTA DE SEGURIDAD, PRESTE ESPECIAL ATENCIÓN A LA INFORMACIÓN A CONTINUACIÓN! LEA DETENIDAMENTE TODAS LAS ADVERTENCIAS DE SEGURIDAD E INSTRUCCIONES ANTES DE ARMAR Y USAR EL ASADOR ESTILO ROTISSERIE.
-
Page 9: Instrucciones De Armado
INSTRUCCIONES DE ARMADO LEA DETENIDAMENTE TODAS LAS ADVERTENCIAS DE SEGURIDAD E INSTRUCCIONES DE ARMADO ANTES DE ARMAR O USAR EL ASADOR. LEA EL MANUAL DEL PROPIETARIO DE LA PARRILLA ANTES DE ARMAR O USAR ESTE ROTISSERIE . SE NECESITAN LAS SIGUIENTES HERRAMIENTAS PARA ARMAR ESTE UNIVERSAL ROTISSERIE: •... - Page 10 PASOS DE ASAMBLAGE La mayoría de los modelos de la parrilla ® utilizan el soporte de montaje Charmglow del motor (Paso 1 - Paso 6), si su parrilla es el modelo 810-7400-S o 810- 7500-S, use el soporte de montaje del motor y siga al Paso 7.
- Page 11 Hueco del Motor PASOS 7 - 11 SON PARA MODELOS 810-7400-S Y 810-7500-S Paso 7 Abra la cubierta de la parrilla y quite las rejillas para cocinar. Consulte su manual del propietario original de su parrilla. Paso 8 Ate el soporte del montaje de motor parrilla utilizando dos M6 X 10mm tornillos.
- Page 12 LEA TODAS LAS ADVERTENCIAS EN LA PÁGINA 7 Y EN EL MANUAL DEL PROPIETARIO DE LA PARRILLA. INSTRUCCIONES PARA CONECTAR A TIERRA LOS ARTEFACTOS ELÉCTRICOS: Este artefacto (motor del asador estilo rotisserie) está equipado con un enchufe de tres clavijas (de puesta a tierra) para proteger al usuario contra el electrochoque. Este enchufe debe conectarse directamente a un receptáculo para tres clavijas conectado correctamente a tierra.
-
Page 13: Limpieza Y Mantenimiento
COCCIÓN ESTILO ROTISSERIE - CONTINUACIÓN: Siempre coloque el interruptor del motor de asador en “OFF” (apagado) cuando abra la tapa de la parrilla. Una vez que la comida esté lista, use guantes para el horno para sacar la varilla del motor. Afloje los tornillos de fijación de los trinches y saque la carne deslizándola del extremo de la varilla. -
Page 16: Year Limited Warranty
Durante un año a partir de la fecha de compra, The Brinkmann Corporation garantiza al comprador original que el Charmglow Rotisserie está libre de defectos de materiales o mano de obra. Las obligaciones de The Brinkmann Corporation con respecto a esta garantía se limitan a lo siguiente: •...
Need help?
Do you have a question about the Charmglow Universal Rotisserie and is the answer not in the manual?
Questions and answers