Table of Contents
Advertisement
Quick Links
Advertisement
Table of Contents

Summary of Contents for DESi Utopic-R OK
- Page 1 Wireless Smart Lock USER MANUAL...
-
Page 2: General Information And Warnings
GENERAL INFORMATION and WARNINGS Before using your smart lock, Locking way (right or left handed door) and Number of turns should be adjusted properly. Otherwise, the smart lock will not work in the correct way and maybe broken. For emergency conditions, we recommend you to put the keys in an accessible place (like car, bag etc.) If there is any problem with the door or the locking mechanism, first of all, those problems have to be solved. -
Page 3: Features Of The Device
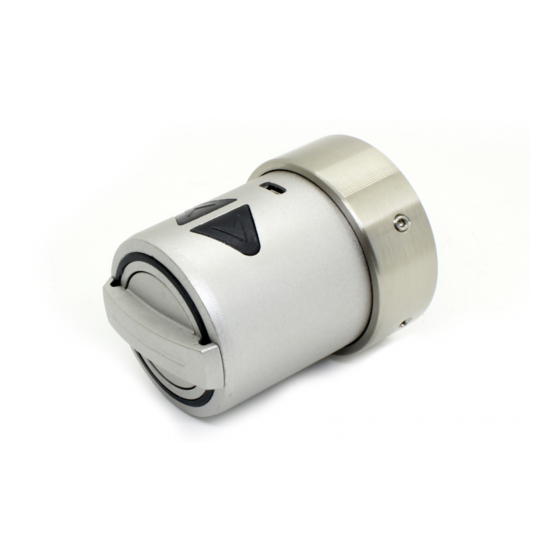
Your smart lock is equipped with rechargeable Lithium Ion batteries. 2. BOX CONTENT According to DESi labratory tests, with a usage of 10 1x Wireless smart lock operations per day on a 2 turns lock, battery life of smart 1x Charging Cable (USB) - Page 4 3. PARTS OF DEVICE and INSTALLATION (TYPE A) Charging Port Control Buttons (microUSB) Min. 2 mm Fixing Screws (4 pcs) Handle for The existing Manual Fixing Screws Slot for (4 pcs) cylinder should Operation The Modified Key come out, at least 2 mm to be caught by smart lock Type A.
- Page 5 - Take out the key and saw o the head of the key fom marked line. You may need some tools like vice, hacksaw etc. Use a rasp to smooth the edges. DESi accepts no liability for damages. - Insert modified key to cylinder and verify that it is cut in a proper way.
- Page 6 4. PARTS OF DEVICE and INSTALLATION (TYPE B) Charging Port Control Buttons (microUSB) Gripping Screws Min. (2 pcs) 4 mm Fixing Screws Handle for (2 pcs) Manual Operation The Slot for Modified Key The existing cylinder should come out, at least MODIFIED KEY 4 mm to be caught by smart...
- Page 7 - Take out the key and saw o the head of the key fom marked line. You may need some tools like vice, hacksaw etc. Use a rasp to smooth the edges. DESi accepts no liability for damages. - Insert modified key to cylinder and verify that it is cut in a proper way.
- Page 8 Otherwise, the app may not work properly. - Search “Desi Utopic” on application stores. Download, install and run the application. - Choose desired language and define a password or skip it.
-
Page 9: Mobile Application
MOBILE APPLICATION If you enroll your smart phone as first controller, it will be master controller of your smart lock. Both master and user controllers can lock/unlock the smart lock. Besides, only the master controller can change settings of smart lock. Before using your smart lock, you should adjust it properly by setting “locking way”... -
Page 10: Application Settings
5.2. APPLICATION SETTINGS If you touch the menu button in the top right corner when it is not connected to smart lock, you will reach settings menu of application. Related menu items are as follows: PASSWORD: You can disable, enable or change the password of application. Also you can enable biometric login or face ID from that menu. -
Page 11: Device Info Tab
5.3. KNOB SETTINGS / ADMINISTRATION MENU If you touch the menu button in the top right corner when the application is connected to smart lock as master controller, you will reach to settings menu of connected smart lock. You can change settings of your smart lock and perform administrative activities via this menu. - Page 12 5.3.2. KNOB SETTINGS TAB Menu In this tab, you can change following settings: Button SETUP WIZARD: You can reach quick setup settings and easily follow steps. DELAYED LOCKING: If this feature is enabled, the device will lock the door 10 seconds after the locking button on the device is pressed. When you are going out, if you press the locking button on the device and then close the door, it will automatically lock your door in 10 seconds.
-
Page 13: Advanced Settings Page
5.3.2.a. ADVANCED SETTINGS PAGE BUZZER OF KNOB: You can enable / disable activation sounds coming from smart lock. INVERT LOCKING WAY: You should set locking way of the device in accordance with your door’s locking way. ADJUST NUMBER OF TURNS: You should set how long the device will rotate to lock the door in accordance with your door’s lock. -
Page 14: Users Tab
5.3.3. USERS TAB In this tab, you can manage controllers of smart lock including auto-locking module, home automation interface, keypad, fingerprint reader, remote controllers etc. If you touch “Controllers” line, you can edit enrolled controllers. If you touch any user, you reach dedicated controller page which you can edit name or delete the controller one by one. In addition, you can apply time limited access to any user or controllers from this menu. - Page 15 For how to video, please click on the link https://youtu.be/7iKNoLvnvN8?t=30 For fingerprint reader; For keypad; For remote controller; For auto-locking module; DESi DESi wake it up and touch the wake it up and touch the press and hold any take the magnet closer to locking button.
- Page 16 NOTE: For Android phones, all the requested permissions need to be given without any restriction during installation of app. NEW MOBILE PHONE, search “Desi Utopic” on application stores. Download, install and run the application. - With - Choose language and confirm.
- Page 17 5.3.3.3. GENERATING ONE TIME/LIMITED TIME ACCESS CODE VIA MASTER PHONE Menu If you are the master user of smart lock, you can let anybody unlock the door via application or wireless keypad, even if you are far away. Internet connection is not needed for this function to work.
- Page 18 Unlocking The Door By Using Generated Code - Copy the shared code to clipboard. (You can copy all the shared text. The app will filter the code automatically.) - Install Utopic application to your mobile phone, launch the app, choose the language. - Hold your mobile as close as possible to the door that smart lock is installed and on the main screen, touch to “Use One Time Pass Code”...
- Page 19 After enabling OTP mode on keypad, follow the steps below to enroll it to the smart lock: - Launch the app on the master phone and connect to the smart lock. - Touch to “Settings” icon located on upper right corner and go to “Users” tab. - Touch to “Enroll New Controller”...
- Page 20 From: You can choose beginning date of the period which the generated password will be valid. To: You can choose ending date of the period which the generated password will be valid. After choosing desired settings, touch to “Create One Time Code” line. - A pop-up will appear which shows 8 digit password.
-
Page 21: Important Notes
IMPORTANT NOTES - You can generate time limited access codes while you are away. Bluetooth or internet connection is not necessary. Besides, if you want to change check-in/out times, you should connect to the smart lock via bluetooth. - “Single” usage codes can be used “1 time only”. “Multi” usage code will be valid during selected period. - You can generate both “single”... -
Page 22: Locking The Door
5.4. USAGE Before you use your smart lock, you should adjust it properly according to the lock which smart lock will work together. First, you should adjust “direction of locking” and then “number of rotation” (see page 12) 5.4.1. UNLOCKING AND OPENING THE DOOR Launch the app, connect to your smart lock and touch UNLOCK button. -
Page 23: Maintenance
5.5. MAINTENANCE You can clean external surfaces by soft, slightly damp cloth. Never use abrasive chemicals or water for this purpose. Don’t try to disassemble your smart lock. 5.5.1. CHARGING YOUR SMART LOCK If you hear three short tones after operation of the smart lock or if the rotation speed is too slow compared to normal working speed, you need to charge your smart lock. - Page 24 6. TROUBLESHOOTING SMART LOCK CANNOT FULLY LOCK/UNLOCK THE DOOR - There can be high friction on the lock or latch bold. It may be caused by sag of the door or unadjusted locking mechanism. Check if you can open the lock and the latch with a key easily. If there is a problem on door or lock, that need to be fixed.
- Page 25 - If the device is not used for a long period, the rechargeable batteries may be damaged. Call your dealer and ask for service. - Check the button mode, if it is in B2 mode, you would not able to use buttons. (FW 87 and above) Please see the FAQ section for more http://en.desi.com.tr/faqutopicr.pdf...
- Page 26 - Press 'Activate Key Enterance' button and disconnect from lock then wait 10 seconds. After these steps you need to able to use key from outside. - You may not have adjusted the key override position. You can make the setting in the advanced settings section. Please see the FAQ section for more http://en.desi.com.tr/faqutopicr.pdf...
- Page 27 7. HOW TO UPDATE FIRMWARE OF SMART LOCK Please follow the steps below: Menu Button - Connect to the smart lock via master phone and touch to menu button. - On “Device Info” tab, touch to ‘”Software Version” line. - If a new firmware is available, the application will inform you. - Touch the Start button and follow the instructions on application.
- Page 28 8. HOW TO RESET SMART LOCK If you want to change master controller of your smart lock or if you want to delete all controllers enrolled to the device, you can reset your smart lock as follows: - Press and hold 2 buttons on the smart lock. A long warning tone will be heard. Continue to hold the buttons. After a while, second warning tone will start.
- Page 29 9. HOW TO SET ATC (Defining Key Override Position) / HOW TO USE KEY FROM OUTSIDE First insert the key from outside and rotate it quarter turn. Then touch to key icon on the right to define the rotational position which would help you to override the key from outside.
- Page 30 10. HOW TO USE 'SETUP WIZARD' - First install your smartlock to door. Please watch how to assemble video, https://youtu.be/KF7SPaxDIws?t=45 - When you look at the door handle from inside the house, you should choose which side it is. Then click continue for automatic adjustments of turns. - Press LOCK to see if everything works good.
- Page 31 10.1. SET KEY OVERRIDE POSITION WITH 'SETUP WIZARD' - Insert key from outside and from inside move smart lock handle left or right gently to find key override position and press continue. Please watch video https://youtu.be/ KF7SPaxDIws?t=249 - Remove the key from outside and turn smart lock handle left or right few times to rotatable again. Then press continue to let device makes tests. - If locking operation is successful, press YES to move to next step to test overriding key from outside.
- Page 32 10.1. SET KEY OVERRIDE POSITION WITH 'SETUP WIZARD' - Remove the key from outside and turn smart lock handle left or right few times to rotatable again. - Press continue and confirm to finish setup. Smart Lock Installation, Adjustments and Pairing The Smart Phone Video https://www.youtube.com/watch?v=KF7SPaxDIws...
- Page 33 11. HOW TO FIX CONNECTION PROBLEM IN SOME ANDROID PHONES Some Android phones may have problems when pairing to the smart lock for the first time. These problems are due to the difference of Android versions. To solve this problem, just follow the steps below. 1.
- Page 34 12. USAGE WITH THIN KEYS Some keys may be thinner than 2.4mm (approx. two euro coin thickness). In this case, you may need to thicken the key with a few turns of tape after or before cutting the key. To do this, follows the steps below:...
- Page 35 © DESi Alarm and Security Systems Inc.
Need help?
Do you have a question about the Utopic-R OK and is the answer not in the manual?
Questions and answers