
Summary of Contents for Hobbes SMARTFiber Pro
- Page 1 SMARTFiber Pro Fiber Optic Power Meter for Wavelength 850/1300/ 1310/1490/1550/1625 User Manual Model No. 257835Pro...
-
Page 2: Table Of Contents
Introduction Features Product description Accessories Key definition Specification Instructions for operation 3-1 TEST MODE 3-2 RECORD MODE 3-3 BROWSE MODE 3-4 SET MODE 3-5 ZERO MODE 3-6 LIMIT MODE Instructions for battery Driver installation Maintenance Storage conditions Warranty... -
Page 3: Introduction
+3 to –60dBm with six calibrated wavelengths: 850nm, 1300nm, 1310nm, 1490nm, 1550nm and 1625nm. With Hobbes Optical Power Meter, it displays a pass or fail result according to the threshold the user has defined. It also has the capability to identify modulate signals (270Hz, 1kHz, 2kHz) simultaneously by the power source for identification purposes. -
Page 4: Features
Features • Portable, high accuracy and dynamic power meter • Calibrated at 850nm, 1300nm, 1310nm, 1490nm, 1550nm and 1625nm • Relative and absolute power display • With self-calibrated ZERO function • Ideal for both multi-mode and single-mode optical fibers • Identify modulate signals (270Hz, 1kHz, 2kHz) for identification purposes •... -
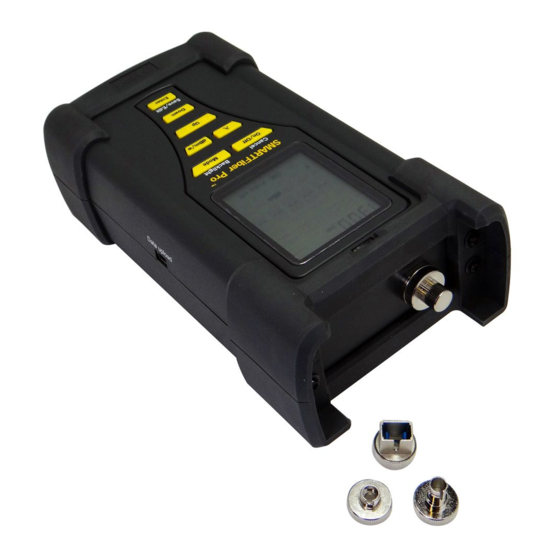
Page 5: Product Description
Product description 1. Replacement connector 8. Down 9. Enter (save/edit) 2. LCD display 10. Rubber cover 3. On/Off (cancel) 11. Battery holder 4. Mode (backlight) (Wavelength) 12. Stand 6. dBm/W 13. USB connector 7. Up... -
Page 6: Accessories
Accessories (Portable strap) (USB 2.0 cable) (Protective zipped bag with PU foam inside) (SC and ST connector) SMARTFiber Pro Fiber Optic Power Meter for Wavelength 850/1300/ 1310/1490/1550/1625 User Manual Model No. 257835Pro (Driver installation CD) (User manual) -
Page 7: Key Definition
Key definition Marking Name Function On/Off Power button 1. Press the button for a few (cancel) Cancel button seconds to power the unit “on” or “off” 2. When the power is on, press the button to activate or deactivate auto off function. 3. -
Page 8: Specification
Specifications Sensor type: InGaAs Wavelength: 850nm, 1300nm, 1310nm, 1490nm, 1550nm, 1625nm Dynamic Range: +3 to –60dBm Accuracy: ±0.15dB±1nW@1300nm/1310nm/1490nm/ 1550nm, ±0.25dB±1nW@850nm/1625nm Resolution: 0.01dBm Unit: dBm, Watt, dB Fiber connector: Replacement type for FC, ST, SC Battery: AA battery x 4(1.5V) Dimension: 202.8 x 107 x 64.5mm Weight: Around 550g (without battery) -
Page 9: Instructions For Operation
Instructions for operation 1.Turn on/off the unit Turn the unit on: Press and hold the “On/Off” button for a few seconds, the unit will display all the screen contents on the LCD until button is released. The unit then enters the TEST MODE automatically. -
Page 10: Test Mode
2. Backlight function When power is on, press “Mode” button for a few seconds to activate/deactivate LCD backlight. 3. Mode selection When Power is on, press “Mode” button to enter the mode selection menu. 6 Selection Modes: TEST MODE, RECORD MODE, BROWSE MODE, SET MODE, ZERO MODE, and LIMIT MODE. - Page 11 Note: During the power value -dBm rate measuring. 1. Current Wavelength 2. Power Value 3. TEST mode 4. Battery Status How to measure in db power value Step 1: First, set power reference value (REF): (Press and hold “dBm/W” button for a few seconds to set the current power values as power reference value)
- Page 12 Step 2: Formula and Example are as follow: Formula: The current value (in dBm) –REF = the current value (in dB) Example: REF= –46.97dBm, the current value (in dB)= –13.79 Then the current value (in dBm) = (–46.97dBm) + (–13.79dB) = –60.76dBm Switch power measure of three types to power value.
-
Page 13: Record Mode
1 step increment. The fiber ID is from 1 to 999. 3-2 RECORD MODE By using SMARTFiber Pro RECORD MODE function, user can test the stability of LD light source in a period of time. In RECORD MODE, the unit tests and restores fiber power value automatically in a period of time. - Page 14 RECORD MODE Selection Press “Mode” button to select the RECO mode, and then press Enter button to enter the mode. In wavelength selection submenu, pressing “Up” and “Down” button will change wavelength. After selection, pressing the “On/Off” button will cancel the operation and return to previous menu.
- Page 15 Set auto test time parameter Pressing the “Enter”buttons to increase or decrease the value parameter and sample frequency parameter, 15/ 30/ 60/ 120/ 180/ 240/ 300 minutes is available (default is 15 minutes). Press “On/Off” button to cancel the operation, and return to previous menu.
- Page 16 Set sample frequency parameter Press the “Up” and “Down” buttons to increase or decrease the value, 5/10/15/20/30/60 seconds is available, default is 5 seconds, then press “On/Off” button to cancel the operation, and return to previous menu. 0005 0005 SAMP SAMP Auto off Note:...
- Page 17 Note: LCD displays the remaining time. It is 00 hour, 14 minutes, 23 seconds. 1. Hour (Counting down automatically) 2. Minutes and Seconds (Counting down automatically) 3. Testing automatically 4. RECORD Mode...
-
Page 18: Browse Mode
3-3 BROWSE MODE In the mode, user can browse fiber ID, power value and wavelength. Note: LCD displays current wavelength, fiber ID, power value. 1. Current wavelength 2. Fiber ID or the number of Records 3. Power value in dBm 4. - Page 19 Step 1: Press “Mode” button to select the BROWSE mode, and then press “Enter” button to enter the mode. Step 2: Press the “Up” and “Down” button to change the test results forward or backward. Step 3: Pressing and Holding the “Enter” button a few seconds will delete the current record.
-
Page 20: Set Mode
3-4 SET MODE In SET MODE, user can set identification number for each fiber cable in order to identify the cable test result. Cable name is only viewable in SMARTFiber Pro application, it is not available in BROWSE MODE. For example:... -
Page 21: Zero Mode
Note: The default fiber name is setting by user. Press “Up” and “Down” to increase or decrease the character number. 3-5 ZERO MODE Whenever the environmental conditions (temperature, humidity, etc.) changes, user may zero the unit for more accuracy. User can clear the meter’s memory to return to manufacturer’s default settings. - Page 22 Note: CAL menu in ZERO mode. CAL menu Before CAL operation, user need to cover fiber input port with dust–protection cap. Press “Enter” button to begin the zero/CAL operation. The LCD displays “NULL” for 2 seconds then return to CAL menu. Press “On/Off” button to cancel and return to the previous menu.
- Page 23 Note: CLEAR menu in ZERO mode. CLEAR menu The menu is used for clear all memory data. In the menu, press “Enter” button to begin the clearing operation. LCD displays MEM for clearing data item, P/F for clearing...
-
Page 24: Limit Mode
threshold value, REF for clearing dB measure ratio. After clearing, LCD displays CLEAR again. Press “On/Off” button to return to the previous menu. 3-6 LIMIT MODE User can define threshold to specify acceptable power values in dBm. When a threshold is activated, the unit will indicate the test result pass or fail. - Page 25 Step 3: Press “ ” button to change wavelength Step 4: Press the “Enter” Button to edit the threshold and then press “Up” and “Down” button to increase/decrease each character value. Press the “ Mode ”button to edit the value’s positive (+) or negative (–). After setting the first character, press “Enter”...
- Page 26 1. Current wavelength 2. The threshold value which user has defined 3. Asterisk: Saving the settings once pressing "Enter" button a few seconds 4. Pass or Fail 5. LIMIT mode...
- Page 27 Cooperates with compatible optical laser light source (Hobbes’ OPTISource) Compatible optical laser light source simultaneously sends wavelength code along the fiber. The meter can identify the code, and switch to the corresponding wavelength, avoiding manually changing the power meter wavelength. (OPTISource) (SMARTFiber Pro)
-
Page 28: Instructions For Battery
When the “Low Battery icon” flashes on the screen, it is indicating that the battery status is low and need to be replaced. Driver installation Steps: 1. Insert the SMARTFiber Pro CD into the computer and press “Next” to start the installation:... - Page 29 2. To install in this folder, click “Next”. To install in a different folder, enter it below or click “Browse”.
- Page 30 3. Click “Next” to start the installation.
- Page 31 4. The SMARTFiber Pro is being installed.
- Page 32 5. The SMARTFiber Pro has been installed.
- Page 33 6. After the driver has been installed, connect SMARTFiber Pro with your computer through USB cable. After device is connected, please go to my computer, and right click your mouse to choose manage.
- Page 34 7. In Computer Management, please choose Device Manager from Universal Serial Bus Controllers. Choose Hobbes SMARTFiber Pro and right click mouse to choose update driver.
- Page 35 8. Windows will display Hardware Update wizard, and choose install from a list or specific location (Advanced)
- Page 36 9. From search and installation options, choose include this location in this search and browse your SMARTFiber Pro driver.
- Page 37 10. While you istall, it might shows a Hardware installation warning. Click continue Anyway.
- Page 38 11. Hardware update is complete...
- Page 39 12. On your desk top, choose the SMARTFiber Pro icon.
- Page 40 13. In SMARTFiber Pro software, choose update. If you would like to see your auto test result, choose Auto Tests and click get data.
- Page 42 14. If you would like to see your manual test result, please go to Table and click upload. From upload data, choose manual Tests and click get data.
- Page 43 15. Your manual test result has been uploaded.
-
Page 44: Maintenance
The device is guaranteed for two years after completing the registration procedure from the date of original sale in Hobbes Group web site. The manufacturer will repair the device free of charge if manufacturer determines the product failed due to manufacture defect.
Need help?
Do you have a question about the SMARTFiber Pro and is the answer not in the manual?
Questions and answers