Advertisement
Advertisement
Table of Contents

Related Manuals for Callaway GPSy Watch


Summary of Contents for Callaway GPSy Watch
-
Page 2: Specifications
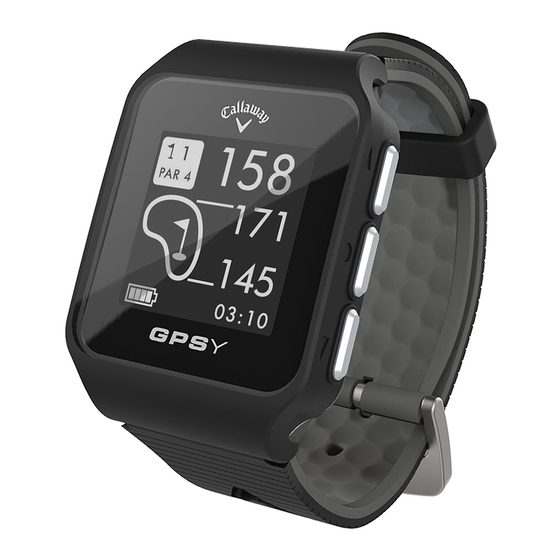
INTRODUCTION The Callaway GPSy Watch delivers elite performance on the course in a sporty, fashionable design. Hit more greens and minimize penalty strokes by knowing precise distances to the front, center, and back of the green, as well as distances to hazards and doglegs. - Page 3 CHARGING Power watch Off. Hold [ ] until POWER screen goes blank. (See watch diagram page 4) Connect Charger Pins on the charger to the Charging Ports on the watch by placing watch in Charging Dock. CHARGING PINS CHARGING PORTS CHARGING DOCK Plug USB cord end into USB port.
-
Page 4: Description Of Terms
DESCRIPTION OF TERMS PRESS - Press & Release button quickly. • • HOLD - Press & Hold button until desired screen appears or change happens. WATCH DIAGRAM ] - HOLD to Power On/Off, PRESS POWER to turn Backlight On/Off Charging Ports ] - Scroll Up ] - PRESS to Toggle Screens, Select Options - HOLD to access Main Menu. -
Page 5: Display Diagram
DISPLAY DIAGRAM PLAY MODE HAZARD MODE Distance to the Center of Green Distance to the Back of Green Distance to the Front of Green Distance to front and back of Dogleg Distance to layup or carry Water Distance to layup or carry Bunker ENGLISH... -
Page 6: Time Mode
TIME MODE PRESS [ ] button to toggle between Analog or Digital Time Display. PRESS [ ] button to turn Backlight POWER On/Off. To set time and date, see Settings. (Pg. 13) HOLD [ ] button to access Main Menu. AT GOLF COURSE From Time Screen, HOLD [ ] button to... - Page 7 PLAY MODE PRESS [ ] button to toggle between Hazard, Scorecard, and Shot Distance Screens. To exit Play Mode at any time, HOLD [ ] button. HAZARD VIEW Note: If no hazards are present, screen will be blank. PRESS [ ] button to access the Hazard Screen.
-
Page 8: Shot Distance
SHOT DISTANCE Note: Shot Distance must be turned On in Settings. PRESS [ ] button to access Shot Distance. To start measuring Shot Distance, PRESS the [ ] button. DOWN A value of “0” will appear, indicating it is ready to start tracking. As you travel to your ball, the distance will begin calculating. - Page 9 SCORECARD Note: Scorecard must be turned On in Settings. PRESS [ ] button to access Scorecard. Use [ ] buttons until number of UP/DOWN total strokes for that hole is displayed. HOLD the [ ] button to scroll to Putts, DOWN use [ ] buttons until correct...
-
Page 10: End Round
END ROUND When finished with round, HOLD [ button to return to Main Menu. ODOMETER From Time Screen, HOLD [ ] button to access Main Menu. Use [ ] buttons to scroll to UP/DOWN Odometer, PRESS [ ] button to select. Circle will flash while connecting to satellite. - Page 11 SETTINGS From Time Screen, HOLD [ ] button to access Main Menu. Use [ ] buttons to scroll to Settings. UP/DOWN PRESS [ ] button to access Settings Menu. Use [ ] buttons to scroll through UP/DOWN Settings Menu. PRESS [ ] button to select desired setting.
- Page 12 ALARM PRESS [ ] button to select ALARM. Use [ ] buttons to select Alarm 0, UP/DOWN Alarm 1, or Alarm 2. PRESS [ ] button to scroll down. PRESS ] buttons to Enable/Disable Alarm. UP/DOWN PRESS [ ] button to scroll down. Use ] buttons to set the Hour.
- Page 13 DATE/TIME PRESS [ ] button to select DATE/TIME. Use [ ] buttons to select Auto UP/DOWN or Manual. • Auto: The Watch will start searching for satellite connection, once connected; the time and date will appear according to your location. (Note: Must be outside.) •...
- Page 14 PRESS [ ] button to scroll down. Use ] button to select Month. UP/DOWN PRESS [ ] button then use [ UP/DOWN button to select Day. PRESS [ ] button then use [ UP/DOWN button to select Year. PRESS [ ] button then use [ UP/DOWN button to select Hour.
-
Page 15: Daylight Savings Time (Dst)
LANGUAGE PRESS [ ] button to select LANGUAGE. Use [ ] buttons to scroll through UP/DOWN Languages (English, Espanol, Francais,Deutsch). PRESS [ ] button to select Language and return to Settings Menu. HOLD [ ] button again to return to Time Screen (if desired). -
Page 16: Model Info
Use [ ] buttons to toggle UP/DOWN DST (On/Off). PRESS [ ] button to save and return to Settings Menu. HOLD [ ] button again to return to Time Screen (if desired). SCORECARD PRESS [ ] button to select SCORECARD. Use [ ] buttons to toggle UP/DOWN... -
Page 17: Warranty Policy
WARRANTY POLICY This product is warranted to be free from defects for up to (1) year from the original purchase date. IZZO Golf cannot refund your purchase unless purchased directly from IZZO Golf. IZZO Golf will replace or repair any unit that is determined defective under normal use within the warranty period. - Page 18 • Please do not store the device in places exposed to direct sunlight or in extremely high temperatures. © 2016 CALLAWAY GOLF COMPANY. Callaway Golf and the Chevron device are trademarks of Callaway Golf Company. IZZO Golf is an official licensee of Callaway Golf Company. WARRANTY / CAUTION...
- Page 19 © 2016 CALLAWAY GOLF COMPANY. Callaway Golf and the Chevron device are trademarks of Callaway Golf Company. IZZO Golf is an official licensee of Callaway Golf Company.
Need help?
Do you have a question about the GPSy Watch and is the answer not in the manual?
Questions and answers
Can, I order a replacement manual for gpsy golf manual threw the mail
How do I reset my Callaway GPSY watch GW730 CS33561
How can I manually set hour and minutes? What is OTC offset?