Advertisement
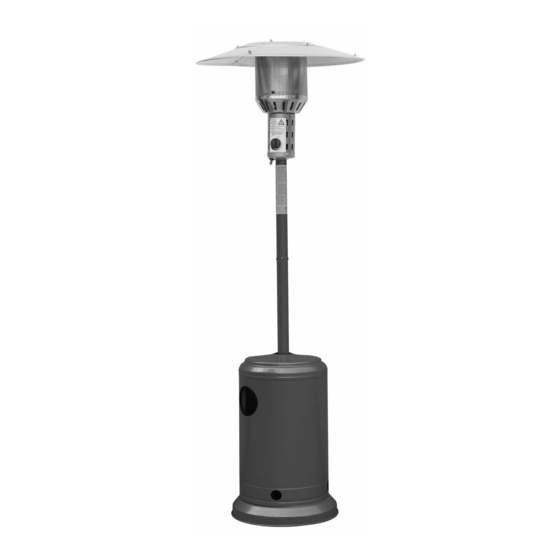
Outdoor Patio Heater
Portable heater with gas bottle housing.
Wheels for easy mobility.
Stainless Steel Burner head.
Operates on Propane Gas.
38.5MJ/h Output.
Flame failure & tip over safety switch.
9Kg gas bottle fits housing.
Powder coated steel.
Colour: Charcoal.
12 month warranty.
Please retain this manual for reference
The Australian
Gas Association
Advertisement
Table of Contents

Summary of Contents for Jumbuck JDS06
- Page 1 Outdoor Patio Heater Portable heater with gas bottle housing. Wheels for easy mobility. Stainless Steel Burner head. Operates on Propane Gas. 38.5MJ/h Output. Flame failure & tip over safety switch. 9Kg gas bottle fits housing. Powder coated steel. Colour: Charcoal. 12 month warranty.
- Page 2 GAS LEAK TEST Gas connections on the heater are leak tested at the factory prior to shipment. A complete gas tightness check must be performed due to possible mishandling in shipment or excessive pressure being applied to the heater gas connections. 1.Make a soap solution of one part liquid detergent and one part water.
-
Page 3: Table Of Contents
TABLE OF CONTENTS Caution ………………………………………………………. 1 Heater Stand and Location ………………………………… 2 Gas Requirements ………………………………………….. 4 Leakage Test …………………………………………… ….. 4 Operation and Storage ……………………………………... 5 Cleaning and Care ………………………………………….. 6 Parts and Specifications ..………………………………….. 6 Assembly Parts and Procedures ………………………….. 7 Trouble Shooting ……………………………………….. -
Page 4: Caution
CAUTION PLEASE READ CAREFULLY THE FOLLOWING SAFETY GUIDELINES BEFORE OPERATION. This patio heater is not for commercial use. Do not use the patio heater for indoors, as it may cause personal injury or property damage. Do not place articles on or against this appliance Do not use or store flammable materials near this appliance Do not spray aerosols in the vicinity of this appliance while it is in operation This outdoor heater is not intended to be installed on recreational vehicles and/or boats. -
Page 5: Heater Stand And Location
610mm... - Page 6 Both ends open Open side at least 30 percent or more in total of the remaining wall area 25% of total wall area is open and unrestricted - 3 -...
-
Page 7: Gas Requirements
Open side at least 30 percent or more in total 25% of total wall area of the remaining wall area is open and unrestricted GAS REQUIREMENTS • Refer to the gas type label for confirmation of the gas type to be used with your appliance. •... -
Page 8: Operation And Storage
OPERATION AND STORAGE TO TURN ON THE HEATER Turn on the valve on the gas cylinder. Press and turn the control knob to HI position (anti-clockwise 90° ). Press and hold down the control knob, at the same time repeatedly pressing the igniter button until the burner is ignited. Release the control knob 10 seconds after the ignition, at which time the burner should remain alight. -
Page 9: Cleaning And Care
CLEANING AND CARE Wipe off powder coated surfaces with soft, moist rag. Do not clean heater with cleaners that are combustible or corrosive. Remove debris from the burner to keep it clean and safe for use. Cover the burner unit with the optional protective cover when the heater is not in use. PARTS AND SPECIFICATIONS 705 mm Reflector... -
Page 10: Assembly Parts And Procedures
JDS06 13.2 JDS06 1.80 mm M6 wing nut and 4 pcs 3/16'' screw for 2pcs main pole... - Page 11 ASSEMBLY PROCEDURES STEP 1 Use 2pcs M8X15mm bolts and M8 nuts to connect the bracket with STEP 1 wheels to the base. Then fasten them. Base Wheel STEP 2 STEP 2 2-1. Remove white cap from the base by pulling on the tab of the cap. 2-2.
- Page 12 STEP 4 STEP 4 4-1. Assemble the bottom section of the main pole on top of 3pcs support legs. 4-2. Use 6 pcs M6 x 30 mm bolts and nuts to connect the main pole to the Main pole 3 pcs support legs .Tighten the bolts and nuts. Bolt STEP 5 Place the tank housing on the stand.
- Page 13 STEP 7 STEP 7 7-1. Check whether the connection of vertical post and burner are Reflector flat washer assembled according to instructions, and all bolts and nuts are tightened. 7-2. Screw 3 reflector spacers on to burner. 7-3. Put washer Ø6 mm on each reflector spacer. STEP 8 Assemble the 4 piece reflector according to the following sketch.
-
Page 14: Trouble Shooting
STEP 10 STEP 10 10-1. Bring up the tank housing and rest it on the post plate. 10-2. Connect the regulator to the gas cylinder and tighten it with adjustable wrench.Conduct a gas leakage test as described earlier in this manual. 10-3. - Page 15 Product Warranty Any claim under this warranty must be made within (12) months from the date of purchase of the product. To make a claim under the warranty, take the product (with proof of purchase) to any Bunnings store. (see www.bunnings.com.au for store locations) or contact our service agent on number below.
Need help?
Do you have a question about the JDS06 and is the answer not in the manual?
Questions and answers