
Subscribe to Our Youtube Channel
Summary of Contents for Oplink TripleShield
- Page 1 TripleShield™ Hardware User Manual V 2.2.0t1b English - User Manual Français - Manuel de l'Utilisateur Deutsche - Benutzerhandbuch Español - Manual del Usuario Nederlands - Gebruiksaanwijzing...
- Page 2 V 2.2.0t1b Oplink Connected TripleShield Hardware User Manual Note: This manual applies to several packages. As such, some parts and some steps may not pertain to the package that you purchased. Oplink Communications, Inc. Oplink Communications, Inc.
-
Page 3: Table Of Contents
V 2.2.0t1b Contents TripleShield At A Glance ..................... 3 Assemble OPU Station And Connect To Router ........... 5 Set Up And Power Up IP Camera ................7 Place Sensors And Power Up Siren ..............10 a.) Install the Door/Window Sensor ................. 10 b.) Motion Sensor... -
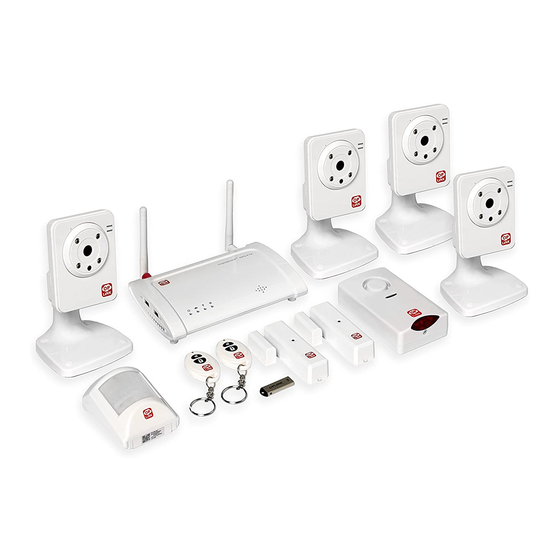
Page 4: Tripleshield At A Glance
V 2.2.0t1b TripleShield At A Glance Item Product Name Function Provide wireless access and control OPU (Oplink Processing Unit) function of mi Security system Smart camera with an Adjustable Motion Detection Feature and IP Camera infrared night-vision with a built-in... - Page 5 Panic Button function 16G Flash Drive Data storage for video recordings Warning: Do not dispose of electrical appliances as unsorted municipal waste. Use separate collection facilities. Contact your local government for information regarding the collection systems available. Oplink Communications, Inc.
-
Page 6: Assemble Opu Station And Connect To Router
• Provide wireless access and control function of Oplink Connected system • OPU allows for system recovery • Transmit sensor data and control signal • Support Oplink cloud server Wireless Features • Support IEEE 802.11 b/g/n standards • Wired and Wireless Network Support Security Support: WPA2-PSK •... - Page 7 Connect the OPU to the home router using the provided Ethernet Cable. c. Plug Power Adapter to the OPU and an outlet. d. Enable router’s DHCP setup (see Appendix B for DHCP setting of router). *Most routers have their DHCP setting set to “Enabled” by default. Oplink Communications, Inc.
-
Page 8: Set Up And Power Up Ip Camera
D. Mounting Screws And Dry Wall Anchors Overview Features • Smart setup wizard • High quality video • Built-in antenna and microphone • Support Oplink cloud server • Day/night vision • Records automatically when events are triggered • Remote monitoring from smartphone or tablet Wireless Features •... - Page 9 Note: The Camera can be moved and mounted after the initial activation. The Camera can be placed on a table using the attachment base provided. We recommend you placing the Camera on a countertop giving it a clear line of sight. Infrared night vision makes it easy to monitor at night. Oplink Communications, Inc.
- Page 10 Screw Camera onto attachment base. b. Secure Camera using attachment base nut. Step 3: Complete the Camera’s mount a. Make sure the Camera is firmly fixed on the wall. b. Adjust the Camera to the preferred position. Oplink Communications, Inc.
-
Page 11: Place Sensors And Power Up Siren
• Support Oplink cloud server • Apply to doors, windows, etc. • Send off instant intrusion alerts • Easy to install, no wiring required • Auto add-on to any Oplink security system • Battery Included • Tamper Switch • Low Battery Alert Notification... - Page 12 On your door: i. After selecting a location on the door, preferably on the edge of the door away from the hinges, the large unit of the sensor should be placed on the immovable frame of the door. Oplink Communications, Inc.
- Page 13 This is an acceptable approach to sensor placement, although it should only be used when necessary. Oplink Communications, Inc.
-
Page 14: B.) Motion Sensor
B. Battery C. Double-sided Tape Overview Features • Smart setup wizard • Wireless security technology • Support Oplink cloud server • Detects motion up to 120-degree, 10-40 feet • Passive Infrared, Pet immune • Battery included • Tamper Switch • Low Battery Alert Notification •... - Page 15 The Motion Sensor has 2 modes: Initial Test Mode and a Power-Save Mode. • The Initial Test Mode occurs during the first hour after a battery is put into the device, as is the case during the initial installation of the system. Within this hour, whenever the Motion Sensor Oplink Communications, Inc.
- Page 16 - Do not aim the detector at a staircase which a pet has access to. - Do not mount the detector near furniture or object higher than 4 feet tall which a pet may climb onto (such as a couch within 6 feet of the motion sensor). Oplink Communications, Inc.
-
Page 17: C.) Siren
B. Mounting Screws And Dry Wall Anchors Overview Features • Smart setup wizard • Wireless security technology • Support Oplink cloud server • Alarm for 60 seconds upon receiving SIREN ON order, stops immediately upon receiving SIREN OFF order • Pre-Installed Backup Battery... - Page 18 Mount the Wireless Siren a. Use double-sided tape or screws to mount the Siren at the desired location. b. Connect Siren to nearest power outlet. Oplink Communications, Inc.
-
Page 19: Opu
Storage Temperature: -40° F to 158° F (-40° C to 70° C) Network Protocols: DHCP, Auto IP Address Network Interface: One 10/100Mbps LAN/WAN Interchangeable Port, IEEE 802.3 / IEEE 802.3u Wireless interface: Wi-Fi, RF433MHz, WPA2-PSK Power Adapter: 5V 1.5A Oplink Communications, Inc. -
Page 20: Flash Drive
Operating Temperature: 32° F to 113° F (0° C to 45° C) Video compression: MJPEG Image resolution: 640 x 480 Storage Temperature: 5° F to 140° F ( -15° C to 60° C) Network Protocols: DHCP, Auto IP Address Network Interface: 1 Ethernet 10/100BaseT (RJ45) LAN connection Oplink Communications, Inc. -
Page 21: Door/Window Sensor
Power source: 1.5V*2pcs“AAA” Lithium and Iron Disulfide battery Standby Current: <10uA (@3.3VDC) Operating Current: <18mA (@3.3VDC) Battery Low Level Indicator: 2.2V-2.4V Low Battery Alarm Mode: Low battery alarms only when another sensor alarm is triggered Unpick Detection: Tamper switch wireless alarm Oplink Communications, Inc. -
Page 22: Motion Sensor
Unpick Detection: Tamper switch wireless alarm Motion Sensor Model: PIR1301 Operating Temperature: 14° F to 122° F ( -10° C to 50° C) Frequency: 433.92 MHz +/- 150KHz Transmit Power: >= -16dBm(Manufacture’s test condition) Modulation: ASK Oplink Communications, Inc. -
Page 23: Siren
Operating Temperature: 32° F to 113° F (0° C to 40° C) Device Type: Wireless Indoor Siren RF Receiver Frequency: 433.92 MHz +/- 0.125MHz Sensitivity: -110dbm Modulation: ASK Power Source: Main Power-AC Adaptor (American Standard); Backup Battery-Alkaline “AAA”size * 3pcs Standby Mode Current: ≤12mA(average)@4.5V Alarm Mode Current: <=300mA@4.5V Oplink Communications, Inc. -
Page 24: Remote Control
Operating Environment: 32° F to 113° F (0° C to 45° C) Storage Temperature: -4° F to 140° F (-20° C to 60° C) RF Frequency: 433.92 MHz +/- 150 KHz Modulation: ASK Transmit Power: >= -10dBm (manufacturer’s test condition) Oplink Communications, Inc. - Page 25 (2) Log in to your router’s account. Check your user manual or documentation if you do not know the log-in credentials. (3) Make sure you are in the Setup category, select 'Enable DHCP' and enter the address range (from “192.168.1.100” to “192.168.1.199”). Oplink Communications, Inc.
-
Page 26: Fcc Statement
(2) this device must accept any interference received, including interference that may cause undesired operation. 3. Shielded cables must be used with this unit to ensure compliance with the Class B FCC limits. Oplink Communications, Inc. - Page 27 V 2.2.0t1b Oplink Connected TripleShield Matériel Informatique Manuel de l'Utilisateur Note: Ce manuel s'applique à plusieurs packages À ce titre, certaines pièces et certaines étapes peuvent ne pas se rapporter au package que vous avez acheté. Oplink Communications, Inc.
- Page 28 V 2.2.0t1b Contenu TripleShield en Bref ....................3 Assembler la Station OPU et la Connecter au Routeur ...1 ....5 Installer et brancher la Caméra IP ..2 ............7 Placer les Capteurs et brancher la Sirène...3 .......... 10 ............10 a,) Installer le capteur porte/fenêtre .
-
Page 29: Tripleshield En Bref
V 2.2.0t1b TripleShield en Bref Article Nom du Produit : Fonction Fournit la OPU (Unité de Traitement fonction d'accès et de commande Oplink) sans fil du systèmede mi Security Caméra intelligente avec une Fonction de Détection de Caméra IP Mouvement Réglable et vision nocturne infrarouge avec un microphone intégré... - Page 30 16G Flash Drive enregistrements vidéo Avertissement Ne pas jeter les appareils électriques comme des déchets municipaux non triés. Utiliser les installations de collecte sélective. Contactez vos autorités locales pour plus d'informations concernant les systèmes de collecte disponibles. Oplink Communications, Inc.
-
Page 31: Assembler La Station Opu Et La Connecter Au Routeur
Oplink Connected • OPU permet une récupération du système • Transmettre les données des capteurs et le signal de commande • Serveur de nuage d'Oplink de soutien Caractéristiques sans Fil • Supporte les normes IEEE 802.11 Oplink Communications, Inc. - Page 32 Branchez l'adaptateur de puissance à l'OPU et à une prise. d. Activez la configuration DHCP du routeur (voir l'annexe B pour le paramètre DHCP du routeur). *La plupart des routeurs ont leur configuration DHCP définie sur « Activé » par défaut. Oplink Communications, Inc.
-
Page 33: Installer Et Brancher La Caméra Ip
Vue d'ensemble des Caractéristiques • Assistant d'Installation intelligent • Vidéo de qualité • Antenne et microphone intégrés • Serveur de nuage d'Oplink de soutien • Vision diurne/nocturne • Enregistre automatiquement quand des événements sont déclenchés • Télésurveillance depuis le téléphone intelligent ou la tablette Caractéristiques sans Fil... - Page 34 Montage de la caméra (en option) Note : La Caméra peut être déplacée et montée après l'activation initiale. La Caméra peut être placée sur une table en utilisant la base de fixation fournie. Nous vous recommandons de Oplink Communications, Inc.
- Page 35 Assurez la caméra à l'aide de l'écrou de base de la fixation. Étape 3 : Complétez le montage de la Caméra. a. Assurez-vous que la Caméra est solidement fixée sur le mur. b. Réglez la Caméra à la position préférée. Oplink Communications, Inc.
-
Page 36: Placer Les Capteurs Et Brancher La Sirène
• Serveur de nuage d'Oplink de soutien • S'appliquent aux portes, fenêtres, etc.. • Envoi d'alertes d'intrusion instantanées • Facile à installer, aucun câblage requis • Ajout automatique à tout système de sécurité d'Oplink • Piles fournies • Interrupteur d'autoprotection • Notification d'Alerte de Pile basse... - Page 37 2. Appliquer le ruban adhésif double-face sur l'arrière de chaque pièce. 3. Porte/Fenêtre (il est recommandé de monter le capteur de Porte/Fenêtre en position verticale/tout droit. a. Sur votre porte : i. Après avoir sélectionné un emplacement sur la porte, de préférence sur Oplink Communications, Inc.
- Page 38 C'est une solution acceptable au placement du capteur, bien qu'elle ne devra s'utiliser uniquement que si c'est nécessaire. Oplink Communications, Inc.
-
Page 39: B.) Capteur De Mouvement
C. Bandes adhésives double face Vue d'ensemble des Caractéristiques • Assistant d'Installation intelligent • Technologie de sécurité sans fil • Serveur de nuage d'Oplink de soutien • Détecte le mouvement jusqu'à 120 degrés, 10-40 pieds (3 m-12 m) • Infrarouge passif, immunisé aux animaux. - Page 40 à rebours de 3 minutes se soit écoulé. Lorsque/si un mouvement est détecté pendant la période de pause , le compte à rebours de 3 minutes se remettra en marche. Oplink Communications, Inc.
- Page 41 -Ne pas monter le détecteur près des meubles ou d'objets supérieurs à 4 pieds (1,20 m) de haut sur lesquels un animal domestique peut grimper (par exemple, un canapé dans le rayon du capteur de mouvement de 6 pieds (1,80 m)). Oplink Communications, Inc.
-
Page 42: C.) Sirène
Vue d'ensemble des Caractéristiques • Assistant d'Installation intelligent • Technologie de sécurité sans fil • Serveur de nuage d'Oplink de soutien • Alarme pendant 60 secondes lors de la réception de l'ordre SIRÈNE ACTIVÉE, elle s'arrête immédiatement après avoir reçu l'ordre SIRÈNE DÉSACTIVÉE. - Page 43 Montez la sirène sans fil a. Utiliser la bande adhésive double-face ou les vis pour monter la Sirène à l'endroit désiré. b. Branchez la sirène à la prise de courant la plus proche. Oplink Communications, Inc.
-
Page 44: Annexe A
Température de Stockage: -40° F à 158° F (-40° C à 70° C) Protocoles de réseau : DHCP, adresse IP automatique Interface de Réseau: Un 10/100Mbps LAN/WAN Port interchangeable, IEEE 802.3 / IEEE 802.3u Interface sans fil : Wi-Fi, RF433MHz, WPA2-PSK Adaptateur de courant: 5V 1.5A Oplink Communications, Inc. -
Page 45: Flash Drive
Résolution d'image : 640 x 480 Température de Stockage: 5° F à 140° F ( -15° C à 60° C) Protocoles de réseau : DHCP, adresse IP automatique Interface de Réseau: 1 LAN de l'Ethernet 10/100BaseT (RJ45) Connexion Oplink Communications, Inc. -
Page 46: Capteur De Porte Et Fenêtre
Indicateur de niveau bas de pile: 2.2V-2.4V Mode d'alarme de pile basse : L'alarme de pile basse se déclenche seulement quand une autre alarme de capteur est déclenchée Défaire la Détection : Alarme sans fil de l'interrupteur d'autoprotection Oplink Communications, Inc. -
Page 47: Capteur De Mouvement
Défaire la Détection : Alarme sans fil de l'interrupteur d'autoprotection Capteur de mouvement Modèle: PIR1301 Température de fonctionnement : 14° F à 122° F (-10° C à 50° C) Fréquence : 433.92 MHz +/- 150KHz Oplink Communications, Inc. -
Page 48: Sirène
Sirène Modèle: SRN1300 Température de fonctionnement : 32° F to 113° F (0° C to 40° C) Type de dispositif : Sirène d'intérieur sans fil Fréquence de récepteur de RF : 433.92 MHz +/- 0.125MHz Sensibilité: -110dbm Oplink Communications, Inc. -
Page 49: Commande À Distance
Environnement d'opération : 32° F à 113° F (0° C à 45° C) Température de Stockage : -4° F à 140° F (- 20° C à 60° C) Fréquence de RF: 433.92 MHz +/- 150 KHz Modulation : ASK Puissance de Transmission: >= -10dBm (condition de test du fabricant) Oplink Communications, Inc. -
Page 50: Annexe B
(3) Assurez-vous que vous êtes bien dans la catégorie d'Installation, sélectionnez « Activer DHCP » et saisissez la plage d'adresses (à partir de "192.168.1.100" à « 192.168.1.199 »). Oplink Communications, Inc. -
Page 51: Déclaration De Fcc
Consultez le revendeur ou un technicien radio/TV pour de l'aide. 2. Cet appareil est conforme à l'article 15 des Normes FCC. Son fonctionnement est assujetti aux deux conditions suivantes; (1) Ce dispositif ne doit pas causer d'interférences nuisibles et (2) cet Oplink Communications, Inc. - Page 52 3. Des câbles blindés doivent être utilisés avec cet appareil pour assurer la conformité avec les limites de classe B FCC. Oplink Communications, Inc.
- Page 53 V 2.2.0t1b Oplink Connected TripleShield Hardware Benutzerhandbuch Dieses Handbuch gilt für mehrere Pakete. Hinweis: Daher können einige Teile und einige Schritte nicht auf das Paket zutreffen, das Sie gekauft haben. Oplink Communications, Inc. Oplink Communications, Inc.
- Page 54 V 2.2.0t1b Inhalt TripleShield At A Glance..................... 3 Assemble OPU Station And Connect To Router ..........5 Set Up And Power Up IP Camera ................7 Place Sensors And Power Up Siren ..............10 a.) Install the Door/Window Sensor ................10 b.) Motion Sensor...
- Page 55 V 2.2.0t1b TripleShield auf einen Blick Punkt Produktname Funktion Bietet Wireless-Zugriff und OPU (Oplink Processing Kontrollfunktion des Unit) mi-Sicherheitssystems Smart-Kamera mit einer einstellbaren Bewegungserkennung und IP-Kamera Infrarot-Nachtsicht mit eingebautem Mikrofon Erkennt und warnt den Benutzer bei Bewegung unter Benutzung von...
- Page 56 Panikknopf-Funktion für mit Panikknopf Notfälle Datenspeicher für Videoaufnahmen 16G-USB-Speicherstick Warnung: Entsorgen Sie Elektrogeräte nicht über den unsortierten Hausmüll . Verwenden Sie getrennte Sammeleinrichtungen. Kontaktieren Sie Ihre lokalen Verwaltung, um Informationen über die verfügbaren Sammelsysteme zu erhalten. Oplink Communications, Inc.
- Page 57 …………..………..……..…..……..……..……..……..…..…... Inhalt A. OPU B. Ethernet-Kabel Netzteil D. 16G-USB-Speicherstick Funktionsübersicht • Smart-Einrichtungs-Assistent • Überbrücken Sie die Kommunikation für alle Oplink Smart-Geräte • Bietet Wireless-Zugriff und Kontrollfunktion für das Oplink Connected-System • OPU ermöglicht Systemwiederherstellung • Übertragung von Sensordaten und Steuersignal •...
- Page 58 Schließen Sie die OPU mit dem mitgelieferten Ethernet-Kabel an den Eigenheim-Router an. c. Verbinden Sie das Netzteil mit der OPU und einer Steckdose. d. Aktivieren Sie die Router-DHCP-Einrichtung (siehe Anhang B für DHCP-Einstellung des Routers). * Die meisten Router haben ihre DHCP-Einstellung standardmäßig auf „Aktiviert“ gestellt.. Oplink Communications, Inc.
- Page 59 D. Befestigungsschrauben und Trockenmaueranker Funktionsübersicht • Smart-Einrichtungs-Assistent • Hochqualitative Videofunktion • Eingebaute Antenne und Mikrofon • Unterstützt Oplink Cloud-Server • Tag-/Nachtsicht • Automatische Aufzeichnung bei Auslösung von Ereignissen • Fernüberwachung per Smartphone oder Tablet Wireless-Funktionen • Unterstützung von IEEE 802.11 b/g/n-Normen •...
- Page 60 Wir empfehlen Ihnen, wenn Sie die Kamera dem beigefügten Befestigungssockel auf einem Tisch platziert werden. auf eine Arbeitsplatte platzieren, für sie eine klare Sichtlinie zu sorgen. Infrarot-Nachtsicht macht die Überwachung bei Nacht einfach. Installieren des Kamera-Befestigungsockels Schritt 1: Oplink Communications, Inc.
- Page 61 Machen Sie Sie die Kamera unter Verwendung der Befestigungssockel-Mutter fest. Vervollständigen der Kamera-Montage Schritt 3: a. Stellen Sie sicher, dass die Kamera fest an der Wand befestigt ist. b. Stellen Sie die Kamera auf die gewünschte Position ein. Oplink Communications, Inc.
- Page 62 Unterstützt Oplink Cloud-Server • Nutzbar für Türen, Fenster usw. • Aussenden von sofortigen Einbruchwarnungen • Leicht installierbar, keine Verdrahtung erforderlich • Automatischer Zusatz für jedes Oplink Security-System • Batterie inklusive • Sabotageschalter • Alarmbenachrichtigung bei niedrigem Batteriestand: Oplink Communications, Inc.
- Page 63 Nach der Auswahl einer Position an der Tür, vorzugsweise an der Kante der Tür und entfernt von den Scharnieren, sollte die große Einheit des Sensors auf dem unbeweglichen Rahmen der Tür platziert werden. ii. Platzieren Sie die kleine Einheit auf die bewegliche Tür, wobei die kleine Oplink Communications, Inc.
- Page 64 Rahmen zu platzieren, ist es akzeptabel, die kleinere Einheit des Sensors auf den Rahmen zu legen, um die Platzierung zu erleichtern. Dies ist ein akzeptabler Ansatz zur Sensorplatzierung, obwohl dieser nur verwendet werden sollte, wenn dies unbedingt notwendig ist. Oplink Communications, Inc.
- Page 65 Bewegungssensor Inhalt A. Bewegungssensor Batterie C. Doppelseitiges Klebeband Funktionsübersicht • Smart-Einrichtungs-Assistent • WLAN-Sicherheitstechnologie • Unterstützt Oplink Cloud-Server • Erkennt Bewegung innerhalb von einem 120-Grad-Winkel und 10 – 40 Fuß Passiv-infrarot, haustierimmun • • Batterie inklusive • Sabotageschalter • Alarmbenachrichtigung bei niedrigem Batteriestand: •...
- Page 66 Der Sensor ist am effektivsten in Bereichen wie Fluren und Eingangspunkten, wo Eindringlinge hindurchgehen. 3-Minuten-Abkühlphase Eine 3-minütige Abkühlphase ist in den Bewegungssensor einprogrammiert. Dies reduziert Fehlalarme und verlängert die Lebensdauer der Batterie. Nachdem das letzte Ereignis ausgelöst Oplink Communications, Inc.
- Page 67 - Montieren Sie den Detektor nicht in der Nähe von Möbeln oder Objekten, die höher als 4 Fuß hoch sind und auf die eventuell ein Haustier klettern kann (wie etwa eine Couch innerhalb von 6 Fuß um den Bewegungssensor). Oplink Communications, Inc.
- Page 68 Funktionsübersicht • Smart-Einrichtungs-Assistent • WLAN-Sicherheitstechnologie • Unterstützt Oplink Cloud-Server • 60-Sekunden-Alarm bei Empfang des Befehls SIRENE EIN; stoppt sofort nach Erhalt des Befehls SIRENE • Vorinstallierte Backup-Batterie Sirenen-Installation Drahtlose Sirene einrichten a. Platzieren Sie die Sirene innerhalb von 5 Fuß um die OPU, um eine Verbindung herzustellen...
- Page 69 Sie die durchsichtigen Kunststoffstreifen, um denBatteriekontakt zu initiieren. Drahtlose Sirene installieren Verwenden Sie doppelseitiges Klebeband oder Schrauben, um die Sirene an der gewünschten Stelle zu installieren. Schließen Sie die Sirene an der nächsten Steckdose an. Oplink Communications, Inc.
- Page 70 Sendeleistung : Lagertemperatur: -40° F bis 158° F (-40° C bis 70° C) Netzwerkprotokolle: DHCP, Auto-IP-Adresse Ein 10/100Mbps LAN / WAN Netzwerkschnittstelle: austauschbarer Port IEEE 802.3 / IEEE 802.3u Drahtlose Schnittstelle: Wi-Fi, RF433MHz, WPA2-PSK Netzteil: 5V 1,5 A Oplink Communications, Inc.
- Page 71 Abmessungen: 73 (L) x 26 (B) x 95mm (H) Betriebstemperatur: 32° F bis 113° F (0° C bis 45° C) Videokompression: MJPEG Bildauflösung: 640 x 480 Lagertemperatur: 5° F bis 140° F (-15° C bis 60° C) Netzwerkprotokolle: DHCP, Auto-IP-Adresse Oplink Communications, Inc.
- Page 72 Stromquelle: 1,5 V * 2 Stück „AAA“-Lithium- und Eisen- Disulfid-Batterie Standby-Strom: <10uA (@3.3VDC) Betriebsstrom: <18mA (@3.3VDC) Anzeige für niedrigen Batteriestand: 2.2V-2.4V Alarmmodus bei niedrigem Batteriestand: Alarme bei niedrigem Batteriestand ertönen nur wenn ein anderer Sensoralarm ausgelöst wird Auftrennungserkennung: Sabotageschalter-Funkalarm Oplink Communications, Inc.
- Page 73 Batteriestand ertönen nur wenn ein anderer Sensoralarm ausgelöst wird Auftrennungserkennung: Sabotageschalter-Funkalarm Bewegungssensor Modell: PIR1301 Betriebstemperatur: 14° F bis 122° F ( -10° C bis 50° C) Frequenz: 433,92 MHz +/- 150 KHz Sendeleistung: >= -16 dBm (Testbedingung bei der Fertigung) Modulation: ASK Oplink Communications, Inc.
- Page 74 RF-Empfängerfrequenz: 433,92 MHz +/- 0,125 MHz Empfindlichkeit: -110 dbm Modulation: ASK Stromquelle: Stromzufuhr-AC-Adapter (Amerikanischer Standard); Backup-Batterie – Alkali „AAA“-Größe * 3 Stck Standby-Modus-Strom: ≤12 mA (durchschnittlich)@4,5 V Alarm-Modus-Strom: <=300 mA@4,5 V Alarm-Schallpegel: >=110 dB@30 cm auf Desktop 4,5 V Strom Oplink Communications, Inc.
- Page 75 Betriebsumgebung: 32° F bis 113° F (0° C bis 45° C) Lagertemperatur: -4° F bis 140° F (-20° C bis 60° C) RF-Frequenz: 433,92 MHz +/- 150 KHz Modulation: ASK Sendeleistung: >= -10 dBm (Testbedingung bei der Fertigung) Oplink Communications, Inc.
- Page 76 (2) Melden Sie sich bei Ihrem Router-Konto an. Schauen Sie in Ihrem Bedienungshandbuch oder den Unterlagen nach, wenn Sie die Anmeldedaten nicht wissen. (3) Stellen Sie sicher, dass Sie in der Einstellungs-Kategorie sind, wählen Sie „DHCP aktivieren“ und geben Sie den Adressbereich ein (von „192.168.1.100“ bis „192.168.1.199“). Oplink Communications, Inc.
- Page 77 Bedingungen: (1) Dieses Gerät darf keine Störungen verursachen, und (2) das Gerät muss empfangene Störungen akzeptieren, einschließlich Störungen, die einen unerwünschten Betrieb verursachen können. 3. Abgeschirmte Kabel müssen mit diesem Gerät verwendet werden, um die Einhaltung der Klasse B der FCC-Bestimmungen zu gewährleisten. Oplink Communications, Inc.
- Page 78 V 2.2.0t1b Oplink Connected TripleShield Hardware Manual del Usuario Nota: Este manual aplica a diversos paquetes. Por tal motivo, algunas partes y algunos pasos pueden no pertenecer al paquete que usted ha adquirido. Oplink Communications, Inc.
- Page 79 V 2.2.0t1b Contenido TripleShield de un vistazo ..................3 Ensamble la estación OPU y conecte al enrutador……… ......5 Configure y encienda la Cámara IP............... 7 Coloque los sensores y encienda la sirena............. 10 a). Instale el sensor de puerta y ventana ..................10 b).
-
Page 80: Tripleshield De Un Vistazo
V 2.2.0t1b TripleShield de un vistazo Nombre Artículo Función producto (Unidad de Ofrece acceso inalámbrico y control de funciones procesamiento del sistema de seguridad mi Uplink) Cámara smart con característica de detección ajustable de movimiento y visión nocturna por Cámara IP infrarrojo con micrófono integrado. - Page 81 Almacena información para las grabaciones de vídeo Advertencia: No deseche aparatos eléctricos al igual que la basura doméstica. Utilice las instalaciones de acopio especiales. Contacte a su gobierno local para obtener información en cuanto al sistema de acopio disponible. Oplink Communications, Inc.
-
Page 82: Ensamble La Estación Opu Y Conecte Al Enrutador
Oplink Connected • La OPU permite la recuperación de sistema • Transmite los datos del sensor y controla la señal • Soporta el servidor de Oplink en la nube Funciones inalámbricas • Soporta estándares IEEE 802.11 b/g/n... - Page 83 Conecte el adaptador de corriente a la OPU y a una toma de corriente. d. Habilite la configuración DHCP del enrutador (consulte el Apéndice B para la configuración DHCP del enrutador). *La mayoría de los enrutadores tienen la configuración DHCP “habilitada” por defecto. Oplink Communications, Inc.
-
Page 84: Configure Y Encienda La Cámara Ip
Visión general de las funciones • Asistente de configuración inteligente • Video de alta calidad • Antena y micrófono integrados • Soporta el servidor de Oplink en la nube • Visión diurna y nocturna • Graba automáticamente cuando los eventos son desencadenados •... - Page 85 Recomendamos colocar la cámara sobre un mostrador que le dé una línea de visión. La visión nocturna por infrarrojo facilita la supervisión nocturna. Paso 1: Instale la base de acoplamiento de la cámara Oplink Communications, Inc.
- Page 86 Asegure la cámara usando la tuerca de la base de acoplamiento. Paso 3: Complete el montaje de la cámara a. Asegúrese de que la cámara esté firmemente fijada a la pared. b. Ajuste la cámara a la posición deseada. Oplink Communications, Inc.
-
Page 87: Coloque Los Sensores Y Encienda La Sirena
Visión general de las funciones de DWM1301 • Asistente de configuración inteligente • Tecnología de seguridad inalámbrica • Soporta el servidor de Oplink en la nube • Se aplica a puertas, ventanas, etc. • Envía alertas de intrusión instantáneas • Fácil de instalar, no requiere cableado •... - Page 88 Después de seleccionar una ubicación en la puerta, de forma preferible sobre el borde de la puerta alejado de las bisagras, la unidad grande del sensor debe colocarse sobre el marco fijo de la puerta. ii. Coloque la unidad pequeña sobre la puerta movible con la unidad Oplink Communications, Inc.
- Page 89 Esto constituye un enfoque aceptable para la colocación del sensor, aunque solo debe utilizarse cuando sea necesario. Oplink Communications, Inc.
-
Page 90: B). Sensor De Movimiento
Visión general de las funciones • Asistente de configuración inteligente • Tecnología de seguridad inalámbrica • Soporta el servidor de Oplink en la nube • Detecta el movimiento hasta a 120 grados, y de 10 a 40 pies (3 a 12 m) •... - Page 91 3 minutos haya terminado. Si se detecta movimiento durante el período de enfriamiento de 3 minutos, el conteo regresivo de 3 minutos volverá a iniciar. Oplink Communications, Inc.
- Page 92 -No dirija el detector hacia una escalera a la cual una mascota tenga acceso. -No monte el detector cerca de un mueble u objeto más alto a 4 pies (1,2 m) al cual pueda subirse una mascota (como un sofá a 6 pies o 1,8 m del sensor de movimiento). Oplink Communications, Inc.
-
Page 93: C). Sirena
Visión general de las funciones • Asistente de configuración inteligente • Tecnología de seguridad inalámbrica • Soporta el servidor de Oplink en la nube • Emite una alarma de 60 segundos tras recibir la orden de SIREN ON, se apaga inmediatamente tras recibir la orden SIREN OFF •... - Page 94 Montaje de la sirena inalámbrica a. Use la cinta de doble cara o los tornillos para montar la sirena en la ubicación deseada. b. Conecte la sirena a la toma de corriente más cercana. Oplink Communications, Inc.
-
Page 95: Apéndice A
Temperatura de almacenamiento: -40° F a 158° F (-40° C a 70° C) Protocolos de red: DHCP, Dirección IP automática Interfaz de red: Una LAN/WAN de 10/100Mbps Puerto intercambiable, IEEE 802.3 / IEEE 802.3u Interfaz inalámbrica: Wi-Fi, RF433MHz, WPA2-PSK Adaptador de corriente: 5V 1,5A Unidad Flash Oplink Communications, Inc. -
Page 96: Cámara
Resolución de imagen: 640 x 480 Temperatura de almacenamiento: 5° F a 140° F (-15° C a 60° C) Protocolos de red: DHCP, Dirección IP automática Interfaz de red: 1 Ethernet 10/100BaseT (RJ45) conexión LAN Interfaz inalámbrica: EEE 802.11 b/g/n, WPA2-PSK Oplink Communications, Inc. -
Page 97: Sensor De Puerta Y Ventana
Indicador de nivel bajo de la batería: 2,2V-2,4V Modo de alarma de batería baja: Alarma de batería baja se activa solo cuando otro sensor de alarma se desencadena Anulación de detección: Alarma inalámbrica de interruptor de sabotaje Modelo: DWM1301 Oplink Communications, Inc. -
Page 98: Sensor De Movimiento
Sensor de movimiento Modelo: PIR1301 Temperatura de operación: 14° F a 122° F ( -10° C a 50° C) Frecuencia: 433,92 MHz +/-150KHz Potencia de transmisión: >= -16dBm (Condiciones de prueba del fabricante) Modulación: ASK Alimentación: CR123A 3V Oplink Communications, Inc. -
Page 99: Sirena
Alimentación: Adaptador de alimentación de CA principal: (estándar estadounidense); Batería de respaldo alcalina tamaño "AAA" *3 pzas. Corriente en modo de espera: ≤12mA(promedio)@4,5V Corriente en modo de alarma: <=300mA@4,5V Nivel de sonido de la alarma: >=110dB@30cm en escritorio potencia 4,5V Oplink Communications, Inc. -
Page 100: Control Remoto
Temperatura de almacenamiento: -4° F a 140° F (-20° C a 60° C) Frecuencia RF: 433,92 MHz +/- 150 KHz Modulación: ASK Potencia de transmisión: > -10dBm (Condiciones de prueba del fabricante) Apéndice B Configuración del DHCP (Protocolo de configuración dinámica de host) del enrutador. Oplink Communications, Inc. -
Page 101: Declaración De La Comisión Federal De Comunicaciones (Fcc)
(desde "192.168.1.100" hasta "192.168.1.199") Declaración de la Comisión Federal de Comunicaciones (FCC) 1. Advertencia: Los cambios o modificaciones no aprobados expresamente por la parte responsable del cumplimiento pueden anular la autorización del usuario para operar el equipo. Oplink Communications, Inc. - Page 102 3. Se deben usar cables blindados en esta unidad para asegurarse de que cumpla con los límites de la clase B de la FCC. Oplink Communications, Inc.
- Page 103 V 2.2.0t1b Oplink Connected TripleShield Hardware Gebruiksaanwijzing Opmerking: Deze gebruiksaanwijzing is bedoeld voor meerdere pakketten. Hierdoor kan het zijn dat sommige secties en stappen niet van toepassing zijn op het pakket dat u hebt aangeschaft. Oplink Communications, Inc. Oplink Communications, Inc.
- Page 104 V 2.2.0t1b Inhoudsopgave Kort overzicht TripleShield ..............3 OPU Station assembleren en aansluiten op de router ………....5 IP-camera instellen en inschakelen ……………..……..…..…....7 Plaats de sensoren, en schakel de sirene in…………………..………… 10 ..........10 Sensor voor deuren en ramen installeren b.) Bewegingssensor .....................
-
Page 105: Kort Overzicht Tripleshield
V 2.2.0t1b Kort overzicht TripleShield Artikel Naam product Functie Draadloze toegang en regel- OPU (Oplink Processing functie van mi Unit) beveiligingssysteem Slimme camera met een aanpasbare functie voor detecteren van bewegingen en IP-camera infrarood nachtkijkapparaat met ingebouwde microfoon. Detecteert en waarschuwt de... - Page 106 Data-opslag voor video-opnames 16G Flashdrive Waarschuwing: Gooi elektrische apparatuur niet weg met het ongesorteerde gemeentelijk huisvuil. Breng elektrische apparaten weg naar het gemeentelijk inzamelpunt. Neem contact op met uw gemeente voor informatie over inzamelpunten bij u in de buurt. Oplink Communications, Inc.
-
Page 107: Opu Station Assembleren En Aansluiten Op De Router
D. 16G Flashdrive Overzicht functies • Slimme instelwizard • Creëer een systeem voor alle slimme Oplink apparaten • Voor draadloze toegang en de regelfunctie van het Oplink Connected-systeem • Met OPU kunt u het systeem herstellen • Sensordata en regelsignaal overzenden •... - Page 108 Sluit de voedingsadaptor aan op de OPU en een stopcontact. d. Schakel de DHCP-instellingen van de router in (raadpleeg Bijlage B voor de DHCP-instellingen van de router). *Bij de meester routers zijn de DHCP-instellingen standaard ingeschakeld. Oplink Communications, Inc.
-
Page 109: Ip-Camera Instellen En Inschakelen
D. Schroeven en muurankers Overzicht functies • Slimme instelwizard • Video's van hoge kwaliteit • Ingebouwde antenne en microfoon • Werkt met Oplink-cloudserver • Dag-/nachtkijker • Gaat automatisch opnemen als er gebeurtenissen worden gestart. • Bewaking op afstand via smartphone of tablet Draadloze functies •... - Page 110 Opmerking: De camera kan nadat het voor het eerst werd ingeschakeld worden verplaatst en worden gemonteerd. De camera kan op een tafel worden geplaatst met behulp van het meegeleverde steunstuk. Wij raden aan om uw camera op een Oplink Communications, Inc.
- Page 111 Gebruik de steunmoer om de camera vast te zetten. Stap 3: Het monteren van de camera voltooien a. Controleer of de camera is stevig aan de muur vast zit. b. Draai de camera in de gewenste stand. Oplink Communications, Inc.
-
Page 112: Plaats De Sensoren, En Schakel De Sirene In
• Werkt met Oplink-cloudserver • Gebruik het op deuren, ramen et cetera. • Direct alarmmeldingen verzenden bij inbraak • Makkelijk te installeren, geen kabels nodig • Automatisch toevoegen aan elk Oplink- beveiligingssysteem • Inclusief batterij • Knoeischakelaar • Waarschuwing als de batterijen bijna leeg zijn... - Page 113 Nadat u de locatie op de deur hebt bepaald, bij voorkeur bij de rand van de deur uit de buurt van de scharnieren, moet u de grote eenheid van de sensor plaatsen op het onbeweegbare frame van Oplink Communications, Inc.
- Page 114 Dit is een acceptabele benadering voor het plaatsen van de sensoren, alhoewel het alleen gebruikt mag worden indien het echt niet anders kan. Oplink Communications, Inc.
-
Page 115: B.) Bewegingssensor
B. Batterij C. Dubbelzijdig plakband Overzicht functies • Slimme instelwizard • Draadloze beveiligingstechnologie • Werkt met Oplink-cloudserver • Detecteert beweging tot 120 graden, 3 - 12 meter. • Passief infrarood, immuun voor huisdieren • Inclusief batterij • Knoeischakelaar • Waarschuwing als de batterijen bijna leeg zijn •... - Page 116 3 minuten is verlopen. Als/Wanneer er een beweging wordt gedetecteerd tijdens de afkoelperiode, zal het aftellen opnieuw beginnen. Initiële testmodus en Energiebespaarmodus De bewegingssensor heeft 2 modussen: De initiële testmodus en de Energiebespaarmodus. Oplink Communications, Inc.
- Page 117 - Richt de detector niet op een trap waar ook huisdieren kunnen komen. - Monteer de detector niet vlakbij meubelstukken of voorwerpen groter dan 1,20 meter waarop een huisdier kan klimmen (zoals een bank binnen 1,80 meter van de bewegingssensor). Oplink Communications, Inc.
-
Page 118: C.) Sirene
B. Schroeven en muurankers Overzicht functies • Slimme instelwizard • Draadloze beveiligingstechnologie • Werkt met Oplink-cloudserver • Het alarm gaat 60 seconden af als SIREN ON wordt ontvangen; stopt onmiddellijk bij het ontvangen van SIREN OFF. • Reeds geïnstalleerde back-upbatterij... - Page 119 De draadloze sirene monteren a. Gebruik dubbelzijdig plakband of schroeven om de sirene op de gewenste locatie te bevestigen. b. Sluit de sirene aan op het dichtstbijzijnde stopcontact. Oplink Communications, Inc.
-
Page 120: Bijlage A
Overdrachtssnelheid: 150Mbps (Max.) Kanaal: 13 TX-voeding: 13dbm, 15dbm(Max.) Opbergtemperatuur: -40° C tot 70° C Netwerkprotocollen: DHCP, Auto IP-adres Netwerkinterface: Een 10/100Mbps LAN/WAN Verwisselbare poort, IEEE 802.3 / IEEE 802.3u Draadloze interface: Wi-Fi, RF433MHz, WPA2-PSK Voedingsadaptor: 5V 1,5A Oplink Communications, Inc. -
Page 121: Flashdrive
Afmetingen: 73(L) x 26(B) x 95mm(H) Werktemperatuur: 0° C tot 45° C Videocompressie: MJPEG Beeldresolutie: 640 x 480 Opbergtemperatuur: -15° C tot 60° C Netwerkprotocollen: DHCP, Auto IP-adres Netwerkinterface: 1 Ethernet 10/100BaseT (RJ45) LAN- verbinding Draadloze interface: EEE 802.11 b/g/n, WPA2-PSK Oplink Communications, Inc. -
Page 122: Sensor Voor Deuren En Ramen
Magnetisch sensorgat geactiveerd: ~11mm (referentie) Voedingsbron: 1,5V*2pcs“AAA” Lithium en ijzer Disulfide batterij Stroom stand-by: <10uA (@3,3VDC) Werkstroom: <18mA (@3,3VDC) Waarschuwingsindicator batterij: 2,2V-2,4V Modus Batterij bijna leeg: Batterijalarm wordt pas actief als er een ander alarm af gaat. Knoeidetectie: Draadloos alarm knoeischakelaar Oplink Communications, Inc. -
Page 123: Bewegingssensor
Knoeidetectie: Draadloos alarm knoeischakelaar Bewegingssensor Model: PIR1301 Werktemperatuur: -10° C tot 50° C 433,92 MHz +/- 150KHz Frequentie: Overdrachtsvoeding: >= -16dBm (Testconditie fabrikant) Modulatie: VRAGEN Voedingsbron: CR123A 3V Stroom stand-by: <25uA Oplink Communications, Inc. -
Page 124: Sirene
Apparaattype: Draadloze sirene voor gebruik in huis Frequentie RF-ontvanger: 433,92 MHz +/- 0,125MHz Gevoeligheid: -110dbm Modulatie: VRAGEN Hoofd AC-adaptor Voedingsbron: Back-upbatterij - alkaline "AAA", 3 stks Stroom stand-by-modus: ≤12mA )@4,5V gemiddeld Stroom alarmmodus: <=300mA@4,5V Geluidsniveau alarm: >=110dB@30cm op desktop 4,5V voeding Oplink Communications, Inc. -
Page 125: Afstandsbediening
Energieverbruik: >1 jaar (twee keer per dag getriggerd) Knop: “ARM”, ARM ON-modus “DISARM”, ARM OFF-modus “Noodknop” voor noodsituaties Werkomgeving: 0° C tot 45° C Opbergtemperatuur: -20° C tot 60° C RF-frequentie: 433,92 MHz +/- 150 KHz Modulatie: VRAGEN Overdrachtsvoeding: >= -10dBm (testconditie fabrikant) Oplink Communications, Inc. -
Page 126: Bijlage B
(2) Log in op het account van uw router. Raadpleeg de gebruiksaanwijzing of documentatie als u de inloginformatie niet bij de hand hebt. (3) Ga naar de Instellen, kies "DHCP inschakelen", en voer het adresbereik in (van "192.168.1.100" tot "192.168.1.199"). Oplink Communications, Inc. -
Page 127: Fcc-Verklaring
2. Dit apparaat voldoet aan Deel 15 van de FCC Regels. De werking moet voldoen aan de volgende twee voorwaarden: (1) dit apparaat mag geen schadelijke interferentie veroorzaken, en (2) dit apparaat moet elke interferentie accepteren, inclusief interferentie welke ongewenste effecten op de werking kan hebben. Oplink Communications, Inc. - Page 128 V 2.2.0t1b 3. Bij dit apparaat moet gebruik worden gemaakt van afgeschermde kabels zodat het voldoet aan de Class B FCC-limieten. Oplink Communications, Inc.
Need help?
Do you have a question about the TripleShield and is the answer not in the manual?
Questions and answers