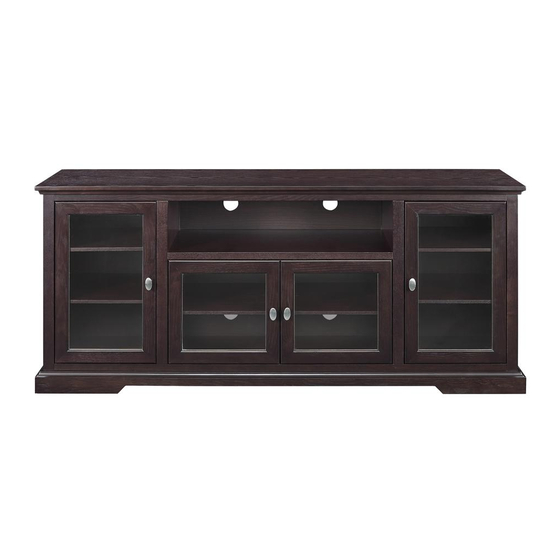
Walker Edison Beaverhead Espresso Highboy W70C32 Aassembly Instructions
Hide thumbs
Also See for Beaverhead Espresso Highboy W70C32:
- Assembly instructions manual (32 pages)
Advertisement
Quick Links
Advertisement

Related Manuals for Walker Edison Beaverhead Espresso Highboy W70C32


Summary of Contents for Walker Edison Beaverhead Espresso Highboy W70C32
- Page 1 Copyright © 2012, by Walker Edison Furniture Co., LLC. All rights reserved.
- Page 3 Copyright © 2012, by Walker Edison Furniture Co., LLC. All rights reserved.
- Page 4 Copyright © 2012, by Walker Edison Furniture Co., LLC. All rights reserved.
- Page 5 Insert dowels (A) into panels (2,3,4). Screw Cam Bolts (C) into panels (3,4). Insert dowels (A) into panel (6). Insert dowels (B) into slats (9). Copyright © 2012, by Walker Edison Furniture Co., LLC. All rights reserved.
- Page 6 Screw cam bolts (C) into top panel (1). Screw cam bolts (C) into bottom panel (5). Copyright © 2012, by Walker Edison Furniture Co., LLC. All rights reserved.
- Page 7 Attach panels (3,4) to panel (6) using cam bolts and dowels as guides. Secure panels (3,4) to panel (6) using cam locks (D). Tighten cam locks (D) with a screwdriver. Attach slats (9) to panels (3,4) using cam bolts and dowels as guides. Copyright © 2012, by Walker Edison Furniture Co., LLC. All rights reserved.
- Page 8 Attach panels (2) to slats (9) using dowels as guides. Attach the assembly from the previous step to bottom panel (5) using cam bolts and dowels as guides. Copyright © 2012, by Walker Edison Furniture Co., LLC. All rights reserved.
- Page 9 Secure panels (2,3) to bottom panel (5) using cam locks (D). Tighten cam locks (D) with a screwdriver. Secure panels (2,4) to bottom panel (5) using cam locks (D). Tighten cam locks (D) with a screwdriver. Copyright © 2012, by Walker Edison Furniture Co., LLC. All rights reserved.
- Page 10 Carefully fit top panel (1) into place using cam bolts and dowels as guides. Secure top panel (1) to panels (2,3) using cam locks (D). Tighten cam locks (D) with a screwdriver. Copyright © 2012, by Walker Edison Furniture Co., LLC. All rights reserved.
- Page 11 Secure top panel (1) to panels (2,4) using cam locks (D). Tighten cam locks (D) with a screwdriver. Attach panel (11) to the back of the console using screw (G). Copyright © 2012, by Walker Edison Furniture Co., LLC. All rights reserved.
- Page 12 Attach panel (10) to the back of the console using screws (G). Attach panel (12) to the back of the console using screws (G). Copyright © 2012, by Walker Edison Furniture Co., LLC. All rights reserved.
- Page 13 Attach panel (13) to the back of the console using screws (G). Cover all visible cam locks with stickers (L) as desired. Copyright © 2012, by Walker Edison Furniture Co., LLC. All rights reserved.
- Page 14 Inserts the shelf support pins (K) to the panel (2,3,4) at desired shelf heights. Carefully place shelves (7,8) in console. Shelves (7,8) will rest on the shelf support pins. Copyright © 2012, by Walker Edison Furniture Co., LLC. All rights reserved.
- Page 15 Attach doors (14) to panels (2) using screws (J) at hinges (H). See page 2 for specific instructions on how to adjust hinges so doors are aligned with console as desired. Attach handles (E) to doors (14) using bolts (F). Copyright © 2012, by Walker Edison Furniture Co., LLC. All rights reserved.
- Page 16 Attach doors (15) to panels (3,4) using screws (J) at hinges (H). See page 2 for specific instructions on how to adjust hinges so doors are aligned with console as desired. Attach handles (E) to doors (15) using bolts (F). Copyright © 2012, by Walker Edison Furniture Co., LLC. All rights reserved.
Need help?
Do you have a question about the Beaverhead Espresso Highboy W70C32 and is the answer not in the manual?
Questions and answers