Table of Contents
Advertisement
Available languages
Available languages
Quick Links
Advertisement
Chapters
Table of Contents

Related Manuals for FOUR MP100BTi

Summary of Contents for FOUR MP100BTi
- Page 1 OMISTAJAN OPAS 4MOBILE 4-MP400BTi FM Radio Automattinen muistin tallennus Esiasetettu taajuuskorjain Bluetooth handsfree audiostriimauksella USB liitäntä 3.5mm AUX liitäntä Kauko-ohjain • App Control...
-
Page 2: Table Of Contents
SISÄLLYS Asennus ..........3 Kaukosäädin ........…11 Irrota ruuvi ennen asennusta ....3 Tekniset tiedot ........12 DIN Etupaneli (Menetelmä A) ....3 Vianetsintä ..........13 APP Control...........27 Laitteen asennus ....... 3 Laitteen irroittaminen ......4 Johdotusliitäntä ........5 Toiminnot ..........6 Näppäimien sijainti ........ -
Page 3: Asennus
Asennus 2-DIN ASENNUS Huomautuksia: Asennusaukko Valitse asennuspaikka, jossa laite ei häiritse kuljettajan normaalia Tä mä laite voidaan asentaa mihin tahansa ajotoimintoa. kojelautaan, jossa on seuraava aukko: Ennen laitteen asentamista lopuksi kytke johdotus väliaikaisesti ja varmista, 106mm että se on kunnolla kiinni ja että laite ja järjestelmä... -
Page 4: Laitteen Irroittaminen
Asennus 5. Liu'uta soitin asennuskehykseen, kunnes se lukittautuu. 6. Kiinnittääksesi laitteen vieläkin paremmin, käytä mukana tulevaa metallipantaa ja kiinnitä se laitteen taakse mukana tulevilla (M5 muttereilla) Tarvittaessa taivuta pantaa mahduttaaksesi se ajoneuvoon. Kiinnitä metallipannan toinen pää kiinteästi ajoneuvon koriin kojelaudan alla. -
Page 5: Johdotusliitäntä
JOHTOJEN KYTKENTÄ... -
Page 6: Toiminnot
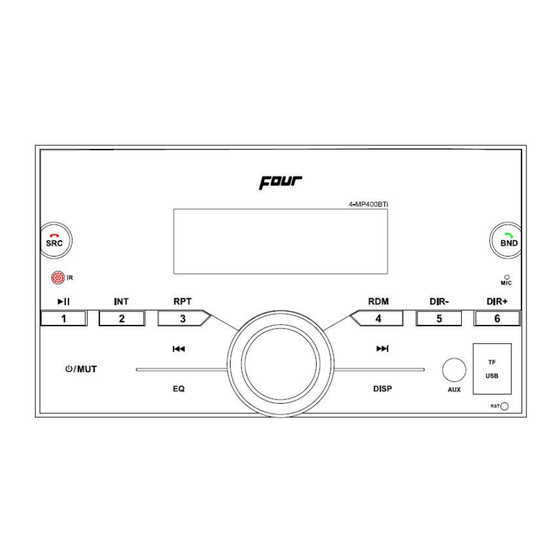
TOIMINNOT NÄPPÄIMIEN SIJAINTI ( SEURAAVA VALINTA ) "SRC" PAINIKE "AUX IN" LIITÄNTÄ IR SENSORI USB LIITÄNTÄ 1 "PLAY / PAUSE" PAINIKE "RESET " PAINIKE "POWER/MUTE" PAINIKE MUISTIKORTTIPAIKKA "2/INT" PAINIKE MIKROFONI "3RPT" PAINIKE "BAND/ " PAINIKE "EQ" PAINIKE "6/DIR+" PAINIKE ( ED. VALINTA ) PAINIKE "5/DIR-"... -
Page 7: Laite Päälle/Pois Päältä
Toiminnot LAITE PÄÄLLE/POIS PÄÄLTÄ kanssa samaan aikaan. (Huom! Kaikilla Paina SRC nappulaa (1) käynnistääksesi radioasemilla ei välttämättä ole tätä laitteen. Paina nappulaa 2s. Ajan toimintoa.) sammuttaaksesi laitteen. Äänen säädöt LOUDNESS Paina EQ nappulaa (5) lyhyesti valitaksesi Mene LOUD valikkoon SEL menun kautta. haluaman tilan. -
Page 8: Aux Sisääntulo
RADION TOIMINTA AUX SISÄÄNTULO Ne radiokanavat, joissa on vahvin Laite voidaan liittää kannettavan soittimeen signaali tallentuvat automaattisesti IN-liittimen (10) kautta. Paina radioon esivalintapainikkeiden alle. AUX IN MODE-painiketta (3) Valitse - Ohjelman skannaus vaihtaaksesi äänilähde yksikköön. Paina AS/PS nappulaa (2) lyhyesti RADION TILAN VAIHTAMINEN ... -
Page 9: Usb
RADION TOIMINTA Ollessasi toisessa tilassa, voit painaa MODE nappulaa (3) valitaksesi USB tilan. PS: Ohjelman nimipalvelu Lisätoimintoja USB tilassa voit tehdä Vastaanottaa aseman nimen ja näyttää sen kirjaimin. seuraavanlaisesti: AF: Vaihtoehtoisia taajuuksia KAPPALEEN VALINTA YHDELLÄ Lista taajuuksista, jotka lä hettää PAINALUKSELLA samaa ohjelmaa. -
Page 10: Bluetooth
RADION TOIMINTA Soittaminen volumenä ppäintä “ NUM*** ” pyörii ruudussa kappale valitaan Sinun pitää soittaa puhelu puhelimestasi. audionäppäimestä (5). Äänet tulevat laitteen kaiuttimista. Jos et Jos kappale valitaan hakee laite kappaleen halua että kaiuttimet toistavat puhelun, 5s kuluessa vaikka et painaisi ENT (5) pitää... -
Page 11: Kaukosäädin
KAUKOSÄÄDIN NÄPPÄIN & TOIMINTO Virta ON/OFF Nappula. 2. VOL+ Volume Ylös Nappula. 3. BAND Aseman vaihto Nappula(Lyhyt painallus). Radio tilassa: etsi asemia taaksepäin. MP3 tilassa: kappale taaksepäin tai taaksepäin kelaus. 5. VOL- Volume alas Nappula. 6. EQ Paina valitaksesi haluaman taajuuskorjauksen. 7. -
Page 12: Tekniset Tiedot
TEKNISET TIEDOT YLEISTÄ Virtajärjestelmä : DC 12 V, Negatiivinen maa. Rungon koko : 178 (W) x 97 (D) x 50 (H) Äänen säädöt : ±10 dB Bass (100 Hz) : ±10 dB Treble (10 kHz) Maksimitehot Versio V : 4x40 watts Virran otto Versio V :10Amppeeria (max.) -
Page 13: Vianetsintä
VIANETSINTÄ Ennekuin käyt listan lä pi, tarkista johdotukset. Jos jokin ongelmista ei poistu ja lista on käyty läpi, ota yhteys lähimpään jälleenmyyjään. OIRE RATKAISU Autossa virrat Jos virrat ovat kytketty, mutta Soitin päällä. moottori käynnissä, käynnisty. käännä auton avain asentoon “ACC”... - Page 14 OWNER’S MANUAL Mobile Audio System PLL Synthesizer Stereo Radio Automatic Memory Storing Preset Equalization Bluetooth function USB Interface 3.5mm Input Jack Remote control function • APP Control...
- Page 15 CONTENTS Installation ......... 16 Remote control………………………24 Take out screw before installation .. 16 Specification…………………………25 DIN Front-Mount (Method A) .... 16 Trouble shooting…………………….26 APP Control........28 Installing the unit ......16 Removing the unit ......17 Wiring Connection ......18 Operation ........... 19 Location of keys ........
-
Page 16: Installation
INSTALLATION Installing the unit Notes: Be sure you test all connections first, and Choose the mounting location where then follow these steps to install the unit. the unit will not interfere with the Make sure the ignition is turned off, normal driving function of the driver. -
Page 17: Removing The Unit
INSTALLATION attach the other end of metal strap to a Removing the unit solid metal part of the vehicle under the - Make sure the ignition is turned off, then dashboard. This strap also helps disconnect the cable from the vehicle ensure proper electrical grounding of battery’s negative (-) terminal. -
Page 18: Wiring Connection
WIRING CONNECTION ISO CONNECTION... -
Page 19: Operation
OPERATION LOCATION OF KEYS 1. “ DISP ” button. 10. “AUX IN” jack. 2. “AS/PS/” button“. 11. “6 10+” button. 3.” MODE/POWER” button 12. “5 10-” button. 4. “BAND/ ” button 13. “4 RDM” button 5. “VOL/SEL/TA/AF/PTY” button. 14.“3 RPT” button 6. -
Page 20: Turning On/Off The Unit
OPERATION TURNING ON/OFF THE UNIT Press PWR button (3) to turn on the unit. signal(The AF symbol of the LCD does not flashing). Several minutes later the When the unit is on. Press and hold for 2 time will be synchronized to the station’s seconds to turn off the unit. -
Page 21: Auxiliary Input
OPERATION AUXILIARY INPUT stations stored into corresponding preset number button. The unit can be connected to a portable audio player through the AUX IN jack (10). - Program scanning Press AS/PS button (2) shortly to And press MODE button (3) to select AUX IN mode when inserted an audio source to scan preset station. -
Page 22: Usb Play Operation
OPERATION segment is turned on. USB driver through this interface (9). When you connect an USB driver through PS: Program Service Name the interface, the unit will search the MP3 Broadcast station name data /WMA files in the USB driver and start to expressed alphanumerically play. -
Page 23: Bluetooth Operation
OPERATION BLUETOOTH OPERATION PRE-PAIR FOR BLUETOOTH Press key to reject the call. OPERATION Hang up a call (i) When use Bluetooth, please make sure When finished a conversation press the mobile phone supports Bluetooth key to hang up this call. function. -
Page 24: Remote Control
REMOTE CONTROL FUNCTION KEY & CONTROL Power ON/OFF Button. 2. VOL+ Volume Up Button. 3. BAND Band Select Button(When pressed shortly). Radio mode: seek/turn down station. MP3 mode: skip to the previous file or fast reverse 5. VOL- Volume Down Button. 6. -
Page 25: Specification
SPECIFICATION GENERAL Power Supply Requirements : DC 12 Volts, Negative Ground Chassis Dimensions : 178 (W) x 97 (D) x 50 (H) Tone Controls : ±10 dB Bass (at 100 Hz) : ±10 dB Treble (at 10 kHz) Maximum Output Power ... -
Page 26: Trouble Shooting
TROUBLE SHOOTING Before going through the checklist, check wiring connection. If any of the problems persist after checklist has been made, consult your nearest service dealer. Symptom Cause Solution The car ignition switch is power supply No power. not on. connected to the car accessory circuits, but the engine is not moving, switch the ignition key... -
Page 27: App Control
APP Control ( iOS / Android )________________________ Lataa iCar Link sovellus laitteesi sovelluskaupasta ( App store / Play kauppa ) iCar Link sovelluksella voit ohjata soitinta älylaitteesi avulla ( iOS / Android ) Avattuasi sovelluksen >> Valittavanasi on seuraavat vaihtoehdot: Radio, USB, BT Music, AUX in ja SD Card, Laitteen käynnistys / sammutus sekä... -
Page 28: App Control
APP Control ( iOS / Android )________________________ Download iCar Link app from your device app store ( App store / Play store ) iCar Link app lets you control your car stereos using mobile devices ( iOS / Android ) After you open the app >>...
Need help?
Do you have a question about the MP100BTi and is the answer not in the manual?
Questions and answers