Table of Contents
Advertisement
Quick Links
Advertisement
Table of Contents

Subscribe to Our Youtube Channel
Summary of Contents for Excelsior INC-13 Series
- Page 1 Biological Indicator Incubator Operator’s Manual Revision 2.0...
- Page 2 Excelsior Scientific Products. This manual contains guidance on the function and operation of our incubators which are used in conjunction with Excelsior Scientific Self- Contained Biological Indicators (SCBIs) and Spore Ampoules. Please read the manual carefully before using the incubator.
-
Page 3: Table Of Contents
Contents Page Excelsior Scientific Warranty.....1 Introduction……………………………...….2 Incubator Diagram……………………...….3 Installation…………………………………..4 Technical Data and Trouble Shooting..5 Safety Precautions ……………………...…6 Operation Guide…………………………….7 Control Elements………………………..7 Setting Incubation Time……………..…...7 Setting Temperature………………...…..7 Programming …………….…………………8 Temperature Calibration………………...9,10 Maintenance and Cleaning.. ……………...11 Wiring Diagram……..……………………..12 Packing List ………………………………...13 Replacement Parts........14 •... -
Page 4: Excelsior Scientific Warranty
Excelsior Scientific Warranty Excelsior Scientific warrants to the original purchaser that the INC-13 series self contained biological indicator incubator is free from manufacturing defects that would adversely affect its performance, under normal use and service, for a period of twelve (12) months from the date the product shipped from Excelsior Scientific. -
Page 5: Introduction
Contained Biological Indicators (SCBIs), including Ex- celsior Scientific’s standard and Mini-SCBIs and Spore Ampoule product configurations. Excelsior Scientific’s SCBI products consist of a carrier or carrying system for bacterial spores which have been identified as the most resistant to sterilisation processes. The spores are a critical element to providing assurance that a sterilisation process was effective. -
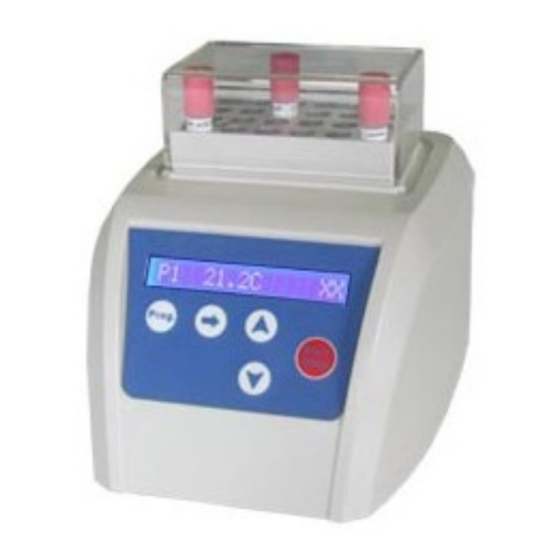
Page 6: Incubator Diagram
Incubator Diagram • • •... - Page 7 Installing the Incubator Place the incubator onto a level, horizontal surface for use and long term storage. Insert the column connector of the adaptor to the back of the incubator and the adaptor to the cord/ plug. Insert the cord/plug into a power supply. Turn on the main switch located on the back of the incubator.
- Page 8 Technical Data Power Supply DC24V Maximum Power Temperature Range 5°C to 70°C Timing Range 0 to 99h 59m Accuracy of Temperature ±0.5°C Display Accuracy 0.1°C ≤ 15 Minutes Heating Time Ambient Temperature 5°C to 35°C Dimensions 120x152x112 mm Weight 0.85 kg Troubleshooting Display Cause...
-
Page 9: Safety Precautions
Safety Precautions ! For indoor use only. ! Do not attempt to access incubator internals or attempt to repair the incubator. Contact Excelsior Scientific in the event the incubator stops working properly, sales@excelsiorscientific.com Tel: +44 7813762926 ! Use and store the incubator on a level, horizontal surface in a location with little or low levels of dust, moisture and sun. -
Page 10: Operation Guide
Operation Guide Control Elements - Buttons Starts and Stops the procedure START/STOP Selects various programs PROG. ∆ or Adjust temperature and time Moves the cursor Setting the Time Press the PROG. key to select various programs, from P1 to P9. Once program is selected, press key to move the cursor and ∆... -
Page 11: Programming
Programming Press PROG. key to select the program from P1 to P9. The incubator will begin to heat automatically according to previous set temperature or default temperature of 56.0°C, as displayed. When the incubator reaches the set temperature, the display will read “OK”. -
Page 12: Temperature Calibration
Temperature Calibration The temperature of the incubator was calibrated prior to shipment. The calibration was linearly performed at 40°C and 100°C. The temperature accuracy is ±0.5°C based on the two temperatures. If a difference is noted between the temperature of the well and the temperature displayed, adjustment can be made as follows: After turning on the power to the incubator, make... -
Page 13: Maintenance And Cleaning
Maintenance and Cleaning Before performing any type of maintenance or cleaning activities, turn the power off. Each well in the aluminium heat block may be cleaned with alcohol to assure the heat is transferred effectively to the SCBI and to reduce the potential for contamination with microbial organisms other than the indicator organism, post-exposure. -
Page 14: Wiring Diagram
Incubator Wiring Diagram • • •... -
Page 15: Packing List
Packing List Item Type Quantity Incubator 13mm, 10 well Adaptor 24VC 2A American, Plug / Cord European or United Kingdom Transparent Not Applicable Cover Operator’s Manual Not Applicable • • •... -
Page 16: Replacement Parts
Replacement Parts Code Number Part Name AS27-00-05 Front Panel AS69-00-01 Heating Film 24V35W AS28-00B 20091008 Control Board DC Power Supply 48W (24V 2A) AMT-130 Temperature Protection Switch BR-12C-11L On/Off Switch HC161A LCD Display (Blue) • • •... - Page 17 Distributed by: Excelsior Scientific Ltd Excelsior House 3 Stow Gardens Wisbech PE13 2HS, United Kingdom Tel: +44 (0) 7813762926 @: sales@excelsiorscientific.com www.excelsiorscientific.com • • •...
Need help?
Do you have a question about the INC-13 Series and is the answer not in the manual?
Questions and answers