Advertisement
Quick Links
INSTRUCTION & OPERATION MANUAL
®
Leakfinder
Model No. WV622N-VWKIT
Diagnostic Smoke
Machine
®
with Integrated Nitrogen Generator
and non-contaminating UltraTraceUV® Tracer Dye Solution
USA | Canada | Int'l Patents • 9,417,152 • 3,060,897 • ZL201480058656.7 | 2,279,147 • 2,394,911 | 1,384,984 | Others Pending
Advertisement

Summary of Contents for VACUTEC Leakfinder WV622N-VWKIT
- Page 1 INSTRUCTION & OPERATION MANUAL ® Leakfinder Model No. WV622N-VWKIT Diagnostic Smoke Machine ® with Integrated Nitrogen Generator and non-contaminating UltraTraceUV® Tracer Dye Solution USA | Canada | Int’l Patents • 9,417,152 • 3,060,897 • ZL201480058656.7 | 2,279,147 • 2,394,911 | 1,384,984 | Others Pending...
- Page 2 Caution and Usage Tips Leakfinder® ALWAYS USE WITH VEHICLE ENGINE TURNED OFF. Leakfinder® DISCONNECT from the vehicle prior to starting the engine or prior to running any on-board monitor, including the DMTL or LDP. Damage caused by not following proper operating procedures will not be covered by the vehicle warranty or Leakfinder®...
-
Page 3: Table Of Contents
Contents Accessories; Included & Optional Product Overview & Technical Specifications Initial Setup & Proper Filtration Control Valve Overview Basic Testing Procedure 10-11 Other Leak Samples Basic EVAP Test Vacuum / Pressure Gauge Overview Leakfinder® Calibration Procedure Troubleshooting Guide Warranty Thank You and Congratulations! Your Leakfinder® WV622N-VWKIT Evaporative Emissions System Tester (EEST) &... - Page 4 Included with Leakfinder® WV622N-VWKIT UltraTraceUV®: (WV0712UV) this is the only Automaker-Approved UV smoke- producing solution in the world. This non-contaminating solution’s chemistry is designed to not damage vehicle components and contains a special dye that deposits at the exact location of a leak. Each bottle will perform approximately 300 tests.
- Page 5 Included with Leakfinder® WV622N-VWKIT Fuel Neck Cap Adapter Threaded: (WVA-142) Fuel Cap Receiver Assembly: (WVA-143) Vehicle/Cap Test Hose Assembly: (WVA-144)
- Page 6 Optional Accessories Bladder Plug with Through Hole: (WVA-096) For sealing irregular sizes (from 47-152mm) and to introduce smoke. Includes spare bladder replacement. Bladder Plug with Through Hole: (WVA-132) For sealing irregular sizes (from 31-90mm) and to introduce smoke. Includes spare bladder replacement. Bladder tube replacement: WVA-098) for bladder WVA-096 (48.5mm ⌀) Bladder tube replacement: (WVA-149)for bladder WVA-134 (22mm ⌀) Filter Elements Kit: (WVRP-103) 5 micron, .01 micron and Carbon-activated.
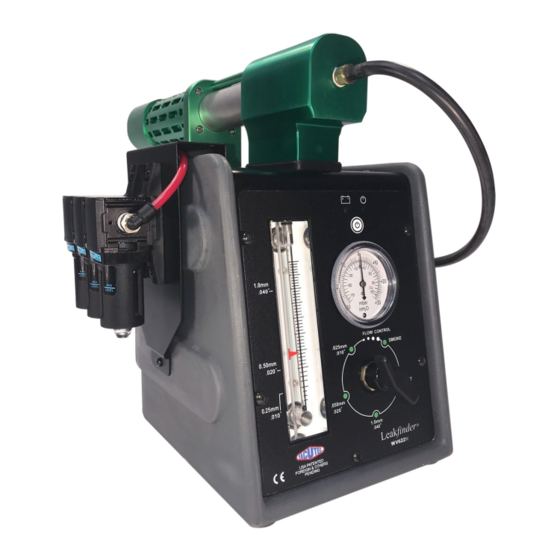
- Page 7 Product Overview Integr ated Nitrogen Generator and Handle Assembly Indicator Lights <ON> <OFF> Switch (on 5-minute timer) Workshop Air Inlet Vacuum/ Pressure Gauge Filter Assembly Flow Meter’s Pointer Flag Control Valve Flow Meter Power Cables Scratch-Resistant Housing (Back of tester) Technical Specifications Height 13.5 in.
- Page 8 Initial Setup Low Full a. Pour entire contents of one 12 oz. UltraTraceUV® solution bottle into the smoke chamber. NOTE: Use second bottle supplied to regularly maintain at or near FULL mark. Bleed Hole Air fitting b. If not supplied; install correct air fitting onto the Leakfinder®. Use Teflon® thread- sealer.
- Page 9 Initial Setup, continued Leakfinder® Air Compressor Air pressure between 3.4 to 17 bar (50 ~ 250 PSIG) It is very important to keep the Leakfinder® nitrogen generator assembly free of oil, water and other contaminants, in order to maintain a high nitrogen purity and long service life.
-
Page 10: Control Valve Overview
Control Valve Overview TEST : Delivers nitrogen, without smoke, and a very accurate flow meter reading. This setting is for determining if a leak exists and how large it is. NOTE: Leak size is discussed in Basic EVAP Test section of manual. SMOKE : Delivers maximum smoke volume. -
Page 11: Basic Testing Procedure
Basic Test Procedure a. Connect red clip to 12V-DC power. c. Use adapter cone supplied to access intake/ b. Connect black clip to chassis ground. induction system and connect smoke supply hose to adapter cone. Be sure and completely unwind smoke supply hose when connecting to the vehicle. - Page 12 Basic Test Procedure, continued Use white light to find the smoke. Use UV light and yellow glasses to find the dye. ‘A’ ‘B’ > The laser light can ‘see’ the smoke vapor even if the naked-eye cannot as demonstrated by this difficult to see smoke vapor leak.
-
Page 13: Other Leak Samples
Other Leak Samples Leakfinder® can be used in virtually any vehicle low pressure system suspected of having a leak, such as; intake / induction, intercooler and turbocharger, vacuum, exhaust, EVAP and even wind/water leaks. Can also be used to verify air solenoid functions and test components prior to assembly. Exhaust Fluorescent Dye Deposit The UltraTraceUV®... - Page 14 Other Leak Samples, continued Wind and Water Leaks 1. Set vehicle’s climate control to ‘Fresh Air’ (not to re-circulate). Set blower on full speed. > This creates positive cabin pressure. 2. Connect supply hose nozzle to Smoke Diffuser. 3. Lay smoke path along seals. 4.
-
Page 15: Basic Evap Test
Basic EVAP Test o A flow meter ball indicating flow = flow going into (or through) the system being leak-tested. This is normal while the system is being filled with smoke. o A flow meter ball indicating flow after the system is filled = a leak in the system being tested. The higher the ball is in the flow meter, the larger the leak size. -
Page 16: Vacuum/ Pressure Gauge Overview
Vacuum/ Pressure Gauge Overview The pressure gauge serves two basic functions: 1. Monitoring system test pressure, while performing a leak test in either TEST or SMOKE mode. 2. Measuring system pressure-decay (pressure loss) once system undergoing a leak test has been filled in either TEST or SMOKE mode. -
Page 17: Leakfinder® Calibration Procedure
Calibrating Leakfinder Output Supply Pressure ® The Leakfinder® has been calibrated at the factory and preset to deliver approximately 14” H2O pressure (35 mbar | 3.5 kPa), in TEST mode. It is normal for the Leakfinder® to deliver a slightly lower pressure in SMOKE mode. However, follow the instructions below if it ever becomes necessary to calibrate the supply pressure that the Leakfinder®... -
Page 18: Troubleshooting Guide
Troubleshooting Guide Two lights on the control panel double as diagnostic lights. Green Interval Cause Blinks: 1 per second Indicates weak battery power. Bad ground or power connection at smoke Blink simultaneously: 1 per second canister or short in circuit Bad ground at smoke canister or open ... -
Page 19: Warranty
Warranty | Technical Support CPS Products Inc. CS@CPSproducts.com LIMITED ONE (1) YEAR WARRANTY Leakfinder® Evaporative Emissions System Tester & Smoke Machine CPS Products Inc. warrant to the original purchaser; under normal use, care and service, tester shall be free from defects in material and workmanship for one years from the date of original invoice. Seller's obligations under this warranty are limited solely to the repair or, at Seller's option, replacement of or refund of the original purchase price for, Equipment or parts which to Seller's satisfaction are determined to be defective and which are necessary, in Seller's judgment, to return the equipment to good operating...
Need help?
Do you have a question about the Leakfinder WV622N-VWKIT and is the answer not in the manual?
Questions and answers