Table of Contents
Advertisement
Advertisement
Table of Contents

Subscribe to Our Youtube Channel
Related Manuals for Azentek SmartMirror

Summary of Contents for Azentek SmartMirror
- Page 1 User’s Guide English (US) 2008 Revision 2.0...
- Page 2 This manual nor any parts thereof may not be reproduced for any purpose whatsoever without the express written consent of AZENTEK, LLC and NAVIGON, INC, nor transmitted in any form either electronically or mechanically, including photocopying and recording. All techni- cal specifications, drawings, etc.
-
Page 3: End User License Agreement
Software, as applicable. You also hereby understand and agree that AZENTEK/NAVIGON and/or its third party licensors own all right, title and interest in and to all content included in the Software, including, but not limited to, all intellectual property rights therein (the “Content”). - Page 4 Soft- ware (and/or Hardware), plus the Limited Warranty, if applicable, reflect the entire agreement between You and AZENTEK/NAVIGON with respect to the subject matter hereof and will supersede and replace all prior understandings and agreements, in whatever form, regarding the subject matter.
- Page 5 Agreement shall not be in any way impaired. 2008 Revision 2.0 SmartMirror User’s Guide AZENTEK, LLC...
- Page 6 This page intentionally left blank. SmartMirror User’s Guide 2008 AZENTEK, LLC Revision 2.0...
-
Page 7: About This Manual
Legal notice Liability The software and the manual are subject to change without notice. AZENTEK, LLC/ NAVIGON, INC are not liable for the accuracy of the information contained in this manual or for damages resulting from the use of this manual. -
Page 8: Customer Service
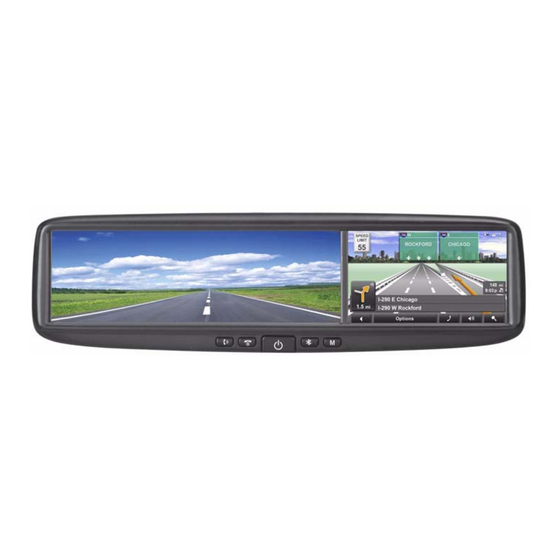
NAVIGON is a registered trademark of NAVIGON, INC. AZENTEK is a registered trademark of AZENTEK, LLC NAVTEQ is a registered trademark of NAVTEQ. SmartMirror is a registered trademark of AZENTEK, LLC Customer Service Our service team is available via telephone or E-mail. - Page 9 Welcome Introducing the SmartMirror Welcome to the exciting world of GPS navigation. The tioning System (GPS)–based navigation and millions of Points Of Interest (POIs). Mirror Answer (Phone) Hangup (Phone) On/Off + Video Select Bluetooth Pair (When in Bluetooth Menu) Main Menu...
-
Page 10: About Gps Navigation
Welcome Introducing the SmartMirror About GPS navigation GPS is based on a total of 24 satellites that circle the earth and are constantly trans- mitting their position. The GPS receiver uses this data and calculates its own geo- graphical position on the basis of the information transmitted by the various satellites. -
Page 11: Getting Started
14 days of purchase. The purchased product includes: • a. Mirror with attached GPS antenna • b. Windshield mounting bracket • c. Microphone • d. External GPS antenna (Not required for most installations) • e. Power Supply 2008 Revision 2.0 SmartMirror User’s Guide AZENTEK, LLC... -
Page 12: Important Safety Information
Note: If you have not understood the spoken instructions, or you're not sure about what to do next, you can briefly refer to the map or arrow view of your navigation system. SmartMirror User’s Guide AZENTEK, LLC 2008 Revision 2.0... -
Page 13: Safety Information For The Navigation Device
Safety guidelines when installing in your car Caution! When installing the SmartMirror, ensure that it does not represent a risk in the event of an accident. Caution! Do not run cables directly next to safety-relevant devices and power supplies. -
Page 14: Inserting A Memory Card
Getting Started Preparing the SmartMirror for use Preparing the SmartMirror for use Use the device at your own risk. Caution! Please be sure to see the safety information in “Important safety information” on page 6. Inserting a memory card The SD memory card contains maps and navigation software. It also stores saved destinations, routes, and logbook entries. -
Page 15: Basic Operations
Basic Operations Starting the SmartMirror 1. Press and hold the If password protection has been activated, the 2. Enter the password. 3. Tap the Continue Each time the navigation device is turned on, the following message appears when the software is started again: 4. - Page 16 Basic Operations Starting the SmartMirror New Destination Tap this button to: • Select an address by city or street. (See page 20.) • Select a POI as a destination. (See page 22.) • Select a POI by tapping on the map. (See page 31.)
-
Page 17: Initializing The Gps Receiver
1. Tap Volume The volume bar opens. It contains three buttons for adjusting the volume: Louder 2. Tap Volume The volume bar closes. Stopping the SmartMirror • Press and hold the 2008 Revision 2.0 Quieter Volume on/off again. (On/Off) switch for at least 2 seconds. - Page 18 For more information, see “About GPS navigation” on page 4. Direction symbol shows the direction you are currently heading. It can show the Direction following points of the compass: N, NE, E, SE, S, SW, W and NW. SmartMirror User’s Guide AZENTEK, LLC 2008 Revision 2.0...
-
Page 19: Alphabetic Keyboard
Only capital letters can be entered. to display the numeric keyboard. to display the special character keyboard. As soon as you have entered a spe- cial character, the Alphabetic key- board reappears automatically. SmartMirror User’s Guide AZENTEK, LLC Basic Operations Using software keyboards... -
Page 20: Special Keys
To select a function: • Tap on a menu button to execute its function. To close a menu without selecting a function: • Tap on the button you used to open the menu. SmartMirror User’s Guide AZENTEK, LLC 2008 Revision 2.0... -
Page 21: Password Protection
4. Type the new password in the 2008 Revision 2.0 (On/Off/Standby) switch for at least 6 seconds. opens. opens. OCK WINDOW field, type the password. Confirm new password opens. opens. OCK WINDOW Old password field. New password SmartMirror User’s Guide AZENTEK, LLC field. field. -
Page 22: Cancelling Password Protection
1. Tap Info 2. Call the number displayed in the window. 3. Follow the instructions given by the service personnel. Confirm new password button. opens. opens. OCK WINDOW Enter password button. SmartMirror User’s Guide AZENTEK, LLC field. 2008 Revision 2.0... -
Page 23: Selecting Destinations
Caution! Please be sure to refer to the safety information in “Important safety informa- tion” on page 6. New destinations for the SmartMirror are destinations that you have not yet navigated to or those that you have not yet stored. - Page 24 2. Tap on the area (country, state, or province) in which your destination lies. The button displays the code for the selected destination area. Note: Only areas that are represented in the currently loaded map can be selected. EARCH list opens. SmartMirror User’s Guide AZENTEK, LLC list opens. To select 2008 Revision 2.0...
-
Page 25: Enter An Address
POI direct access system contains three categories of special destinations. POIs in your vicinity that correspond to these categories can be listed quickly, without the need for additional entry. SmartMirror User’s Guide AZENTEK, LLC Selecting Destinations Selecting Destinations... -
Page 26: Entering An Address
The map opens in For more information, see “Starting navigation” on page 33. > Enter an Address opens. Intersection field. field and enter the name of this street. The navigation sys- button. mode. Preview SmartMirror User’s Guide AZENTEK, LLC 2008 Revision 2.0... - Page 27 Note: For more information, see “Starting navigation” on page 33. 2008 Revision 2.0 > Enter an Address opens. field. Intersection field and enter the name of this street. The navigation sys- button. mode. Preview SmartMirror User’s Guide AZENTEK, LLC Selecting Destinations Entering an address...
- Page 28 5. Tap on the name of the destination. (GPS Ready) symbol. For more information, > Search for POI. list opens. It contains the nearest POIs in the speci- SmartMirror User’s Guide AZENTEK, LLC 2008 Revision 2.0...
- Page 29 Selecting Destinations Selecting a Point of Interest (POI) destination 6. Tap the Start Navigation button. The map opens in mode. Preview For more information, see “Starting navigation” on page 33. 2008 SmartMirror User’s Guide Revision 2.0 AZENTEK, LLC...
- Page 30 4. Tap on the name of the destination. 5. Tap the Start Navigation > Search for POI. opens. IGNIFICANCE WINDOW list opens. It contains a list of national POIs, sorted by button. SmartMirror User’s Guide AZENTEK, LLC 2008 Revision 2.0...
- Page 31 Selecting Destinations Selecting a Point of Interest (POI) destination The map opens in mode. Preview For more information, see “Starting navigation” on page 33. 2008 SmartMirror User’s Guide Revision 2.0 AZENTEK, LLC...
- Page 32 Enter the first characters from the beginning of the POI name to shorten the returned list of POIs. 6. Tap on the name of the destination. 7. Tap the Start Navigation > Search for POI. list opens. It contains POIs from the specified cate- button. SmartMirror User’s Guide AZENTEK, LLC 2008 Revision 2.0...
- Page 33 Selecting Destinations Selecting a Point of Interest (POI) destination The map opens in mode. Preview For more information, see “Starting navigation” on page 33. 2008 SmartMirror User’s Guide Revision 2.0 AZENTEK, LLC...
- Page 34 Name of the Destination fied category, sorted by distance. 3. Tap on the name of the destination. (GPS Ready) symbol. For more button. opens. list opens. It contains the nearest POIs in the speci- SmartMirror User’s Guide AZENTEK, LLC 2008 Revision 2.0...
- Page 35 5. When finished, tap 2008 Revision 2.0 Selecting a Point of Interest (POI) destination mode. Preview field, tap (List) and select a POI category. Direct Access 2 to save the changes. Done SmartMirror User’s Guide AZENTEK, LLC Selecting Destinations Direct Access 3 fields.
- Page 36 , the following buttons are available: ELECTION WINDOW Opens the ESTINATION basic information about the POI including address and phone number. Show the POI on a map relative to your current location. SmartMirror User’s Guide AZENTEK, LLC . It contains NFO WINDOW 2008 Revision 2.0...
- Page 37 5. Tap the Take Me There 2008 Revision 2.0 Selecting a destination by tapping the map button. mode. Destination search opens. Detailed address information for the AP WINDOW button. SmartMirror User’s Guide AZENTEK, LLC Selecting Destinations...
- Page 38 Selecting Destinations Selecting a destination by tapping the map The map opens in mode. Preview For more information, see “Starting navigation” on page 33. SmartMirror User’s Guide 2008 AZENTEK, LLC Revision 2.0...
-
Page 39: Starting Navigation
A message displays when you have reached your destination. Your current position (indicated by an orange triangle) is shown on the map. 2008 Revision 2.0 button or simply start driving. opens. Your destination is saved in the INDOW list. SmartMirror User’s Guide AZENTEK, LLC Selecting Destinations Starting navigation... - Page 40 This page intentionally left blank. SmartMirror User’s Guide 2008 AZENTEK, LLC Revision 2.0...
-
Page 41: Saving A Destination
Revision 2.0 list. This is useful if you often navigate to a particular desti- Start Navigation button! ESTINATIONS LIST button! Start Navigation is highlighted in black. SmartMirror User’s Guide AZENTEK, LLC list can ESTINATIONS . (See page 37.) Toggle ) so... - Page 42 AVORITES button. opens. The cursor blinks in the Name field. WINDOW list can be defined as your home address. AVORITES SmartMirror User’s Guide AZENTEK, LLC but- Take Me Home list, a AVORITES 2008 Revision 2.0...
-
Page 43: Selecting A Saved Destination
2. Tap the destination to which you would like to navigate. 3. Tap the Start Navigation The map opens in Preview mode. For more information, see “Starting navigation” on page 33. 2008 Revision 2.0 > Last Destinations button. SmartMirror User’s Guide AZENTEK, LLC My Destinations Selecting a saved destination ESTINATIONS... - Page 44 2. Tap the destination to which you would like to navigate. 3. Tap the Start Navigation The map opens in For more information, see “Starting navigation” on page 33. > Favorites button. Preview mode. SmartMirror User’s Guide AZENTEK, LLC list. AVORITES 2008 Revision 2.0...
-
Page 45: Navigating Homewards
Navigating homewards With the SmartMirror you can save an address as a home address. You can navigate to your home address at anytime by activating a single button. The first time you tap the For more information, see “Saving your home address as a destination” on page 36. - Page 46 This page intentionally left blank. SmartMirror User’s Guide 2008 AZENTEK, LLC Revision 2.0...
-
Page 47: Working With Routes
Working With Routes With the SmartMirror, you can preplan routes. Planned routes can be saved for later use, allowing you to create as many routes as you like. Accessing the Route Planning Window In the M AIN WINDOW 1. Tap the Options The options list opens. -
Page 48: Changing The Starting Point
: Moves the selected route stage forwards. (Example: : Moves the selected route point backwards. : Deletes the selected route point. A window prompts you to SmartMirror User’s Guide AZENTEK, LLC 2008 Revision 2.0... -
Page 49: Managing Routes
2. Tap the route you want to load. 3. Tap the Load Route OUTE LANNING WINDOW selected route. 2008 Revision 2.0 list. AVED OUTES button. displays the starting point and the route points of the SmartMirror User’s Guide AZENTEK, LLC Working With Routes Managing routes... -
Page 50: Calculating And Displaying Routes
After the route is calculated, you can begin navigation or view a simulation of the route. Calculating and displaying routes With the SmartMirror, you can preplan routes. Planned routes can be saved for later use, allowing you to create as many routes as you like. -
Page 51: Simulating Routes
You can end simulation at any time. While viewing the route simulation: • Tap Back A window prompts you to confirm your decision to cancel navigation. OUTE LANNING WINDOW 2008 Revision 2.0 redisplays. SmartMirror User’s Guide AZENTEK, LLC Working With Routes Simulating routes... -
Page 52: Blocking Route Sections
Section blocks can be removed at anytime. On the T • Tap > Options Calculate original route button. opens. IST WINDOW Include this section in the route. IST WINDOW IST WINDOW IST WINDOW SmartMirror User’s Guide AZENTEK, LLC ) sym- Forbid IST WIN 2008 Revision 2.0... -
Page 53: Working With Maps
Working With Maps Your SmartMirror comes with maps of the 48 contiguous United States, Alaska, Hawaii, Puerto Rico and the Virgin Islands, and all 13 Canadian provinces/territories. 2008 Revision 2.0 SmartMirror User’s Guide AZENTEK, LLC... - Page 54 You can see information about the map currently in use or select another map. On the AIN WINDOW • Tap > Options Settings > Current Map opens. INDOW > Current Map opens. INDOW > Current Map SmartMirror User’s Guide AZENTEK, LLC 2008 Revision 2.0...
-
Page 55: Map In Preview Mode
(See button to begin the journey. to view or change the settings used to calculate the ) to view the map in Destination search SmartMirror User’s Guide AZENTEK, LLC Working With Maps Map in Preview mode button. -
Page 56: Map In Navigation Mode
9. A triangle in orange shows your current position on the map. The map area dis- played continually changes so that your current position is always centered on the map. mode, navigation starts. Preview mode. Navigation SmartMirror User’s Guide AZENTEK, LLC 2008 Revision 2.0... - Page 57 A des- tination shown here can be added as an interim destination by tapping the Interim Destination in the list. SmartMirror User’s Guide AZENTEK, LLC Working With Maps Map in Navigation mode mode. (See...
-
Page 58: Map In Destination Search Mode
Tap on the map and drag it in the desired direction. Zooms the map so that the entire route is visible. Selects the map section shown so that the current location is centered. SmartMirror User’s Guide AZENTEK, LLC 2008 Revision 2.0... -
Page 59: Operating In Destination Search Mode
(See “POIs nearby” on page 22.). ) to quit the Destination search . If you are currently navigating, you AIN WINDOW SmartMirror User’s Guide AZENTEK, LLC Working With Maps Map in Destination search mode . You can enter a WINDOW AVORITES mode. - Page 60 • To change from Navigation Mode back to Reality View, tap the button. Note: Reality View mode is not available for every highway junction. Availability is dependent on the map data currently in use. Navigation mode, tap anywhere on the SmartMirror User’s Guide AZENTEK, LLC Real- Next Maneuver 2008 Revision 2.0...
-
Page 61: Accessing The Settings Window
Customizing Your SmartMirror Accessing the Settings window The settings can be reached via the options of several windows. • Tap Options > Settings The Settings window ETTINGS WINDOW tings to suit your personal needs and preferences. ETTINGS WINDOW • Tap a button to open the corresponding settings window. - Page 62 Customizing Your SmartMirror The Settings window 3D Map:Show Street Names 2D Map:Show Street Names 2D Map Orientation Orientation Show Altitude and Speed Display Compass Show Remaining Distance Show Duration of Journey Show Time of Arrival Info When Crossing Borders Show Speed Limits...
-
Page 63: Poi Settings
Select the type of route to be calculated: Fast, Optimum, Short, or Scenic. Select whether highways are included in a calcu- SmartMirror User’s Guide AZENTEK, LLC Customizing Your SmartMirror The Settings window... -
Page 64: Options Button
Customizing Your SmartMirror The Settings window Toll Roads Ferries Calculate the Next Stage U-turn allowed Options Button Password Lock Production Information Touchscreen Calibration Factory Settings lated route. Select whether toll roads are included in a calcu- lated route. Select whether ferries are included in a calculated route. -
Page 65: Selecting Options
Some settings can only accept two or three different values. All values are displayed with the currently selected value shown in black. • Tap Toggle ) to alternate between values. 2008 Revision 2.0 To the Left ) and SmartMirror User’s Guide AZENTEK, LLC Customizing Your SmartMirror Selecting options To the Right... -
Page 66: Saving Changes
Customizing Your SmartMirror Selecting options • Tap ) to alternate between the potential values. Toggle Viewing information about a setting For each setting there is a explanation of the corresponding setting. Saving changes • Tap the button. Done Any changes you have made are saved. -
Page 67: Technical Data
Operating Temperature 0 °C ‐ 60 °C Compliance Notices The SmartMirror complies with Part 15 of the FCC interference limits for Class B digi- tal devices for home or office use. “Operation is subject to the following two conditions: (1) this device may not cause interference,and (2) this device must accept any interference, including interference that may cause undesired operation of the device.”... - Page 68 Technical Data Specifications...
Need help?
Do you have a question about the SmartMirror and is the answer not in the manual?
Questions and answers