Table of Contents
Advertisement
RJPS200 Karaoke Machine with Bluetooth®
User Guide
Please read this user guide first before operating the karaoke machine and save it for future
reference.
Congratulations on your purchase of this RockJam Karaoke Machine. To get the most from
your purchase, please take a few minutes to read these instructions.
Advertisement
Table of Contents

Related Manuals for RockJam RJPS200


Summary of Contents for RockJam RJPS200
- Page 1 Please read this user guide first before operating the karaoke machine and save it for future reference. Congratulations on your purchase of this RockJam Karaoke Machine. To get the most from your purchase, please take a few minutes to read these instructions.
-
Page 2: Warnings
Warnings This product is designed for indoor use only. Do not expose to rain or other kinds of moisture as that could lead to the risk of electric shock. Do not open the karaoke machine casing except for inserting CD+G/CD discs or batteries. This could lead to damage or risk of electric shock. - Page 3 9. Power-Cord Protection - Power supply cords should be routed so that they are not likely to be walked on or pinched by items placed upon or against them, paying particular attention to cords at plugs and the point where they exit from the appliance. 10.
-
Page 4: Table Of Contents
Index Warnings ........................1 Important Safety Instructions, FCC Statement ..............1 Package Contents ......................5 Location of Controls (Front) ....................6 Location of Controls (Rear) ....................7 Initial Setup........................8 Connecting the Microphones ..................8 Connecting the Karaoke Machine to a TV ..............8 Connecting to the Electricity Supply................9 Battery Operation .......................9 Switching the Karaoke Machine On/Off ..............10 Lightshow Selection and Switching off the Lightshow ..........10... - Page 5 Troubleshooting Guide ....................20 No Power .........................20 The Karaoke Machine Switches Off Unexpectedly ..........20 No Lightshow Effect ....................20 No Sound - General ....................20 No Sound – If connected to a TV ................21 Lyrics do not appear on the TV screen ..............21 No sound from the microphone ................21 Bluetooth®...
-
Page 6: Package Contents
Package Contents Please make sure that the following items are included. Main unit 1 or 2 x 16-Song Chart Hit CD+G discs are optionally included. (See product gift box supplied for details of any included CD+Gs.) -
Page 7: Location Of Controls (Front)
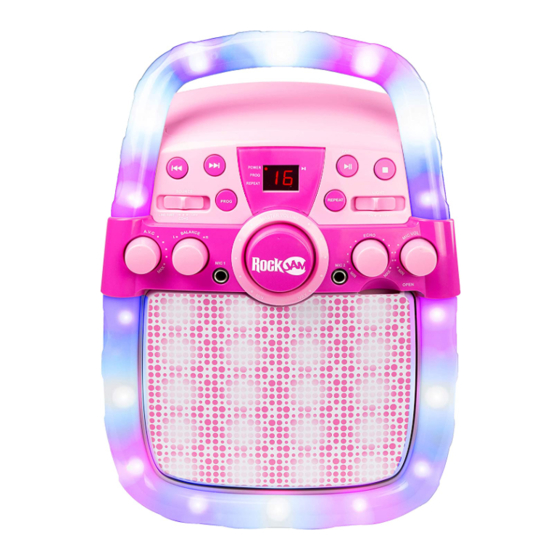
Location of Controls (Front) LED display STOP Button FWD Button Repeat Button REV Button LIGHT ON/OFF Switch Program Button Echo Control ON/OFF/SOURCE Button MIC Volume Speaker Balance CD Door Opening AVC Control MIC 2 Socket MIC 1 Socket CD Door Master Volume Lightshow Carry Handle... -
Page 8: Location Of Controls (Rear)
Location of Controls (Rear) Stereo Speaker LINE IN Socket Video Output Audio R (Right Output) Audio L (Left Output) DC 5V Power Battery Compartment Stereo Speaker... -
Page 9: Initial Setup
Initial Setup Connecting the Microphones Microphones: Connect a microphone into MIC 1 Socket (1) as well as MIC 2 Socket (2) (if desired). Note: Do not drop or tap the microphones as damage to the microphones or speakers may occur. Do not twist the microphone cable as it will cause damage to the internal conductors. -
Page 10: Connecting To The Electricity Supply
To output the song lyrics and audio to your TV, work through the following steps: Connect the RCA video cable (Yellow) to the VIDEO OUT socket and the audio cables (White (L) and Red (R)) to the AUDIO OUT (L + R) sockets located on the back of the Karaoke machine. -
Page 11: Switching The Karaoke Machine On/Off
Switching the Karaoke Machine On/Off 1. To switch on the karaoke, slide the ON/OFF/SOURCE switch to the left. The Power indicator LED will light red. To switch off the karaoke, slide the ON/OFF/SOURCE switch all the way to the right. Lightshow Selection and Switching off the Lightshow 1. -
Page 12: Operation
Operation Playing a CD+G or Audio CD 1. Connect the unit as described previously; if using a CD+G, it is recommended to connect to a TV. Slide the ON/OFF/SOURCE switch to the middle until it clicks into place at the CD+G point. -
Page 13: Using The Microphones
4. Press the PLAY/PAUSE button to start playback; if listening to a CD+G disc, the image and lyrics will appear on the TV screen if connected. The LED display will show the number of the track that is playing. 5. Adjust the playback volume to a comfortable level using the Master Volume control. -
Page 14: Echo And Avc Controls
7. The volume of microphone 1 and 2 are adjusted together using the MIC Volume control. Hold the microphone close to your mouth to maximise the vocal performance. If howling occurs, then turn down the microphone volume and/or stand further away from the karaoke machine. -
Page 15: Skipping Forward \ Backwards
Skipping Forward \ Backwards 10. Move forward or go back one track at a time by pressing the FWD and REV buttons. Repeat Mode 11. Repeat Mode - During CD+G/CD playback, press the REPEAT button briefly to cycle through the track repeat modes. •... -
Page 16: Track Programming
Track Programming 12. While CD+G/CD playback is stopped, briefly press the PROG button. The Program indicator will start to flash and the LED display will show ‘01’ to indicate the first programmed track. 13. Use the FWD and REV buttons to select the track number of the first track to be programmed. -
Page 17: Stopping Playback And Switching Off
Stopping Playback and Switching Off 17. During playback, if you wish to pause the disc, press the PLAY/PAUSE button, the LED display showing the track number will flash on and off. Press again to resume normal playback. 18. Press the STOP button to stop the music playback. -
Page 18: Bluetooth Operation
2. Slide the ON/OFF/SOURCE switch to LINE IN / BT position and the LED display will show 3. Make sure that the external music player is switched on and playing music. Adjust the volume using the Master Volume dial on the karaoke machine or from the external music player. - Page 19 CONNECTED DEVICE 1 source. NOT CONNECTED DEVICE 2 NOT CONNECTED Select device ‘RJPS200’. If asked for a pairing code, enter ‘0000’. A jingle sound will be heard and the Pair indicator light will stay on constantly when the connection is successful.
- Page 20 6. In Bluetooth® mode press the PLAY/PAUSE button to start and stop playback. 7. Skip forward and backwards between audio tracks using the FWD / REV buttons. 9. In Bluetooth® mode ECHO 8! In Bluetooth® mode AVC function is available. function and track programming is not available.
- Page 21 Troubleshooting Guide If you encounter any issues while using the karaoke machine, then please check the following before contacting the retailer or manufacturer for further help: No Power • The power is not on; slide the ON/OFF/SOURCE switch to turn power on. •...
- Page 22 No Sound – If connected to a TV • Volume on the TV is muted or too low. • Correct source (usually AV1, AV2 etc.) was not selected on the TV’s menu. Lyrics do not appear on the TV screen •...
- Page 23 Other Bluetooth® problems The music does not play on the karaoke machine after successfully connecting with Bluetooth® • Ensure your Bluetooth® device can support the A2DP Bluetooth® profile. • The volume on the external Bluetooth® device is set to low or muted; raise the volume of the Bluetooth®...
- Page 24 WEIGHT.......................1.56 kg Specifications are subject to change without notice. RockJam is a registered trademark of PDT Ltd. Unit 4B, Greengate Industrial Estate, White Moss View, Middleton, Manchester, M24 1UN, United Kingdom – info@pdtuk.com The Bluetooth® word mark and logos are registered trademarks owned by Bluetooth SIG,...
Need help?
Do you have a question about the RJPS200 and is the answer not in the manual?
Questions and answers