Table of Contents
Advertisement
Quick Links
Advertisement
Table of Contents

Related Manuals for Dranetz-BMI PowerLogger 10

Summary of Contents for Dranetz-BMI PowerLogger 10
- Page 1 User’s Guide PowerLogger 10 P/N M229H Power Quality Instrument 2007 Rev. A ©...
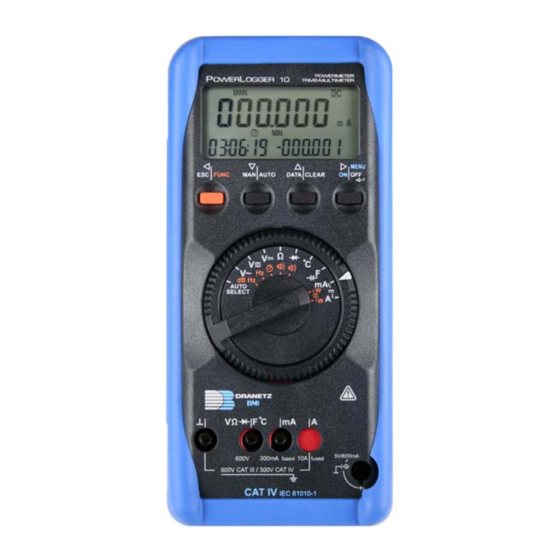
- Page 2 ESC|FUNC Multifunction key Operating Mode Menu:Exit menu level and return to next highest level, exit parameter entry mode without storage of values Rotary switch for measurement functions Connection jacks Power pack connection jack PowerLogger 10 User’s Guide...
- Page 3 13 MIN-MAX storage 14 Event marking 15 Synchronized storage 16 Memory mode 17 Manual measuring range selection 18 Relative value 19 Measurement with clip-on current transformer active: Factor 1000 or 10000 is considered PowerLogger 10 User’s Guide...
-
Page 4: Table Of Contents
Temperature Measurement with Pt100 and Pt1000 ..30 16.2 Temperature Measurement with Thermocouple and Reference Junction ......30 Counting Events and Zero Crossings ....32 17.1 Event Counting ............32 17.2 Count Zero Crossings ..........34 Stopwatch ..............34 Δ Operating Mode, Reference Value REF .....36 PowerLogger 10 User’s Guide... - Page 5 28.2 Characteristic Values of Measuring Cables (Scope of Supply of Safety Cable Set KS17-2)..77 Repair and Replacement Parts Service DKD Calibration Lab and Rental Instrument Service ......77 Warranty ..............78 Product Support ............79 PowerLogger 10 User’s Guide...
-
Page 6: Safety Features And Precautions
For your safety, as well as for the protection of your instru- ment, the PowerLogger 10 is equipped with an automatic socket blocking device. This is coupled to the rotary switch, and only allows connection to the socket required for the selected function. - Page 7 Measurements at the source of low-voltage installations: Meters, main terminal, primary overcurrent protection devices The measurement category and the relevant maximum rated voltage (e.g. 600 V CAT III) which are shown on the instru- ment casing apply to your measuring instrument. PowerLogger 10 User’s Guide...
-
Page 8: Initial Start-Up
• if the instrument no longer functions, • after a long period of storage under unfavorable conditions. Initial Start-Up Battery Please refer to chapter 26.1 regarding correct battery installa- tion. Attention! Before opening the instrument, disconnect it from the measuring circuit! PowerLogger 10 User’s Guide... - Page 9 The instrument can also be switched to “CONTINUOUS ON”. ∞ Simultaneously press the ON key and the multifunction key ESC|FUNC when switching the instrument on. The “CON- TINUOUS ON” function is indicated at the LCD with the symbol. PowerLogger 10 User’s Guide...
-
Page 10: Selection Of Measurement Functions And Measuring Ranges
3 nF → 30 nF → 300 nF → 3 μF → 30 μF → 300 μF → 3000 μF → 30000 μF → 3 nF ... Hz: 300 Hz → 3 kHz → 300 kHz → 300 Hz ... Long Return to Automatic Range Selection — PowerLogger 10 User’s Guide... -
Page 11: Quick Measurements
DATA|CLEAR key. This prevents the continu- ous display of an undefined condition which was present at the start of measurement, e.g. open-circuit, as a maximum value. PowerLogger 10 User’s Guide... -
Page 12: Measurement Value Storage "Data" (Hold & Compare)
If the newly stored measurement value deviates less than 0.33% of the measuring range from the first measurement value, the acoustic signal (DATA Compare) sounds twice. If it deviates more than 0.33 % from the measuring range, only a brief signal sounds. PowerLogger 10 User’s Guide... - Page 13 The DATA function is deactivated if the DATA|CLEAR key is pressed and held (approx. 1 s), if the rotary switch is activated or if the instrument is switched off and back on again. PowerLogger 10 User’s Guide...
-
Page 14: Minimum And Maximum Value Storage "Min-Max" With Time Stamp
Return to 1. brief are stored same as 1. long Cancel are deleted is deleted deleted Note! No new MIN-MAX values are determined for 2 seconds after a change of measuring range, so that measurement values can stabilize. PowerLogger 10 User’s Guide... - Page 15 Measurement Value 0 15.345 DATA brief 0 15.345 0 15.345 Current Meas. Value 0 15.678 DATA brief 09:20:05 0 15.345 tMIN Current Meas. Value 0 15.986 DATA brief 09:20:05 0 15.986 tMAX DATA brief CLEAR long PowerLogger 10 User’s Guide...
-
Page 16: Auto Select
“ ” and “V” jacks. ∞ Connect the measurement cables as shown. The “⊥” jack should be grounded. F °C 600V Note! The following chapter contains more information con- cerning individual measured quantities. PowerLogger 10 User’s Guide... -
Page 17: Voltage Measurement
Zero Balancing in the 300 mV Measuring Range ∞ Select the 300 mV measuring range. ∞ Connect the measurement cables to the instrument, and con- nect the free cable ends to one another. ∞ Briefly press the multifunction key ESC|FUNC. PowerLogger 10 User’s Guide... -
Page 18: Transient Overvoltages
Voltages of greater than 600 V can be measured with a high- voltage probe, e.g. the HV3 (3 kV) or the HV30 (30 kV DC) of Dranetz-BMI. The earthing terminal must be connected to ground for measurements of this type. Observe all required safety precautions! F °C... -
Page 19: Alternating Voltage Level Measurement (Db)
5 MΩ. Input resistance for voltage measurement is listed under technical data. In order to perform correct measurements at non-terminated devices under test, a matching resistor must be connected to the terminals. Observe power dissipation at the matching resistor! PowerLogger 10 User’s Guide... - Page 20 ∞ If the ESC|FUNC multifunction key is activated repeatedly, the instrument is switched to frequency measurement, event measurement, voltage measurement and finally back to level measurement. The dB ranges are listed under technical data. PowerLogger 10 User’s Guide...
-
Page 21: Current Measurement
∞ Securely connect the instrument to the load component in series as shown (without matching resistor)..300 mA 300mA – (+) / ~ + (–) / ~ . . . 10 A 300mA – (+) / ~ + (–) / ~ PowerLogger 10 User’s Guide... -
Page 22: Measurement With (Clip-On) Current Transformers
A current transformer with a transformation ratio of either 1000:1 or 10000:1 must be used, and the appropriate transformation ratio must be selected in the following menu. PowerLogger 10 User’s Guide... -
Page 23: Transformer Output V For Ac And Dc Measurements
Consequently, the secondary terminal must be connected to ⊥ and V, and the instrument switched to voltage measurement. The adjusted transformer factor “CLIP” is disregarded in this case. Note: Transformers with voltage output cannot be used for power measurement with the PowerLogger 10! PowerLogger 10 User’s Guide... -
Page 24: Resistance Measurement
∞ Zero balancing can be deleted: – by pressing and holding the multifunction key ESC|FUNC, after which deletion is acknowledged with a twice repeated acoustic signal, – by switching the instrument off. See chapter 11 for continuity testing. PowerLogger 10 User’s Guide... -
Page 25: Continuity Testing For Resistance Measurement
Deactivation is acknowledged with an acoustic signal. The symbol disappears from the LCD. After the “resistance measurement” function has been selected with the rotary switch, the continuity test or the acoustic signal is always deactivated. PowerLogger 10 User’s Guide... -
Page 26: Diode Testing
F °C 600V Forward Direction Reverse Direction Reverse Direction or Interruption The measuring instrument indicates overflow “OL”. Note! Resistors and semiconductor paths connected in parallel to the diode distort measurement results! See chapter 13 for continuity testing. PowerLogger 10 User’s Guide... -
Page 27: Continuity Testing For Diode Tests
Deactivation is acknowledged with an acoustic signal. The symbol disappears from the LCD. After the “diode test” function has been selected with the rotary switch, the continuity test or the acoustic signal is always deactivated. PowerLogger 10 User’s Guide... -
Page 28: Capacitance Measurement
200 digits). It is automatically subtracted from subsequently measured values. ∞ Zero balancing can be deleted: – by pressing and holding the multifunction key ESC|FUNC, after which deletion is acknowledged with a twice repeated acoustic signal, – by switching the instrument off. PowerLogger 10 User’s Guide... -
Page 29: Frequency Measurement
The last selected voltage measuring range remains active. Selector Switch Position V~ Frequency 050.000 2 x FUNC brief 23 1.4 Voltage Amplitude Selector Switch Position Frequency 050.000 FUNC brief 23 1.4 Voltage Amplitude PowerLogger 10 User’s Guide... -
Page 30: Temperature Measurement
SEt ↵ ↵ J/K ↵ ... tEMP SEnSor The reference temperature can be measured either with the internal or an external reference junction, or it can be assigned a fixed value in the Setup menu. PowerLogger 10 User’s Guide... - Page 31 Temperature Menu tEMP SEnSor time SEnSor Pt 1000 tEMP SEnSor Pt 100 time SEnSor tEMP SEnSor intErn EXtErn time tEMP teMP 00.1 Ω LEAd 230000 °C °C/°F tEMP °C tEMP unit Symbol for Instrument Flow Direction ↵ PowerLogger 10 User’s Guide...
-
Page 32: Counting Events And Zero Crossings
Values of up to 60 000 digits (for H-trig) are reasonable for the 600 V measuring range, because a trigger threshold of 600 V results from this maximum value, which corresponds with the measuring range upper limit. PowerLogger 10 User’s Guide... - Page 33 Overall time as of start of events measurement ON Total time of all events (voltage above H-triG) The DATA|CLEAR key has no function in this case. Recorded events are automatically deleted by switching to voltage measurement with the ESC|FUNC key. PowerLogger 10 User’s Guide...
-
Page 34: Count Zero Crossings
∞ Pressing the MAN|AUTO key stops the clock. ∞ If the multifunction key ESC|FUNC is pressed once, or if the rotary switch is activated, the stopwatch function is exited. PowerLogger 10 User’s Guide... - Page 35 Capture Intermediate Time 00:0 1.2 DATA/CLEAR brief 00:0 1.23 Update Intermediate Time 00:35.0 DATA/CLEAR brief 00:35.06 00:0 1.23 Stop the Clock 04:00.28 MAN/AUTO brief 00:35.06 00:0 1.23 Reset Stopwatch / Exit Function 00:00.00 DATA/CLEAR long 00:35.06 00:0 1.23 PowerLogger 10 User’s Guide...
-
Page 36: Δ Operating Mode, Reference Value Ref
Basic Display = Meas. Value – Ref. Value FUNC -2.90000 MAN/AUTO 3.00000 0. 10000 simultaneous Reference Value Measurement Value ∞ Exit the Δ operating mode by pressing and holding the ESC|FUNC key. PowerLogger 10 User’s Guide... - Page 37 300 mV to 300 V. Values of up to 60000 digits are reasonable for the 600 V measuring range, because this maximum value results in a reference value of 600 V, which corresponds to the measuring range upper limit. PowerLogger 10 User’s Guide...
-
Page 38: Power Measurement
20.1 Power Measurement with Analog Signals I and V The PowerLogger 10 is a compact power meter for direct and alternating current for single phase power measurement. The current path can be measured directly (up to 10 A) or with the help of a (clip-on) current transformer. - Page 39 Elapsed time since start of a new time interva e.g. 15 minutes maximum, see EnErGY FUNC 1 16.00 brief 14:37:06 05.06.98 Time Date * If measurement value < 1% of smallest measuring range PF = – – – PowerLogger 10 User’s Guide...
-
Page 40: Energy Measurement With Pulses
Mean value during integral-action time, see EnErGY 120.000 FUNC brief MEAn 00: 10:00 Elapsed time since start of a new time interval e.g. 15 minutes maximum, see EnErGY FUNC 1 16.00 brief 14:37:06 05.06.98 Time Date PowerLogger 10 User’s Guide... -
Page 41: Energy Menu For Energy Measurement
2 In memory mode, only the mean value generated at the interval selected under dEMAnd tiME [in hh:mm] for the selected power quantity, dEMAnd unit [W/VA/VAr], is stored to memory at the end of each interval. PowerLogger 10 User’s Guide... -
Page 42: Exit Power/Energy Measurement
Since DC current clips are only equipped with one voltage out- put, measurement of DC power with clips is not possible. Chapter 9.1.1, page 22, contains information for taking trans- formation ratios into consideration. … 300 mA F°C (… 10 A) 600V 300mA PowerLogger 10 User’s Guide... -
Page 43: Line Fault Recording
ESC|FUNC key, upon which the basic display reappears. Note! The instrument continues recording new events, even when you scroll through previously stored events. If two events occur simultaneously, only one is displayed, although both are correctly stored. PowerLogger 10 User’s Guide... - Page 44 000004 Event 4: lower limit violation 03:35:06 000004 Event 3: upper limit violation 02:48:06 000003 Event 2: drop out drP.out 0 1: 15:0 1 000002 Event 1: pulse or short duration peak -PULSE 00:02:06 00000 1 PowerLogger 10 User’s Guide...
- Page 45 00: 12:06 000004 Duration Note! The functions ZERO, DATA, MIN, MAX and DELTA are disabled in the line fault recording mode. Deleting Events All stored events can be deleted by simultaneously activating the MAN|AUTO and DATA|CLEAR keys. PowerLogger 10 User’s Guide...
-
Page 46: Trigger Parameters For Line Fault Recording
SEt ↵ triG ↵ MAinS ↵ rAnGE: XXXX V ↵ H-triG: XXXXXX ↵ L-triG: XXXXXX ↵ triG drPout: XXXX V ↵ ↵ triG PULSE: amplitudes from 200 to 600 V PowerLogger 10 User’s Guide... -
Page 47: Line Fault Recording With Memory Mode
∞ Check the charging level of the battery before starting long- term measurement value recording (see Chapter 26.1, page 74). Connect the AC power pack if necessary. PowerLogger 10 User’s Guide... - Page 48 ∞ Activate the DATA|CLEAR key and the measurement val- ues are stored to memory with the “DATA” function, i.e. after the measuring signal has been applied and the display has settled to a stable value (see chapter 5). PowerLogger 10 User’s Guide...
- Page 49 • “StorE buSY” appears at the sub-displays, • each measurement value is stored to memory (trigger and hysteresis are not active), • Toroidal core memory mode is deactivated (CYCLE = OFF; see chapter 22.1) PowerLogger 10 User’s Guide...
-
Page 50: General Parameters
The toroidal core memory mode cannot be activated if rapid sampling has been selected (0.5 ms to 20 ms). The selected set- ting is always perceived as “OFF”. SEt ↵ durA ↵ OFF ↵ CYCLE ↵ OFF on ↵ PowerLogger 10 User’s Guide... -
Page 51: Trigger Functions
If the triG function is set to OFF, measurement values can be stored to memory independent of quantity (independent of parameters H-triG, L-triG, prEtr and rEtriG). However, storage is dependent upon date and time trigger parameters. SEt ↵ triG ↵ V ↵ 0FF ↵ on ... tiME PowerLogger 10 User’s Guide... -
Page 52: 22.2.1 Trigger Function Parameters
SEt ↵ triG ↵ MAinS ↵ rAnGE: XXXX V ↵ H-triG: XXXXXX ↵ L-triG: XXXXXX ↵ triG drPout: XXXX V ↵ PowerLogger 10 User’s Guide... - Page 53 OFF/on ↵ 00:00:00 ↵ dAtE triG: OFF/on ↵ 00:00:00 Note! Current date and time should be checked and corrected if necessary, before the time trigger is activated, and before trigger date and time are selected. PowerLogger 10 User’s Guide...
- Page 54 Trigger Menu triG Sto-out trig triG Sto-in trig trig trig triG 000000 H-triG 000000 L-triG pretr PrETr time rEtriG time triG tiME triG 00:00:00 tiME triG time triG dAtE triG 00.00.00 dAtE triG PowerLogger 10 User’s Guide...
- Page 55 Ω 000000 300- 1000 Ω/V triG contin H-triG MAinS rAnGE 000000 0-999 100000 ΩImV triG contin L-triG H-triG MAinS 000000 L-triG MAinS 0- 1000 triG drPout 200- 1000 triG PuLSE Symbol for Instrument Flow Direction ↵ PowerLogger 10 User’s Guide...
-
Page 56: Setting The Measurement Parameters
This key sends the cursor back to the previous entry posi- tion. ↵ After acknowledgement for the last entry position (extreme right) – in this case seconds – the instrument returns to the menu mode. PowerLogger 10 User’s Guide... - Page 57 SEnd CLEAR ↵ ↵ ↵ ↵ rAtE tiME Sub-Menus SurE HYSt OCCUP SurE triG tESt durA (→ bAtt CYCLE tiME (→ dAtE) CLIP tEMP (→ tEMP SEnSor unit vALUE EnErGY (→ dEMAnd unit/time Addr MEnu CYCLE PowerLogger 10 User’s Guide...
-
Page 58: Description Of General Parameters In The Set Menu
Current time and date allow for real-time recording of mea- surement values (TT: day, MM: month, JJ: year). SEt ↵ tiME ↵ hh:mm:ss ↵ mm ↵ ss ↵ (hh: hours, mm: minutes, ss: seconds) dAtE ↵ TT.MM.JJ ↵ MM ↵ JJ ↵ PowerLogger 10 User’s Guide... -
Page 59: Parameter Description Of Menu Item: Info
• After the occurrence of hardware or software problems • If you feel that the instrument is not functioning properly ∞ Briefly disconnect the battery. ∞ Simultaneously activate the ESC|FUNC, MAN|AUTO and DATA|CLEAR keys and hold them depressed while con- necting the battery. PowerLogger 10 User’s Guide... -
Page 60: List Of All Parameters
59: Testing Random Access Memory - tEStrAM • tiME 58: tiME und Datum dAtE • tiME triG 53: Time Trigger: tiME triG, dAtE trig • triG drPout 46: Drop Out Trigger Level: triG drPout triG • 46: Pulse Trigger: triG PULSE PULSE PowerLogger 10 User’s Guide... -
Page 61: Data Transmission Via The Rs 232 Interface
The following exceptions apply: Events counting mode, count zero-crossings (counter), stop- watch mode, continuous operation, power measurement and power disturbance recording (mains). The display is automatically reactivated as soon as an event occurs. PowerLogger 10 User’s Guide... -
Page 62: Selecting Interface Parameters
PC. Interface Menu Flow Direction Instrument Symbol Addr ↵ 01 ..99 Addr Si 232 si232 rS 232 bd 232* AdAPt StorE/ AdAPt onLinE/ AdAPt AdAPt no / YES ModeM *also for USB-HIT PowerLogger 10 User’s Guide... - Page 63 ® The DranWin 10 software package includes a WINDOWS full version and is compatible with WINDOWS 95, 98 and NT. Measurement data from several PowerLogger 10 instruments can be simultaneously acquired, stored, represented and docu- ® mented with DranWin 10 software. Measurement values can be displayed in the following formats: •...
-
Page 64: Characteristic Values
100 min (1/10 s) – 200.0 ... +100.0 °C Pt 100/ 0.1 °C Pt 1000 + 100.0 ... +850.0 °C °C/°F – 270.0 ... 0.1 °C +1372.0 °C NiCr-Ni – 210.0 ... 0.1 °C +1200.0 °C Fe-CuNi PowerLogger 10 User’s Guide... - Page 65 Use short and screened measurement cables in the case of high-resistance mea- surements. Perform the measurements in this range with inserted batteries and without con- necting the power supply unit to prevent a 100 Hz hum from affecting the results. PowerLogger 10 User’s Guide...
- Page 66 0.5 K + 3 600 V Pt 100/ +100.0 ... +850.0 °C Pt 1000 TRMS 0.2 + 3 sine 10 min 600 V 12, 13) 0.7 + 3 NiCr-Ni TRMS 12, 13) 0.8 + 3 sine Fe-CuNi PowerLogger 10 User’s Guide...
- Page 67 Without integrated reference junction, with integrated reference junction, additional error: ±2 K For V > 10% of the measuring range valid as from 500 digits Abbreviations rdg. = Reading r. = Measuring range d = Digit PowerLogger 10 User’s Guide...
- Page 68 2 + 10 > 65 Hz ... 2kHz 10 A 0.75 + 5 > 2kHz ... 10kHz 5 + 5 With zero balancing Indicated inherent deviation valid as of display of 10% of the measuring range PowerLogger 10 User’s Guide...
- Page 69 > 60 dB Interference quantity V Series-Mode resp. measuring range nominal value, > 60 dB Interference max. 600 V , 50 Hz, 60 Hz sine Voltage Interference quantity max. 600 V > 60 dB Except for sinusoidal waveshape PowerLogger 10 User’s Guide...
- Page 70 * Settings via drop out trigger Real-Time Clock ±1 min/month Accuracy Temp. Influence 50 ppm/K Reference Conditions +23 °C ±2 K Ambient Temp. Relative Humidity 40 ... 60% Frequency of Measured Quantity 45 ... 65 Hz PowerLogger 10 User’s Guide...
- Page 71 A, Ω, EVENTS AC+DC, Count 2 per second V AC, EVENTS AC 1 per second W, VA, VAr, Wh 1 per second Hz, °C (Pt100, Pt1000) 1 to 2 per second °C (J ,K) 0.5 per second PowerLogger 10 User’s Guide...
- Page 72 3 A and 10 A Electrical Safety Protection Class IEC 61010-1:2001/EN 61010- II per 1:2001/VDE 0411-1:2002 Measurement Category III Operating Voltage 600 V 300 V Contamination Level 2 Test Voltage 5.2 kV~ per IEC 61010-1:2001/ EN 61010-1:2001/VDE 0411-1:2002 PowerLogger 10 User’s Guide...
- Page 73 ≥ 50.0 mm dia. drops vertically falling ≥ 12.5 mm dia. drops with enclosure tilted 15° ≥ 2.5 mm dia. spraying water ≥ 1.0 mm dia. splashing water dust protected water jets PowerLogger 10 User’s Guide...
-
Page 74: Maintenance
You can continue to take measurements, but reduced measuring accuracy may result. The instrument works with two 1.5 V batteries per IEC R6 or IEC LR6, or with corresponding NiCd storage batteries. PowerLogger 10 User’s Guide... -
Page 75: Power Pack
∞ Please dispose of used batteries properly! 26.2 Power Pack Use only the NA5/600 power pack from Dranetz-BMI for power supply to your instrument. The highly insulated cable assures safety for the operator, and the power pack provides for reliable electrical isolation (secondary rating: 5 V/600 mA). -
Page 76: Housing
2.3 V measuring indicates overflow PASSEd RAM test see chapter 23.2 memory mode with storE bUSY see page 49 high memory rate PowerLogger 10 User’s Guide... -
Page 77: Accessories
28.2 Characteristic Values of Measuring Cables (Scope of Supply of Safety Cable Set KS17-2) -
Page 78: Warranty
PowerLogger series is 3 years from delivery. A warranty period of 12 months is granted for calibration. Warranty covers defective material and workmanship, not including any damage caused by use for any other than the intended purpose and any follow-up costs. PowerLogger 10 User’s Guide... -
Page 79: Product Support
If you order a DKD calibration certificate reprint for your instrument, please provide us with the reference number indi- cated in the upper and lower most fields of the calibration mark. We do not need the instrument’s serial number. PowerLogger 10 User’s Guide... - Page 80 Printed in Germany • Subject to change without notice • A pdf version is available on the internet Published by Dranetz-BMI 1000 New Durham Road Edison, NJ 08818-4019 • USA Phone1-800-372-6832 or 732-287-3680 732-248-1834 www.dranetz-bmi.com...
Need help?
Do you have a question about the PowerLogger 10 and is the answer not in the manual?
Questions and answers