Table of Contents
Advertisement
Quick Links
Advertisement
Table of Contents

Summary of Contents for GC EUROPE Aadva IOS
- Page 1 Intraoral Scanner INSTRUCTIONS FOR USE...
-
Page 2: Table Of Contents
GC AADVA Table of Contents Table of Contents ........................... 2 Preface ..............................6 Manual for AADVA IOS ........................7 Symbols and warnings ........................7 Product description ........................... 7 USB port for data storage and Ethernet connection ............7 Indications ............................. 8 User profile ............................ - Page 3 ™ GC AADVA 22.6 Scan section ............................28 22.7 How to scan ............................29 22.8 Bite scan ............................34 22.9 Margin line definition ........................35 22.10 Bite registration..........................36 22.11 Restoration tab ..........................39 22.11.1 Patient tab ..........................39 22.12 Delivery tab ..........................
- Page 4 GC Aadva™ IOS ™ GC AADVA List of Figures Figure 1: Monitor movement ..............................13 Figure 2: Hand piece/cradle inlay .............................. 14 Figure 3 : GC AADVA Cradle Inlay .............................. 14 Figure 4: Scanner Application Device (Hand Piece) ........................14 Figure 5: Monitor Arm ................................
- Page 5 ™ GC AADVA Table 4: Settings Export ________________________________________________________________________________ 25 Table 5: electromagnetic emissions _______________________________________________________________________ 51 Table 6: electromagnetic immunity _______________________________________________________________________ 52 Table 7: Recommended separation distances between portable and mobile RF communications equipment and the AADVA IOS _________________________________________________________________________________________________ 53 Table 8: Electromagnetic emissions and immunity ___________________________________________________________ 56 Table 9: Device specifications ____________________________________________________________________________ 57 Table 10: Cable specifications ____________________________________________________________________________ 57...
-
Page 6: Preface
Please carefully read and follow the instructions for use described in this manual in order to Therefore, please read and carefully follow this manual and the relevant operating safely operate the GC Aadva IOS. Improper use of the device will result in personal injury instructions. Always keep them within easy reach. -
Page 7: Manual For Aadva Ios
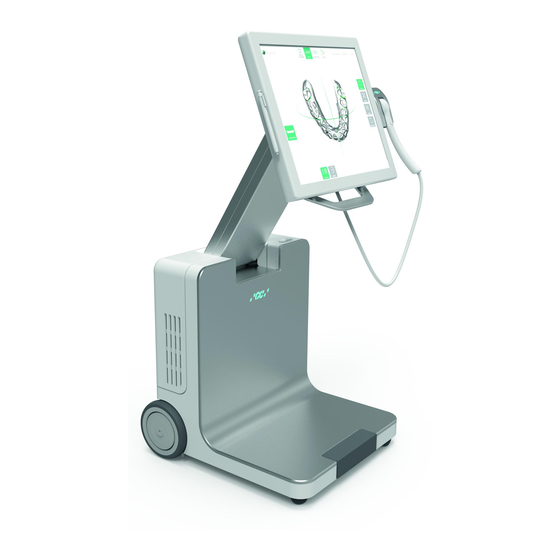
Indicates a potentially hazardous situation, which could result in property damage. Product description The GC AADVA IOS creates 3D images of individual teeth or groups of teeth and generates standard triangulation language (herein after referred to as ‘STL’) files using software for further machine processing in e.g. -
Page 8: Indications
4 elements. The GC Aadva IOS is not be used to mold or manufacture computer-aided restorations. Aadva IOS merely provides the digital model and transfers the model data to an external tool (not part of Aadva IOS). -
Page 9: Inspection, Repairs And Replacement
In case repair and/or replacement is deemed to be necessary, please read chapter 11 – “Inspection, Repairs and Replacement”. The PC component of the AADVA IOS constitutes an integral part of the AADVA IOS and may not be used for any purposes other than for the functionality of the AADVA IOS itself. -
Page 10: Odontogram Used
GC AADVA WARNING MESSAGE Upon sending/returning the Aadva IOS to GC Europe, it must be cleaned and disinfected in a correct way. Effective disinfectants consist out of a combination of ethanol and didecyldimethyl-ammonium chloride. (FD 333 and FD 333 wipes from DÜRR Dental AG (Bietigheim-Bissingen, Germany). -
Page 11: Limitation Of Liability
IOS expert will train the user to achieve the best results with the GC AADVA IOS. The AADVA IOS should be connected only to a power supply of the same voltage as the one indicated on the voltage display, and can only be operated on single-phase AC supply. - Page 12 WARNING MESSAGE All components are delivered non-sterile HARDWARE COMPONENTS: Hardware components of the AADVA IOS are: the wheeled cart with integrated computer, safety power supply, touch-screen monitor, scanner application device and cradle for the support of the scanner application device.
-
Page 13: Figure 1: Monitor Movement
™ GC AADVA The application device is fragile, please use caution when handling. CRADLE FOR SCANNER APPLICATION DEVICE The cradle for the application device for scanning is an open case for the placement of the hand piece in resting position. It contains a heating plate responsible for the maintenance of the temperature of the glass plate at the head of the hand piece in order to avoid fogging when used in the mouth. -
Page 14: Figure 2: Hand Piece/Cradle Inlay
160° angle. The upper monitor handle can also be used for transportation of the GC AADVA IOS device in the transport mode with the monitor arm in a locked position. (See chapter 31 – “transport and packaging”). -
Page 15: Figure 5: Monitor Arm
Once the ‘I/O’ button is pushed, the GUI will be directly shown on the monitor. The GC AADVA IOS also has the possibility to connect with USB memory sticks on two USB 3.0 ports (Fig. 5.2 and 5.3), which are also suitable for USB 2.0 connections. -
Page 16: Figure 6: Transport Position
By pushing the release button (Fig. 8.2) the brake will be released and the GC AADVA IOS can be moved again. The bottom rubber part is enabling the operator to slightly adjust and fine tune the device into correct position. -
Page 17: Figure 10: Ios Power Switch
(Fig. 10.3 and 11.1) is located at the backside of the IOS and needs to be flipped to enable the power. For making a connection to a local area network, the GC AADVA IOS can be connected through a LAN connector, also located on the back of the device (Fig. 10.2). The product label with according technical information can be found on the left side of the power outlet (Fig. -
Page 18: Warnings, Safety Regulations And Other Notes
Do not handle liquids (E.g. beverages of cleaning agents in the immediate vicinity • of the GC Aadva IOS. Do not spill liquids on the system as this can result in personal injury (e.g. skin burns, heart rhythm disturbance…) To reduce the risk of electrical and fire hazards: •... - Page 19 ™ GC AADVA • Always contact the GC Digital Services Team or authorised GC Europe N.V. service personnel • Do not make any modifications to parts of the AADVA IOS; • Do not place the unit in locations where it is difficult to unplug the power cord from the outlet.
- Page 20 Please refer to the material safety data of the used disinfectant for more detailed information. PLEASE NOTE In order to reduce the risk of damage to the GC AADVA IOS, please read and follow the following instructions. To prevent damage to the system: The device may only be used by qualified personnel (see chapter 8 –...
-
Page 21: Starting, Terminating And Disconnecting The Device
™ GC AADVA • Make sure that the cable is not bent on the back of the scanner application device; • For more information on handling, please see the section on cleaning and disinfection. • Do not use sharp objects on the surface of the scanner application device neither clean it with an abrasive material as this can damage the device. -
Page 22: Figure 13: Screenshot Log-In
GC Aadva™ IOS ™ GC AADVA Figure 13: Screenshot Log-in Figure 14: Screenshot Log-in 2 2. Process menu icons at the top of the screen. The process menu shows the current section of the digital impression process. Sections are “Patient Database”, “Scan”, “Model”, “Export” “General” and an additional help, FAQ and download area. -
Page 23: Figure 15: Screenshot Navigation Buttons
™ GC AADVA Figure 15: Screenshot navigation buttons 4. Icons on the left side of the screen during scanning. These icons are used to define different scans: “pre-scan upper”, “pre-scan lower”, “upper”, “lower” and “bite”. By clicking these icons, the following sub menu icons are enabled: “new”, “load”... -
Page 24: Settings
GC Aadva™ IOS ™ GC AADVA Figure 17: Screenshot action features 6. Visualization area in the centre of the screen during scanning. This area is used to visualize various objects and general information. 7. A “settings” icon can be found in the top right corner, to access the settings and help menu. -
Page 25: Help Menu
™ GC AADVA Language Choose the language User Management Displays the active or inactive status of the user management Wi-Fi Connection Status Displays online or offline status of the Wi-Fi connection Hidden Network Name Displays the active or inactive status Network Name Displays the network name Wi-Fi Password... -
Page 26: Downloads
GC Aadva™ IOS ™ GC AADVA 22.3.1 Downloads This section will allow the user to download documents such as, the ‘Instructions For Use’ as well as software updates. 22.3.2 This area is dedicated to frequently asked questions. You can find the most frequently asked questions and their answers. -
Page 27: Patient Database
22.5 Patient database DISCLAIMER GC Europe n.v. and its Aadva IOS, including the Aadva Digital Service Platform (DSP) comply with the Data Protection Directive 95/46/EC which regulates the processing of personal data and in particular with the Belgian data protection legislation. -
Page 28: Scan Section
22.6 Scan section Caution Before using the AADVA IOS to scan a patient, it is advised that the dental professional performs a visual inspection of the system. The visual inspection should include checks on the application device and cable, for kinks in the cable, discoloration, deterioration or damage of any kind. -
Page 29: How To Scan
™ GC AADVA For isolation purposes we recommend the Optiview retractor from Kerr™ Dry the scan area using air flow and keep relative isolation with cotton rolls, cotton pads and suction appliances; Take the camera from the GC AADVA Cradle Inlay before triggering the scan mode. -
Page 30: Figure 24: Ideal Distance
GC Aadva™ IOS ™ GC AADVA 15 mm Figure 25: Scan parallel to occlusal plane Figure 24: Ideal distance 1.4. For scanning a single quadrant, move the scanner over the tooth surfaces, from buccal to palatal while moving the camera towards the anterior or posterior areas of the arch, as shown in the figure below (Fig. -
Page 31: Figure 27: Screenshot Screen Layout
™ GC AADVA 2. Screen layout The small “Support Window” shows a real time view of the scan. The blue coloured area is what the camera is actually detecting. Grey areas are the ones in which sufficient information was captured to build the 3d image. Areas with insufficient or poor information appear in red and yellow, respectively. - Page 32 GC Aadva™ IOS ™ GC AADVA Rotate: move your finger over the model. It rotates in the all directions according to your command. Move: move your finger to move the model in different directions. Zoom in and out: move your finger up or to the left to zoom in. Move your finger down or to the right to zoom out.
-
Page 33: Figure 28: Screen Layout 2
™ GC AADVA Figure 28: Screen layout 2 If there are still important areas which need to be rescanned, touch the "Rescan" icon and subsequently the "Control" icon to continue the scan. If you are satisfied with your scan, save by touching the "Save" icon. Four new icons will appear. -
Page 34: Bite Scan
GC Aadva™ IOS ™ GC AADVA Saving will happen automatically according to the scan type you have chosen. After saving, you are redirected the start screen as shown in the figure below. Note that the scan you have saved will be highlighted in green on the left side indicating that it has been properly processed and saved. -
Page 35: Margin Line Definition
™ GC AADVA Figure 31: Screenshot Bite Scan Once the scan types upper, lower and bite are saved, the user is automatically lead to the “Model” section. At this moment, the “Model” icon on the top menu is highlighted in green. -
Page 36: Bite Registration
GC Aadva™ IOS ™ GC AADVA Figure 32: Screenshot Margin Line The main central area shows the 3D model with the preparation (chosen scan type) and the dentist can view the model from top position. When touching the model in the main central area, the support window shows a zoom of this specific area. -
Page 37: Figure 33: Screenshot Bite Registration
™ GC AADVA Figure 33: Screenshot Bite Registration The main model window shows the three 3D-models: upper, bite and lower. In step one, only the upper and the bite model is visualized in the main model view window. The dentist has to choose “add points” and must set at least three points on the upper scan and the bite scan (Note: The location and the set order must be the same in both scans). -
Page 38: Figure 34: Screenshot Bite Registration 2
22.6 Scan section Caution Before using the AADVA IOS to scan a patient, it is advised that the dental professional performs a visual inspection of the system. The visual inspection should include checks on the application device and cable, for kinks in the cable, discoloration, deterioration or damage of any kind. -
Page 39: Restoration Tab
™ GC AADVA colorized with rainbow colours, showing the contact points and the distance between teeth in a range of X mm (X to be configured in the settings menu). A histogram is shown on the left side of the main model window. By clicking on a model, it is visualized a second time and can be rotated, moved or zoomed via the navigation menu on the right side. -
Page 40: Figure 37: Screenshot Completing Data
GC Aadva™ IOS ™ GC AADVA Figure 37: Screenshot Completing Data Choose a restoration touching the respective tooth and then the "Add" Button. Select the “Restoration Type”, “Material Type” and “Shade”. When touching each item, a drop down menu will appear so that you can make your choices. Use the icon “Add” to include additional prosthetic work. -
Page 41: Delivery Tab
™ GC AADVA Figure 38: Screenshot Restoration Tab 22.12 Delivery tab Choose a delivery date by using the "select date" icon. Then choose an already stored address in the field highlighted in green or create a new one touch the icon "New Address"... -
Page 42: Attachments Tab
GC Aadva™ IOS ™ GC AADVA In case of a different billing address, select the check box (red arrow in the figure below) and enter the billing address. Use the "Next" button for saving and proceeding to the next step. 22.13 Attachments tab Add external files (from a USB stick or flash card) by using "Add"... -
Page 43: Figure 41: Screenshot Summary Tab
™ GC AADVA Figure 41: Screenshot Summary Tab By touching the icon “View PDF Order Form” on the right side of the screen a view of the PDF Order Form is generated with all information which had been input. This PDF will be exported together with the scan data in the next step (Data Transfer). -
Page 44: Data Transfer Tab
DSP or export to network. When exporting data to an external drive, place a USB memory stick or an SD Card in the respective ports at the side of AADVA IOS flexible arm before selecting the icon “USB only” or “USB and Aadva DSP”. All cases will also be saved at the AADVA IOS hard disk by default. -
Page 45: Gc Aadva Cradle Inlays
™ GC AADVA Effective disinfectants consist out of a combination of ethanol and didecyldimethyl- ammonium chloride. (FD 333 and FD 333 wipes from DÜRR Dental AG (Bietigheim- Bissingen, Germany). Follow the method below for the disinfection of the application device, screen and other surfaces of the device: Rub the surfaces thoroughly for about 30 seconds with disinfection wipes or a dry, soft,... -
Page 46: Cleaning And Sterilization Procedures
GC Aadva™ IOS ™ GC AADVA Inlay and gently compress them. Tilt the GC AADVA Cradle Inlay horizontally and downwards. This movement will detach the GC AADVA Cradle Inlay from its cradle. (Fig. Figure 45: Removal of cradle inlay 24.2 Cleaning and sterilization procedures Follow the method below for sterilisation of the inlay of the storage station: 1. - Page 47 ™ GC AADVA Cracks on the GC AADVA Cradle Inlay Structural damage A new GC AADVA Cradle Inlay or sterilized GC AADVA Cradle Inlay is installed by clicking it into the IOS device again in the preformed shape. WARNING MESSAGE To reduce risks of cross-contamination: Disinfect the application device before each use.
-
Page 48: Safety / Guidelines / Technology
GC Aadva™ IOS ™ GC AADVA 25 Safety / Guidelines / Technology Materials of the device which come into human contact (scanner application device) are certified in regards to the biocompatibility in accordance with ISO 10993-1 and applicable subparts. The definition of safety and regulatory markings are listed below: Read the accompanying documents. -
Page 49: Care With The Unit
Keep the device dust-free and covered when not in use for a long time; • The AADVA IOS can be kept running if necessary, but the device can be turned • off as an energy-saving measure; ensure that you have saved your data before turning off the device. -
Page 50: Information For Electromagnetic Compatibility (Emc)
2: 2007 Guidance and manufacturerʼs declaration – electromagnetic emissions The [AADVA IOS] is intended for use in the electromagnetic environment specified below. The customer or the user of the [AADVA IOS] should assure that it is used in such an environment. - Page 51 Portable and mobile RF communication can affect the IOS device Guidance and manufacturerʼs declaration – electromagnetic immunity The [AADVA IOS] is intended for use in the electromagnetic environment specified below. The customer or the user of the [AADVA IOS] should assure that it is used in such an environment.
- Page 52 To assess the electromagnetic environment due to fixed RF transmitters, an electromagnetic site survey should be considered. If the measured field strength in the location in which the [AADVA IOS] is used exceeds the applicable RF compliance level above, the [AADVA IOS] should be observed to verify normal operation. If abnormal performance is observed, additional measures may be necessary, such as re-orienting or relocating the [AADVA IOS].
-
Page 53: Electrostatic Discharge (Esd)
These guidelines may not apply in all situations. Electromagnetic propagation is affected by absorption and reflection from structures, objects and people. Table 9: Recommended separation distances between portable and mobile RF communications equipment and the AADVA IOS Please note: The separation distance for the higher frequency is applied with 80 MHz and 800 MHz. - Page 54 ™ GC AADVA All users of the GC AADVA IOS should be familiar with the proper ESD procedures before working with the scanner. This training should include at least an introduction to the physics of the electrostatic discharges that occur under normal circumstances, voltage levels and the possible damage to electronic components by contact with an electrostatically charged operator.
- Page 55 IEC 61000-3-3 Guidance and manufacturerʼs declaration – electromagnetic immunity The [AADVA IOS] is intended for use in the electromagnetic environment specified below. The customer or the user of the [AADVA IOS] should assure that it is used in such an environment.
-
Page 56: Identification Plate And Labelling
Table 10: Electromagnetic emissions and immunity 29 Identification plate and labelling The information on the identification plate describes the AADVA IOS and contains the serial number along with the necessary regulatory and safety symbols. Figure 46: Identification plate 30 Device specifications and classifications This device is an imaging system. - Page 57 Ensure that GC AADVA IOS device is positioned on solid and even surface. • DO not touch the touch screen with sharp or pointed objects. • The GC AADVA IOS components can be damaged by corrosion thus must only be • stored indoors...
-
Page 58: Transport And Packaging
Customer support sheet Shipping: AADVA IOS is shipped with a standard Euro pallet. In case the device has to be returned, please use the original packing material for re-packaging, as only this ensures safe transport and maintenance of warranty. In case of disposal of the packaging, please ensure that all packing materials are properly disposed of according to current recycling directives. -
Page 59: Environment
To initiate return of AADVA IOS contact your local IOS expert (see chapter 20 - "IOS Customer Service"). Other countries: Contact your local IOS expert for country-specific information (see chapter 20 - "IOS... -
Page 60: Troubleshooting
GC Aadva™ IOS ™ GC AADVA 33 Troubleshooting No power Is the power cable connected? Is the main power switch I/O button on the back of the device switched to ‘I’? Did you press the power button, situated next to the USB ports on the support arm of the touch screen? Is the device in transport position or in scan position? ... -
Page 61: Ios Customer Service - Gc Digital Services Team
34 IOS Customer Service – GC Digital Services Team If you have any questions concerning AADVA IOS and/or this operating manual, our local GC Digital Services Team will be pleased to help you. Please refer to the DSP where all local information for support can be found or refer to the separate sheet ‘GC Digital...
Need help?
Do you have a question about the Aadva IOS and is the answer not in the manual?
Questions and answers