
Summary of Contents for FUJII 913MRA3-Ai
- Page 1 SNOWROTARY OPERATION MANUAL Safe work with correct operation ・Be sure to read this manual before using the machine. ・Keep this manual securely so that you can read whenever you need. FUJII CORPORATION...
- Page 2 IMPORTANT SAFETY POINTS FOR SNOW ROTARY Be sure to repeat followings every time you use the machine. ◆ When working, I pay attention to rotating parts such as augers, blowers, etc. ◆ When moving the machine, I make sure all the covers are in correct place securely.
- Page 3 Thank you for purchasing FUJII SNOW ROTARY. INTRODUCTION This manual mainly explains safety instruction that must be observed and technical matters ● on the right operation, adjustment and maintenance to ensure the best performance of the machine. This machine is for snow removal work.
-
Page 4: Table Of Contents
CONTENTS IMPORTANT SAFETY POINTS FOR SNOW ROTARY ・・・・・・・・・・・ Ⅰ INTRODUCTION ・・・・・・・・・・・・・・・・・・・・・・・・・・・・・・・・・・・・・・・・・・・・・・・・・・・・ Ⅱ PART Ⅰ FOR SAFE WORK ・・・・・・ 1 FOR SAFE WORK ・・・・・・・・・・・・・・・・・・・・・・・・・・・・・・・・・・・・・・・・・・・ 1 ~ ●GENERAL SAFETY PRECAUTIONS ・・・・・・・・・・・・・・・・・・・・・・・・・・・・・・・・・・ ●SAFETY PRECAUTIONS BEFORE/AFTER USE ・・・・・・・・・・・・・・・・・・・・・・・・ ●PRECAUTIONS FOR TRANSPORT ・・・・・・・・・・・・・・・・・・・・・・・・・・・・・・・・・・ ●PRECAUTIONS FOR TRAVEL AND WORK ・・・・・・・・・・・・・・・・・・・・・・・・・・・・ ●PRECAUTIONS FOR POST-WORK AND STORAGE ・・・・・・・・・・・・・・・・・・・... - Page 5 SNOWMATIC plus ・・・・・・・・・・・・・・・・・・・・・・・・・・・・・ 43 ~ (MRA-Ai only) 1.SNOWMATIC plus ・・・・・・・・・・・・・・・・・・・・・・・・・・・・・・・・・・・・・ 43 2.OPERATION OF SNOWMATIC plus ・・・・・・・・・・・・・・・・・・・・・・・・・・・・・・・・・・・ 43 3.STOP SNOWMATIC plus ・・・・・・・・・・・・・・・・・・・・・・・・・・・・・・・・・・・ 45 Ai BACK AUTO LIFT ・・・・・・・・・・・・・・・・・・・・・・・・・・ 46 ~ (MRA-Ai only) 1.Ai BACK AUTO LIFT ・・・・・・・・・・・・・・・・・・・・・・・・・・・・・・・・・・・・・・・・・・・・・・ 46 2.OPERATION OF Ai BACK AUTO LIFT ・・・・・・・・・・・・・・・・・・・・・・・・・・・・・・・...
-
Page 6: Part Ⅰ For Safe Work
PART Ⅰ FOR SAFE WORK This chapter describes points that must be observed to use the snow blower safely. ● Failure to comply with the contents may result in death, serious injury, injury, fire, ● poisoning. It is extremely dangerous. Some of the contents may not be applicable depending on the purchased product. -
Page 7: General Safety Precautions
PART Ⅰ FOR SAFE WORK ● GENERAL SAFETY PRECAUTIONS WARNING Do not operate the machine under following conditions. • Unable to concentrate due to fatigue, illness, medication, or other reason • Under the effects of alcohol • During pregnancy • Under the age of 18 •... -
Page 8: Safety Precautions Before/After Use
PART Ⅰ FOR SAFE WORK WARNING Do not modify the machine nor use unapproved attachments. Do not modify nor use attachments other than specified ones by any means. [Results of failure to comply] Machine damage, accident, and injury may occur. WARNING Do not insert hands under covered areas. - Page 9 PART Ⅰ FOR SAFE WORK WARNING Fire is strictly prohibited when inspecting battery. Fire is strictly prohibited when inspecting the battery or opening the vent plug. [Results of failure to comply] Failure to comply may result in fire caused by ignition of gas from battery.
- Page 10 PART Ⅰ FOR SAFE WORK WARNING Do not let battery fluid come in contact with your body. Do not let the skin come into contact with battery fluid. If the skin comes into contact with battery fluid, wash it off immediately with water. [Results of failure to comply] Failure to comply may result in burns and damage to clothes.
- Page 11 PART Ⅰ FOR SAFE WORK WARNING Remove foreign objects from work area beforehand. Remove pieces of wood, plastics, bottles, hoses, ropes, clothes, and all other foreign objects from work area before starting to remove snow. [Results of failure to comply] Foreign objects which are taken in during snow removal work may fly out causing unexpected injury and machine damage.
-
Page 12: Precautions For Transport
PART Ⅰ FOR SAFE WORK WARNING Be sure to fix covers to the machine. Any covers which are detached for inspections and service must be correctly fixed to their original positions. [Results of failure to comply] Operator may be caught in the machine causing injury. - Page 13 PART Ⅰ FOR SAFE WORK WARNING Fix gangplanks securely. Make sure the gangplanks are fixed securely so that they will not move or come off truck carrier when loading and unloading the machine on and from a truck. [Results of failure to comply] Failure to comply may result in machine falling over.
-
Page 14: Precautions For Travel And Work
PART Ⅰ FOR SAFE WORK WARNING Fix the machine to truck securely with rope. When loading the machine on a truck for transportation, ground auger housing on the truck, disengage work clutch, and securely fix the machine to the truck carrier with strong rope. - Page 15 PART Ⅰ FOR SAFE WORK WARNING Be sure to disengage travel clutch and work clutch before starting the engine. Disengage travel clutch and work clutch, and set change lever at "N.Neutral" when starting the engine. [Results of failure to comply] Machine may move at the time of engine start, which may cause unexpected accident.
- Page 16 PART Ⅰ FOR SAFE WORK WARNING Do not change travel speed nor operate side clutch on slope. Never set change lever at "N.Neutral" nor operate side clutch lever on slope. [Results of failure to comply] Failure to comply may cause accident such as slipping and falling over.
- Page 17 PART Ⅰ FOR SAFE WORK WARNING Stop the engine when exchanging shear bolt. Disengage travel clutch and work clutch, stop the engine, and make sure auger and blower have stopped their operation completely before exchanging shear bolt. [Results of failure to comply] The machine may move, or auger and blower may rotate causing serious accident.
- Page 18 PART Ⅰ FOR SAFE WORK WARNING Work and travel near fire are prohibited. Do not travel nor remove snow near fire. [Results of failure to comply] Failure to comply may result in fire due to ignition of fuel or oil. WARNING Pay attention to the shoulder of road while moving the machine. If there are ditches or slope around the road, pay attention to the shoulder.
-
Page 19: Precautions For Post-Work And Storage
PART Ⅰ FOR SAFE WORK ● PRECAUTIONS FOR POST-WORK AND STORAGE. DANGER Cover the machine with sheet cover only after the machine has sufficiently cooled down. When covering the machine with sheet cover or storing the machine indoors, make sure heating parts have cooled sufficiently. -
Page 20: Safety Label
PART Ⅰ FOR SAFE WORK ● SAFETY LABEL ■ SAFETY LABEL Safety labels are attached on the machine for safe work. ● Check them carefully and be sure to follow the instructions. In case mud is on the labels, wipe it completely so that the labels are always visible. ●... - Page 21 PART Ⅰ FOR SAFE WORK 8600-13-74-0 MARK/CAUTION C/ISO 8600-13-73-0 MARK/CAUTION B/ISO 8600-13-72-0 MARK/CAUTION A/ISO SH3-01 A. WARNING! Pay attention to safety. B. WARNING! Read the operation manual carefully. C. DANGER! When carrying out service, stop the engine and remove engine key. D.
-
Page 22: Part Ⅱ Operation
PART Ⅱ OPERATION This chapter explains how to operate the machine to ensure the best performance of ● the machine and safe work. Failure to follow the instructions may cause accidents including death and machine ● damage. CAUTION For the best performance of the machine, perform snow removal work safely in correct way. -
Page 23: Before Using The Machine
PART Ⅱ OPERATION BEFORE USING THE MACHINE BEFORE USING THE MACHINE 1.GUARANTEE AND SERVICE ■PURPOSE AND LIMITS FOR USING THE MACHINE This machine is for snow removal only. ● Never use the machine for any other purpose and never modify it. ●... -
Page 24: 2.Name Of Parts
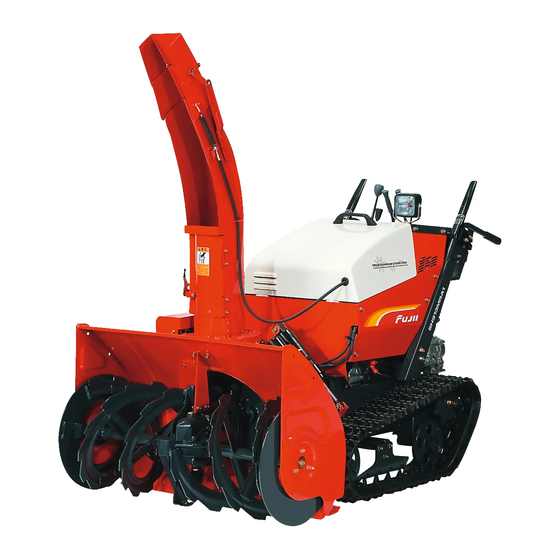
PART Ⅱ OPERATION BEFORE USING THE MACHINE 2.NAME OF PARTS Chute deflector Back Chute ⑩Chute cover Left Unclogging stick Auger housing Auger Travel sprocket Right SH1-05 Front Auger mission Auger shear bolt Blower Sleigh SH3-15 - 19 -... - Page 25 PART Ⅱ OPERATION BEFORE USING THE MACHINE ⑯Speed control switch lever Neutral point SH-33 for work Neutra SH2-01 N.Neutral (MRA-Ai/MRA only) SH2-09 SH-34 ⑦Side clutch lever (R) ⑦Side clutch lever (L) ⑪Head light ④Change lever ⑤Travel clutch lever ⑥Work clutch lever ⑫"Easy"...
-
Page 26: 3.Name And Work
PART Ⅱ OPERATION BEFORE USING THE MACHINE 3.NAME AND WORK ● The No. shown below correspond to the numbers listed in "NAME OF PARTS" (p.19 - 20). NAME WORK Operate when starting, running, and stopping the engine. "Stop" - Stop the engine. Stop "Run"... - Page 27 PART Ⅱ OPERATION BEFORE USING THE MACHINE NAME WORK Operate when moving the machine. ⑤ Travel clutch lever "On" (hold the lever) - the machine travels. "Off" (release the lever) - the machine stops traveling. Operate when rotating auger and blower. "On"...
- Page 28 PART Ⅱ OPERATION BEFORE USING THE MACHINE NAME WORK Operate when using Snowmatic and Back auto lift. Snowmatic is a control function to keep auger housing ● horizontal automatically . (see p.42) Back auto lift is a function to raise auger housing automatically ●...
- Page 29 PART Ⅱ OPERATION BEFORE USING THE MACHINE NAME WORK Operate when using automatic speed control. The function is to control automatically travel speed according to Speed control switch ⑯ load. (p.47) lever (MRA-Ai/MRA only) "On" (turn the lever to "On" position) - speed control is activated. "Off"...
-
Page 30: 4.Inspection And Preparation Before Work
PART Ⅱ OPERATION BEFORE USING THE MACHINE 4.INSPECTION AND PREPARATION BEFORE WORK Be sure to stop the engine and confirm that every part has stopped its operation ● DANGER and the engine has cooled before carrying out inspection, refueling, and lubrication. - Page 31 PART Ⅱ OPERATION BEFORE USING THE MACHINE ■AMOUNT AND DIRT OF ENGINE OIL Check engine oil after engine has cooled down. CAUTION ● Otherwise, a burn may occur. Carry out inspection before starting engine ● Oil gauge or when 5 minutes or more have passed after stopping engine.
- Page 32 PART Ⅱ OPERATION BEFORE USING THE MACHINE ■DIRT OF BATTERY, AMOUNT OF ELECTROLYTE DANGER Pay attention to short-circuit, spark, and fire such as cigarette when handling ● battery. Wrong handling may cause ignition and explosion. Check if surface of battery is dirty. ●...
- Page 33 PART Ⅱ OPERATION BEFORE USING THE MACHINE ■CLUTCH INTERLOCK Carry out inspection after engine and every part has stopped its operation DANGER ● completely. Check if handle and panel parts are frozen. When there is frozen snow and ice, ● WARNING remove it.
- Page 34 PART Ⅱ OPERATION BEFORE USING THE MACHINE ※ Inspections below require engine start. Refer to "Start/Stop the engine" (p.30 - 31) and carry out inspection. When starting engine indoors, open the windows for sufficient ventilation. WARNING ● If the place is poorly ventilated, poisoning may occur due to exhaust gas, which is very dangerous.
-
Page 35: How To Operate
PART Ⅱ OPERATION HOW TO OPERATE HOW TO OPERATE 1.START THE ENGINE When starting engine indoors, open the windows for sufficient ventilation. WARNING ● If the place is poorly ventilated, poisoning may occur due to exhaust gas, which is very dangerous. Set travel clutch lever at "Off"... -
Page 36: 2.Stop The Engine
PART Ⅱ OPERATION HOW TO OPERATE 2.STOP THE ENGINE Be sure to remove engine key from engine switch after stopping the engine. ● CAUTION The engine key may be lost and unexpected accident may occur. Make sure travel and work clutch levers are Travel clutch lever Change lever at "Off". -
Page 37: 3.How To Start Moving
PART Ⅱ OPERATION HOW TO OPERATE 3.HOW TO START MOVING When moving backward, be careful of obstacles on your back and footing. ● CAUTION Travel at low speed. When starting to move, check around the machine. Do not look aside during ●... -
Page 38: 4.How To Stop Moving
PART Ⅱ OPERATION HOW TO OPERATE 4.HOW TO STOP MOVING Do not stop the machine on slope. If stopping the machine on slope ● WARNING unwillingly, be sure to put stopper blocks beside crawlers. Do not set change lever at or through "N.Neutral". The machine may slip down. Before setting travel clutch lever at "Off", be sure to set change lever at ●... -
Page 39: 6.Loading, Unloading, Transportation By Truck
PART Ⅱ OPERATION HOW TO OPERATE 6.LOADING, UNLOADING, TRANSPORTATION BY TRUCK ■LOADING AND UNLOADING Failure to follow the instructions below may cause the machine turning over. Be sure to use gangplanks that comply with the standard below. ● WARNING Select a location where the gangplanks will not tilt due to the weight of the machine. -
Page 40: How To Remove Snow
PART Ⅱ OPERATION HOW TO REMOVE SNOW HOW TO REMOVE SNOW 1.OPERATING CONDITION Do not carry out snow removal work under conditions below. When snow throw control is difficult because of ● snowstorm or strong wind. When visibility is bad because of snowfall or obstacles. ●... - Page 41 PART Ⅱ OPERATION HOW TO REMOVE SNOW Set change lever at "N.Neutral". Refer to "Start the engine" (p.30) and start the engine. When starting engine indoors, open the windows for sufficient ventilation. ● WARNING If the place is poorly ventilated, poisoning may occur due to exhaust gas, which is very dangerous.
- Page 42 PART Ⅱ OPERATION HOW TO REMOVE SNOW Hold travel clutch lever slowly and set it at Travel clutch lever Work clutch lever "On". Hold work clutch lever slowly and set it at "On" to rotate auger and blower. SUPPLEMENT When both work clutch lever and ●...
-
Page 43: 3.Stop Snow Removal Work
PART Ⅱ OPERATION HOW TO REMOVE SNOW 3.STOP SNOW REMOVAL WORK Do not stop the machine on slope. If stopping the machine on slope unwillingly, ● WARNING be sure to put stopper blocks beside crawlers. Do not set change lever at or through "N.Neutral". - Page 44 PART Ⅱ OPERATION HOW TO REMOVE SNOW ■WHEN IT IS WINDY If snow is thrown against the wind direction, it ● cannot go to the right place which operator intended. If thrown snow goes toward operator, it may cause trouble to operation. Throw snow to the same direction as the wind direction as much as possible.
- Page 45 PART Ⅱ OPERATION HOW TO REMOVE SNOW Adjustment of blade ● Auger Stop the engine. Make sure every ● DANGER part has stopped its operation completely before carrying out Fixing nut adjustment. Do not enter under the machine. ● WARNING Raise auger housing.
-
Page 46: 5.Maintenance After Work
PART Ⅱ OPERATION HOW TO REMOVE SNOW 5.MAINTENANCE AFTER WORK When removing snow from auger housing and chute, set work clutch lever and ● DANGER travel clutch lever at "Off" and stop the engine. Make sure auger and blower have stopped rotating, and then, be sure to use installed unclogging stick. Never remove snow with hands. -
Page 47: Easy" Button (Mra/Mr Only)
PART Ⅱ OPERATION "EASY" BUTTON "EASY" BUTTON (MRA/MR only) 1."EASY" BUTTON "Easy" button activates Snowmatic (automatic horizontal control) and back auto lift (automatic ● lift control for backward travel), and controls the movement of auger housing automatically. ■SNOWMATIC (automatic horizontal control) Snowmatic is a control function which senses inclination and keeps right side and left side of auger housing horizontal automatically . -
Page 48: Snowmatic Plus (Mra-Ai Only)
PART Ⅱ OPERATION SNOWMATIC plus SNOWMATIC plus (MRA-Ai only) 1.SNOWMATIC plus (automatic inclination control) Snowmatic plus is a control function which senses inclination of auger housing and automatically keeps auger housing horizontal or with angle which is set up (up/down and right/left) . - Page 49 PART Ⅱ OPERATION SNOWMATIC plus ■MODE 1 (optional angle control : up/down, right/left) ●Mode 1 sets up an optional angle (up/down and right/left) for automatic control according to work conditions. It automatically keeps auger housing at the angle. Optional angle control (up and down) Optional angle control (right and left) Up/down SH3-07...
-
Page 50: 3.Stop Snowmatic Plus
PART Ⅱ OPERATION SNOWMATIC plus ■MODE 3 (horizontal control : right/left) ●Mode 3 automatically keeps auger housing horizontal (right/left). Angle control of up/down is not activated. Operate auger housing control lever to adjust the height. Angle control of up/right is not activated. Horizontal control (right and left) SH3-11 Turn the knob of mode change switch and choose... -
Page 51: Ai Back Auto Lift (Mra-Ai Only)
PART Ⅱ OPERATION Ai BACK AUTO LIFT Ai BACK AUTO LIFT (MRA-Ai only) 1.Ai BACK AUTO LIFT Ai back auto lift is a function which combined ● artificial intelligence and back auto lift (automatic lift control for backward travel). Go up Back auto lift is a function to raise auger housing Backward ●... -
Page 52: Automatic Speed Control (Mra-Ai/Mra Only)
PART Ⅱ OPERATION AUTOMATIC SPEED CONTROL AUTOMATIC SPEED CONTROL (MRA-Ai/MRA only) 1.AUTOMATIC SPEED CONTROL Automatic speed control is a function that controls travel speed automatically according to ● condition and amount of snow to keep the work load constant. If the load becomes big during snow removal work, engine revolution drops. ●... -
Page 53: Part Ⅲ Inspection And Service
PART Ⅲ INSPECTION AND SERVICE This chapter explains inspection and service which are required to always keep the ● machine in the best condition. Failure to follow the instructions may cause accidents including death and machine ● damage. If you do not have skill and experience, do not attempt to service the machine. ●... -
Page 54: Inspection And Service
PART Ⅲ INSPECTION AND SERVICE INSPECTION AND SERVICE For inspection and service, place the machine in a flat and large space ● DANGER without obstacle. Stop the engine and make sure each part has stopped its operation and heating part has cooled down before inspection and service. During inspection and service, never smoke or keep anything which may cause ●... - Page 55 PART Ⅲ INSPECTION AND SERVICE ■REGULAR SERVICE LIST (●:Check, Adjust, Clean) Time for inspection and exchange Time After 300H Used time (Time: H) Page Before Before Before (Time: H) long season work Check and storage Check item Check service Clean/Exchange Ignition plug ●...
- Page 56 PART Ⅲ INSPECTION AND SERVICE ■REGULAR SERVICE LIST (REPLENISH, REFILL, LUBRICATION, GREASING) Time for inspection and exchange Capacity, (used time) Check item Service Sort Page prescribed amount Check Exchange Lead free gasoline Fuel tank Replenish - 6.0 L ※26 for automobiles Engine oil for gasoline ※...
-
Page 57: 2.Inspection And Exchange Of Oil
PART Ⅲ INSPECTION AND SERVICE 2.INSPECTION AND EXCHANGE OF OIL For inspection and service, place the machine in a flat and large space ● DANGER without obstacle. Stop the engine and make sure each part has stopped its operation and heating part has cooled down before inspection and service. During inspection and service, never smoke or keep anything which may ●... -
Page 58: 3.Lubrication
PART Ⅲ INSPECTION AND SERVICE 3.LUBRICATION (BEFORE AND AFTER SEASON) ■CHUTE DEFLECTOR FULCRUM ■TRAVEL CLUTCH LEVER ■WORK CLUTCH LEVER FULCRUM FULCRUM 03-8619-07 SH2-07 SH2-08 ■CHUTE WIRE IMPORTANT Do not lubricate throttle lever fulcrum. ● Otherwise, holding power of the lever decreases and the lever cannot be fixed. -
Page 59: 5.Exchange Of Shear Bolt
PART Ⅲ INSPECTION AND SERVICE 5.EXCHANGE OF SHEAR BOLT When exchanging shear bolt, stop the engine and make sure auger and blower ● DANGER have stopped rotating. If you do not have skill and experience, do not exchange shear bolt by yourself. ●... -
Page 60: 6.Inspection And Handling Of Electrical Part
PART Ⅲ INSPECTION AND SERVICE 6.INSPECTION AND HANDLING OF ELECTRICAL PART ■INSPECTION AND HANDLING OF BATTERY For details of battery, read provided "Battery manual" well. ● Pay attention to short-circuit, spark, and fire such as cigarette when handling ● DANGER battery. - Page 61 PART Ⅲ INSPECTION AND SERVICE ▼ HANDLING OF BATTERY When temperature is lower, the performance of battery goes down. Pay attention to storage ● condition especially in winter. Electricity is discharged when the battery is not used, too. Recharge on a regular basis. ●...
-
Page 62: Maintenance For Long-Term Storage
PART Ⅲ INSPECTION AND SERVICE MAINTENANCE FOR LONG-TERM STORAGE MAINTENANCE FOR LONG-TERM STORAGE ■ENGINE Before handling fuel, remove static electricity by touching metal such as the DANGER ● machine. Never smoke or keep anything which may cause fire near the machine. -
Page 63: Trouble Shooting
PART Ⅲ INSPECTION AND SERVICE TROUBLE SHOOTING TROUBLE SHOOTING 1.FUSE Circuit which is related to each fuse and fuse capacity are shown below. ● When abnormality occurs in wiring circuit, relevant fuse cuts. ● When fuse blows, stop using the machine and ask your dealer for IMPORTANT ●... - Page 64 PART Ⅲ INSPECTION AND SERVICE TROUBLE SHOOTING PROBLEM CAUSE SERVICE The machine stops Change lever returns. Contact your dealer. traveling. The machine does not stop traveling although travel The tension of travel belt is too much. Contact your dealer. clutch lever is set at "Off".
- Page 65 PART Ⅲ INSPECTION AND SERVICE TROUBLE SHOOTING PROBLEM CAUSE SERVICE Set Snowmatic plus button at "On". Snowmatic plus button is set at "Off". →P.20, 23 Follow correct procedures. Snowmatic plus Operation procedure is incorrect. →P.43 to 45 (automatic angle control) does not work.
-
Page 66: Part Ⅳ Service Data
PART Ⅳ SERVICE DATA 1.SPECIFICATIONS Model 913MRA3-Ai/913MRA2 913MR2 / 913MR2-S 913ML2-S 1680 X 900 X 1600 Length X Width X Height (mm) Weight (kg) GB400LE Model Type Air-cooled, 4 cycle OHV gasoline engine 9.6 (13.0) Maximum output (kw(PS)) Fuel Lead free gasoline for automobiles... -
Page 67: 2.List Of Oil And Belt
PART Ⅳ SERVICE DATA 2.LIST OF OIL AND BELT HST oil tank Engine Speed control case Blower belt (MRA-Ai/MRA only) Travel belt Auger mission SH-30 Item Quantity Description Engine oil for gasoline Engine 1.0 L Over SE grade, 10W-30 Within prescribed HST oil tank amount Engine oil for diesel... -
Page 68: 3.Attachment
PART Ⅳ SERVICE DATA 3.ATTACHMENT Check following items which are provided with the machine. Description Q'ty Standard Operation manual 1 Warranty 1 Engine manual 1 Battery manual 1 Spanner 1 10 X 12 Bolt 10 M8 X 30 4T Auger shear bolt (part code : SG810-830) 10... - Page 69 Use genuine parts. Purchase reliable genuine parts for repair. If similar parts not genuine are used, it may cause malfunction and shorten the life of the machine. Use genuine attachments. Genuine attachements are reliable because they are designed to be most suitable for the machine and are produced and shipped under thoroughgoing quality control.
- Page 70 FUJII CORPORATION 285 Koike, Tsubame City NIIGATA, JAPAN ; 959-1276 Tel : + 81-256-64-5512 Fax : +81-256-64-5763 Item number 0114740...
Need help?
Do you have a question about the 913MRA3-Ai and is the answer not in the manual?
Questions and answers