Advertisement
Quick Links
Advertisement

Summary of Contents for Clever Little Box PVI14V
- Page 1 PVI14V Pro-Vue Interactive Adaptor User Instructions...
- Page 2 Introduction: The new Pro-Vue Interactive product range provides a whole new dimension to interactive teaching and presentation; all the benefits of an interactive whiteboard... without the whiteboard!! This cost-saving ‘Adaptor-only’ version allows any existing standard projector to be simply and effectively converted to an interactive projector, allowing almost any surface (such as walls, dry-wipe boards, curtains, ceilings or floors!) to be used as a virtual, fully interactive screen! In addition, the size of your virtual interactive screen is only limited to the space...
-
Page 3: Installation Of The Unit
Installation of the Unit: Front Rear Filtering Lens Socket Lens Cover Specifications: Throw Ratio Power Consumption Less than 0.5W Projection Size 40” ~ 120” (Recommended) Dimensions 110(W) x 67(D) x 24(H) mm Weight 100g System Requirements: OS Required Microsoft Windows XP(SP2)/Vista/Windows 7 USB 2.0 Core Duo or above... - Page 4 Installation of the Unit: 1) Fig 1 shows the Projector mounting 4) Plug the USB cable in to the side of bracket with the projector attached. The unit. (Fig. 6) unit needs to be attached to one of the Fig 6 arms at the front of the projector.
- Page 5 Installation of the Unit (Cont): 8) Check that the projection image is within the viewing window and adjust accordingly. (Fig 9) Fig 9 Left side out of Right side out of viewing window viewing window Top side out of Bottom side out of viewing window viewing window Projection image...
-
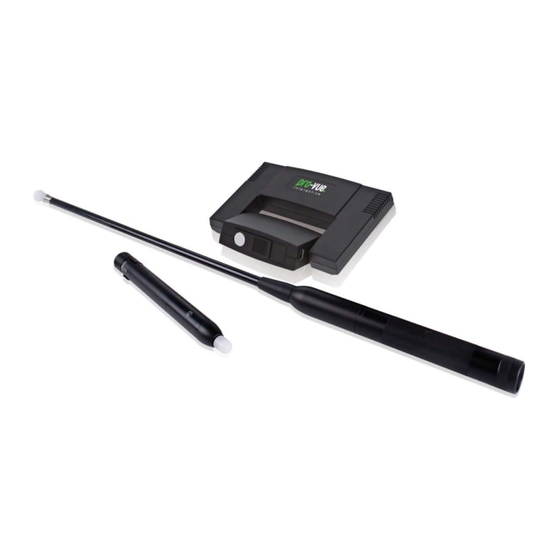
Page 6: Accessories Introduction
Accessories Introduction: Function of the “E-Wand” When the silver button on the E-Wand body is pressed, an infrared signal is emitted, which is detected by the IR Sensor LED Lamp integrated within the Projector (when the button is pressed and an IR signal emitted, the LED on the E-Wand lights red). - Page 7 Accessories Introduction (Cont): Good Practice use of the E-Pen & E-Wand when presenting/ teaching: Please note that as the Pro-Vue functions using infrared light, a ‘line-of-sight’ between the E-Pen/E-Wand and the Projector is essential for effective use. Therefore, good-practice use requires the presenter/teacher to ensure the E-Pen/ E-Wand is used out of any shadow area, which may occur dependent on your positioning of the projector to screen.
- Page 8 Operation Guide for Windows OS: Interactive function provided Note: for Windows Vista “LightPenII” software. (a) Click mouse right key on “LightPenII. exe” or the short-cut icon for “LightPenII. 1. System Requirements exe” and then click mouse left key to select “Properties”. To ensure the interactive functions of your Pro-Vue Projector work properly, please check your computer to ensure it meets...
- Page 9 Operation Guide for Windows OS: 3. Initial Setup for Interactive Step 2: Select “Projection Distance”. Function Connect the supplied USB & VGA cables between Pro-Vue projector and PC. Execute “LightPenII” software double-clicking “LightPenII.exe” or the short-cut icon for Step 3: Choose the projection distance the “LightPenII.exe”.
- Page 10 Operation Guide for Windows OS: 3.5 StartUp Step 3: Push the button on the “E-Wand” or press the tip of the “E-Pen” on the Step 1: Click the mouse left key on the center of each green target. The colour “LightPenII”...
- Page 11 Operation Guide for Windows OS: 4. How To Use Interactive Functions Function of each Icon in the Toolbar Change location Hot key to change of the tool bar pen to black Switch to mouse Hot key to switch to function yellow highlighter Mouse function - right click...
- Page 12 Operation Guide for Windows OS: In Mouse Mode (default) By selecting ‘Mouse’, ‘Mouse Right Click’ or ‘Mouse Double Click’ from the Lightpen Toolbar, the E-Pen and E-Wand will fully interact with all your standard software, functioning as would a standard mouse. Shortcut switch between ‘Mouse’...
- Page 13 Operation Guide for Windows OS: 5. How to close Interactive 5.4 Click ‘OK’. function 5.1 Select “Mouse” mode by clicking “Mouse” icon in the tool bar. 5.2 Click the mouse left key on the LightPen icon in the task bar. 5.3 Click the mouse left key to select “Exit”.
- Page 14 Operation Guide for Mac OS: Interactive function is provided by “LightPen” software. 1. System Requirements To ensure the interactive functions of your Pro-Vue Interactive Projector work properly, please check your computer to ensure it meets the following specifications. System Requirements OS Required Mac OS X v10.4.11- v10.5 or above...
- Page 15 Operation Guide for Mac OS: 3. Initial Setup for Interactive Step 2: Select the “Projection Distance”. Function 3.1 Connect the supplied USB and VGA* cables between Pro-Vue projector and the PC. 3.2 Execute “LightPen” software by clicking the “LightPen” or the shortcut icon for the “LightPen”.
- Page 16 Operation Guide for Mac OS: 3.4 Calibration Step 1: Click the mouse key on “LightPen” in the task bar. Step 2: Select the “Calibration”. Step 3: Push the button on the E-Wand or press the tip of the E-Pen on the centre of each green target.
- Page 17 Operation Guide for Mac OS: 4. How To Use Interactive Functions Function of each icon in the Toolbar Tool bar position: To position tool bar on the right or left side of screen Switch to mouse function: To change function to Computer Mouse Pen: To change function to Pen Eraser:...
-
Page 18: Troubleshooting
Troubleshooting: 1. Q: Why does it show “No Please check port LightPen found”? functioning correctly. If not, please consult with IT engineer. Reasons for this might be: Some notebook computers will cable properly disable USB ports when the battery is connected. -
Page 19: Troubleshooting (Cont)
Troubleshooting (Cont): 4. Q: cursor In Windows Vista system, one jumping? of the green cross targets may be hidden by “start” square of computer / This may be caused by strong ambient notebook computer. Please point to the light interference. Try to avoid strong position as shown for calibration. - Page 20 CIE-Group Ltd Widdowson Close Blenheim Ind Est Bulwell Nottingham NG6 8WB England T +44(0)115 977 0075 F +44(0)115 9770081 E audio@cie-group.com W www.cie-group.com UKA S QUALITY MANAGEMENT Registered in England No. 2761780...
Need help?
Do you have a question about the PVI14V and is the answer not in the manual?
Questions and answers