Table of Contents
Advertisement
Quick Links
Advertisement
Table of Contents

Summary of Contents for AMG-Sicherheitstechnik ST-Sensor
- Page 1 Page 1 of 35...
- Page 2 General TabTechnic manuals Content G e n e ra l Ta bT e ch nic m a nu a ls ............2 O ve r vie w o f th e con t ro l ce nt e r .
-
Page 3: Table Of Contents
A rm t he cen t e r o n t h e d isp la y ........... . . 2 0 A rm in g a t th e co n tro l p a ne l b y vo ice co mm an d . - Page 4 Explanation of the green numbers in the picture 1. Menu overview 2. Backspace to the start page / last tab 3. Direct connection to the shop of the specialist dealer 4. Information page for updates, recommendations, notes 5. Indication of whether timer is activated 6.
- Page 5 SIM-Card Please use a SIM card with a data connection. We recommend using a SIM card from e.g. Discotel or Blau.de. The cost is 6 or 8 cents per call / SMS / MB. To turn on mobile data, you must go to the following settings: Android Settings> Data consumption>...
- Page 6 Automatic Maintainance The Center periodically checks whether a Wi-Fi connection is available. The headquarters should determine that 3 hours no online synchronization has occurred, although this option is turned on, the Tablet performs a restart to solve the problem in this way. If necessary, the checks of the mobile wireless data connection can be activated daily.
- Page 7 Attention: For use as a wall mount, it is imperative that you remove protective paper from the magnet bracket after mounting the 3 M. Let the magnet holder at your place. The adhesive surface is open after removal of the protective paper. Insert the Tablet- PC with the bottom edge first into the holder (the display must be visible), and then press the back of the Tablet-PC carefully against the open adhesive surface.
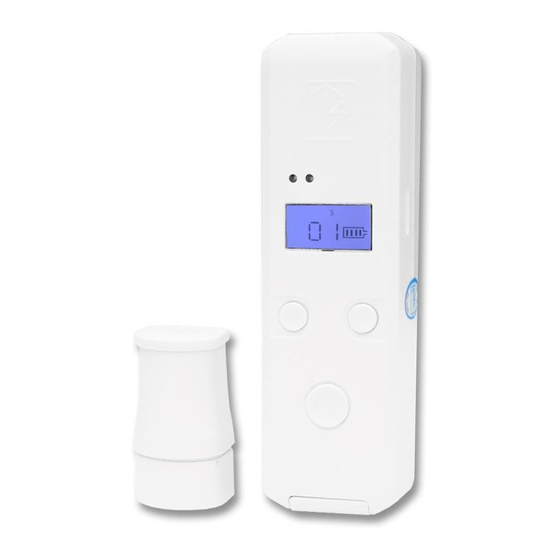
- Page 8 ST-Sensor CT-Sensor ON/OFF ON/OFF As soon as the control unit receives the radio signal, a piece of information in the display of the control panel is displayed for approx. 3 seconds. This information displays the name of the transmitter, the transmitter number and the signal strength of the wireless signal the strength of 0 (very weak) to 4 (very strong).
- Page 9 Attention: The ST station are intended not for the Repeatereinsatz, since they run on battery base! Step 6: If you have checked the signal connection of the sensors to the control centre and all stations transmit their signal directly or through stalled Repeater reliably to the headquarters, you can start with the settings in the control panel.
- Page 10 If you have stored a voice command, the microphone icon is displayed and you can disarm the Headquarters also via voice command. You will see a number in the video on the left that counts down every second. This is the set delay time for a delayed alarm triggering.
- Page 11 To help you operate your control panel remotely, you have 2 tools at your disposal. The online portal and the Android app Bluetosec controller 1. Bluetosec Controller The Bluetosec Controller app is currently available exclusively for Android. Please download the app from the Google Play Store. This app gives you quick access to your central unit.
- Page 12 The Bluetosec Online Portal is a browser-based tool. It works with any Internet- enabled device such as Smartphones, tablets, notebooks and desktop PCs. You do not need any special software, no installations and no special router settings. Any browser can be used. Enter the following address in your Internet browser: www.bluetosec-online.com To call your head office on the online portal, use your e-mail address and the master...
- Page 13 found in the respective area. Open the settings by tapping upper left corner in the home page of the control panel menu. It opens a window, here you tap Settings. Attention: To change settings, select always the multistage alert system. Only here, all options are available.
- Page 14 If an information window appears, close it with OK. Then tap their data, then change MASTER PIN and PIN-code. It the factory default master PIN is queried first 12345, then opens a window in which you can assign a name and a new PIN. Then, you go through all of the settings from top to bottom and make the necessary settings.
- Page 15 2. Sensor = Alarm Confirmation. 5) After ending the alarm video (factory setting 90 seconds) 6) Smart home transmitter is activated Siren & acknowledgment tone loudspeakers are activated 7) SMS and mail with content "alarm confirmation" will be sent 8) first stored number is called 9) Sound recording of one minute begins 10) All other numbers are called Traditional alarm process...
- Page 16 Online synchronization Online Sync allows you to remotely view your alarm center's current data and restore it in the event of a reset or replacement. Likewise, online synchronization is necessary if you want to arm or disarm your control panel via app or browser and change settings. The data you have stored in the settings and the records of the sensor events are saved.
- Page 17 If desired, the sensors displayed in these areas can be separately armed later with the respectively assigned ARROW OPTIONS. Under Sensors, you can assign the sensors individually to a surveillance area. You can see in the overview of the individual monitoring areas which sensors are contained in the respective area.
- Page 18 If you ever want to delete a monitoring area, then please remove all allocated sensors from this area beforehand by assigning them to another area under SENSORS. Arming Options The arming options are your activation options for arming the control panel. Set arming options to focus only specific sensors for different situations.
- Page 19 Here are examples of other arming options, let's call them for example: At night Here you can, for example, all outer skin sensors and motion detectors on the ground floor are active while sleeping upstairs. In this way, several sensors of your choice are integrated into the monitoring.
-
Page 20: A Rm T He Cen T E R O N T H E D Isp La
Arm the center on the display On the home screen you will see the arming surfaces. A tip with the finger, on the area concerned, starts the arming. The factory setting is a delay time of 20 seconds during which you can leave the object without triggering a sensor alarm. The countdown indicates the remaining time until arming. - Page 21 Make sure that the control panel has a good internet connection and that the ambient noise is low when you want to switch by voice command. You learn the voice command by scrolling down to arming mode to voice command ...
-
Page 22: T Ime -Co N T Ro Lle D A Rm In
Time-controlled arming You have the option of automatically switching the control panel to focus and disarm using the timer in the control panel. Set the start and end of the monitoring time, as well as the days of the week in the control panel. -
Page 23: A Rm In G Re Mo T E Ly Vi A T E Lep H On E Ca
APP SYMBOL IN PLAYSTORE The central checks the incoming SMS for authorization. Only stored SMS numbers can control the center via SMS. To switch, send an SMS, with your PIN code that you use in the control panel and the surveillance area you want to arm, to the telephone number of your headquarters' SIM card. -
Page 24: Di S A Rmi Ng / A Rmi
within 1 minute of the first call, sound it 2-3 times, then hang up. Now the central unit is armed. Telephone costs did not arise. The phone number of the SIM card for your headquarters can be found in the delivery documents. NOTE: Arming by telephone call generally sets the arming option FULL SHARP. -
Page 25: Disarm On Arrival At The Control Panel
Make sure that the control panel has a good internet connection and that the ambient noise is low when you want to switch by voice command. As soon as the screen of your control panel opens, the microphone symbol is displayed in the top left corner. -
Page 26: Disarm On Arrival For The Outdoor Area
PIN code field will open. Enter your PIN code and the control panel will disarm. No alarm message is sent, the photos in the buffer are deleted. Disarm on arrival for the outdoor area Page 26 of 35... -
Page 27: Disa Rm Re Mo T E Ly Vi A S
Disarm them with a simple handheld remote control simply by pressing the open lock icon. Disarm remotely via SMS You are on the way and would like to remotely switch the control panel off via SMS. If you want to disarm the control panel without an app via SMS, please use a mobile / smartphone whose telephone number is stored in the control center under SMS numbers. -
Page 28: S E N So
Here you can change the factory-set delay times for switching the control panel or for triggering an alarm. Note: If there is a sensor message such as Window tilted, then the arming delay is automatically 10 seconds to play the announcement. Sensors Here you learn, edit and delete the sensors. -
Page 29: Ch A N Ge Of St At U S A T Th E T Ra N Sm It T E R
On the right is a triangle pointing downwards, if you press it you can extend station specific options. (for example, a motion detector test mode, or a water alarm immediate alarm) You can temporarily remove stored sensors from the monitoring in the Sensors overview by tapping the green symbol. -
Page 30: S M A Rt -Hom E & S Ire N Con T Ro
Smart-Home & Siren control Here you can teach in and set new Smart Home circuits. The smart home radio transmitters for sirens are also taught in here and the sirens are activated. To teach in a new smart home switch, press + NEW SWITCH in the top left corner and press, after reading the info box (NEW SENSOR), on. -
Page 31: B Ts -Ca M E Ra
- Here you can set a smart home switch when a particular sensor is triggered for a certain number of seconds. Two examples of this: A motion detector triggers in the hallway and turns on the light for 60 seconds. An outdoor sensor registers you in the driveway and makes it easy to illuminate. -
Page 32: E -Ma Il A D Re
• Play the test tone via the receipt tone speaker to find the optimum position • You can also choose the sound the tablet should play to attract the burglar in case of an alarm, the volume of the sound, and the duration of the alarm video. The sensitivity of the position sensor can also be selected here. -
Page 33: P Le A Se N O Te Th A T Yo U Ha Ve P H On E N Um B E Rs A N D S Ms N Um B E Rs H A Ve T O Sa Ve O N Ce E A Ch. I T Wil L N O T P U Ll B O Th O P T Ion S F Rom A N Um B E R H E
head office starts making the telephone connection. Depending on the GSM reception, there may therefore be a different number of rings on the called telephone. If the GSM connection is bad, it will take longer for a connection to be established and correspondingly less rings or time remaining after the call is accepted. -
Page 34: S T A Rt -U
Restart WLAN: (Your) Master-PIN-Code plus restartwifi Example: 12345restartwifi Restart Bluetooth: (Your) Master-PIN-Code plus restartbluetooth Example: 12345restartbluetooth Restart monitoring software: (Your) Master-PIN-Code plus restartapp Example: 12345restartapp Restart the central office: (Yourr) Master-PIN-Code plus reboot Example: 12345reboot Start-up Here you can set what should be displayed when you start your control panel or activate the screen. -
Page 35: Ho W D O E S A N A La Rm T Rigge R ? A N D Ta Rge T S F O R A La Rm T Rigge Rin
How does an alarm trigger? and Targets for alarm triggering In the event of a break-in, the alarm system follows the following objectives: • Information about the triggering of a sensor via SMS and e-mail (pre-alarm) • Alarm confirmation when additional sensors are triggered or when the control panel is moved by means of call, SMS and e-mail. - Page 36 tablets, cameras and game consoles - anything that is small and easy to carry and can be quickly turned into money ). 4. After the photos have been taken, the control panel starts to record voice / sound (the perpetrator can not detect all this). 5.
-
Page 37: Ja Mm E R De T E Ct O R (B A Ckgro U N D P Ro Ce
First the message Pre-alarm followed, followed by the alarm confirmation with 2 photos, followed by the escape route investigation and the sound recording. This is then repeated every 3 minutes. 1. The tablet is protected against turning off or uninstalling programs. If the battery runs out of power or the device is turned off by other means, the transmission of further photos, voice recording and address data from the hiding place of the offender starts again as soon as the tablet PC is switched on again. -
Page 38: E N T E Rin G D At A A N D P Riva C
mobile radio frequency in Europe) and 2.4GHz (Bluetooth and WLAN) at the same time. Your alarm center monitors all frequencies relevant to your alarm center and triggers an alarm if these frequencies are disturbed for 2 x 30 seconds. Before an alarm is triggered, your alarm center checks whether all monitored frequencies are disturbed at the same time, so that the best possible way to prevent false alarms. -
Page 39: T Ro Ub Le Sho O T In G An D Q & A / Fa Q A Re
settings in your head office and to activate your server account for remote access to the central office. The assignment of a master PIN is strongly recommended for the protection of the control center. Troubleshooting and Q & A / FAQ area Further help can be found in our Forum http://service-amg.de... - Page 40 Please check if there is enough credit left on the SIM card. Depending on the provider, prepaid cards will be deactivated if no credit has been charged for 6 or 12 months. In this case, get a new SIM card or have the old one unlocked again. If the SIM card has sufficient credit, please check if all the settings listed in the Quick Start Guide have been made.
Need help?
Do you have a question about the ST-Sensor and is the answer not in the manual?
Questions and answers