Table of Contents
Advertisement
Quick Links
03
Applications
The OTA Programmer module works with the following products of HOBBYWING.
• Some of XERUN series & EZRUN series of car ESCs.
• Some of PLATINUM series of aircraft ESCs.
• Some of SEAKING series of boat ESCs.
• For details, please refer to ESC manual to ensure if the ESC can work with OTA Programmer.
04
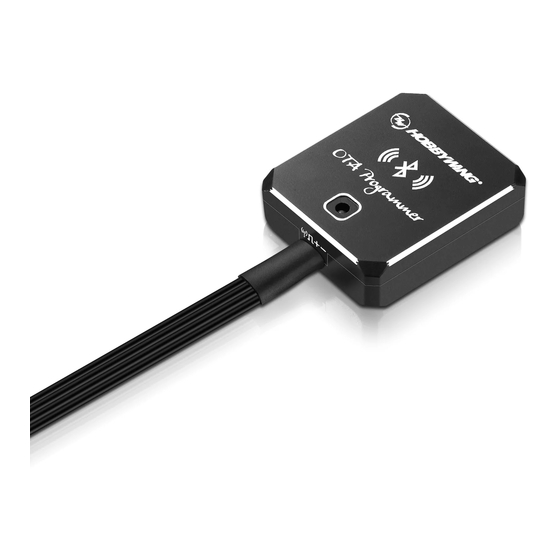
Features
• Tri-black cable: to connect the programming port on the ESC or
one end of the Y harness.
• Short black line: it's the antenna to enhance the Bluetooth signals.
• LED light: to indicate the working status of OTA Programmer.
• RESET button: to factory reset this OTA Programmer.
05
Download (of HOBBYWING HW Link APP)
1. Android Version
Users can download the app from HOBBYWING website or GOOGLE PLAY.
2. iOS Version
Users can visit Apple's App Store, search "hobbywing", and click the "download" icon to download the app.
06
User Guide
1
How to Connect OTA Programmer to Different ESCs
The way to connect OTA Programmer to ESC may vary because of different ESC hardware design. The following are the ways to connect OTA Programmer to different
ESCs, about which way you should take, please refer to the user manual of your ESC. In some case, the special Y harness (As shown picture 1: with three female
connectors not two female connectors and one male connector) included in the package may be needed for connecting the OTA Programmer to ESC.
A
C
Picture1
1. For ESC with the throttle cable and programming cable multiplexed.
1.1 For ESC with built-in BEC: in this case, a piece of Y harness is needed to connect the OTA Programmer and ESC. To be specific, connect the ESC throttle cable and
OTA Programmer tri-black cable to connector A and connector B of the Y harness respectively (as shown picture 3).
1.2 For ESC without built-in BEC: in this case, a piece of Y harness is also needed to connect the OTA Programmer and ESC. To be specific, connect the ESC throttle
cable and OTA Programmer tri-black cable to connector A and connector B of the Y harness respectively. And connect the remaining end (/connector C) of the Y
harness to an UBEC to power the OTA Programmer (as shown picture 3).
2. For ESC that the fan port (on the ESC) is also the programming port
In this case, please unplug the fan wire first, and then plug the tri-black cable on the OTA Programmer to the fan/programming port (as shown picture 2).
3. For ESC with a separate programming cable
3.1 For ESC with the programming cable which has the output voltage of 5-12.6V: in this case, a piece of Y harness is needed to connect the OTA Programmer and ESC.
To be specific, connect the ESC throttle cable and OTA Programmer tri-black cable to connector A and connector B of the Y harness respectively (as shown picture 3).
3.2 For ESC with the programming cable which has no output voltage: in this case, a piece of Y harness is needed to connect the OTA Programmer tri-black and ESC.
To be specific, connect the ESC programming cable and OTA Programmer tri-black cable to connector A and connector B of the Y harness respectively. And an
UBEC is needed to power the OTA Programmer, connect the remaining end (/connector C) to the battery (as shown picture 3).
4. For ESC with a separate port for programming
Plug the OTA Programmer directly into the programming port on ESC(as shown picture 2).
Note: An extra battery(5-12.6V) can replace the UBEC mentioned above.
2
How to make change to ESC & OTA Programmer via the Hobbywing HW Link App
Users can program or upgrade their ESCs via the App. (For detailed information, please refer to the user manual of HOBBYWING HW Link App).
Connect a battery to the ESC and turn it on, Start the Hobbywing App "HW Link" on your smart device, It will ask if you want to connect
"Bluetooth" or "W iFi" the first time when you open the app; at this point, please select "Bluetooth". You need to change the connection to
"Bluetooth" after using the "W iFi" connection, you can click "Settings" (on the home page) and then "Select the connecting mode" to change the
connection. then the following interface will show up.
1. Connect OTA Programmer
A list of Bluetooth devices will pop out when you click the Connect icon on the upper right corner, then select Bluetooth
named "HW-BLE*****", enter the initial passwor "888888" and then click "OK".
2. OTA Programmer Connection Status
The Connect icon (at the top right cor ner on the user interface of the App) will tur n Blue if the the smart device is
successfully connected to the to the ESC. Otherwise, it will stay Grey (as shown right).
3. How to change the factory-default Bluetooth name & password
• Click the "Settings" icon and get into the "Setting page".
• Click "Setting of the Bluetooth Module" and get into the "Bluetooth Setting" page,
input the new Bluetooth name(HW can't be deleted), new password and then click "OK".
07
Explanations for LED Status
LED turns on solid RED indicating the OTA Programmer is successfully powered on and it functions well.
LED blinks indicating the OTA Programmer is building the connection or transferring data between the ESC and the smart device.
08
Factory Reset
Keep holding the RESET button with a thin and sharp thing like toothpick\tweezer or something for about 5 seconds, release the RESET button when the LED is flashing,
then you can reset all parameters of the OTA Programmer to factory default values.
09
FCC Information
FCC Radiation Exposure Statement:
This equipment complies with FCC radiation exposure limits set forth for an uncontrolled environment. This equipment should be installed and operated with minimum distance
20cm between the radiator & your body.
FCC Warning
This device complies with Part 15 of the FCC Rules. Operation is subject to the following two conditions:
(1) This device may not cause harmful interference, and (2) this device must accept any interference received, including interference that may cause undesired operation.
NOTE1 : This equipment has been tested and found to comply with the limits for a Class B digital device, pursuant to part 15 of the FCC Rules. These limits are designed to provide reasonable protection against harmful
interference in a residential installation. This equipment generates uses and can radiate radio frequency energy and, if not installed and used in accordance with the instructions, may cause harmful interference
to radio communications. However, there is no guarantee that interference will not occur in a particular installation. If this equipment does cause harmful interference to radio or television reception, which can
be determined by turning the equipment off and on, the user is encouraged to try to correct the interference by one or more of the following measures:
- Reorient or relocate the receiving antenna.
- Increase the separation between the equipment and receiver.
-Connect the equipment into an outlet on a circuit different from that to which the receiver is connected.
-Consult the dealer or an experienced radio/TV technician for help.
NOTE2 : Any changes or modifications to this unit not expressly approved by the party responsible for compliance could void the user's authority to operate the equipment.
USER MANUAL
20200828
B
Picture 2
Thank you for purchasing this HOBBYWING product! For avoiding
any possible troubles that you may have in use, please take time to
ATTENTION
read through this manual before the use. In addition, please note
the use conditions and technical parameters of this product.
CAUTIONS
01
Introduction
OTA Programmer is a module which adopted the Bluetooth communication
technology for transferring data between an ESC and a smart device (Android
phone, tablet, and etc). It makes the wireless communication between ESC and
smart device possible; user can easily program and upgrade ESC, and monitor
data transferring via this unit.
02
Specifications:
• Working Voltage: 5V-12.6V.
• Supported Bluetooh Version : ≥ 4.0
• Effective Range: 0-3m (Open Field).
• Size: 30.0x25.5x8.5mm (LxWxH).
• Weight: 10.2g.
LED Light
Short Black Line
Tri-black
Connect an UBEC only
in the following
circumstances(1.2 & 3.2)
RESET Button
Connect to the
programming cable
UBEC
Picture 3
Disconnected
Connected
Advertisement
Table of Contents

Summary of Contents for Hobbywing OTA PROGRAMMER
- Page 1 1. For ESC with the throttle cable and programming cable multiplexed. 1.1 For ESC with built-in BEC: in this case, a piece of Y harness is needed to connect the OTA Programmer and ESC. To be specific, connect the ESC throttle cable and OTA Programmer tri-black cable to connector A and connector B of the Y harness respectively (as shown picture 3).
- Page 2 2、电调编程口与风扇接口共用: 把风扇线拨出,然后把OTA Programmer模块线上的JR插头插入电调的风扇接口即可,如图二所示。 3、电调具有独立的编程线: 3.1 若电调编程线有电压(5-12.6V)输出:需通过Y线连接,即电调编程线、OTA Programmer模块插头分别插入Y线的A、B接口,如图三所示。 3.2 若电调编程线无电压输出:需通过Y线连接,即电调编程线、OTA Programmer模块插头分别插入Y线的A、B接口;此外,还须用额外的UBEC给 OTA Programmer模块供电,电池插入Y线的C接口,如图三所示。 4、电调具有独立的编程口: OTA Programmer模块直接插入编程口即可,如图二所示。 备注:以上所述额外的UBEC,也可以用电池(5-12.6V)给代替! 使用Hobbywing HW Link APP设置电调及OTA Programmer HW Link APP可以对电调进行参数设置、固件升级等操作(具体详情请查看Hobbywing HW Link APP软件说明书) 电调接上电池并打开开关,打开智能终端设备的Hobbywing APP “HW Link”应用程序,首次进入APP,会提示选择 蓝牙连接或是WiFi连接,此处选择蓝牙连接。使用过WiFi连接后如果要切换为蓝牙连接请点击“系统设置”中的“选择连 接方式”改变设置。然后显示图界面; 1、连接OTA Programmer: 点击APP内右上方的电调标识,会弹出附近可连接的蓝牙设备,点选蓝牙名称“HW-BLE*****”,输入出厂默认密码 “888888”,然后点击“确认”即可。 2、OTA Programmer连接状态指示: 若智能终端设备与OTA Programmer连接正常,APP界面右上角的连接图标为动态的蓝色,否则为灰色,如图所示。...
Need help?
Do you have a question about the OTA PROGRAMMER and is the answer not in the manual?
Questions and answers