
Subscribe to Our Youtube Channel
Summary of Contents for Pari LL VERNEBLER
- Page 1 LL Vernebler Distributed by 031 996 85 85 puras.ch ©2013 PARI GmbH Spezialisten für effektive Inhalation, 012D0000-H 03/13...
- Page 2 Gebrauchsanweisung......3 Instructions for use ......25...
-
Page 3: Table Of Contents
- 3 - Gebrauchsanweisung Stand der Information: 2012-12. Technische Änderungen vorbehalten. WICHTIGE HINWEISE ............Allgemein ................Informationen zur Gebrauchsanweisung ......Gestaltung von Sicherheitshinweisen ........Therapie von Kindern und hilfsbedürftigen Personen ..Hygiene ................PRODUKTBESCHREIBUNG ..........Lieferumfang ................ Materialinformation............... Produktkombinationen ............Zweckbestimmung ............... -
Page 4: Wichtige Hinweise
Alle Gebrauchsanweisungen sind im Internet unter Alle Gebrauchsanweisungen sind ... www.pari.de/produkte (auf der jeweiligen Produktseite) abrufbar und auf Anfrage bei der PARI GmbH in gedruckter Form erhält- lich. Prüfen Sie regelmäßig, ob eine neuere Version der Gebrauchsanweisung erhältlich ist. -
Page 5: Therapie Von Kindern Und Hilfsbedürftigen Personen
- 5 - – Mit dem Signalwort HINWEIS sind allgemeine Vorsichtsmaß- nahmen gekennzeichnet, die im Umgang mit dem Produkt beachtet werden sollten, um Schäden am Produkt zu vermei- den. 1.4 Therapie von Kindern und hilfsbedürftigen Personen Kinder und hilfsbedürftige Personen dürfen nur unter ständiger Aufsicht eines Erwachsenen inhalieren. - Page 6 - 6 - – Achten Sie auf ausreichende Trocknung aller Einzelteile nach jeder Reinigung und Desinfektion. – Bewahren Sie den Vernebler und das Zubehör nicht in feuch- ter Umgebung oder zusammen mit feuchten Gegenständen auf.
-
Page 7: Produktbeschreibung
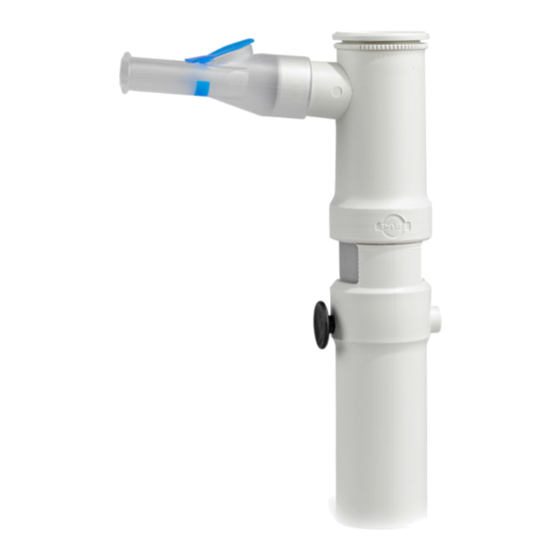
- 7 - 2 PRODUKTBESCHREIBUNG 2.1 Lieferumfang Prüfen Sie, ob alle Teile Ihres PARI Produkts im Lieferumfang Prüfen Sie, ob ... enthalten sind. Sollte etwas fehlen, verständigen Sie umgehend den Händler, von dem Sie das PARI Produkt erhalten haben. Verneblerunterteil mit Unterbrechertaste... -
Page 8: Materialinformation
Luftstromsteuer, Druckfeder (für Unterbre- chertaste) 2.3 Produktkombinationen Der PARI LL Vernebler kann mit allen auf dem Markt befindli- chen PARI Kompressoren (wie z.B. PARI BOY S, PARI BOY SX, PARI BOY N, PARI MASTER usw.) betrieben werden. Die Verwendbarkeit des PARI LL Verneblers mit künftig erschei-... -
Page 9: Lebensdauer
- 9 - Nur für die Inhalationstherapie zugelassene Medikamente dür- Nur für die Inhalationstherapie ... fen verwendet werden. Diese werden in der Regel vom Arzt fest- gelegt. Beachten Sie eventuelle Einschränkungen in der Gebrauchsinformation des jeweiligen Medikaments. Die Häufig- keit der Anwendung ist abhängig vom Krankheitsbild und dem verwendeten Medikament. -
Page 10: Inhalation
Therapie der unteren Atemwege, da hiermit die größte Menge an Medikament in die Lunge gelangt. Sollte die Verwendung eines Mundstücks nicht möglich sein oder vom Patienten eine Maskeninhalation bevorzugt werden, bietet PARI das passende Zubehör. 3.1 Montage des Verneblers Überprüfen Sie alle ... - Page 11 - 11 - • Schrauben Sie das Vernebler- oberteil auf das Verneblerunter- teil. • Stecken Sie den LL Adapter (11) an das Verneblerunterteil. • Stecken Sie den Anschlussschlauch (12) an den LL Adapter. Verwendung mit Mundstück • Stecken Sie das Mundstück auf das Vernebleroberteil.
-
Page 12: Einfüllen Des Medikamentes
- 12 - 3.2 Einfüllen des Medikamentes • Füllen Sie die vom Arzt ange- wiesene Menge des Medika- ments von oben in den Kamin des Verneblers ein. Achten Sie darauf, dass das Medikament höchstens bis zum obersten Skalenstrich eingefüllt wird (max. Füllmenge 8 ml). Bei Überfüllung kann die Medika- mentenverneblung stark beein- trächtigt werden. -
Page 13: Inhalation Durchführen
Bei Verwendung eines PARI Kompressors: • Schließen Sie den Anschlussschlauch am Kompressor an und schalten Sie den Kompressor ein. Bei Verwendung mit einem PARI CENTRAL: Voraussetzung: An der Wandentnahmearmatur des Kranken- hauses ist ein PARI CENTRAL angeschlossen. • Stecken Sie den Anschlussschlauch mit dem dafür vorgese- henen Adapter mit einer leichten Drehung in den PARI CENTRAL. - Page 14 (Unterbrechertaste drücken). • Brechen Sie die Behandlung ab, sobald das Aerosol nur noch unregelmäßig austritt. • Sobald Sie mit der Inhalation fertig sind, schalten Sie den Kompressor aus bzw. ziehen Sie den Anschlussschlauch mit dem Adapter aus dem PARI CENTRAL.
-
Page 15: Reinigung Und Desinfektion
- 15 - 4 REINIGUNG UND DESINFEKTION In diesem Kapitel ist die Reinigung und Desinfektion des Verne- blers bei der Anwendung zu Hause beschrieben. Für die hygie- nische Wiederaufbereitung in professionellen Umgebungen liegt dem Vernebler eine separate Anleitung bei. Der Vernebler und das ... Der Vernebler und das verwendete Zubehör müssen nach jeder Anwendung gereinigt und mindestens einmal täglich desinfiziert werden.... - Page 16 - 16 - Ziehen Sie das Ausatemventil ... • Ziehen Sie das Ausatemventil am Mundstück vorsichtig aus dem Schlitz heraus. Das Ventil muss danach immer noch am Mundstück hängen. • Ziehen Sie das Einatemventil und den Kamin vom Vernebler • Nehmen Sie das Ventilplättchen aus dem Einatemventil.
-
Page 17: Pflege Des Anschlussschlauches
- 17 - • Schrauben Sie das Vernebler- oberteil vom Verneblerunterteil • Schieben Sie den Medikamen- tenbecher an den Sichtfenstern nach oben und ziehen Sie ihn dann aus dem Verneblerunter- teil heraus. • Drücken Sie die Düse mit dem Luftstromsteuer nach unten aus dem Medikamentenbecher her- aus. -
Page 18: Reinigung
- 18 - 4.3 Reinigung • Reinigen Sie alle Einzelteile (außer den Anschlussschlauch) ca. 5 Minuten lang gründlich in warmem Leitungswasser und Spülmittel. Verwenden Sie bei grober Verschmutzung ggf. eine saubere Bürste (diese Bürste darf ausschließlich für diesen Zweck benutzt werden). •... - Page 19 - 19 - In kochendem Wasser • Legen Sie alle Einzelteile mind. 5 Minuten in kochendes Was- ser. Verwenden Sie einen sauberen Kochtopf und frisches Trink- wasser. Bei besonders hartem Wasser ... Bei besonders hartem Wasser kann sich auf den Kunststoff- teilen Kalk als milchiger Belag ablagern.
-
Page 20: Düse Reinigen
• Bauen Sie den Vernebler wieder zusammen. HINWEIS Es besteht die Gefahr, die kleinen Düsenbohrungen zu zer- stören. Verwenden Sie deshalb nur original PARI Düsenreiniger und gehen Sie mit äußerster Vorsicht vor. Bei wiederholter Ver- stopfung ersetzen Sie die Düse. -
Page 21: Visuelle Kontrolle
- 21 - 4.6 Visuelle Kontrolle Überprüfen Sie alle Produktbestandteile nach jeder Reinigung und Desinfektion. Ersetzen Sie gebrochene, verformte oder stark verfärbte Teile. 4.7 Trocknung und Aufbewahrung • Beschleunigen Sie das Abtropfen des Wassers durch Aus- schütteln aller Teile. Halten Sie dabei den Deckel des Verneb- leroberteils fest, damit das Scharnier durch das Schütteln nicht beschädigt wird. -
Page 22: Sonstiges
2,0 bar / 200 kPa Minimales Füllvolumen 2 ml Maximales Füllvolumen 8 ml Aerosoldaten gemäß DIN EN 13544-1 sind auf Anfrage bei der Aerosoldaten gemäß ... PARI GmbH oder im Internet unter www.pari.de/produkte (auf der jeweiligen Produktseite unter „Technische Daten“) erhältlich. -
Page 23: Austauschsets, Ersatzteile Und Zubehör
- 23 - 6 AUSTAUSCHSETS, ERSATZTEILE UND ZUBEHÖR Beschreibung Art. Nr. Austauschsets: PARI LL Vernebler Year Pack 012G6310 09476543 Ersatzteile und Zubehör: PARI LL Vernebler 012G6202 01453169 Vernebleroberteil 012B1800 07465742 Verneblerunterteil 012B1200 07465736 Medikamentenbecher 012E1601 04758254 Düse 019B2110 04758260 Einatemventil 022B0510 07449364 Mundstück universell... - Page 24 - 24 -...
- Page 25 - 25 - Instructions for use Information as of: 2012-12. We reserve the right to make technical changes. IMPORTANT INFORMATION ..........26 General ................26 Information about the instructions for use ......26 Structure of safety instructions ..........26 Treatment of children and anyone who requires assistance Hygiene ................
-
Page 26: Important Information
All instructions for use can ... www.pari.de/en/products (on the respective product page), or they are available in hardcopy form on request from PARI GmbH. Check for updated versions of all instructions for use at regular intervals. 1.3 Structure of safety instructions... -
Page 27: Treatment Of Children And Anyone Who Requires Assistance
- 27 - 1.4 Treatment of children and anyone who requires assistance Children and anyone who requires assistance must be super- vised constantly by an adult during inhalation therapy. This is the only way to ensure safe and effective treatment. Individuals in this group often underestimate the hazards involved (e.g. -
Page 28: Product Description
- 28 - 2 PRODUCT DESCRIPTION 2.1 Components Check that all components of your PARI product are contained Check that all... in your package. If anything is missing, please notify the dealer from whom you purchased the PARI product immediately. -
Page 29: Material Information
The PARI LL nebuliser can be operated with all PARI compres- sors that are available on the market (for example the PARI BOY S, PARI BOY SX, PARI BOY N, PARI MASTER etc.). The manufacturer will be able to tell you whether the PARI LL nebuliser can be used with new PARI compressors or PARI CENTRALs that are introduced in the future. -
Page 30: Operating Life
- 30 - Only medication that has been approved for inhalation treatment Only medication that has been ... must be used. This is generally determined by the doctor. Take note of any restrictions in the instructions for use of the medica- tion in question. -
Page 31: Inhalation
If it is not possible to use a mouthpiece, or if the patient prefers to inhale through a mask, PARI can provide the right accessories. 3.1 Assembling the nebuliser Check all nebuliser... - Page 32 - 32 - • Screw the nebuliser upper section onto the nebuliser lower section. • Attach the LL adapter (11) to the nebuliser lower section. • Fit the connection tubing (12) onto the LL adapter. Using with a mouthpiece • Attach the mouthpiece to the nebuliser upper section.
-
Page 33: Filling With Medication
- 33 - 3.2 Filling with medication • Pour the quantity of medication prescribed by your doctor into the nebuliser chamber. Ensure that the medication is filled no higher than the upper scale marking (max. level 8 ml). Overfilling can greatly impair the nebulisation of medication. -
Page 34: Performing The Inhalation
When using with a PARI CENTRAL: Prerequisite: A PARI CENTRAL must be connected to the wall outlet fitting in the hospital. • Insert the connection tubing into the PARI CENTRAL using the adapter provided for this purpose. Twist slightly to make the connection easier. - Page 35 (press interrupter button). • Stop treatment as soon as the aerosol emerges irregularly. • As soon as your inhalation session is over, switch the com- pressor off and disconnect the connection tubing together with the adapter from the PARI CENTRAL.
-
Page 36: Cleaning And Disinfection
- 36 - 4 CLEANING AND DISINFECTION This chapter describes how to clean and disinfect the nebuliser when it is used in the home. A separate set of instructions for hygienic re-use in the professional environment is included with the nebuliser. The nebuliser and the ... - Page 37 - 37 - Carefully pull the expiratory valve ... • Carefully pull the expiratory valve out of the slot in the mouthpiece. The valve must still be attached to the mouthpiece. • Detach the inspiratory valve and the chamber from the nebuliser. •...
-
Page 38: Care Of The Connection Tubing
- 38 - 4.2 Care of the connection tubing • Connect the connection tubing to the compressor. • Switch the compressor on. • Leave the compressor running until any condensation in the tubing has been removed by the air flowing into the tube. 4.3 Cleaning •... -
Page 39: Disinfection
- 39 - 4.4 Disinfection After cleaning, disinfect the dismantled nebuliser and access- ories used (except for the connection tubing) (effective disinfec- tion is only possible if the nebuliser has been cleaned). Information when using masks with rubber bands ... Information when using masks with rubber bands:... -
Page 40: Cleaning The Nozzle
- 40 - Using a standard thermal disinfector for baby bottles (not a microwave oven) Disinfection must last at least 6 minutes. Regarding disinfection and the quantity of water required for this, it is essential to follow the instructions for use of the disinfector you are using. Always check carefully that it is clean and fully functional. -
Page 41: Visual Inspection
- 41 - NOTICE There is a risk of damaging the nozzle bore holes irrepara- bly. Therefore, always use only an original PARI nozzle cleaner and proceed extremely carefully. If the nozzle becomes blocked repeatedly, replace the nozzle. 4.6 Visual inspection Inspect all product components after each cleaning and disinfec- tion. -
Page 42: Miscellaneous
2 ml Maximum fill volume 8 ml Aerosol data according to DIN EN 3544-1 is available on request Aerosol data according ... from PARI GmbH or on the internet at www.pari.de/en/products (under "Technical data" on the respec- tive product page). -
Page 43: Replacement Sets, Spare Parts And Accessories
- 43 - 6 REPLACEMENT SETS, SPARE PARTS AND ACCESSORIES Description Item no. Replacement sets: PARI LL nebuliser Year Pack 012G6310 Spare parts and accessories: PARI LL nebulisers 012G6202 Nebuliser upper section 012B1800 Nebuliser lower section 012B1200 Medication cup 012E1601... - Page 44 - 44 -...
- Page 46 Rückseite PARI GmbH Moosstrasse 3 • 82319 Starnberg • Germany Tel.: +49 (0)81 51-2 79 0 • Fax: +49 (0)81 51-2 79 101 E-Mail: info@pari.de • www.pari.de...
Need help?
Do you have a question about the LL VERNEBLER and is the answer not in the manual?
Questions and answers