Advertisement
Quick Links
Parts list
Sides, plywood
Sides, plywood
Playing field, plywood
Small parts, plywood
Pine strip
Pine strip
Pine strip
Dowel
Dowel
Dowel
Wooden wheels
Screws
Marble
Thread
D104098#1
1 0 4 . 0 9 8
L a b y r i n t h
Stückzahl
Maße (mm)
2
8 x 80 x 300
2
8 x 80 x 200
1
4/5 x 140 x 240
1
4/5 x 30 x 100
2
10 x 20 x 300
2
10 x 20 x 200
6
5 x 10 x 250
1
ø 4 x 100
1
ø 6 x 350
1
ø 6 x 250
4
ø 30 mm
4
2,9 x 9,5 mm
1
ø 15 mm
1
1,00 m
Necessary tools
Teil-Nr.
Fret saw
1
Pillar drill or hand drill
Wood glue
2
File
3
Scissors
Coloured pen
4
Forstner bit
5
6
The OPITEC range of projects is not in-
7
tended as play toys for young child-
8
ren.They are teaching aids for young
people learning the skills of Craft, De-
9
sign and Technolo- gy.These projects
10
should only be undertaken and tested
with the guidance of a fully qualified
11
adult. The finished projects are not
12
suitable to give to children under 3
13
years old. Some parts can be swallo-
wed. Dan- ger of suffocation!
14
Please Note
1
Advertisement

Summary of Contents for Opitec Hobbyfix 104.098
- Page 1 Pine strip 10 x 20 x 300 Please Note Pine strip 10 x 20 x 200 The OPITEC range of projects is not in- Pine strip 5 x 10 x 250 tended as play toys for young child- Dowel ø 4 x 100 ren.They are teaching aids for young...
- Page 2 Instructions Allgemein The frames can be constructed using butt joints, glue and nails or a made with more difficult finger joints or with 45 degree sawn mitre joints. 1. The outer frame ( Finger joint construction) Finger joint construction: a) Mark out an 8mm line on both ends of the sides ( Diagram 1). Divide up this line into 5 x 16mm divisions and square them across as shown.
- Page 3 Instructions c) Assemble the four outer frame parts as Abb. 3 shown and glue them together. Note. Take care as regards to the position of the Abb. 3 holes ! 2. The inner frame ( Butt Jointed ) a) Shorten the pine strips ( Parts 5/ 6 ) from the length 270mm to 170mm ( Diagram 4) Mark out and cut the joints as shown b) Mark out and drill the 4mm hole in the middle ( Diagram 4 ) Abb.
- Page 4 Instructinos 2. Frame for the playing area ( 45 degree Mitre joints) a) Saw the pine strips (7) to length of 240mm and then saw the 45 degree mitres at the ends ( Diagram 6) Abb. 6 b) Saw two pine strips (7 ) to 140mm and cut mitres as above Abb.
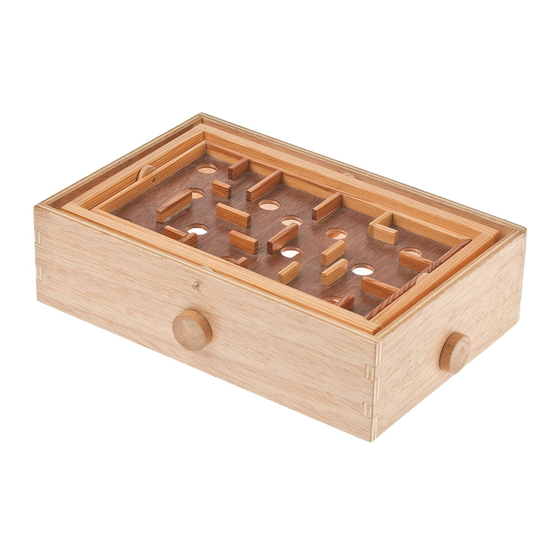
- Page 5 Instructions e) Use the pattern ( Page 7) to mark out the playing field ( Part 3) Drill the 20mm diameter holes with a forstner bit Arrange and glue on the pine blocks ( from step 3 ) as shown in Diagram 10 Finally glue the frame around the edge.
- Page 6 Instrucitons 4. The guidance system a) Saw the dowel (Part 9) to 310mm and the dowel ( part 10 ) to 210mm b ) Insert both of the dowels crossed over underneath through the 6mm holes in the frame Glue a 30mm wooden wheel A ( Part 11 ) on each end of the outer frame Diagram 12 c ) Cut from the dowel ( Part 8) 4 pieces 25mm long.
- Page 7 Pattern for the playing field Note: The finish of the playing field is left up to you Scale 1 : 1 D104098#1...
Need help?
Do you have a question about the Hobbyfix 104.098 and is the answer not in the manual?
Questions and answers