
Summary of Contents for Storch Kamine SIC 700 SMART
- Page 1 AUTOMATIC BURNING REGULATOR SIC 700 SMART - User Manual Gültig seit/Valid from/Valide: 09.10.2019...
-
Page 2: Table Of Contents
TABLE OF CONTENTS BASIC AND TECHNICAL DESCRIPTION ..................5 Basic description of the equipment ................5 No more overheating with SIC 100 SMART ..............5 General information ...................... 5 Advantages of automatic regulation ................6 Technical description of the equipment ................6 1.5.1 Control unit ...................... - Page 3 Display panel indications ..................... 24 Control unit acoustic signals ..................24 OPERATING INSTRUCTIONS ....................24 Starting the stove (burning without SIC 700 SMART) ............. 24 Before putting the stove into operation ............... 27 Heating with burn-off control ..................28 End the heating process ....................29 SAFETY INSTRUCTIONS ......................
- Page 4 Warning: the service actions listed in this document may only be carried out by persons who have been trained to assemble STORCH automatic combustion regulators. In order to operate with 230 V equipment, the servicing person must also have the corresponding qualifications.
-
Page 5: Basic And Technical Description
BASIC AND TECHNICAL DESCRIPTION Basic description of the equipment Thank you for purchasing our product - the SIC 700 SMART automatic burning regulator for fireplaces and stoves. When we developed this device, we put our many years of experience in burning regulators to good use and linked the device to a mobile app using modern communication technology. -
Page 6: Advantages Of Automatic Regulation
1.4 Advantages of automatic regulation Prolongs the combustion process and extends stoking intervals Reduces fuel consumption by 30 % or more Prevents overheating of the heating system Increases combustion efficiency and the efficiency of the heating system as a whole ... -
Page 7: Display Unit
- configuration required for automatic combustion regulation - optional configuration Note: the SIC 700 SMART has a fully autonomous regulator. This means the control unit does not need to be connected to a display panel or mobile app. By not connecting, the user will, however, not have the option to adjust combustion parameters or get access to combustion data and overheating indication. -
Page 8: Servomotors
Silicon up to 180 °C 1.7.2 Servomotors Parameters Input voltage: 24 V/DC Torque: 2 Nm standard servomotor; 2.5 Nm servomotor with return spring 1.7.3 Door switch STORCH door switch connection: Doors closed – switch contact disconnected ... -
Page 9: Step 4 - Download And Install The Mobile App
If an update is found in menu 3.2 User Settings, perform the update. The mobile application is now paired with the SIC 700 SMART controller If a different regulator is to be paired to the mobile device, the previous mobile app and regulator pairing must be cancelled. -
Page 10: List Of Components And Diagram Depicting The Basic Connection Of A Burning Regulator
2.2 List of components and Diagram depicting the basic connection of a burning regulator Gültig seit/Valid from/Valide: 09.10.2019... -
Page 11: Connection Diagram Standard Connection Cable For The Servo
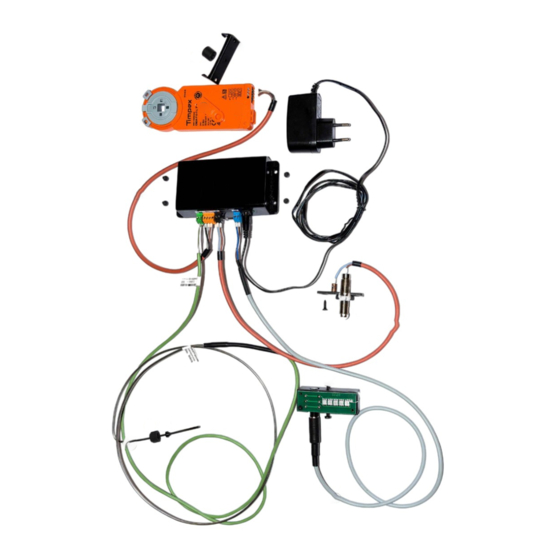
Flue gas thermal sensor – “TS” (green Servomotor plastic clamp connector) M4x20 screw Control unit Servomotor distance washer Display panel (blue connector) Servomotor cable Door switch (black connector) M4x8 screw Servomotor with Air flap (orange Door switch cable connector) LED display cable 24 V/DC power adapter M3x8 screw M10 swivel nut... -
Page 12: Installation And Assembly Regulations
2.4 Installation and assembly regulations 2.4.1 Temperature sensor assembly Gültig seit/Valid from/Valide: 09.10.2019... -
Page 13: Door Switch Assembly
2.4.2 Door switch assembly Gültig seit/Valid from/Valide: 09.10.2019... -
Page 14: Assembly Of The Central Unit
2.4.3 Assembly of the central unit Gültig seit/Valid from/Valide: 09.10.2019... -
Page 15: Servomotor Assembly
2.4.4 Servomotor assembly Gültig seit/Valid from/Valide: 09.10.2019... -
Page 16: Assembly Of Led Display
2.4.5 Assembly of LED display Gültig seit/Valid from/Valide: 09.10.2019... -
Page 17: Description Of The Mobile App
3 DESCRIPTION OF THE MOBILE APP 3.1 Main screen Ac va on / deac va on App colours of acous c signaling by temperature - grey Se ngs - green - yellow Combus on mode - red ECO - SMART - TURBO Manual restart Flue gas temperature... - Page 18 Combustion mode – the Air flap is partially shut (reduced combustion) Use this setting if you want the fire to burn at a lower intensity, for instance when the heating area is already at the right temperature. SMART –...
-
Page 19: User Settings
3.2 User settings Click on the symbol to enter user settings. Update ( see 2.1.5 Step 5 – Pair the regulator with the mobile app ) Gültig seit/Valid from/Valide: 09.10.2019... - Page 20 Notifications Configure notifications for different events. The notifications will be displayed in the notification panel of your phone or tablet. Notifications can be set for Requests for the next stoking Reminders to close furnace doors Combustion mode Set the combustion mode. You can select between three modes (ECO, SMART, TURBO), see section 3.1.
- Page 21 Regulator is connected Information about the burning regulator the app is connected to. Pressing here allows you to terminate the connection between the app and the regulator. Only do this if you want to connect the mobile device to a different regulator. Service menu This is used by the authorized technicians who install the burning regulator.
-
Page 22: Service Menu
3.3 Service menu These settings may only be changed by a trained person. A password is required to access the service menu. Gültig seit/Valid from/Valide: 09.10.2019... -
Page 23: Indications And Notifications
Select furnace Select the type of furnace Settings 1 – ASKJA EX / ASKJA SE / ASKJA H EX / ASKJA H SE / ASKJA BF EX / VULSINI EX / VULSINI SE / VULSINI H EX / VULSINI H SE ... -
Page 24: Display Panel Indications
When the stove is installed on place including chimeny connection surfarce paint needs to be hardened by first intensive buring as described in stove manual. This first intensive burning is operated without automatic burning regulator SIC 700 SMART. 1. Place magnetic key (5) onto servomotor (4) - Page 25 2. Pull out grate lever to ensure enough air coming to the chamber!!! 3. Open the air by moving the air control lever to the right. 4. During first firing in the stove leave the door slightly open (1-2 cm) to avoid gluing Gültig seit/Valid from/Valide: 09.10.2019...
- Page 26 door gasket to not hardened paint. The paint is heat-resistant and during first intensive firing it will get hard. During hardening process the paint can be soft a little so try to avoid touching the paint by hand or other subject. First firing is done with low flames –...
-
Page 27: Before Putting The Stove Into Operation
5.2 Before putting the stove into operation 1. Make sure that all parts of the burn-up control are connected to each other. 2. Check the air flap function. To do this, place the magnetic key (5) on the servomotor (4) (see illustration). Then manually check the air slide for function (slide left and right). -
Page 28: Heating With Burn-Off Control
5. Plug the power adapter into the socket. This is followed by a 3x acoustic signal and the diode on the central unit flashes green. 6. Make paring of mobile app with the regulator. See chapter 2.1.5 step 5. Heating with burn-off control 1. -
Page 29: End The Heating Process
End the heating process 1. At the end of the burning process (residual glow), a signal sounds and the LED display flashes. If no fuel is loaded within 5 minutes, the control system checks the combustion chamber: If there is some fuel inside then restart is done automatically (new burning process runs). -
Page 30: Safety Instructions
The device must not be used in rooms that are exposed to flammable or explosive chemicals, dust, gases or vapors. SIC 700 SMART fireplace insert can only be connected to an alternating current power point with a voltage of 230V/50Hz. Gültig seit/Valid from/Valide: 09.10.2019... -
Page 31: Technical Specifications
The electrical device is delivered as an accessory to STORCH fireplace stoves and must not be damaged in any way. During installation of SIC 700 SMART, repair, or replacement of electric parts, the equipment must be disconnected from the electric mains. ...
Need help?
Do you have a question about the SIC 700 SMART and is the answer not in the manual?
Questions and answers