
Summary of Contents for Hebo TRS ONE 2021
- Page 1 User Manual 125 - 250 - 280 - 300 From model year 2021 - 300,280,250,125cc - User Manual (Nov 2020)
- Page 3 Welcome to TRS Dear customer, Thank you for your confidence in us, and congratu- lations on the purchase of your new TRS One. Because of our experience, professionalism and pas- sion for trial bikes we are able to offer you an innova- tive, reliable and up-to-date motorcycle.
- Page 4 Picture shows homologated version with regard to regulation (EU) Nº168/2013 Picture shows competition version only and is not manufactured for, nor should it be used on public streets, roads or highways. The use of this kit should be limited to participation in sanc- tionet competition events upon a closed course.
- Page 5 TRS advises you: Please read this user manual thoroughly before using your motorcycle. It details all the instructions for the correct handling of the motorcycle and for your safety, as well as helping towards the best possible maintenance ¬and upkeep from day one. Please pay special attention to the notes flagged up with the following symbols: ATTENTION! This symbol refers to points which, if ignored, could lead to some kind of damage to your...
- Page 6 TRS recommends: If you have any doubts about adjustments to your • For a long life of service, keep the motorcycle motorcycle, refer to the manual and/or contact an maintained as recommended¬ in this manual. authorised TRS dealer. • This bike is designed to be safe when driving, pro- Please carefully read through the information in the vided that the driver is equipped with the appro- user manual to familiarise yourself with the features...
- Page 7 Index 22 - Temperature switch 1 - Description of parts 23 - Filling with coolant 2 - Technical specifications TRS One - Engine 24 - Bleeding air in the cooling system 3 - Technical specifications TRS One - Frame 25 - Carburettor 4 - Manufacturer’s plate (under the fuel tank) 26 - Carburetion of the mixture 5 - Unboxing, set up...
-
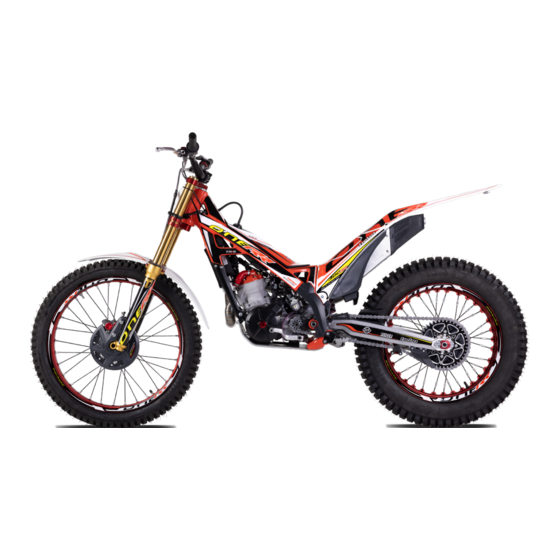
Page 8: Description Of Parts
1 - Description of parts 1- Clutch lever 7- kick-start 12- Fuel tank breather 2- Indicator, horn and stop buttons 8- Fuel tap 13- Reed valve 3- Brake lever 9- Radiator 14- Drive chain 4- Accelerator 10- Radiator bleed screw 15- Gear change pedal 5- Radiator cap 11- Rear brake pedal... - Page 9 17- Front fork 22- Water pump 27- Carburettor 32- Drive sprocket 18- Spark plug 23- Front mudguard 28 - Rear Sprocket 33 - Drain plug oil engine 19 - Exhaust muffler 24 - Front brake calliper 29 - Front suspension adjustment 20- Swing arm 25- Ignition cover 30- Footrests...
- Page 10 1 - Description of parts 1- Clutch lever 2- Indicator, horn and stop buttons 7- kick-start 12- Fuel tank breather 3- Brake lever 8- Fuel tank 13- Fuel tap 4- Accelerator 9- Radiator 14- Reed valve 5- Radiator cap 10- Radiator bleed screw 15- Drive chain 6 - Fuel tank cap 11- Rear brake pedal...
- Page 11 17- Front fork 22 - Water pump 27- Carburettor 32- Drive sprocket 18- Spark plug 23- Front mudguard 28 - Rear Sprocket 33 - Battery 19 - Exhaust muffler 24 - Front brake calliper 29 - Front suspension adjustment 34 -Engine electric start 20- Swing arm 25- Ignition cover 30- Footrests...
-
Page 12: Technical Specifications Trs One - Engine
2 - Technical specifications TRS One - Engine Technical Specifications TRS One - Engine ENGINE: Single cylinder 2 stroke. Displacement: 294,1cc - 272,2 cc - 247,7 cc- 125cc Cooling system: Liquid cooled. Bore x stroke: 79x60 mm (300 cc) - 76x60 mm (280 cc) - 72,5x60 mm (250 cc) - 54x54,6 (125cc) Ignition: HIDRIA CDI (double spark). -
Page 13: Technical Specifications Trs One - Frame
3 - Technical specifications TRS One - Frame Technical specifications TRS One - Frame CHASSIS: Double cradle forged aluminum frame. Swing arm: Aluminium. Front suspension: Aluminium Tech, 39mm diameter, 175mm str. Setting: Adjustable spring, preload, compression, extension. Rear suspension: Reiger 2 ways Setting: Spring preload and extension / Spring preload, compresion, extension Stroke-travel:... -
Page 14: Manufacturer's Plate (Under The Fuel Tank)
4 - Manufacturer’s plate (under the fuel tank) All motorcycles manufactured by TRS have an identification number stamped a) The position of the identifi- on the frame which also appears in the technical sheet of the documentation cation number, located on the that will be supplied to the user. -
Page 15: Setup Before Using
5 - Unboxing , set up SETUP BEFORE USING For safety reasons, motorcycles TRRS with Electric Start are delivered wi- thout fuel and oil (only when the transport is air and maritime transport) , and with the ground connector disconnected to prevent ocurrance during transport. -
Page 16: Starting And Stopping The Engine
6 - Starting and stopping the engine 7 - Choke STARTING AND STOPPING THE ENGINE KICK-START CHOKE Use the choke when the engine is cold to help star- ting without damaging the engine. This device, used correctly, will prevent wear and mechanical damage by starting the motorcycle in adverse tem- peratures. - Page 17 6 - Starting and stopping the engine 7 - Choke STARTING AND STOPPING THE ENGINE SWITCH ELECTRIC START CHOKE Use the choke when the engine is cold to help star- ting without damaging the engine. This device, used correctly, will prevent wear and mechanical damage by starting the motorcycle in adverse temperatures.
- Page 18 8 - Gearshift 9 - Fuel tap GEARSHIFT FUEL TAP The gearshift is controlled by a pedal on the left-hand side of the vehicle. The On the left side of the frame, you can find the fuel tap. The positions of knob is located sequence of gears is as shown in the diagram.
- Page 19 8 - Gearshift 9 - Fuel tap GEARSHIFT FUEL TAP The gearshift is controlled by a pedal on the left-hand side of the vehicle. The On the left side of the frame, you can find the fuel tap. sequence of gears is as shown in the diagram. You must hold down the clutch The position of knob is located above the carburettor.
- Page 20 10 - Fuel tank FUEL TANK The tank has a capacity of 2.5 litres and should be filled with a mixture of unleaded petrol and oil. The tank cap is positioned at the top of the tank. Minimum octane rating of fuel: 98 octanes. Important.
- Page 21 11 - Tyres TYRES On low-grip terrain you can reduce the tyre pressu- TYRES re slightly to increase the grip and vice versa. Front wheel: 2,75x21” TRIAL Rear wheel: 4,00x18” TRIAL RECOMMENDED TYRE PRESSURE: Front wheel: 0,45bar (0,42bar for competition) The condition of the tyres is a key factor in safety and guarantees better driving.
-
Page 22: Braking System
12 - Braking system BRAKE PADS LEVEL OF REAR BRAKE FLUID LEVEL OF FRONT BRAKE FLUID To ensure optimal braking you need to check the At the rear of the front brake pump you can check condition of the brake pads. Initially the pad indi- the fluid level, and replenish it to the correct level cator groove is normally around 3mm. -
Page 23: Steering Lock
13 - Steering lock 14 - Side stand STEERING LOCK SYSTEM SIDE STAND b) Side stand located on the right of the motorcycle c) Adjustment holes in the side stand The side stand is located on the right side of the vehicle, At the base of the side stand there are two holes that you a) The steering lock system is located under the headlight secured to the frame by a spring. -
Page 24: Handlebar And Instrument Panel
15 - Handlebar and Instrument panel HANDLEBAR AND INSTRUMENT PANEL STANDARD Left-hand side of the handlebar. Central part of the handlebar. Right-hand side of the handlebar. On the left side of the handlebar are: The instrument panel is in the centre of the handlebar On the right-hand side of the handlebar you can (e). - Page 25 15 - Handlebar and Instrument panel with electric start HANDLEBAR AND INSTRUMENT PANEL WITH ELECTRIC START Left-hand side of the handlebar. Central part of the handlebar. Right-hand side of the handlebar. On the left side of the handlebar are: The instrument panel is in the centre of the hand- On the right-hand side of the handlebar you lebar (e).
-
Page 26: Adjustment Of The Levers And The Handlebar
16 - Adjustment of the levers and the handlebar / 17 - Changing the transmission oil ADJUSTMENT OF THE LEVERS CHANGING THE STANDARD TRANSMISSION OIL Fig (b):Oil drain plug at the bottom of the sump Maximum initial free play of both levers of the handlebar. a) Oil filler cap, in the upper part of the sump. - Page 27 17 - Changing the transmission oil CHANGING THE TRANSMISSION OIL WITH ELECTRIC START The electric start system is lubricated with the same oil engine. To change the oil, if the engine is cold, we recommend start the motorcycle and let it run at idle speed for 5 minutes.
-
Page 28: Spark Plug
18 - Spark plug 19 - Air Filter AIR FILTER SPARK PLUG b) Removing the cover, you can access the air box baffle; c) Air box baffle. a) The plug that is factory-ins- talled is defined in the techni- b) Top view of the cover of air filter case. cal specifications. -
Page 29: Temperature Switch
20 - Cooling system 21 - Draining of coolant 22 - Temperature switch COOLING SYSTEM DRAINING OF COOLANT TEMPERATURE SENSOR b) Coolant drain bolt located on the cover of the water pump. c) Temperature sensor, screwed on the To drain the coolant follow the instructions: cylinder head cover. -
Page 30: Filling With Coolant
23 - Filling with coolant 24 - Bleeding air in the cooling system FILLING WITH COOLANT BLEEDING AIR IN THE COOLING SYSTEM Remove the cap on the top of the radiator to fill it up with coolant, making sure you remove the air using the bleed screw on the cylinder head. - Page 31 25 - Carburettor 26 - Carburetion of the mixture 27 - Carburator adjustment of the idle speed CARBURETTOR A good way to find out the quality of the mixture that is going into the engine is It is advisable to periodically check the carburettor, washing and drying it with to check the spark plug.
- Page 32 27 - Carburator adjustment of the idle speed CARBURATOR ADJUSTMENT KEIHIN Idle mixture adjusting screw c) is used to adjustment richness of fuel/air intake engine. The adjustment Get the bike warmed up. With the engine runs turn could be necessary when the elevation (meters from level sea) or the weather temperature changes enough the screw slightly (no more than 5 minutes) each to feel variations on the performance on engine.
-
Page 33: Front Suspension
28 - Front suspension 29 - Rear suspension REAR SUSPENSION FRONT SUSPENSION Factory default settings: Periodic maintenance of the Clicks are from the closed position. Open anticlockwi- rocker-link system is essential se direction. to ensure a correct function and avoid wear premature that Screws at top: could cause excessive toleran- ce. -
Page 34: Drive Chain
30 - Drive chain DRIVE CHAIN It is important to assemble the connecting link carefu- Tension of chain should allow a play of approximately lly. The closed end must point in the direction of chain 10-15mm in the area between the swing arm and the rotation so that it doesn’t fly off if the chain is hit by chain tensioner. -
Page 35: Reed Valve
31 - Reed valve 32 - Swing arm 33 - Rear brake pedal REED VALVE SWING ARM REAR BRAKE PEDAL The inlet is through a reed valve and its condition For correct maintenance of the rear suspension system The screw for adjusting the brake pedal height in has a significant influence on the performance of and swing arm, it needs to be regularly dismantled for relation to the footrest is at the front of the lever. -
Page 36: Exhaust Muffler
34 - Footrest 35 - Exhaust muffler 36 - Tank clutch pump FOOTRESTS EXHAUST MUFFLER CLUTCH PUMP TANK The footrests are adjustable. By swapping the was- The end of the muffler is detachable and allows you It is necessary to periodically check the oil level in hers you can move them forward or backwards to easily replace the exhaust packing fibreglass in the clutch pump tank. -
Page 37: Motorcycle Maintenance
37 - Motorcycle maintenance / 38 - Pares de Apriete MOTORCYCLE MAINTENANCE TIGHTENING TORQUES The greater the care given to the motorcycle, the TORQUE TORQUE longer its service life will be and the better it will Swinging arm-Chassis 40-50 Ignition fasteners perform. - Page 38 39 - Storage STORAGE If it is necessary to store the motorcycle for a long period of time, the following operations are recommen- ded before storage: •Clean the whole vehicle. •Lubricate or grease the components that need it. •Empty the fuel tank. (Take care with the fuel, which is inflammable and toxic) •Empty the sump, removing the old transmission oil and refilling with new oil (If the engine is cold, it is recommended to start up and leave running for a few minutes to warm up the oil and assist draining).
-
Page 39: Maintenance Work
40 - Maintenance operations MAINTENANCE WORK (Note: Note that cleaning your motorcycle prior to maintenance will aid you in detecting any faults and wear in the vehicle) COMPONENT CHECK ADJUST REPLACE CLEAN LUBRICATE Rear shock absorber Annually Every 2 years Front fork suspension oil 60 hours Transmission oil... - Page 40 COMPONENT CHECK ADJUST REPLACE CLEAN LUBRICATE Air Filter After every use If damaged After every use After each wash Steering play After every use Whenever necessary Brake hoses Whenever necessary Every 2 years After each wash Coolant Whenever necessary Annually General lubrication After every use After every use...
- Page 41 41 - Approval APPROVAL All the components fitted in this vehicle comply with legal approval require- ments, including the identification marks on parts that require them. In particular, note that the following items are compulsory for using the motor- cycle on public roads and must be present on the vehicle in order to pass the Vehicle Technical Inspection Test: - Registration plate holder - Speedometer...
- Page 42 42 - Xtrack Kit XTRACK KIT This kit is a competition accessory only and is not manufacturated for, nor should it be used on public streets, roads or highways. The use of this kit should be limited to participation in sanctioned competition events upon a closed course.
-
Page 43: Troubleshooting And Frequently Asked Questions
43 - Troubleshooting and Frequently Asked Questions TROUBLESHOOTING: FREQUENTLY ASKED QUESTIONS (IMPORTANT NOTE: We recommend you go to an authorised garage to carry out any internal adjustments to the engine or parts that are not the result of normal wear. Please note that tampering with the motorcycle is potentially dangerous to you and/or may lead to possible cancellation of the warrantee) Go to a specialized workshop to check the temperature sensor, faulty fan, regulator or installation. - Page 44 PROBLEM POSSIBLE CAUSES STEPS TO TAKE Engine makes strange noises - Ignition problems. - Take the motorcycle to an authorised workshop. - Overheated engine. - Stop the engine and check the state of the cooling and exhaust systems. - Intake problems. - Clean the fuel admission system and air filter.
- Page 45 PROBLEM POSSIBLE CAUSES STEPS TO TAKE Gears engage badly - Problems in forks, gears or additional gearbox systems. - Take bike to a specialist garage. -Clutch not working correctly. - Worn or badly adjusted chain - Adjust or change chain. - Rear sprocket teeth worn.
- Page 46 PROBLEM POSSIBLE CAUSES STEPS TO TAKE - Low oil level in fork. - Add the right oil to the specified level. Suspension too soft - Oil with excessively low density. - Replace oil with correct density. - Rear shock absorber badly adjusted. - Adjust rear shock absorber.
-
Page 47: Recommended Products
44 - Recommended products RECOMMENDED PRODUCTS TRS Motorcycles recommends the use of NILS lubricants and maintenance products. -
Page 48: Warning Symbols
Warning Symbols SAFETY/ATTENTION This symbol refers to points which, if ignored, could lead to physical danger for the user. VEHICLE PROPER ASSEMBLY This symbol refers to points which, if ignored, could lead to some kind of damage to your motorcycle. Non-observance of these warnings could render your mo- torcycle warranty void.
Need help?
Do you have a question about the TRS ONE 2021 and is the answer not in the manual?
Questions and answers