Advertisement
Quick Links
Model F300-2
www.moldiber.com
Instruction Manual
P I C T U R E F R A M I N G
PRO JOINER
Description
The Pro Joiner Model F300-2 has been
designed as a full featured manual joiner
that is easy to use. Features include
alignment pins which will correctly drive
V-nails into all woods, fully adjustable
press for variable moulding sizes and
shapes, adjustable V-nail spacing allowing
you to drive up to two V-nails at once,
convenient V-nail spacing gauge to take
the guess work out of placement, e a sy to
load V-nail blocks that slide on a xed rail
and includes a quick set-up clamp to
precisely secure moulding. Precise corner
joints can be achieved with this heavy duty
professional style joiner. Producing
professional quality picture frames is
now easier than ever.
Advertisement

Summary of Contents for Moldiber PRO JOINER
- Page 1 P I C T U R E F R A M I N G PRO JOINER Description The Pro Joiner Model F300-2 has been designed as a full featured manual joiner that is easy to use. Features include alignment pins which will correctly drive...
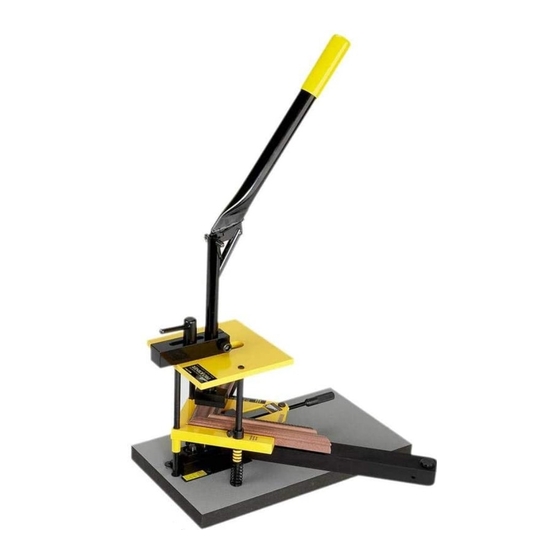
- Page 2 Model F300-2 Instruction Manual PR O JO I N ER Identification Lever Lever Adjustment Block Pressure Foot Vise Stop Lever Height Wheel Vise Extension Arms V-nail Corner Spacing Stop (Not visible) V-nail Blocks V-nail Gauge V-nail Slide Cartridge V-nails...
-
Page 3: Parts List
Model F300-2 Instruction Manual PR O JO I N ER Parts List Pro-J oiner Extension V-nail Slider Arms V-nails Moulding Extension Arm Spacer Screws Extension Arm Wrench Parts List Extension Arms Extension Arm Screws 4 Extension Arm Wrench 1... -
Page 4: Assembly Procedure
Model F300-2 Instruction Manual PR O JO I N ER Assembly Procedure A. Extension Arms 1. Align set of holes in arm with holes in vise, making sure the rubber bumper faces up. (Fig. 1). Fig. 2 Fig. 1 2. - Page 5 Model F300-2 Instruction Manual PR O JO I N ER Preparation continued B. Set V-nail Spacing 1. Read dimension from vise scale (Fig. 7). 2. Adjust V-nail block in slider to same dimension as vise scale. V-nails are now set approximately 1/4 inch from each end of joint (Fig.
- Page 6 Model F300-2 Instruction Manual PR O JO I N ER Fig. 10 Preparation continued C. Set Pressure Foot Over Moulding 1. Loosen lever adjustment block handle. 2. Adjust lever adjustment block so pressure foot locates over middle moulding or where even downward pressure can be applied (Fig.
- Page 7 Model F300-2 Instruction Manual PR O JO I N ER Operation Fig. 13 A. Load V-nails 1. Remove slider from base board (Fig. 13). 2. Decide to drive one or two V-nails. With some hardwoods (wal- nut, etc) it may be easier to press only one V-nail in at a time.
-
Page 8: Troubleshooting
Model F300-2 PR O JO I N ER Instruction Manual Trouble Shooting Problem Solution Gaps in joints. Sand Mitres smooth. Make sure the two pairs are equal length. Reduce the amount of glue in joint. Check square cutting action of saw. - Page 9 Model F300-2 Instruction Manual PR O Jo i n er Description Qty. L124 Feet L124N Ext. Arm Bumper L804N2 L348N Knob Screw L879/880 L1902 L804N2 Handle Spring L889 L881 L828 Post Washer L853N Ext. Arms L854 Block Plate L904N...
- Page 10 Model F30 Instruction Manual PR O Jo i n er V-nail Slider L899 Description Qty. L897 L348N Knob Screw L838 Slide Block Tension Screw L860NS L860N5 Pin Block L861N Pin Holder L861N L862N2 Slide Block Small L862N2 L863N3 Slide Block Large...
- Page 11 Model F300-2 Instruction Manual PRO Joiner A l s o a v a i l a b l e F r o m L o g a n G r a p h i c s Logan Graphics picture framing system includes all the tools and accessories you need to produce professional quality frames including…...
Need help?
Do you have a question about the PRO JOINER and is the answer not in the manual?
Questions and answers