
Related Manuals for Fulgor Milano SOFIA FSRC 4807 2P MK 2F X


Summary of Contents for Fulgor Milano SOFIA FSRC 4807 2P MK 2F X
- Page 1 FSRC 4807 2P MK 2F X MANUALE DI ISTRUZIONI INSTRUCTION MANUAL BEDIENUNGSANLEITUNG HANDLEIDING...
- Page 3 Dear Customer, Thank you for purchasing one of our Sofia ranges. This range was conceived, designed and handcrafted in Italy. Your selection of a Sofia range confirms you are among a special group who share a love and passion for cooking. This unique community shares in the experience of creating quality dishes;...
-
Page 5: Table Of Contents
INDICE PAG. INDICE PAG. 1- Caratteristiche del forno 14 - Istruzioni per l’uso Primo utilizzo del forno 2 - Avvertenze speciali Griglie del forno Prima di iniziare l'installazione Griglie del Forno Estensibili 3 - Istruzioni di sicurezza 15 - Istruzioni per l’uso Sicurezza per forni autopulenti Istruzioni per la prima accensione 4 - Dimensioni del prodotto e requisiti da... - Page 6 INDICE PAG. 26 - Impostare la modalità di autopulizia Come impostare la modalità Autopulizia Per Cambiare il Tempo di Pulizia Come Ritardare l'Inizio della Pulizia 27 - Sistema di Blocco della Porta (disponibile solo in alcuni modelli) Blocco automatico della porta durante il ciclo pirolitico Manutenzione Fai-da-Te Rimozione Porta Forno 28 - Sostituzione della luce del forno 29 - Caratteristiche del piano cottura...
-
Page 7: 1- Caratteristiche Del Forno
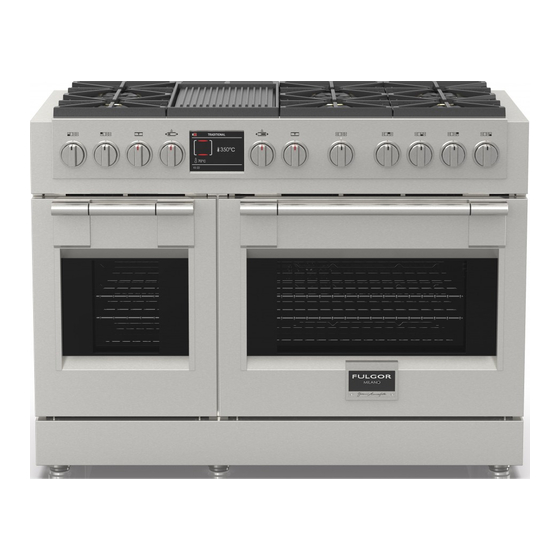
1 - Caratteristiche del forno CARATTERISTICHE DEL FORNO Display Ventole di raffreddamento Bruciatore Grill Guarnizione porta Luce alogena Luce alogena Luce alogena Luce alogena Bruciatore inferiore (coperto) Bruciatore inferiore (coperto) Targhetta con numero di modello e di serie Ventola di convezione (coperta) Retro della griglia del forno Parte frontale della griglia del forno... - Page 8 1 - Caratteristiche del forno CONTENUTO DELL'IMBALLO QTÀ DESCRIZIONE QTÀ DESCRIZIONE BLOCCO COTTURA GRIGLIE IN GHISA SUPPORTO PER L’INNESTO PIASTRA (PER LA GAMMA DI DUE VITI DI FISSAGGIO DA 48” - 91,4 cm) DA 1” + STAFFE ZOCCOLO KIT CONVERSIONE GAS PIEDINI PER 30”...
-
Page 9: Avvertenze Speciali
2 - Avvertenze speciali IMPORTANTE: Conservare il presente manuale ad uso ATTENZIONE dell'elettricista locale. Si tratta del simbolo di un avviso di sicurezza. Questo INSTALLATORE: Lasciare presente manuale simbolo segnala potenziali pericoli possono proprietario per future consultazioni. comportare la morte o lesioni gravi per l'utente o per gli altri. -
Page 10: Istruzioni Di Sicurezza
3 - Istruzioni di sicurezza • Prima di utilizzare il forno, è opportuno farlo IMPORTANTE funzionare vuoto alla massima temperatura per circa un’ora al fine di eliminare l’odore del L’elettrodomestico deve essere installato materiale isolante. da un tecnico qualificato in conformità con •... - Page 11 3 - Istruzioni di sicurezza • Indossare abiti idonei. Non indossare mai indumenti ATTENZIONE svolazzanti o maniche pendenti mentre si cucina. • Non lasciare che gli abiti, le presine o altri materiali Assicurarsi che l'elettrodomestico sia infiammabili vengano a contatto con i bruciatori o le spento prima di sostituire la lampadina griglie del piano cottura bollenti.
-
Page 12: Sicurezza Per Forni Autopulenti
3 - Istruzioni di sicurezza Sicurezza per forni autopulenti • Non toccare le resistenze o le superfici interne del forno. • Le resistenze possono essere bollenti anche quando sono di colore scuro. Le superfici interne di un forno possono • Una volta impostata la manopola nella funzione CLEAN diventare sufficientemente bollenti da causare ustioni. -
Page 13: Dimensioni Del Prodotto E Requisiti Da Incasso
4 - Dimensioni del prodotto e requisiti da incasso DIMENSIONI DEL PRODOTTO Modelli di blocchi cottura da 91,4 cm (48”) 47 7/8” (121,6) 29 3/4” (75,6) 27 1/2” (69,7) 9" (22,8) [opzionale] 3" (7,6) 7” (17,9) Max. 37 1/4” (94,7) Min. - Page 14 4 - Dimensioni del prodotto e requisiti da incasso REQUISITI DA INCASSO min 25 1/2” (65) di distanza dai max 13” (33) combustibili o dalla parte inferiore della cappa di ventilazione min 18” (45,7) min 18” (45,7) min 6” (15,2) min 6”...
-
Page 15: Installazione Della Staffa Anti-Ribaltamento
4 - Dimensioni del prodotto e requisiti da incasso Prima di spostare il blocco cottura, proteggere i pavimenti ATTENZIONE e fissare la/e porta/e del forno per non provocare danni. Combinazioni con cappa aspirante: Per verificare che la staffa anti-ribaltamento sia installata Si consiglia di installare questi blocchi cottura insieme a una e incastrata: cappa aspirante idonea montata in corrispondenza. -
Page 16: Informazioni Di Installazione
5 - Informazioni di installazione UTENSILI NECESSARI ATTENZIONE • Pericolo per peso eccessivo Sono necessarie due o più persone per l'installazione del blocco cottura. Il mancato rispetto di questa istruzione può comportare lesioni alla schiena o di altro tipo. • Pericolo di taglio Fare attenzione ai bordi taglienti. -
Page 17: Istruzioni Di Installazione
6 - Istruzioni di installazione Non porre il blocco cottura su un lato al momento FASE 2 dell’installazione dei piedini. Le pareti laterali non sono Aprire la parte superiore della confezione (2) e rimuovere state progettate per sostenere il peso del blocco cottura gli accessori (3), dopodiché... - Page 18 6 - Istruzioni di installazione FASE 3 (Solo per la gamma da 48”) FASE 5 Rimuovere la staffa posteriore in legno (5) e i supporti di Far scivolare ulteriormente e inclinare la cucina a gas (9), sicurezza frontali in metallo (6). appoggiando i piedini posteriori sul pavimento per poi montare i piedini frontali (10).
- Page 19 6 - Istruzioni di installazione FASE 7 FASE 8 Nel caso in cui sia necessario spostare il blocco cottura; Installare la protezione posteriore (se in dotazione) utilizzare l’imballaggio in schiuma e/o cartone (13), fissandola con le tre viti sul retro. In alcuni casi, potrebbe riposizionarli strategicamente intorno al blocco cottura per trattarsi di una protezione posteriore accessoria ordinata proteggere le sue superfici rifinite dal contatto con il carrello...
- Page 20 6 - Istruzioni di installazione FASE 9 FASE 10 Dopo aver completato le procedure di collegamento di Posizionare i gancetti nella parte inferiore dello zoccolo elettricità e gas (vedere le istruzioni incluse), misurare i negli appositi fori su ciascun lato del telaio, dopodiché quattro angoli nell’incasso per verificare che il pavimento sia ruotare verso l’alto finché...
-
Page 21: Requisiti Dell'impianto A Gas
7 - Requisiti dell'impianto a gas FAR ESEGUIRE L'ALLACCIAMENTO DEL GAS DA UN c) le posizioni delle aperture devono essere scelte in modo TECNICO DI ASSISTENZA O DA UN INSTALLATORE da evitare la possibilità che si ostruiscano e, se installate ESPERTO IN DISPOSITIVI A GAS. -
Page 22: Conversione Ad Altro Tipo Di Gas
8 - Conversione ad altro tipo di gas Conversione ad altro tipo di gas Prima di convertire l’apparecchio per il funzionamento con un diverso tipo di gas, controllare quale tipo di gas è attualmente impostato (etichetta adesiva sull’elettrodomestico (Figura 1 a pagina 3)). Scollegare l’elettrodomestico dall’alimentazione elettrica;... - Page 23 8 - Conversione ad altro tipo di gas Bruciatore piano cottura 4,00 kW Portata termica nominale 4,00 4,00 4,00 4,00 Iniettore anello interno dimensioni Iniettore anello esterno dimensioni Consumo 291 g/h 291 g/h 291 g/h 291 g/h Tipo di gas 3B/P 3B/P 3B/P...
- Page 24 8 - Conversione ad altro tipo di gas Piastra piano cottura 3,35 kW Portata termica nominale 3,35 3,35 3,35 3,35 Iniettore dimensioni Consumo 244 g/h 244 g/h 244 g/h 244 g/h Tipo di gas 3B/P 3B/P 3B/P "G30G31" "G30G31" "G30G31" "G30G31"...
- Page 25 8 - Conversione ad altro tipo di gas Bruciatore piano cottura 4,50 kW Portata termica 4,50 4,50 4,50 4,50 4,50 4,50 4,50 4,50 4,50 4,50 nominale Iniettore anello interno dimensioni Iniettore anello esterno dimensioni Consumo 429 l/h 429 l/h 429 l/h 488 l/h 498 l/h 498 l/h 429 l/h 498 l/h 595 l/h 523 l/h Tipo di gas "G20 G25.3...
- Page 26 8 - Conversione ad altro tipo di gas Bruciatore piano cottura 4,00 kW Portata termica 4,00 4,00 4,00 4,00 4,00 4,00 4,00 4,00 4,00 4,00 nominale Iniettore anello interno dimensioni Iniettore anello esterno dimensioni Consumo 381 l/h 381 l/h 381 l/h 433 l/h 443 l/h 443 l/h 381 l/h 381 l/h 529 l/h 464 l/h Tipo di gas "G20 G25.3...
- Page 27 8 - Conversione ad altro tipo di gas Bruciatore piano cottura 3,35 kW Portata termica 3,35 3,35 3,35 3,35 3,35 3,35 3,35 3,35 3,35 3,35 nominale Iniettore dimensioni Consumo 319 l/h 319 l/h 319 l/h 363 l/h 371 l/h 371 l/h 319 l/h 371 l/h 443 l/h 389 l/h Tipo di gas "G20 G25.3...
-
Page 28: Sostituzione Degli Iniettori (Bruciatore A Doppio Cerchio Di Fiamma)
8 - Conversione ad altro tipo di gas Sostituzione degli iniettori (bruciatore Sostituzione dell’iniettore (piastra) a doppio cerchio di fiamma) 1. Rimuovere la piastra. 1. Rimuovere le griglie del piano cottura e i cappucci dei 2. Rimuovere la copertura del bruciatore. bruciatori. -
Page 29: Regolazione Fiamma Bassa
8 - Conversione ad altro tipo di gas Regolazione fiamma bassa Questo apparecchio è impostato di fabbrica con la fiamma a un livello medio-basso. Se si rende necessaria un'ulteriore regolazione, procedere PERICOLO come segue: Accendere un bruciatore a gas con un fiammifero Regolazione dei bruciatori a cerchio di è... -
Page 30: Conversione In Gpl O Gn
9 - Conversione in GPL o GN Se la regolazione è corretta, la fiamma è blu, stabile e ferma e di dimensioni minime. Si può verificare la regolazione finale ruotando la manopola diverse vole da alto a basso senza spegnere la fiamma. Questa regolazione, fiamma... -
Page 31: Alimentazione Elettrica
10 - Alimentazione elettrica POTENZA ASSORBITA FORNO GRANDE FORNO PICCOLO resistenza superiore forno: 3500 + 1000W 230V - 3500 + 1000W 240V 2100 + 700W 230V - 2100 + 700W 240V resistenza inferiore 3000W 230V - 3000W 240V 1750W 230V - 1750W 240V forno: elemento circolare 2x1300W 240V or 1x2500W 240V (a... -
Page 32: Pannello Di Controllo
11 - Pannello di controllo Il vostro elettrodomestico potrebbe differire leggermente dalle illustrazioni sottostanti. - Schermo display - Manopole di controllo per forno grande - Manopole di controllo per forno grande Manopole di comando Per utilizzare le manopole di controllo, ruotarle a destra/sinistra e premere delicatamente. Il controllo non funzionerà nel caso in cui vengano premute o ruotate più... -
Page 33: Informazioni Generali Forno
12 - Informazioni generali forno Prima di utilizzare il forno per la prima volta rimuovere tutto l'imballaggio e i corpi estranei dal forno(i). Qualunque materiale di questo tipo lasciato all'interno potrebbe fondersi o bruciare durante l'utilizzo dell'elettrodomestico. Codici errore Preriscaldamento e Preriscaldamento Rapido Questo codice appare in caso il controllo elettrico indichi Ogni qualvolta viene impostata una modalità... -
Page 34: Suggerimenti Generali Forno
13 - Suggerimenti generali forno Come preriscaldare il forno Condensa e temperatura del forno • Preriscaldare il forno quando si utilizzano le modalità • È normale che una certa quantità di umidità evapori Cottura statica, Cottura ventilata e Cottura arrosto dalle pietanze durante qualunque processo di cottura. -
Page 35: Istruzioni Per L'uso
14 - Istruzioni per l’uso Primo utilizzo del forno ATTENZIONE Pulire accuratamente il forno con acqua saponata e Assicurarsi di non forzare la griglia per evitare sciacquare bene. di danneggiare lo smalto. Utilizzare il forno per circa 30 minuti alla massima temperatura per bruciare ogni traccia di grasso che potrebbe altrimenti creare degli odori sgradevoli durante la cottura. -
Page 36: Griglie Del Forno Estensibili
14 - Istruzioni per l’uso Griglie del Forno Estensibili Come riposizionare la griglia allungabile nel forno: 1. Afferrare la griglia saldamente da entrambi i lati. • La griglia allungabile consente di accedere più facilmente Posizionare la griglia (compreso il telaio) sopra la guida ai cibi in cottura. -
Page 37: Istruzioni Per La Prima Accensione
15 - Istruzioni per l’uso Istruzioni per la prima accensione ESEMPIO 2 Forno GRANDE: Icona ROSSA - ACCESA (attivo / selezionato) Forno PICCOLO: Icona ROSSA - ACCESA (attivo / non selezionato) Una volta che il blocco cottura è stato collegato alla corrente elettrica per la prima volta, il controllo si prepara automaticamente per impostare una serie di impostazioni utente, che rimangono immagazzinate in caso di successive... -
Page 38: Impostazioni Utente
16 - Impostazioni Utente Temperatura e Peso Quando il forno è acceso, selezionare l’icona confermare con la manopola di funzione per entrare nel menù IMPOSTAZIONI. Questo menù consente di personalizzare le Ruotare la manopola di funzione per selezionare una delle impostazioni del proprio forno. -
Page 39: Data
16 - Impostazioni Utente Data Segnale acustico Ruotare la manopola di funzione per selezionare il formato Ruotare la manopola di funzione per selezionare il volume della data tra le opzioni “D.M.Y (Giorno Mese Anno) – del segnale acustico e confermare premendo la manopola Y.M.D. -
Page 40: Impostazioni Di Sistema
17 - Impostazioni di sistema Demo Quando il forno è acceso, selezionare l’icona confermare con la manopola di funzione per entrare nel menù IMPOSTAZIONI. Tale menù permette di impostare Lo scopo di questa funzione è impostare la modalità una serie di parametri o funzioni speciali. Permette inoltre DEMO, la quale rende il forno inutilizzabile per la cucina, di accedere alla lista eventi errore. -
Page 41: Avviare Il Forno
18 - Avviare il Forno Accendere e spegnere il forno Funzioni IMPORTANTE SCONGELAMENTO • Dopo aver spento il forno, la ventola di raffreddamento continua a funzionare fino a che le parti interne del ESSICCARE forno non si siano raffreddate. MANTENERE IN CALDO Premere la manopola [ON/OFF] per accendere il forno e premerla di nuovo per spegnerlo. - Page 42 18 - Avviare il Forno MODALITÀ DI COTTURA ICONA PRERISCAL- SONDA TEMPERATURA DAMENTO TERMICA Min. Preimpostare Max. RAPIDO CARNE SCONGELAMENTO ESSICCARE 120° F (50° C) 140° F (60° C) 160° F (70° C) MANTENERE IN CALDO 85° F (30° C) 105°...
-
Page 43: Fase Di Preriscaldamento
18 - Avviare il Forno Fase di preriscaldamento Per selezionare PRERISCALDAMENTO RAPIDO: 1. Selezionare e avviare la modalità di cottura, dopodiché Mentre il forno è in fase di preriscaldamento, la temperatura ruotare la manopola verso DESTRA. corrente viene mostrata sotto l'icona della modalità di 2. -
Page 44: Funzionamento Forno In Modalità Temporizzata
19 - Funzionamento forno in modalità temporizzata Assicurarsi che data e ora siano impostate correttamente. La modalità temporizzata spegne il forno alla fine del tempo di cottura. ATTENZIONE Non lasciare mai alimenti nel forno per più di un'ora prima e dopo la cottura. Ciò... -
Page 45: Impostazione Sonda Termica Carne (Se Presente)
20 - Impostazione sonda termica carne (se presente) Quando vengono cotti arrosti, bistecche o pollame, questa Per evitare la moltiplicazione dei batteri, è necessario è il modo migliore per vedere quando la pietanza è prendere le seguenti misure: adeguatamente cotta. •... - Page 46 20 - Impostazione sonda termica carne (se presente) 1. Impostare la temperatura della sonda richiesta tramite la ATTENZIONE manopola di temperatura. • Per evitare ustioni, utilizzare un guanto da cucina per rimuovere la sonda termica carne quando il forno è caldo.
-
Page 47: Capire Le Varie Modalità Di Funzionamento Del Forno
21 - Capire le Varie Modalità di Funzionamento del Forno Suggerimenti e Tecniche per la Cottura Arrosto • La cottura su più griglie per prodotti da forno viene effettuata su griglie in posizione 1, 2, 3 e 4. Tutti e quattro le griglie Arrostire è... -
Page 48: Suggerimenti E Tecniche Per La Cottura Ventilata
21 - Capire le Varie Modalità di Funzionamento del Forno Suggerimenti ricette facili e veloci Suggerimenti e Tecniche per la Cottura alla Griglia Ventilata Conversione da COTTURA STATICA standard a COTTURA • Posizionare la griglia nella posizione richiesta prima di VENTILATA: accendere il forno. -
Page 49: Tabella Essiccazione
21 - Capire le Varie Modalità di Funzionamento del Forno Tabella Essiccazione ALIMENTO PREPARAZIONE TEMPO DI CONTROLLO ESSICCAZIONE ESSICCAZIONE APPROSSIMATIVO* (ore) FRUTTA Immerse in ¼ di tazza di succo di 11 - 15 Leggermente duttili Mele limone e 2 tazze d'acqua, ¼ fette Immerse in ¼... -
Page 50: Ricette
22 - Ricette La funzione Ricette del vostro forno vi da la possibilità di cucinare pietanze senza dover ogni volta impostare il forno manualmente. Selezionando una ricetta "SET", la modalità di cottura, la temperatura e il tempo vengono impostati automaticamente in base alla ricetta selezionata dal menù. Lista Ricette Tipo di Condizione... - Page 51 22 - Ricette 7. Per avviare la ricetta, confermare premendo la manopola 4. A questo punto, la ricetta può essere salvata nella lista di funzione. delle ricette "PERSONALI” selezionando “SALVA” e Durante una ricetta, una serie di messaggi sonori e visivi confermando tramite la manopola di funzione.
-
Page 52: Classic Pizza (Su Alcuni Modelli)
23 - Classic Pizza (Su Alcuni Modelli) CLASSIC PIZZA è stato specificatamente studiato per cucinare al forno PIZZE perfette in appena pochi minuti. Per ottenere perfetti risultati selezionare il tasto per accedere a questa speciale ricetta. Dopo aver inserito le vostre impostazioni, le ricette Classic Pizza faranno il resto, raggiungendo circa 650°F (345°C) attivando gli elementi riscaldanti al 100% della loro capacità. - Page 53 23 - Classic Pizza (Su Alcuni Modelli) Suggerimenti Per Una Buona Pizza. Date le alte temperature e il tempo di cottura ridotto, raccomandiamo di inserire e rimuovere le pizze velocemente cosicché la porta rimanga aperta il minor tempo possibile e la temperatura non cali. Una volta che il segnale acustico e il display indicano che la cottura è...
-
Page 54: Istruzioni Modalità Sabbath (Su Alcuni Modelli)
24 - Istruzioni Modalità Sabbath (su alcuni modelli) La funzione Modalità Sabbath del vostro forno rispetta le norme Ebraiche. Tale funzione permette la forno di eseguire solo la funzione statica. Quando la funzione Sabbath è selezionata, le seguenti funzioni sono disabilitate: •... -
Page 55: Cura E Pulizia Del Forno
25 - Cura e Pulizia del Forno Per la pulizia non devono essere utilizzati detergenti di apertura della porta mentre l'interno del forno è a abrasivi né pulitori a vapore. temperature di pulizia. • La luce del forno non è in funzione durante questa modalità. -
Page 56: Impostare La Modalità Di Autopulizia
26 - Impostare la modalità di autopulizia Come impostare la modalità Autopulizia Come Ritardare l'Inizio della Pulizia 1. Premere la manopola ON/OFF e selezionare l’icona 1. Seguire i passaggi da 1 a 3 descritti sopra. dopodiché confermare con la medesima manopola. 2. -
Page 57: Sistema Di Blocco Della Porta (Disponibile Solo In Alcuni Modelli)
27 - Sistema di Blocco della Porta (disponibile solo in alcuni modelli) Blocco automatico della porta durante il ciclo pirolitico Per motivi di sicurezza, la porta si blocca automaticamente non appena viene selezionata la modalità auto-pulizia. La porta viene sbloccata automaticamente anche quando il tempo di pulizia è... -
Page 58: Sostituzione Della Luce Del Forno
28 - Sostituzione della luce del forno • Ciascun forno è dotato di luci alogene situate sulle pareti LUCI DEL FORNO laterali del forno. • Le luci si accendono quando la porta è aperta o quando il forno è in un ciclo di cottura. •... -
Page 59: Caratteristiche Del Piano Cottura
29 - Caratteristiche del piano cottura PIANO COTTURA DA 91,4 CM (48”) A - Griglie VALORI NOMINALI USCITA BRUCIATORE: GN (Naturale) GPL (Propano) BTU/HR MODELLO DA 91,4 cm (48”) 13650 (Btu/h) - 4000W/1200 (Btu/h) 350W 13650 (Btu/h) - 4000W/1200 (Btu/h) 350W 1 BRUCIATORI A DOPPIA CORONA (bruciatore e manopola) 13650 (Btu/h) - 4000W/1200 (Btu/h) 350W 13650 (Btu/h) - 4000W/1200 (Btu/h) 350W 2 BRUCIATORI A DOPPIA CORONA (bruciatore e manopola) - Page 60 29 - Caratteristiche del piano cottura PIASTRA D - Piastra E - Copertura del bruciatore F - Supporto per piastra...
-
Page 61: Utilizzo Del Piano Cottura A Gas
30 - Utilizzo del piano cottura a gas Impostazione manopola controllo gas Bruciatori a gas Accensione elettrica del gas I bruciatori a gas di questi modelli sono progettati per semplificare le operazioni di cottura, con particolare I bruciatori a gas usano un dispositivo di accensione attenzione a dimensioni, potenza e regolazione dell'intensità... -
Page 62: Superficie Dei Bruciatori Super Sigillata
30 - Utilizzo del piano cottura a gas Le fiamme dei bruciatori Come pulire i bruciatori a gas: Accendere tutti i bruciatori. Le fiamme devono essere di IMPORTANTE colore blu senza tracce di giallo. La fiamma del bruciatore non deve traballare o allontanarsi dal bruciatore. Il cono interno della fiamma deve avere una lunghezza compresa Prima di pulire, accertarsi che tutti i comandi tra 1,3 cm (1/2”) e 1,1 cm (3/4”). -
Page 63: Accensione Elettrica Del Gas
30 - Utilizzo del piano cottura a gas Accensione elettrica del gas Spegnimento del bruciatore Ruotare la manopola in senso orario finché non raggiunge Il bruciatore della piastra utilizza un dispositivo di accensione la posizione di spegnimento. Accertarsi che la fiamma si elettrica situato vicino al bruciatore, il quale garantisce spegna completamente. -
Page 64: Consigli Per Cucinare
31 - Utilizzo della piastra del piano cottura a gas Consigli per cucinare • Preriscaldare la piastra per circa 20 minuti, dopodiché ESPLOSO DEL BRUCIATORE DELLA PIASTRA impostare la temperatura desiderata. • Utilizzare olio da cucina, spray da cucina o burro per cucinare uova, pancake, french toast, pesce e sandwich. -
Page 65: Strumenti Di Cottura
32 - Strumenti di cottura IMPORTANTE: Non lasciare mai pentole e padelle vuote ATTENZIONE sull'area di cottura o sui bruciatori quando sono bollenti. Padelle e pentole ideali sono quelle con fondo piatto, bordi diritti, un coperchio che chiuda perfettamente e realizzate con un materiale di spessore medio alto. -
Page 66: Informazioni Generali Sulla Manutenzione Del Forno
33 - Informazioni generali sulla manutenzione del forno Come usare la tabella di pulizia del forno 1. Individuare il numero del componente da pulire sulla figura di questa pagina. 2. Trovare il nome del componente nella tabella. • Usare il metodo di pulizia della colonna di sinistra se il forno è smaltato con finitura colorata. •... -
Page 67: Finiture Forno / Metodi Di Pulizia
34 - Finiture forno / Metodi di pulizia Si possono pulire tutti i componenti del forno con una spugna insaponata, risciacquando e asciugando con cura. Per i residui più difficili da rimuovere, seguire i metodi di pulizia consigliati di seguito. •... -
Page 68: Pulizia Del Piano Cottura
35 - Pulizia del piano cottura Si possono pulire tutti i componenti del piano PULIZIA DEL PIANO COTTURA cottura strofinando con una spugna insaponata, risciacquando e asciugando con cura. Per i residui più difficili da rimuovere, seguire i metodi di pulizia consigliati di seguito. ATTENZIONE •... - Page 69 35 - Pulizia del piano cottura Parti e materiali Detergenti consigliati Suggerimenti/promemoria Cappuccio Detergenti non abrasivi: Acqua bollente Le griglie sono pesanti; sollevarle con cura. Appoggiarle su una superficie protetta. bruciatore e griglia sgrassatore multiuso antibatterico. È normale che si formino bolle/crepe/ (smalto porcellanato su Risciacquare e asciugare immediatamente.
- Page 70 36 - Risoluzione problemi di funzionamento Prima di contattare il centro assistenza, controllare quanto segue per evitare costi di assistenza inutili. Problema forno Procedura di risoluzione del problema Errore F1030* F2030* Problema con il meccanismo di blocco. Staccare la corrente e ripristinarla dopo pochi compare sullo schermo...
-
Page 71: Risoluzione Problemi Di Funzionamento
36 - Risoluzione problemi di funzionamento Problema forno Procedura di risoluzione del problema I bruciatori del piano cottura non funzionano È la prima volta che si usano i Ruotare una delle manopole dei bruciatori per far fuoriuscire l'aria dai tubi del gas. bruciatori del piano cottura? manopola è... -
Page 72: Risoluzione Problemi Di Cottura
37 - Risoluzione problemi di cottura Sia con la cottura statica che con la cottura ventilata si possono ottenere risultati insoddisfacenti per una serie di motivi che esulano dal cattivo funzionamento del forno. Consultare la tabella sottostante per le cause dei problemi più comuni. Poiché la dimensione, forma e materiale degli utensili da forno influisce in maniera diretta sui risultati della cottura, la soluzione migliore potrebbe essere quella di sostituire utensili da forno vecchi che si sono scuriti o deformati nel tempo e con l'uso. -
Page 73: Assistenza O Manutenzione
38 - Assistenza o manutenzione Prima di contattare il centro assistenza, si prega di controllare il capitolo "Risoluzione Problemi". Si può così risparmiare il costo della chiamata per l'assistenza. Se si ha ancora bisogno di aiuto, seguire le istruzioni sottostanti. Al momento della chiamata, accertarsi di avere a disposizione la data di acquisto, il modello completo e il numero di serie del proprio elettrodomestico. - Page 75 INDICE PAG. INDICE PAG. 1- Features of your Oven 14 - Instruction for Use The first time you use the oven 2 - Special Warnings Oven Racks Before Starting Installation Oven Extendable Racks 3 - Safety Instructions 15 - Instruction for Use Safety for the Self-Cleaning Oven Instruction for initial switch-on 4 - Product...
- Page 76 INDICE PAG. 26 - Setting The Self Cleaning Mode To Set the Self-Clean Mode To Change the Cleaning Time To Delay the Start of Cleaning 27 - Door Locking System (only available in some models) Automatic door locking during pyrolytic cycle Do-it-Yourself Maintenance Oven...
-
Page 77: 1- Features Of Your Oven
1 - Features of your Oven FEATURES OF YOUR OVEN Display panel Cooling Vents Broil Burner Door gasket Halogen Light Halogen Light Halogen Light Halogen Light Bottom Burner (concealed) Bottom Burner (concealed) Model and Serial # Plate Convection Fan (concealed) Oven Rack Back Oven Rack Front Broiler Pan Rack... - Page 78 1 - Features of your Oven CONTENTS OF YOUR RANGE PACK QTY DESCRIPTION QTY DESCRIPTION RANGE COOKER CAST IRON GRATES 1” ISLAND TRIM TWO FIXING SCREWS + GRIDDLE (FOR 48” RANGE) BRACKETS KICK COVER GAS CONVERSION KIT FEET FOR 30” & 36” NIPPLE FEET FOR 48”...
-
Page 79: Special Warnings
2 - Special Warnings IMPORTANT: Save these instructions for the local electrical WARNING inspector use. This is the safety alert symbol. This symbol alerts you to INSTALLER: Please leave this manual with owner for potential hazards that can kill or hurt you and others. You future reference. -
Page 80: Safety Instructions
3 - Safety Instructions • In all models, leave the door closed when the grill IMPORTANT is used. • The cooling fan may remain in operation so long The appliance must be connected by as the oven is hot, even after it has been switched qualified technician in accordance with off. - Page 81 3 - Safety Instructions • Use only certain types of glass, heatproof glass ceramic, WARNING ceramic, earthenware, or other glazed utensils that are suitable for cooktop use. Ensure that the appliance is switched off • Do not clean the cooktop while it is still hot. Some cleaners before replacing the lamp to avoid the produce noxious fumes when applied to a hot surface.
-
Page 82: Safety For The Self-Cleaning Oven
3 - Safety Instructions Safety for the Self-Cleaning Oven • The trim on the top and sides of the oven door may become hot enough to cause burns. • Use care when opening the door. Open the door slightly • Make sure that the door is locked and that it cannot be to let hot air or steam escape before removing or replacing opened once the knob is turned into the CLEAN position food. -
Page 83: Product Dimensions And Cutout Requirements
4 - Product Dimensions and Cutout Requirements PRODUCT DIMENSIONS 48” Wide Range Models 47 7/8” (121.6) 29 3/4” (75.6) 27 1/2” (69.7) 9" (22.8) [optional] 3" (7.6) 7” (17.9) Max. 37 1/4” (94.7) Min. 35 3/8” (89.8) 3/8” (1) 1 3/8” (3.5) 3 3/8”... - Page 84 4 - Product Dimensions and Cutout Requirements CUTOUT REQUIREMENTS min 25 1/2” (65) Minimum to max 13” (33) Combustibles or to botton of ventilation hood min 18” (45,7) min 18” (45,7) min 6” (15,2) min 6” (15,2) 3” ( 9 ) 3”...
-
Page 85: Anti-Tip Bracket Installation
4 - Product Dimensions and Cutout Requirements Before moving the range, protect any finished flooring and WARNING secure oven door(s) closed to prevent damage. To verify the anti-tip bracket is installed and engaged: Vent hood Combinations: • Slide range forward. •... -
Page 86: Installation Information
5 - Installation Information TOOLS WILL YOU NEED WARNING • Excessive Weight Hazard Use two or more people to move and install range. Failure to do so can result in back or other injury. • Cut Hazard Beware of sharp edges. Use the polystyrene ends when carrying the product. -
Page 87: Installation Instruction
6 - Installation Instruction Do not tip the range on its side when installing the legs.The STEP 2 sidewalls are not designed to bear the weight of the range Openthe top (2) and remove the accessories (3) then lift off and will bend. - Page 88 6 - Installation Instruction STEP 3 (For 48” range only) STEP 5 Remove the rear wood brace (5) and the front metal securing Slide back more and tilt back (9), putting the rear legs on brackets (6). the floor and then mount the front legs (10) while in this angled position supported by the rear legs and the skid.
- Page 89 6 - Installation Instruction STEP 7 STEP 8 In case it is necessary to move the range; using the foam Install the back guard (if provided) by the three screws on the and/or cardboard packaging (13), replace them around back. In some cases this may be an accessory back guard the range strategically to protect the finished surfaces of that was ordered separately rather than the one which was the range from contact with the hand-truck and any straps...
- Page 90 6 - Installation Instruction STEP 9 STEP 10 After completing the electrical and gas connections (see Hook tabs on bottom of toekick into slots on either side of the included instructions) measure the four corners in cutout frame and rotate up until the magnets at the top of toekick area to verify if flooring is level.
-
Page 91: Gas Requirement
7 - Gas Requirement QUALIFIED SERVICE MAN OR GAS APPLIANCE c) the positions of the apertures should selected so as to INSTALLER MUST MAKE SUPPLY avoid the possibility of their being obstructed and, CONNECTION. if made in external walls, they must be protected with Leak testing of the appliance shall be conducted by the grilles, metal meshes, etc. -
Page 92: Nozzle Table
8 - Conversion to a Different Type of Gas Conversion to a Different Type of Gas Before converting the appliance for operation with a different gas type, check which type of gas it is currently set to operate with (adhesive label (Figure 1 page 3) on appliance). Disconnect the electrical power supply to the appliance;... - Page 93 8 - Conversion to a Different Type of Gas Top burner 4,00 kW Nominal heat input 4,00 4,00 4,00 4,00 Inner ring injector size Outer ring injector size Consumption 291 g/h 291 g/h 291 g/h 291 g/h Gas family 3B/P 3B/P 3B/P "G30G31"...
- Page 94 8 - Conversion to a Different Type of Gas Top griddle 3,35 kW Nominal heat input 3,35 3,35 3,35 3,35 Injector size Consumption 244 g/h 244 g/h 244 g/h 244 g/h Gas family 3B/P 3B/P 3B/P "G30G31" "G30G31" "G30G31" "G30G31" Gas pressure mbar "28…3037"...
- Page 95 8 - Conversion to a Different Type of Gas Top burner 4,50 kW Nominal heat 4,50 4,50 4,50 4,50 4,50 4,50 4,50 4,50 4,50 4,50 input Inner ring injector size Outer ring injector size Consumption 429 l/h 429 l/h 429 l/h 488 l/h 498 l/h 498 l/h 429 l/h 498 l/h 595 l/h 523 l/h Gas family "G20 G25.3...
- Page 96 8 - Conversion to a Different Type of Gas Top burner 4,00 kW Nominal heat 4,00 4,00 4,00 4,00 4,00 4,00 4,00 4,00 4,00 4,00 input Inner ring injector size Outer ring injector size Consumption 381 l/h 381 l/h 381 l/h 433 l/h 443 l/h 443 l/h 381 l/h 381 l/h 529 l/h 464 l/h Gas family "G20 G25.3...
- Page 97 8 - Conversion to a Different Type of Gas Top burner 3,35 kW Nominal heat 3,35 3,35 3,35 3,35 3,35 3,35 3,35 3,35 3,35 3,35 input Injector size Consumption 319 l/h 319 l/h 319 l/h 363 l/h 371 l/h 371 l/h 319 l/h 371 l/h 443 l/h 389 l/h Gas family "G20 G25.3...
-
Page 98: Replace Injector (Griddle)
8 - Conversion to a Different Type of Gas Replace Injectors (two ring flame Replace Injector (griddle) burner) 1. Remove griddle plate. 1. Remove the grates and burner caps. 2. Remove burner cover. 2. Remove aluminium gas spreader. 3. Remove the burner fixing screw (1). 3. -
Page 99: Low Flame Adjustment
8 - Conversion to a Different Type of Gas Low Flame Adjustment This appliance is shipped from the factory with low and medium flame settings adjusted. If further adjustment is necessary, proceed as follows: DANGER Lighting gas burners with a match is dangerous. Adjustment for Burners with one or You should match light the burners only in an two flame rings:... -
Page 100: Conversion For Lp Or Ng Gas
9 - Conversion for LP or NG Gas Proper adjustment will produce a stable, steady blue flame of minimum size. The final adjustment should be checked by turning the knob from high to low several times without extinguishing the flame. This adjustment, at low setting, will automatically provide the proper flame size at medium setting. -
Page 101: Electrical Supply
10 - Electrical supply ABSORBED POWER LARGE OVEN SMALL OVEN oven top element: 3500 + 1000W 230V - 3500 + 1000W 240V 2100 + 700W 230V - 2100 + 700W 240V oven bottom 3000W 230V - 3000W 240V 1750W 230V - 1750W 240V element: round element (hot 2x1300W... -
Page 102: Control Panel
11 - Control Panel Your appliance could vary slightly compared to the illustrations below. - Display screen - Large oven control knobs - Small oven control knobs Command Knobs To operate the control knobs, rotate them to left/right press gently. The control will not work if more than one knobs is pressedor rotate at the same time. -
Page 103: General Oven Information
12 - General Oven Information Before using your oven for the first time remove all packing and foreign materials from the oven(s). Any material of this sort left inside may melt or burn when the appliance is used. Error codes Preheat and Fast Preheat This code appears in the event of the electronic control Whenever a cooking made is set and the oven is heating,... -
Page 104: General Oven Tips
13 - General Oven Tips Preheating the Oven Oven Condensation and Temperature • Preheat the oven when using the Bake, Convection Bake • It is normal for a certain amount of moisture to evaporate and Convection Roast modes. from the food during any cooking process. The amount depends on the moisture content of the food. -
Page 105: Instruction For Use
14 - Instruction for Use The first time you use the oven CAUTION Clean the oven thoroughly with soapy water and rinse well. Make sure you do not force it to avoid damage Operate the oven for about 30 minutes at maximum to the ename. -
Page 106: Oven Extendable Racks
14 - Instruction for Use Oven Extendable Racks To replace an extendable rack: 1. Grasp rack firmly on both sides. Place rack (including frame) above desired rack guide • The extendable rack allows for easier access to cooking foods. It extends beyond the standard flat rack bringing he food closer to the user. -
Page 107: Instruction For Use
15 - Instruction for Use Instruction for initial switch-on EXAMPLE 2 LARGE oven: RED icon - ON (active / selected) SMALL oven: RED icon - ON (active / not selected) Once the range has been connected to the power supply for the first time, the control atomatically prepares for setting a number of user settings, which remain stored in case of any subsequent switch-on. -
Page 108: User Settings
16 - User Settings Temperature & Weight With the oven on, select the iconand confirm with the function knob to enter the SETTINGS menu. This menu permits personalizing the settings of your oven. To make Rotatethe [FUNCTION] knob to selectone of the two access, no active cooking or any set time functions must be temperature options “°C/°F”... -
Page 109: Date
16 - User Settings Date Beeper Rotate the [FUNCTION] knob to select the date format from Rotate the [FUNCTION] knob to select the required beep among the options “D.M.Y. – Y.M.D. – M.D.Y.” and confirm level and confirm by means of pressing the [FUNCTION] by means of pressing the [FUNCTION] knob. -
Page 110: System Setting
17 - System Setting Demo With the oven on, select the icon and confirm with the [FUNCTION] knob to enter the SETTINGS menu. This menu permits setting a number of parameters or special functions. The purpose of this function is to set the DEMO mode, It also permits accessing the error events list. -
Page 111: Starting Your Oven
18 - Starting your Oven Switching the oven on and off Functions IMPORTANT DEHYDRATE • After switching off the oven, the cooling fan could continue to operate until the inner parts of the oven WARM have cooled down. WARM PLUS Press the [ON/OFF] knob to switch the oven ON and press again to switch it OFF. - Page 112 18 - Starting your Oven COOKING MODE ICON FAST MEAT TEMPERATURE PREHEAT PROBE Min. Preset Max. DEFROST DEHYDRATE 120° F (50° C) 140° F (60° C) 160° F (70° C) WARM 85° F (30° C) 105° F (40° C) 120° F (50° C) WARM PLUS 130°...
-
Page 113: Pre-Heating Phase
18 - Starting your Oven Pre-heating phase To select FAST PREHEAT: 1. Select and start the cooking mode and turn the knob While the oven is in pre-heating phase, the instantaneous tothe RIGHT. temperature is displayed underneath the cooking mode 2. -
Page 114: Time Oven Mode Operation
19 - Time Oven Mode Operation Be sure that the time-of-day clock is displaying the correct time. The timed mode turns off the oven at the end of the cook time. CAUTION Never leave food in the oven for more than one hour before and after cooking. This could deteriorate the properties of the food itself. -
Page 115: Setting The Meat Probe (If Present)
20 - Setting the Meat Probe (if present) When roasts, steaks or poultry are being cooked, this is the To prevent bacteria from multiplying, it is necessary to take best way to tell when the food is correctly cooked. the following measures: This oven is optionally provided with the meat probe feature •... - Page 116 20 - Setting the Meat Probe (if present) 1. Set the required probe temperature by means of the WARNING [TEMPERATURE] knob. • To avoid burns, use a kitchen glove to fit and remove the meat probe when the oven is hot. •...
-
Page 117: Understanding The Various Oven Modes
21 - Understanding the Various Oven Modes Roast Tips and Techniques cookies, biscuits and appetizers. - 2 Rack baking: Use positions 1 and 3. Roasting is cooking with heated air. Both upper and lower - When baking four cake layers at the same time, stagger elements in the oven are used to heat the air but no fan is pans so that one pan is not directly above another. -
Page 118: Convection Roast Tips And Techniques
21 - Understanding the Various Oven Modes Quick and easy recipe tips Convection Broil Tips and Techniques Converting from standard BAKE to CONVECTION BAKE: • Place rack in the required position needed before turning Reduce the temperature by 25°F (15°C). on the oven. -
Page 119: Dehydrate Chart
21 - Understanding the Various Oven Modes Dehydrate Chart FOOD PREPARATION APPROXIMATE TEST FOR DONENESS DRYING TIME* (hrs) FRUIT Dipped in ¼ cup lemon juice and Apples 11 - 15 Slightly pliable 2 cups water, ¼ slices Dipped in ¼ cup lemon juice and Bananas 11 - 15 Slightly pliable... -
Page 120: Recipes
22 - Recipes The Recipe function of your oven gives you the chance to cook food without having to set the oven manually every time. By selecting a “SET” recipe, the cooking mode, the temperature and the time are automatically set according to the recipe selected from the menu. - Page 121 22 - Recipes 7. To start the recipe, confirm by pressing the [FUNCTION] 4. At this point, the recipe can be saved in the list of knob. “PERSONAL” recipes by selecting “SAVE” and confirming During a recipe, a number of acoustic and visual messages by means of the [FUNCTION] knob.
-
Page 122: Classic Pizza (On Some Models)
23 - Classic Pizza (on some models) The CLASSIC PIZZA was specifically designed so you can bake perfect PIZZAS in just a few minutes. For perfect results, select the to access this special recipe. After you make your settings, Classic Pizza recipes will do the rest, reaching about 650°F (345°C) by turning on the heating elements at 100% of their capacity. - Page 123 23 - Classic Pizza (on some models) Tips For A Good Pizza: Given the high temperatures and short baking time, we recommend that you insert and remove the pizzas quickly so that the door is open for as short a time as possible and the temperature doesn’t drop. Once the beep and display indicate that baking is finished, immediately remove the pizza, since the cooking times are very short and even a few seconds can have a significant effect.
- Page 124 24 - Sabbath Mode Instructions (on some models) The Sabbath Mode function of your oven complied with Jewish laws. This function allows the oven to perform only the static function. When the Sabbath function is selected, the following functions are disabled: •...
-
Page 125: Oven Care And Cleaning
25 - Oven Care and Cleaning Abrasive detergents and steam cleaning equipment should the display. This ensures that the door cannot be opened not be used for cleaning. while the oven interior is at clean temperatures. • The oven light does not operate during this mode. WARNING •... -
Page 126: Setting The Self Cleaning Mode
26 - Setting The Self Cleaning Mode To Set the Self-Clean Mode To Delay the Start of Cleaning 1. Press the ON/OFF knob and select the icon and then 1. Follow steps 1 through 3 above. confirm with the same knob . 2. -
Page 127: Door Locking System
27 - Door Locking System (only available in some models) Automatic door locking during pyrolytic cycle For safety reasons, the door is locked automatically as soon as self-clean mode is selected. The door is also unlocked automatically when the clean time has expired but only after the temperature has fallen below the safety threshold. - Page 128 28 - Replacing an Oven Light • Each oven is equipped with halogen lights located in the OVEN LIGHT lateral walls of the oven. • The lights are switched on when the door is opened or when the oven is in a cooking cycle. •...
-
Page 129: Features Of Your Cooktop
29 - Features of your Cooktop COOKTOP 48” A - Grates BURNER OUTPUT RATINGS:BTU/HR NG (Natural) LP (Propane) MODEL 48” 1 DOUBLE CROWNS (burner & knob) 13650 (Btu/h) - 4000W/1200 (Btu/h) 350W 13650 (Btu/h) - 4000W/1200 (Btu/h) 350W 2 DOUBLE CROWNS (burner & knob) 13650 (Btu/h) - 4000W/1200 (Btu/h) 350W 13650 (Btu/h) - 4000W/1200 (Btu/h) 350W 3 DOUBLE CROWNS (burner &... - Page 130 29 - Features of your Cooktop GRIDDLE D - Griddle Plate E - Cover Burner F - Griddle Plate support...
-
Page 131: Gas Cooktop Operation
30 - Gas Cooktop Operation Gas Control Knob Setting Gas burners Electric gas ignition The gas burners design of these cooktop models, allow a pleasing option for cooking where size, power and The gas burner use an electric ignition device located near simmering are a primary concern. -
Page 132: Super Sealed Surface Burners
30 - Gas Cooktop Operation The Burner Flames To Clean gas burner: Turn each burner on. Flames should be blue in color with no IMPORTANT trace of yellow. The burner flames should not flutter or blow away from the burner. The inner cone of the flame should be between 1/2”... -
Page 133: Electric Gas Ignition
30 - Gas Cooktop Operation Electric gas ignition Turning off the burner The griddle burner uses an electric ignition device located Turn the knob clockwise as far as it will go to the off position. near burner that ensures burner ignition. It is thermostatically Ensure flame extinguishes fully. -
Page 134: Cooking Tips
31 - Gas Cooktop Griddle Operation Cooking Tips • Preheat the griddle plate for about 20 minutes, then set EXPLODED VIEW OF BURNER GRIDDLE the desired temperature. • Use liquid cooking oil, cooking sprays, or butter for eggs, pancakes, French toast, fish and sandwiches. This will help reduce sticking. -
Page 135: Cookware
32 - Cookware IMPORTANT: Never leave empty cookware on a hot WARNING surface cooking area, element or surface burner. Ideal cookware should have a flat bottom, straight sides, a well fitting lid and the material should be of medium-to- heavy thickness. Rough finishes may scratch the cooktop. Aluminium and copper may be used as a core or base in cookware. -
Page 136: General Oven Care
33 - General Oven Care How to Use the Oven Cleaning Chart 1. Locate the number of the part to be cleaned in the illustration on this page. 2. Find the part name in the chart. • Use the cleaning method in the left column if the oven has a colored enamel finish. •... -
Page 137: Oven Finishes / Cleaning Methods
34 - Oven Finishes / Cleaning Methods The entire oven can be safely cleaned with a soapy sponge, rinsed and dried. If stubborn soil remains, follow the recommended cleaning methods below. • Always use the mildest cleaner that will do the job. •... -
Page 138: Cleaning The Cooktop
35 - Cleaning the Cooktop The entire Cooktop can be safely cleaned by CLEANING THE COOKTOP wiping with a soapy sponge, then rinsing and drying. If stubborn soil remains, follow the recommended cleaning methods below. ATTENTION • Before cleaning, be certain the burners are turned off and the grates are cool. - Page 139 35 - Cleaning the Cooktop Parts and materials Suggested cleaners Suggestions/Reminders Exterior finish Hot sudsy water: rinse and dry thoroughly. Acidic and sugar-laden spills deteriorate the (Porcelain enamel) abrasive cleansers: Ammonia, porcelain enamel. Remove soil immediately. Fantastic®, Formula 409®. Do not use wet sponge or towel on hot Mild abrasive cleansers: Bon Ami®, Ajax®, porcelain.
-
Page 140: Solving Operational Problems
36 - Solving Operational Problems Before contacting service, check the following to avoid unnecessary service charges. Oven Problem Problem Solving Steps Error F1030* F2030* A problem with latch mechanism occurred. Remove power and turn it back on again appears in the display window. after a few seconds. - Page 141 36 - Solving Operational Problems Oven Problem Problem Solving Steps Surface burner flames are uneven yellow and/or noisy Are the burner ports clogged? See “Super Sealed Surface Burners” section. Are the burner caps positioned See “Super Sealed Surface Burners” section. properly? Is propane gas being used? The appliance may have been converted improperly.
-
Page 142: Solving Baking Problems
37 - Solving Baking Problems With either Bake or Convection Bake, poor results can occur for many reasons other than a malfunction of the oven. Check the chart below for causes of the most common problems. Since the size, shape and material of baking utensils directly affect the baking results, the best solution may be to replace old baking utensils that have darkened and warped with age and use. -
Page 143: Assistance Or Service
38 - Assistance or Service Before contacting service, please check “Troubleshooting.” It may save you the cost of a service call. If you still need help, follow the instructions below. When calling, please know the purchase date and the complete model and serial number of your appliance. - Page 145 VERZEICHNIS VERZEICHNIS 1- Merkmale Ihres Ofens 14 - Bedienungsanleitung Erste Inbetriebnahme 2 - Besondere Warnhinweise Gitterroste Vor Installationsbeginn Ausziehbare Gitterroste 3 - Sicherheitshinweise 15 - Bedienungsanleitung Sicherheit für den selbstreinigenden Ofen Anleitung zum ersten Einschalten 4 - Produktabmessungen und Auswahl des Ofenraums (Doppelofen) Einbauanforderungen 16 - Benutzer-Einstellungen Installation der Kippschutz-Halterung...
- Page 146 VERZEICHNIS 26 - Selbstreinigung einstellen Um die Selbstreinigung einzustellen Um die Reinigungsdauer zu verändern Startverzögerung bei der Reinigung 27 - Verriegelungssystem der Tür (nur bei einigen Modellen erhältlich) Automatischer Türverschluß beim Pyrolysekreislauf Selbständige Wartung Ofen-Tür-Entfernung 28 - Ofenbeleuchtung austauschen 29 - Merkmale Ihres Kochfeldes 30 - Gas-Kochfeld-Betrieb Einstellung des Gasregelknopfes Gasbrenner...
-
Page 147: 1- Merkmale Ihres Ofens
1 - Merkmale Ihres Ofens MERKMALE IHRES OFENS Anzeigetafel Kühlungsschlitze Grill-Brenner Deurpakking Halogenlicht Halogenlicht Halogenlicht Halogenlicht Unterer Brenner (verdeckt) Unterer Brenner (verdeckt) Modell- und Seriennummernschild Konvektionsgebläse (verdeckt) Gitterrost hinten Gitterrost vorne Bratrost-Pfanne-Grillrost Pfannenstopp Bratrost-Pfanne Teleskopische Ablage (falls vorhanden) Handgriff (falls ausgestattet - nicht alle Modelle) Schiebearm Stopp... - Page 148 1 - Merkmale Ihres Ofens INHALT IHRES HERD-PAKETS MGE BESCHREIBUNG MGE BESCHREIBUNG HERD GUSSEISEN-ROSTE 1" INSELVERKLEIDUNG ZWEI GRILLPLATTE (FÜR BEFESTIGUNGSSCHRAUBEN 48"-HERD) + HALTERUNGEN EINSATZ-ABDECKUNG GAS-UMWANDLUNGSATZ FÜßE FÜR 30" & 36" NIPPEL DICHTUNG / FÜSSE FÜR 48" UNTERLEGSCHEIBE HANDBUCH & FUß MIT MANSCHETTE ALLGEMEINE DOKUMENTATION VIER...
-
Page 149: Vor Installationsbeginn
2 - Besondere Warnhinwese WICHTIG: Bewahren Sie diese Anleitung für den WARNUNG örtlichen Elektroinspekteur auf. Dies ist das Symbol für die Sicherheitswarnung. Dieses INSTALLATEUR: Bitte überlassen Sie diese Anleitung Symbol macht Sie auf potenzielle Gefahren aufmerksam, Eigentümer späteren die Sie und andere Personen töten oder verletzen können. Nachschlagen. -
Page 150: Sicherheitshinweise
3 - Sicherheitshinweise • Es wird empfohlen, den Herd vor dem ersten WICHTIG Gebrauch im leeren Zustand etwa eine Stunde auf höchster Stufe zu erhitzen, um die Gerüche des Das Gerät muss von einem qualifizier- Isoliermaterials zu entfernen. ten Techniker in Übereinstimmung mit • Bei allen Ausführungen bleibt beim Grillen die den geltenden Vorschriften angeschlos- Backofentür zu. - Page 151 3 - Sicherheitshinweise • Tragen Sie angemessene Kleidung. Lose sitzende WARNUNG Kleidung oder hängende Ärmel sollten niemals beim Kochen getragen werden. Sicherstellen, dass das Gerät vor dem • Lassen Sie niemals Kleidung, Topflappen oder andere Austausch der Glühbirne ausgeschaltet ist, um brennbare Materialien mit heißen Brennern oder heißen einen eventuellen Stromschlag zu vermeiden.
-
Page 152: Sicherheit Für Den Selbstreinigenden Ofen
3 - Sicherheitshinweise Sicherheit für den selbstreinigenden Ofen • Die Heizelemente können heiß sein, auch wenn sie dunkel sind. Die Innenflächen eines Ofens sind heiß genug, um Verbrennungen zu verursachen. • Vergewissern Sie sich, dass die Tür verriegelt ist und • Berühren Sie während und nach dem Gebrauch nicht die nicht geöffnet werden kann, sobald der Knopf in die Heizelemente oder die Innenflächen des Ofens und lassen Position CLEAN gedreht wird und das Symbol der... -
Page 153: Produktabmessungen Und Einbauanforderungen
4 - Produktabmessungen und Einbauanforderungen PRODUKTABMESSUNGEN 48” Breite-Herdmodelle 47 7/8” (121.6) 29 3/4” (75.6) 27 1/2” (69.7) 9" (22.8) [optional] 3" (7.6) 7” (17.9) Max. 37 1/4” (94.7) Min. 35 3/8” (89.8) 3/8” (1) 1 3/8” (3.5) 3 3/8” (8.5) 25 3/4”... - Page 154 4 - Produktabmessungen und Einbauanforderungen AUSSCHNITTANFORDERUNGEN min 25 1/2” (65) Minimum zu den max 13” (33) Brennstoffen oder zum Boden der Lüftungshaube min 18” (45.7) min 18” (45.7) min 6” (15.2) min 6” (15.2) 3” ( 9 ) 3” ( 9 ) 2”...
-
Page 155: Installation Der Kippschutz-Halterung
4 - Produktabmessungen und Einbauanforderungen Schützen Sie vor dem Verschieben des Geräts den fertigen WARNUNG Bodenbelag und sichern Sie die geschlossene(n) Ofentür(en), um Schäden zu vermeiden. Überprüfen Sie, ob der Kippschutz installiert und Entlüftungshauben-Kombinationen: eingerastet ist: Es wird empfohlen, diese Herde in Verbindung mit einer • Schieben Sie den Herd vorwärts. -
Page 156: Informationen Zur Installation
5 - Informationen zur Installation BENÖTIGTE WERKZEUGE WARNUNG • Gefahr von übermäßigem Gewicht Verwenden Sie zwei oder mehr Personen, um den Herd zu bewegen und zu installieren. Andernfalls kann es zu Rücken- oder anderen Verletzungen kommen. • Schnittgefahr Vorsicht vor scharfen Kanten. Verwenden Sie die Polystyrol-Enden, wenn Sie das Produkt tragen. -
Page 157: Installationsanleitung
6 - Installationsanleitung Beim Installieren der Beine darf der Herd nicht auf die SCHRITT 2 Seite gekippt werden. Die Seitenwände sind nicht dafür Öffnen Sie das Oberteil (2), entfernen Sie das Zubehör (3) ausgelegt, das Gewicht des Herdes zu tragen und werden und heben Sie dann die Papphülle (4) ab. - Page 158 6 - Installationsanleitung SCHRITT 3 (nur für den 48"-Herd) SCHRITT 5 Entfernen Sie die hintere Holzstrebe (5) und die vorderen Gleiten Sie mehr nach hinten und neigen Sie sich nach Metallsicherungsbügel Metallsicherungsbügel (6). hinten (9), legen Sie die hinteren Beine auf den Boden und montieren Sie dann die vorderen Beine (10), während Sie sich in dieser angewinkelten Position auf den hinteren Beinen und der Kufe abstützen.
- Page 159 6 - Installationsanleitung SCHRITT 7 SCHRITT 8 Falls es notwendig ist, den Schießstand zu verschieben, Montieren Sie den Rückenschutz (falls vorhanden) mit den sind die Schaumstoff- und/oder Kartonverpackungen (13) drei Schrauben auf der Rückseite. In einigen Fällen kann strategisch um den Schießstand herum zu ersetzen, um die es sich dabei um einen zusätzlichen Rückenschutz handeln, fertigen Oberflächen des Schießstands vor dem Kontakt mit der separat bestellt wurde und nicht der im Lieferumfang...
- Page 160 6 - Installationsanleitung SCHRITT 9 SCHRITT 10 Nach Fertigstellung der elektrischen und Gasanschlüsse Haken Sie die Laschen an der Unterseite des Trittraums in (siehe beiliegende Anleitung) messen Sie die vier Ecken im Schlitze auf beiden Seiten des Rahmens ein und drehen Sie Ausschnittbereich, um zu überprüfen, ob der Bodenbelag sie nach oben, bis die Magnete an der Oberseite des Trittes eben ist.
-
Page 161: Gas-Anforderung
7 - Gas-Anforderung EIN QUALIFIZIERTER SERVICE- ODER c) die Positionen der Öffnungen sind so zu wählen, dass GAS-INSTALLATEUR MUSS DEN sie nicht verstopft werden können, und wenn sie in GASVERSORGUNGSANSCHLUSS VORNEHMEN. Außenwänden angebracht sind, müssen sie durch Gitter, Die Dichtheitsprüfung des Geräts ist vom Installateur gemäß Metallgitter usw. -
Page 162: Düsentabelle
8 - Umwandlung auf eine andere Gasart Umwandlung auf eine andere Gasart Bevor Sie das Gerät für den Betrieb mit einer anderen Gasart umrüsten, prüfen Sie, welche Gasart derzeit eingestellt ist (Aufkleber (Abbildung 1 Seite 3) am Gerät). Trennen Sie die Stromversorgung des Geräts ab; den richtigen Düsendurchmesser finden Sie in der entsprechenden Tabelle in dieser Broschüre. - Page 163 8 - Umwandlung auf eine andere Gasart Oberer Brenner 4,00 kW Nenn-Wärmezufuhr 4,00 4,00 4,00 4,00 Innenring-Injektor Abmessung Aussenring-Injektor Abmessung Verbrauch 291 g/h 291 g/h 291 g/h 291 g/h Gas-Familie 3B/P 3B/P 3B/P "G30G31" "G30G31" "G30G31" "G30G31" Gas-Druck mbar "28…3037"...
- Page 164 8 - Umwandlung auf eine andere Gasart Obere Grillplatte 3,35 kW Nenn-Wärmezufuhr 3,35 3,35 3,35 3,35 Injektor Abmessung Verbrauch 244 g/h 244 g/h 244 g/h 244 g/h Gas-Familie 3B/P 3B/P 3B/P "G30G31" "G30G31" "G30G31" "G30G31" Gas-Druck mbar "28…3037"...
- Page 165 8 - Umwandlung auf eine andere Gasart Oberer Brenner 4,50 kW Nenn- 4,50 4,50 4,50 4,50 4,50 4,50 4,50 4,50 4,50 4,50 Wärmezufuhr Innenring-Injektor Abmessung Aussenring-Injektor Abmessung Verbrauch 429 l/h 429 l/h 429 l/h 488 l/h 498 l/h 498 l/h 429 l/h 498 l/h 595 l/h 523 l/h Gas-Familie "G20 G25.3...
- Page 166 8 - Umwandlung auf eine andere Gasart Oberer Brenner 4,00 kW Nenn- 4,00 4,00 4,00 4,00 4,00 4,00 4,00 4,00 4,00 4,00 Wärmezufuhr Innenring-Injektor Abmessung Aussenring-Injektor Abmessung Verbrauch 381 l/h 381 l/h 381 l/h 433 l/h 443 l/h 443 l/h 381 l/h 381 l/h 529 l/h 464 l/h Gas-Familie "G20 G25.3...
- Page 167 8 - Umwandlung auf eine andere Gasart Oberer Brenner 3,35 kW Nenn- 3,35 3,35 3,35 3,35 3,35 3,35 3,35 3,35 3,35 3,35 Wärmezufuhr Injektor Abmessung Verbrauch 319 l/h 319 l/h 319 l/h 363 l/h 371 l/h 371 l/h 319 l/h 371 l/h 443 l/h 389 l/h Gas-Familie "G20 G25.3...
-
Page 168: Injektor Austauschen (Grillplatte)
8 - Umwandlung auf eine andere Gasart Injektoren austauschen (zwei Ringflammenbrenner) Injektor austauschen (Grillplatte) 1. Entfernen Sie die Roste und Brennerdeckel. 1. Entfernen Sie die Grillplatte. 2. Entfernen Sie den Aluminium-Gasverteiler. 2. Entfernen Sie die Brennerabdeckung. 3. Entfernen Sie die drei Schrauben des Gasverteilers (1). 3. -
Page 169: Einstellung Der Niedrigen Flamme
8 - Umwandlung auf eine andere Gasart Einstellung der niedrigen Flamme Dieses Gerät wird ab Werk mit eingestellten niedrigen und mittleren Flammeneinstellungen ausgeliefert. GEFAHR Wenn weitere Einstellungen erforderlich sind, gehen Sie wie folgt vor: Das Anzünden von Gasbrennern mit einem Streichholz ist gefährlich. -
Page 170: Elektrische Gaszündung
9 - Umrechnung für LP- oder NG-Gas Bei richtiger Einstellung wird eine stabile, gleichmäßige blaue Flamme von minimaler Größe erzeugt. Die endgültige Einstellung sollte durch mehrmaliges Drehen des Knopfes von hoch auf niedrig überprüft werden, ohne die Flamme zu löschen. Bei dieser Einstellung wird bei niedriger Einstellung automatisch die richtige Flammengröße bei mittlerer Einstellung erreicht. -
Page 171: Stromversorgung
10 - Stromversorgung ABSORBIERTE LEISTUNG GROSSER OFEN KLEINER OFEN Oberes Ofenelement: 3500 + 1000W 230V - 3500 + 1000W 240V 2100 + 700W 230V - 2100 + 700W 240V Unteres 3000W 230V - 3000W 240V 1750W 230V - 1750W 240V Ofenelement: Rundelement 2x1300W 240V oder 1x2500W 240V (hängt... -
Page 172: Bedienfeld
11 - Bedienfeld Ihr Apparat kann sich leicht von der unten aufgeführten Abbildung unterscheiden. - Bildschirm - Steuerknöpfe grosser Ofen - Steuerknöpfe kleiner Ofen Steuerknöpfe Um die Steuerknöpfe zu bedienen, drehen Sie sie nach links/rechts und drücken Sie sie leicht. Die Steuerung funktioniert nicht, wenn mehr als ein Knopf gleichzeitig gedrückt oder gedreht wird. -
Page 173: Allgemeine Informationen Über Den Ofen
12 - Allgemeine Informationen über den Ofen Vor der ersten Inbetriebnahme des Ofens, das gesamte Verpackungs- und Fremdmaterial vom Ofen (den Öfen) entfernen. Solches Material kann, falls es im Ofen verbleibt, schmelzen oder sich entzünden. Fehlercodes Vorheizen und schnelles Vorheizen Dieser Code erscheint, falls die elektronische Steuerung Beim Einstellen eines Garmodus und beim Heizen des Ofens einen Fehler feststellt. -
Page 174: Den Ofen Vorheizen
13 - Allgemeine Tipps zum Ofen Den Ofen vorheizen Ofenkondensation und -temperatur • Heizen Sie den Ofen zum Backen, Backen mit Umluft und • Es ist normal, dass eine gewisse Feuchtigkeit aus den Braten mit Umluft vor. Speisen beim Garen austritt. Die Menge hängt von der in der Speise enthaltenen Feuchtigkeit ab. -
Page 175: Bedienungsanleitung
14 - Bedienungsanleitung Erste Inbetriebnahme ACHTUNG Den Ofen vollkommen mit Seifenwasser reinigen und gut Sicherstellen, ihn nicht zu forcieren, um die nachspülen. Beschädigung der Emaillierung zu vermeiden. Den Ofen ca. 30 Minuten bei maximaler Temperatur laufen lassen, um alle Fettspuren zu verbrennen, die sonst beim Kochen unangenehme Gerüche verursachen könnten. -
Page 176: Ausziehbare Gitterroste
14 - Bedienungsanleitung Ausziehbare Gitterroste Ausziehbaren Gitterrost austauschen: 1. Gitterrost fest an beiden Seiten anfassen. Gitterrost (mit Rahmen) an der gewünschten Führung anlegen • Der ausziehbare Gitterrost erlaubt einen einfacheren Zugriff zu den Speisen. Es ist länger als der normale Gitterrost und die Speisen sind dadurch näher am Benutzer. -
Page 177: Anleitung Zum Ersten Einschalten
15 - Bedienungsanleitung Anleitung zum ersten Einschalten BEISPIEL 2 GROSSER Ofen: ROTES Symbol - ON (aktiv / ausgewählt) KLEINER Ofen: ROTES Symbol - ON (aktiv / nicht ausgewählt) Nachdem das Herd zum ersten Mal mit der Stromversorgung angeschlossen wurde, dann bereitet sich die Steuerung automatisch auf einige Benutzer-Einstellungen vor, die auch für späteren Nutzungen abgespeichert bleiben. -
Page 178: Benutzer-Einstellungen
16 - Benutzer-Einstellungen Temperatur & Gewicht Wählen Sie bei eingeschaltetem Gerät das Symbol und bestätigen Sie mit dem Funktionsknopf, um das Menü EINSTELLUNGEN aufzurufen. In diesem Menü können Sie Drehen Sie den [FUNKTION]-Knopf, um eine der beiden die Einstellungen Ihres Ofens personalisieren. Um auf diese Temperatur-Optionen "°C/°F" oder Gewichts-Optionen zugreifen zu können, dürfen keine Garfunktionen oder Kg/lb auszuwählen und bestätigen Sie durch Drücken des... -
Page 179: Datum
16 - Benutzer-Einstellungen Datum Piepser Drehen Sie den [FUNKTION]-Knopf, um das Datumsformat Drehen Sie den [FUNKTION]-Knopf, um die gewünschte aus den Optionen "T.M.J." auszuwählen. – J.M.T. - M.T.J." Piepstiefe auszuwählen, und bestätigen Sie durch Drücken und bestätigen Sie durch Drücken des [FUNKTION]-Knopfes. des [FUNKTION]-Knopfes. Helligkeit Drehen Sie den [FUNKTION]-Knopf, um zu wählen, welche Helligkeitseinstellung zwischen ON oder STANDBY zu wechseln ist, dann wählen Sie durch Drehen des [FUNKTION]-Knopfes den gewünschten Helligkeitsgrad und... -
Page 180: Systemeinstellungen
17 - Systemeinstellungen Demo Wählen Sie bei eingeschaltetem Ofen das Symbol bestätigen Sie mit dem [FUNKTION]-Knopf, um in das Menü EINSTELLUNGEN zu gelangen. Dieses Menü erlaubt es, Der Zweck dieser Funktion ist die Einstellung des DEMO- mehrere Parameter oder spezielle Funktionen einzustellen. Modus, der den Ofen zum Kochen unbrauchbar macht, Hier kann auf die Liste der Fehlerereignisse zugegriffen aber automatisch eine Funktionsdemonstration durchführt. -
Page 181: Den Ofen Einschalten
18 - Den Ofen einschalten Den Ofen ein- und ausschalten Funktionen WICHTIG DEHYDRIEREN • Nachdem der Ofen ausgeschaltet wurde, wird die Kühlventilator solange weiterarbeiten, bis die Innenteile WÄRMEN des Ofens abgekühlt sind. WÄRMEN PLUS Drücken [ON/OFF]-Knopf, Ofen einzuschalten, und drücken Sie ihn erneut, um ihn auszuschalten. - Page 182 18 - Den Ofen einschalten GARFUNKTION IKONE SCHNELLES FLEISCHBRATEM- TEMPERATUR VORHEIZEN THERMOMETER Min. Voreinstellung Max. AUFTAUEN DEHYDRIEREN 120° F (50° C) 140° F (60° C) 160° F (70° C) WÄRMEN 85° F (30° C) 105° F (40° C) 120° F (50° C) WÄRMEN PLUS 130° F (55° C) 165° F (75° C) 210° F (100° C) BACKEN 165° F (75° C) 345° F (175° C) 480° F (250° C) BRATEN...
-
Page 183: Vorheizen
18 - Den Ofen einschalten Vorheizen Auswahl SCHNELLES VORHEIZEN: 1. Wählen und starten Sie die Garfunktion und drehen Sie Befindet sich der Ofen in der Vorheizphase, dann wird den Knopf auf die rechte Seite. die derzeitige Temperatur unter der Ikone der Garfunktion 2. -
Page 184: Garzeit
19 - Bedienung mit Zeitschaltung Überprüfen Sie, dass die richtige Uhrzeit eingestellt ist. Die Zeiteinstellung schaltet den Ofen am Ende der Garzeit aus. ACHTUNG Niemals Speisen länger als eine Stunde vor dem Garen im Ofen lassen. Die Eigenschaften der Nahrungsmittel könnten verderben. HINWEIS Zeiteinstellungen können nicht angewandt werden, wenn das Bratenthermometer an ist. -
Page 185: Bratenthermometer Einstellen (Falls Vorhanden)
20 - Bratenthermometer einstellen (falls vorhanden) Beim Garen von Braten, Steaks und Geflügel ist dies die Sie Folgendes beachten: beste Methode, um den richtigen Garpunkt festzustellen. • Tauen Sie Lebensmittel nicht bei Raumtemperatur sondern Dieser Ofen kann mit einem Bratenthermometer ausgestattet im Kühlschrank oder im Ofen mit der entsprechenden werden, das die Temperatur im Fleisch feststellen kann Funktion auf. - Page 186 20 - Bratenthermometer einstellen (falls vorhanden) 1. Stellen Sie die gewünschte Temperatur des WARNUNG Bratenthermometers mit dem [TEMPERATUR]-Knopf ein. • Damit Sie sich nicht verbrennen, verwenden Sie bitte einen Ofenhandschuh, um das Bratenthermometer hineinzustecken oder herauszunehmen, wenn der Ofen heiß ist. • Das Bratenthermometer immer...
-
Page 187: Die Verschiedenen Ofenfunktionen Verstehen
21 - Die verschiedenen Ofenfunktionen verstehen Braten - Tipps und Techniken • Es können auch Mahlzeiten auf mehreren Gitterrosten auf Positionen 1, 2, 3 und 4 zubereitet werden. Alle vier Gitterroste können für Cookies, Kekse und Braten bedeutet Garen mit heißer Luft. Es wird sowie Ober- Appetithäppchen verwendet werden. -
Page 188: Grillen - Tipps Und Techniken
21 - Die verschiedenen Ofenfunktionen verstehen Schnelle und einfache Rezepttipps Grillen mit Umluft - Tipps und Techniken Vom klassischen BACKEN auf BACKEN MIT UMLUFT • Gitterrost in die gewünschte Position bringen, bevor der umstellen: Ofen angeschaltet wird. Temperatur um 15°C (25°F) reduzieren. • Bei der Einstellung Umluftgrill, die Ofentür immer Die gleiche Garzeit wie beim Backen verwenden, wenn die Zeit unter 10 bis 15 Minuten liegt. -
Page 189: Dehydrieren - Tabelle
21 - Die verschiedenen Ofenfunktionen verstehen Dehydrieren - Tabelle NAHRUNGSMITTEL ZUBEREITUNG DURCHSCHNITTLICHE TEST GARUNG ERREICHT TROCKNES* (Std.) OBST Vierteln und in eine Tasse Äpfel Zitronensaft und 2 Tassen 11 - 15 Etwas geschmeidig Wasser eintauchen Vierteln und in eine Tasse Bananen Zitronensaft und 2 Tassen 11 - 15... -
Page 190: Rezepte
22 - Rezepte Die Funktion der Rezepte Ihres Ofens gibt Ihnen die Möglichkeit Speisen vorzubereiten, ohne die Garzeit jedesmal von Hand einzustellen. Wird Rezept "EINSTELLEN" ausgewählt, dann werden Garfunktion, Temperatur und Zeit automatisch anhand des Rezepts, das vom Menü ausgewählt wird, eingestellt. Rezeptliste Lebensmittelart Zustand des... - Page 191 22 - Rezepte 7. Um das Rezept zu starten, bestätigen Sie durch Drücken 4. Zu diesem Zeitpunkt kann das Rezept in der Liste der des [FUNKTION]-Knopfes. "EIGENEN" Rezepte gespeichert werden, indem Sie Während des Repeztes werden mehrere akustische "SPEICHERN" wählen und mit dem [FUNKTION]-Knopf und visive Nachrichten bitten, folgende Vorgänge bestätigen.
-
Page 192: Klassische Pizza (Bei Einigen Modellen)
23 - Klassische Pizza (bei einigen Modellen) KLASSISCHE PIZZA wurde spezifisch entworfen, so dass Sie eine perfekte PIZZA in wenigen Minuten zubereiten können. Um ein einwandfreies Ergebnis zu erzielen, wählen, um zu diesem speziellen Rezept zu gelangen. Nachdem Sie Ihre Einstellungen vorgenommen haben, führt das Rezept Klassische Pizza den Rest aus und etwa 650°F (345°C) erreicht, in dem alle Heizelemente mit 100% ihrer Leistung arbeiten. - Page 193 23 - Klassische Pizza (bei einigen Modellen) Tipps für eine gute Pizza: Aufgrund der hohen Temperatur und kurzen Backzeit, empfehlen wir, Pizzas schnell hineinzuschieben und herauszuholen, so dass die Tür nur so kurz wie möglich geöffnet ist und die Temperatur nicht abfällt. Wurde durch den Piepston und am Display angezeigt, dass die Backzeit zu Ende ist, die Pizza sofort herausnehmen, da die Garzeit sehr kurz ist und schon wenige Sekunden große Auswirkungen haben.
- Page 194 24- Anleitungen für die Einstellung Sabbath (einige Modelle) Die Funktionsweise Sabbath Ihres Ofens befolgt die jüdischen Regeln. Mit dieser Funktion kann der Ofen nur in statischer Funktion heizen. Wurde die Sabbath-Funktion gewählt, dann sind folgende Funktionen nicht aktiv: • Ofenlichter • Alle Tasten außer AN/AUS • Bratenthermometer • Zeitgesteuerte Funktionen • Timerfunktion...
-
Page 195: Pflege Und Reinigung Des Ofens
25 - Pflege und Reinigung des Ofens Zur Säuberung dürfen weder ätzende Putzmittel noch nigungskreislauf gestartet wird. Die Ikone "VORHÄNG- Dampfstrahlreiniger zum Einsatz kommen. ESCHLOSS" wird am Display angezeigt. Dies bedeutet, dass die Tür nicht geöffnet werden kann, während im In- neren Reinigungstemperaturen bestehen. -
Page 196: Um Die Selbstreinigung Einzustellen
26 - Selbstreinigung einstellen Um die Selbstreinigung einzustellen Startverzögerung bei der Reinigung 1. Drücken Sie den ON/OFF-Knopf, wählen Sie das Symbol 1. Schritt 1 bis 3 oben folgen. aus und bestätigen Sie mit demselben Knopf. 2. Ikone berühren und überprüfen, ob "ZEITSTOPP" am 2. -
Page 197: Verriegelungssystem Der Tür (Nur Bei Einigen Modellen Erhältlich)
27 - Verriegelungssystem der Tür (nur bei einigen Modellen erhältlich) Automatischer Türverschluß beim Pyrolysekreislauf Aus Sicherheitsgründen sperrt die Tür automatisch, sobald die Funktionsweise der Selbstreinigung gewählt wird. Die Tür wird ebenso automatisch entriegelt, wenn die Reinigungszeit zu Ende ist, aber erst nachdem die Temperatur sich wieder in einem sicheren Bereich befindet. -
Page 198: Ofenbeleuchtung Austauschen
28 - Ofenbeleuchtung austauschen • Jeder Ofen ist mit Halogenleuchten ausgestattet, die sich OFENLICHT an den Seitenwänden des Ofens befinden. • Die Leuchten gehen an, wenn die Ofentür geöffnet wird oder wenn der Ofen einen Garvorgang ausführt. • Die Ofenbeleuchtung funktioniert SELBSTREINIGUNG nicht. • Jede Leuchte besteht... -
Page 199: Merkmale Ihres Kochfeldes
29 - Merkmale Ihres Kochfeldes KOCHFELD 48” A - Roste BRENNERLEISTUNGSWERTE: BTU/HR NG (Erdgas) LP (Propan) MODELL 48“ 13650 (Btu/h) - 4000W/1200 (Btu/h) 350W 13650 (Btu/h) - 4000W/1200 (Btu/h) 350W 1 DOPPELKRONEN (Brenner & Knopf) 2 DOPPELKRONEN (Brenner & Knopf) 13650 (Btu/h) - 4000W/1200 (Btu/h) 350W 13650 (Btu/h) - 4000W/1200 (Btu/h) 350W 13650 (Btu/h) - 4000W/1200 (Btu/h) 350W 13650 (Btu/h) - 4000W/1200 (Btu/h) 350W 3 DOPPELKRONEN (Brenner &... - Page 200 29 - Merkmale Ihres Kochfeldes GRILLPLATTE D - Grillplatte E - Brennerabdeckung F - Halterung Grillplatte...
-
Page 201: Gas-Kochfeld-Betrieb
30 - Gas-Kochfeld-Betrieb Einstellung des Gasregelknopfes Gasbrenner Elektrische Gaszündung Das Design der Gasbrenner dieser Kochfeld-Modelle ermöglicht eine angenehme Option für das Kochen, bei der Die Gasbrenner verwenden eine elektrische Zündvorrichtung, Größe, Leistung und Kochen eine wichtige Rolle spielen. die sich in der Nähe jedes Brenners befindet und die Zündung des Brenners gewährleistet. -
Page 202: Extra-Versiegelte Brenneroberfläche
30 - Gas-Kochfeld-Betrieb Die Brennerflammen Gasbrenner reinigen: Schalten Sie jeden Brenner ein. Die Flammen sollten eine WICHTIG blaue Farbe haben und keine Spuren von Gelb aufweisen. Die Brennerflammen sollten nicht flattern oder vom Brenner wegblasen. Der Innenkegel der Flamme sollte zwischen Stellen Sie vor dem Reinigen sicher, dass alle 1/2"... -
Page 203: Elektrische Gaszündung
30 - Gas-Kochfeld-Betrieb Elektrische Gaszündung Ausschalten des Brenners Drehen Sie den Knopf im Uhrzeigersinn bis zur Off-Position. Grillplatte-Brenner verwendet eine elektrische Sicherstellen, dass die Flamme vollständig erlischt. Zündvorrichtung, die sich in der Nähe des Brenners befindet und die Zündung des Brenners gewährleistet. Er wird thermostatisch gesteuert, um eine konstante Temperatur GRILLPLATTE BRENNER KNOF aufrechtzuerhalten. -
Page 204: Kochentipps
31 - Funktionsweise Gas-Kochfeld mit Grill Kochentipps • Die Grillplatte etwa 20 Minuten vorheizen und dann die EXPLOSIONSANSICHT BRENNER GRILLPLATTE gewünschte Temperatur einstellen. • Verwenden Sie flüssiges Speiseöl, Kochsprays oder Butter für Eier, Pfannkuchen, French Toast, Fisch und Sandwiches. Dies hilft, das Anhaften zu verringern. (Verwenden Sie nur Fette/Öle, die hohe Temperaturen vertragen) • Tupfen Sie nasse Lebensmittel mit einem Papiertuch ab, um Spritzer beim Grillen zu vermeiden. -
Page 205: Kochgeschirr
32 - Kochgeschirr WICHTIG: Lassen Sie niemals leeres Kochgeschirr auf WARNUNG einer heißen Kochstelle, einem Element oder einem Oberflächenbrenner stehen. Ideales Kochgeschirr sollte einen flachen Boden, gerade Seiten und einen gut passenden Deckel haben und das Material sollte von mittlerer bis schwerer Dicke sein. Raue Oberflächen können das Kochfeld verkratzen. -
Page 206: Allgemeine Ofenpflege
33 - Allgemeine Ofenpflege Wie man die Ofenreinigungstabelle verwendet 1. Suchen Sie die Nummer des zu reinigenden Teils in der Abbildung auf dieser Seite. 2. Suchen Sie den Namen des Teils in der Tabelle. • Verwenden Sie die Reinigungsmethode in der linken Spalte, wenn der Ofen farbig emailliert ist. • Verwenden Sie die Reinigungsmethode in der rechten Spalte, wenn der Ofen aus Edelstahl besteht. -
Page 207: Ofenausführungen / Reinigungsmethoden
34 - Ofenausführungen / Reinigungsmethoden Der gesamte Ofen kann auf sichere Weise mit einem Seifenschwamm gereinigt, gespült und getrocknet werden. Wenn hartnäckige Verschmutzungen zurückbleiben, befolgen Sie die unten empfohlenen Reinigungsmethoden. • Verwenden Sie immer den mildesten Reiniger, der dazu geeignet ist. • Reiben Sie Metalloberflächen in Faserrichtung ab. -
Page 208: Reinigung Des Kochfeldes
35 - Reinigung des Kochfeldes Das gesamte Kochfeld kann sicher gereinigt REINIGUNG DES KOCHFELDES werden, indem man es mit einem geseiften Schwamm abwischt, dann abspült trocknet. Wenn hartnäckige Verschmutzungen zurückbleiben, befolgen unten empfohlenen Reinigungsmethoden. ACHTUNG • Stellen Sie vor der Reinigung sicher, dass die Brenner ausgeschaltet und die Roste gekühlt sind. - Page 209 35 - Reinigung des Kochfeldes Teile und Vorgeschlagene Reinigungsmittel Vorschläge/Anmerkungen Materialien Nicht scheuernde Reinigungsmittel: Heißes Brennerdeckel und Die Roste sind schwer; seien Sie beim Heben vorsichtig. Auf eine geschützte Oberfläche legen. Roste Wasser Reinigungsmittel, Fantastic, Aufgrund der extremen Temperaturen an den (Porzellan-Emaille auf Formula 409.
- Page 210 36 - Lösung von Betriebsproblemen Bevor Sie sich mit dem Kundendienst in Verbindung setzen, prüfen Sie bitte Folgendes, um unnötige Kosten des Kundendienstes zu vermeiden. Problem des Ofens Schritte zur Lösung des Problems Fehler F1030* oder F2030* Es gibt ein Problem mit dem Verriegelungsmechanismus. Stromversorgung unterbrechen erscheint an der Anzeige.
-
Page 211: Lösung Von Betriebsproblemen
36 - Lösung von Betriebsproblemen Problem des Ofens Schritte zur Lösung des Problems eine Haushaltssicherung Ersetzen Sie die Sicherung oder setzen Sie den Stromkreis zurück. durchgebrannt oder wurde der Schutzschalter ausgelöst? Oberflächenbrenner funktionieren nicht Werden die Oberflächenbrenner Schalten Sie einen der Oberflächen-Brennerknöpfe ein, um Luft aus den Gasleitungen zum ersten Mal eingesetzt? abzulassen. - Page 212 37 - Lösung von Backproblemen Sowie beim Backen als auch beim Backen mit Umluft können aus vielerlei Gründen, außer einer Fehlfunktion des Ofens, schlechte Ergebnisse erzielt werden. Überprüfen Sie die unten aufgeführte Grafik, in der die Ursachen der meisten Probleme aufgeführt sind.
-
Page 213: Assistenz Oder Kundendienst
38 - Assistenz oder Kundendienst Bevor Sie sich mit dem Kundendienst in Verbindung setzen, überprüfen sie bitte die Liste mit der „Störungsbeseitigung.“ Dadurch können Sie eventuell die Kosten für den Kundendiensteinsatz sparen. Falls Sie noch immer Hilfe brauchen, dann befolgen Sie bitte die nachstehenden Anweisungen. Bitte teilen Sie uns beim Anruf das Kaufdatum und die komplette Nummer des Modells und der Serie ihres Apparats mit. - Page 215 INHOUDSOPGAVE PAG. INHOUDSOPGAVE PAG. 1- Kenmerken van uw oven 14 - Gebruiksaanwijzing De eerste keer dat u de oven gebruikt 2 - Speciale waarschuwingen Ovenroosters Voorafgaand aan de installatie Uitschuifbare ovenroosters 3 - Veiligheidsaanwijzingen 15 - Gebruiksaanwijzingen Veiligheid voor de zelfreinigende oven Aanwijzingen voor eerste inschakeling 4 - Afmetingen product en Selectie ovenkamer (dubbele oven)
- Page 216 INHOUDSOPGAVE PAG. 26 - Instelling modus automatische reiniging De instelling van de automatische reiniging De reinigingstijd wijzigen De start van de reiniging uitstellen 27 - Deurvergrendelingssysteem (alleen beschikbaar op sommige modellen) Automatische deurvergrendeling tijdens de pyrolytische cyclus Doe-het-zelf onderhoud verwijderen ovendeur 28 - Een ovenlamp vervangen 29 - Kenmerken van uw kookplaat 30 - Werking gaskookplaat...
- Page 217 1 - Kenmerken van uw oven KENMERKEN VAN UW OVEN Display bedieningspaneel Koelventilatoren Brander braadslede Deurpakking Halogeenlamp Halogeenlamp Halogeenlamp Halogeenlamp Onderste brander (verborgen) Onderste brander (verborgen) Typeplaatje model en serienummer Ventilator hete lucht (verborgen) Achterkant ovenrooster Voorkant ovenrooster Rooster braadslede Stop braadslede Braadslede Telescopisch rooster...
- Page 218 1 - Kenmerken van uw oven INHOUD VAN DE LEVERING HOEVEELH. BESCHRIJVING HOEVEELH. BESCHRIJVING GASFORNUIS GIETIJZEREN ROOSTERS 1” LIJST EILAND TWEE GRILLPLAAT (VOOR BEVESTIGINGSSCHROEVEN MODELLEN 122 cm) + BEUGELS STOOTPLAAT SET GASOMBOUW VOETEN VOOR 76,2 & NIPPEL 91,4 cm VOETEN VOOR 122 cm PAKKING / PAKKINGRING HANDLEIDING VOET MET KRAAG...
- Page 219 2 - Speciale waarschuwingen BELANGRIJK: Bewaar deze aanwijzingen voor de plaatselijke elektrische inspecteur. WAARSCHUWING INSTALLATEUR: Deze handleiding moet door Dit is het symbool voor een veiligheidswaarschuwing. eigenaar bewaard worden voor Dit symbool waarschuwt u voor potentiële gevaren die toekomstige raadpleging. kunnen leiden tot letsel of de dood, voor u en anderen.
- Page 220 3 - Veiligheidsaanwijzingen • Alvorens de oven te openen voor het eerst gebruikt, BELANGRIJK is het aan te raden deze eerst een uur lang leeg op de maximale temperatuur te laten werken om Het apparaat moet worden aangesloten de geur van de isolatiematerialen te verwijderen. door een gekwalificeerde technicus, •...
- Page 221 3 - Veiligheidsaanwijzingen • Plaats de handvatten van pannen naar de binnenkant WAARSCHUWING toe zodat ze zich niet boven de aangrenzende werkoppervlakken, de branders of voorbij de rand van Zorg dat het apparaat is uitgeschakeld de kookplaat bevinden. alvorens de lamp te vervangen om de •...
- Page 222 3 - Veiligheidsaanwijzingen Veiligheid voor de zelfreinigende oven • Verzamel lang haar in een staart. • Raak verwarmingselementen binnenste oppervlakken van de oven niet aan. • Zorg ervoor dat de deur gesloten is en dat hij niet geopend kan worden nadat de knop naar de stand •...
- Page 223 4 - Afmetingen product en installatieafmetingen AFMETINGEN PRODUCT Modellen gasfornuis 122 cm breed 47 7/8” (121.6) 29 3/4” (75.6) 27 1/2” (69.7) 9" (22.8) [optioneel] 3" (7.6) 7” (17.9) Max. 37 1/4” (94.7) Min. 35 3/8” (89.8) 3/8” (1) 1 3/8” (3.5) 3 3/8”...
- Page 224 4 - Afmetingen product en installatieafmetingen INSTALLATIEAFMETINGEN min 25 1/2” (65) Minimaal tot brandbaar max 13” (33) materiaal of tot de onderkant van de afzuigkap min 18” (45.7) min 18” (45.7) min 6” (15.2) min 6” (15.2) 3” ( 9 ) 3”...
- Page 225 4 - Afmetingen product en installatieafmetingen Voorafgaand aan de verplaatsing van het gasfornuis moeten WAARSCHUWING eventuele afgewerkte vloeren beschermd worden en de ovendeuren geblokkeerd worden om schade te voorkomen. Om te controleren of de kantelbeveiligingsbeugel is Combinaties met afzuigkap: geïnstalleerd en geactiveerd: Aanbevolen wordt om deze gasfornuizen te installeren in •...
- Page 226 5 - Informatie voor installatie NOODZAKELIJK GEREEDSCHAP WAARSCHUWING • Gevaar hoog gewicht Voor de verplaatsing en installatie van het gasfornuis zijn er twee of meer personen nodig. Niet-naleving van dit voorschrift kan leiden tot rugletsel en ander letsel. • Gevaar voor snijwonden Let op voor scherpe randen.
- Page 227 6 - Installatie-aanwijzingen Bij de installatie de pootjes mag het gasfornuis niet op de STAP 2 zijkant worden gekanteld. De zijwanden zijn niet geschikt Open de bovenkant (2) van de verpakking en verwijder om het gewicht van het gasfornuis te dragen en zullen de accessoires (3), verwijder vervolgens het kartonnen doorbuigen.
- Page 228 6 - Installatie-aanwijzingen STAP 3 (alleen voor modellen 122 cm breed) STAP 5 Verwijder het achterste houten anker (5) en de voorste Schuif het apparaat verder en kantel het achterwaarts (9), metalen bevestigingsbeugels (6). plaats de achterste poten op de vloer en monteer dan de voorste poten (10);...
- Page 229 6 - Installatie-aanwijzingen STAP 7 STAP 8 In geval het gasfornuis verplaatst moet worden, gebruik Installeer de achterste bescherming (indien aanwezig) met dan de verpakkingselementen van schuim of karton (13) de drie schroeven op de achterkant. In enkele gevallen rond het apparaat om de afgewerkte oppervlakken van het kan dit een optionele achterste bescherming zijn die apart gasfornuis te beschermen tegen contact met de steekwagen is besteld, in plaats van de bij het gasfornuis geleverde...
- Page 230 6 - Installatie-aanwijzingen STAP 9 STAP 10 Na het voltooien van de aansluitingen op het elektriciteits- en Haak de lipjes van de stootplaat in de sleuven aan beide gasnet (zie de bijgevoegde aanwijzingen), moeten de vier zijden van het onderstel en draai de plaat omhoog tot de hoeken in het uitgespaarde gebied gemeten worden om te magneten op de bovenkant ervan contact maken en de controleren of de vloer vlak is.
- Page 231 7 - Eisen gasnet DE AANSLUITING OP HET GASNET MOET WORDEN c) de plekken van de openingen moeten zo gekozen worden dat hun eventuele belemmering wordt voorkomen; de UITGEVOERD DOOR GEKWALIFICEERDE openingen in buitenmuren worden beschermd worden INSTALLATEUR OF ONDERHOUDSMONTEUR met roosters, metaalgaas, enz.
- Page 232 8 - Ombouw naar een ander soort gas Ombouw naar een ander soort gas Alvorens het apparaat om te bouwen voor gebruik met een ander soort gas moet het momenteel ingestelde soort gas gecontroleerd worden op de sticker (Afbeelding 1 pagina 3) op het apparaat. Koppel de elektriciteitsvoorziening van het apparaat los.
- Page 233 8 - Ombouw naar een ander soort gas Bovenste brander 4,00 kW Nominale branderbelasting 4,00 4,00 4,00 4,00 Gassproeier binnenste ring maat Gassproeier buitenste ring maat Verbruik 291 g/u 291 g/u 291 g/u 291 g/u Gasfamilie 3B/P 3B/P 3B/P "G30G31" "G30G31"...
- Page 234 8 - Ombouw naar een ander soort gas Bovenste bakplaat 3,35 kW Nominale branderbelasting 3,35 3,35 3,35 3,35 Gassproeier maat Verbruik 244 g/u 244 g/u 244 g/u 244 g/u Gasfamilie 3B/P 3B/P 3B/P "G30G31" "G30G31" "G30G31" "G30G31" Gasdruk mbar "28…3037"...
- Page 235 8 - Ombouw naar een ander soort gas Bovenste brander 4,50 kW Nominale 4,50 4,50 4,50 4,50 4,50 4,50 4,50 4,50 4,50 4,50 branderbelasting Gassproeier binnenste ring maat Gassproeier binnenste ring maat Verbruik 429 l/u 429 l/u 429 l/u 488 l/u 498 l/u 498 l/u 429 l/u 498 l/u 595 l/u 523 l/u Gasfamilie "G20 G25.3...
- Page 236 8 - Ombouw naar een ander soort gas Bovenste brander 4,00 kW Nominale 4,00 4,00 4,00 4,00 4,00 4,00 4,00 4,00 4,00 4,00 branderbelasting Gassproeier binnenste ring maat Gassproeier binnenste ring maat Verbruik 381 l/u 381 l/u 381 l/u 433 l/u 443 l/u 443 l/u 381 l/u 381 l/u 529 l/u 464 l/u Gasfamilie "G20 G25.3...
- Page 237 8 - Ombouw naar een ander soort gas Bovenste brander 3,35 kW Nominale 3,35 3,35 3,35 3,35 3,35 3,35 3,35 3,35 3,35 3,35 branderbelasting Gassproeier maat Verbruik 319 l/u 319 l/u 319 l/u 363 l/u 371 l/u 371 l/u 319 l/u 371 l/u 443 l/u 389 l/u Gasfamilie "G20 G25.3...
- Page 238 8 - Ombouw naar een ander soort gas Vervanging gassproeiers (brander twee ringen) Vervanging gassproeier (grillplaat) 1. Verwijder de roosters en de branderdeksels. 1. Verwijder de grillplaat. 2. Verwijder de aluminium branderkelk. 2. Verwijder de afdekking van de brander. 3. Verwijder de drie schroeven van de branderkelk (1). 3.
- Page 239 8 - Ombouw naar een ander soort gas Afstelling lage vlam Bij het verlaten van de fabriek zijn op dit apparaat de afstellingen voor lage en gemiddelde vlam al geregeld. Indien verdere afstelling is vereist, ga dan als volgt te werk: GEVAAR Het ontsteken van gasbranders met een lucifer Afstelling voor brander met één of...
- Page 240 9 - Ombouw voor LPG of aardgas Een correcte afstelling komt overeen met een stabiele blauwe vlam van minimale grootte. De definitieve afstelling moet gecontroleerd worden door de knop verscheidene keren van hoog naar laag te draaien: de vlam mag niet uitgaan. Deze afstelling van de lage vlam heeft automatisch de afstelling van de gemiddelde vlam ten gevolge.
- Page 241 10 - Elektriciteitsvoorziening GEABSORBEERD VERMOGEN GROTE OVEN KLEINE OVEN bovenste element oven: 3500 + 1000W 230V - 3500 + 1000W 240V 2100 + 700W 230V - 2100 + 700W 240V onderste element oven: 3000W 230V - 3000W 240V 1750W 230V - 1750W 240V rond element (hete 2x1300W 240V or 1x2500W 240V 1x2500W 240V...
- Page 242 11 - Bedieningspaneel Uw apparaat kan iets afwijken ten opzichte van onderstaande afbeeldingen. - Beeldscherm - Regelknoppen grote oven - Regelknoppen kleine oven Bedieningsknoppen De regelknoppen moeten bediend worden door ze links- of rechtsom te draaien en zachtjes in te drukken. De regeling zal niet werken als meerdere knoppen tegelijkertijd worden ingedrukt of gedraaid.
- Page 243 12 - Algemene informatie oven Verwijder voor het eerste gebruik van de oven alle verpakking en vreemde materialen van de oven(s). Als dit type materiaal niet wordt weggenomen, zou het kunnen smelten of verbranden tijdens het gebruik van het apparaat. Foutcodes Voorverwarmen en snel voorverwarmen Deze code verschijnt in het geval de elektronische besturing...
- Page 244 13 - Algemene tips oven De oven voorverwarmen Oven condensatie en temperatuur • Bij gebruik van de modi Bakken, Hetelucht Bakken of • Het is normaal dat een bepaalde hoeveelheid vocht Hetelucht Roosteren moet de oven worden voorverwarmd. verdampt uit het voedsel tijdens een bereidingsproces. De hoeveelheid is afhankelijk van het vochtgehalte van •...
- Page 245 14 - Gebruiksaanwijzing De eerste keer dat u de oven gebruikt LET OP Maak de oven grondig schoon met water en zeep en spoel Zorg ervoor niet te forceren om schade aan het goed af. email te voorkomen. Laat de oven ongeveer 30 minuten bij maximale temperatuur functioneren om alle sporen van vet te verbranden;...
- Page 246 14 - Gebruiksaanwijzing Uitschuifbare ovenroosters Een uitschuifbaar ovenrooster vervangen: 1. Pak het rooster aan beide kanten stevig vast. Plaats het rooster (inclusief het frame) boven de gewenste • Het uitschuifbare ovenrooster vereenvoudigt de toegang roostergeleider tijdens het bereiden van de gerechten.# Het ovenrooster is langer dan de standaard platte ovenroosters en brengt het gerecht dichterbij de gebruiker.
- Page 247 15 - Gebruiksaanwijzing Aanwijzingen voor eerste inschakeling VOORBEELD 2 GROTE oven: ROOD pictogram - INGESCHAKELD (actief / geselecteerd) KLEINE oven: ROOD pictogram - INGESCHAKELD (actief / niet geselecteerd) Nadat het gasfornuis voor de eerste keer op de netvoeding wordt aangesloten, bereid de besturing zich automatisch voor op het instellen van een aantal gebruikersinstellingen die in het geheugen blijven opgeslagen voor de latere inschakelingen.
- Page 248 16 - Gebruikersinstellingen Temperatuur en Gewicht Selecteer bij ingeschakelde oven het pictogram bevestig met de functieknop om het menu INSTELLINGEN te openen. In dit menu kan de instelling van uw oven Draai de knop [FUNCTIE] voor de selectie van de twee gepersonaliseerd worden.
- Page 249 16 - Gebruikersinstellingen Datum Zoemer Draai de knop [FUNCTIE] voor de selectie van het formaat Draai de knop [FUNCTIE] voor de selectie van het niveau van de datum onder de opties “D.M.J. – J.M.D. – M.D.J” van het geluidsniveau en bevestig door middel van druk op en bevestig door middel van druk op de knop [FUNCTIE].
- Page 250 17 - Systeeminstelling Demo Selecteer bij ingeschakelde oven het pictogram en bevestig met de knop [FUNCTIE] om het menu INSTELLINGEN te openen. Dit menu maakt het instellen van Het doel van deze functie is de instelling van de modus een aantal parameters of speciale functies mogelijk. Het DEMO, functie waarmee de oven niet gebruikt kan worden, geeft ook toegang tot de foutenlijst.
- Page 251 18 - Uw oven starten De oven in- en uitschakelen Functies BELANGRIJK ONTDOOIEN • Na de uitschakeling van de oven kan de koelventilator nog blijven functioneren, tot de binnenste delen van de DROGEN oven afgekoeld zijn. VERWARMEN Druk op de knop [ON/OFF] om de oven IN te SCHAKELEN en druk nogmaals om de oven UIT te SCHAKELEN.
- Page 252 18 - Uw oven starten BEREIDINGSMODUS PICTOGRAM SNEL VOORVER- VLEES- TEMPERATUUR WARMEN THERMOMETER Min. Voorinstelling Max. ONTDOOIEN DROGEN 120° F (50° C) 140° F (60° C) 160° F (70° C) VERWARMEN 85° F (30° C) 105° F (40° C) 120° F (50° C) VERWARMEN PLUS 130°...
- Page 253 18 - Uw oven starten Voorverwarmingsfase Voor de selectie van SNEL VOORVERWARMEN: 1. Selecteer en start de bereidingsmodus en draai de knop Tijdens de voorverwarmingsfase van de oven wordt de naar RECHTS. momentane temperatuur weergegeven onder het pictogram 2. Open het menu functies en selecteer het pictogram van de bereidingsmodus.
- Page 254 19 - Getimede werking oven Zorg ervoor dat de klok met de tijd van de dag de juiste tijd aangeeft. De getimede modus schakelt de oven uit aan het einde van de bereidingstijd. LET OP Laat voedsel nooit langer dan een uur voorafgaand aan of na de bereiding in de oven staan. Dit zou de eigenschappen van het voedsel zelf kunnen verslechteren.
- Page 255 20 - Instelling vleesthermometer (indien aanwezig) Wanneer vlees gebraden wordt of biefstuk of gevogelte zich heel snel. Gehakt is wat dat betreft bijzonder risicovol. wordt bereid, is dit de beste manier om te weten of het Om het vermenigvuldigen van bacteriën tegen te gaan, zijn voedsel juist gegaard is.
- Page 256 20 - Instelling vleesthermometer (indien aanwezig) 1. Stel de gewenste temperatuur van de thermometer in WAARSCHUWING door middel van de knop [TEMPERATUUR]. • Gebruik, om brandwonden te vermijden, een ovenwant om de vleesthermometer te verplaatsen wanneer de oven heet is. •...
- Page 257 21 - Begrip van de verschillende bereidingsmodi van de oven Tips en technieken voor roosteren • Ovengerechten bereiden met meerdere bakplaten kan worden uitgevoerd op de roosterstanden 1, 2, 3 en 4. Alle vier de ovenroosters kunnen gebruikt worden voor Roosteren is een bepaalde bereiding met verwarmde lucht.
- Page 258 21 - Begrip van de verschillende bereidingsmodi van de oven Snelle en gemakkelijke recepttips. Tips en technieken voor hetelucht braden Converteren van standaard BAKKEN naar HETELUCHT • Plaats het ovenrooster in de vereiste stand alvorens de BAKKEN: oven in te schakelen. Verlaag de temperatuur met 15 °C (25°F).
- Page 259 21 - Begrip van de verschillende bereidingsmodi van de oven Droogtabel VOEDINGSWAREN VOORBEREIDING BIJ BENADERING GAARHEIDSTEST DROOGTIJD* (uren) FRUIT Gedoopt in ¼ kopje citroensap Appels 11 - 15 Licht buigzaam en 2 kopjes water, ¼ plakjes. Gedoopt in ¼ kopje citroensap Bananen 11 - 15 Licht buigzaam...
- Page 260 22 - Recepten De functie Recept van uw oven biedt u de mogelijkheid om gerechten te bereiden zonder dat u de oven elke keer handmatig hoeft in te stellen. Met het selecteren van een “INGESTELD” recept worden automatisch de bereidingsmodus, temperatuur en tijd ingesteld volgens het gekozen recept uit het menu.
- Page 261 22 - Recepten 7. Bevestig, voor de start van het recept, door te drukken op 4. Op dit punt kan het recept worden opgeslagen in de de knop [FUNCTIE]. lijst “PERSOONLIJK” door “OPSLAAN” te selecteren en Tijdens een recept zullen een aantal akoestische en te bevestigen met de knop [FUNCTIE].
- Page 262 23 - Classic Pizza (sommige modellen) De functie CLASSIC PIZZA is specifiek ontworpen om in slechts een paar minuten perfecte PIZZA’S te kunnen bakken. Selecteer, voor perfecte resultaten, de om bij dit speciale recept te komen. Na het maken van deze instellingen doet Classic Pizza de rest, met het bereiken van ongeveer 650°F (345°C) door de verwarmingselementen op 100% van hun capaciteit in te schakelen.
- Page 263 23 - Classic Pizza (sommige modellen) Tips Voor Een Lekkere Pizza: Gezien de hoge temperaturen en de korte bereidingstijd, raden wij aan om de pizza’s snel in de oven te plaatsen en eruit te verwijderen, zodat de deur zo kort mogelijk open staat en de temperatuur niet daalt. Verwijder de pizza meteen uit de oven zodra de piep klinkt en het scherm aangeeft dat het bakken klaar is, omdat de bereidingstijd zo kort is en zelfs een paar seconden een groot effect kunnen hebben.
- Page 264 24 - Aanwijzingen modus Sabbat (op sommige modellen) De modus Sabbat van de oven leeft de Joodse wetten na. Deze functie zorgt ervoor dat de oven alleen in statische functie werkt. De volgende functies worden uitgeschakeld wanneer de functie Sabbat wordt geselecteerd: •...
- Page 265 25 - Oven Onderhoud en Reiniging Wij raden aan geen schuurmiddelen en stoomapparaten te Het pictogram "HANGSLOT" verschijnt op het scherm. gebruiken om de oven te reinigen. Dit zorgt er voor dat de deur niet geopend kan worden wanneer de ovenruimte op schoonmaak temperaturen is. •...
- Page 266 26 - Instelling modus automatische reiniging De instelling van de automatische De start van de reiniging uitstellen 1. Volg de bovenstaande stappen van 1 tot 3. reiniging 2. Druk op het pictogram en controleer of “STOPTIJD” 1. Druk op de knop ON/OFF en selecteer het pictogram op het scherm wordt weergegeven.
- Page 267 27 - Deurvergrendelingssyteem (alleen beschikbaar op sommige modellen) Automatische deurvergrendeling tijdens de pyrolytische cyclus veiligheidsredenen wordt deur automatisch vergrendeld zodra de modus automatische reiniging wordt geselecteerd. De deur wordt ook automatisch ontgrendeld als de reinigingstijd is verstreken, maar alleen nadat de temperatuur is gedaald tot onder de veiligheidsdrempel.
- Page 268 28 - Een ovenlamp vervangen • Elke oven is uitgerust met halogeenlampen in de zijwanden OVENLAMP van de oven. • De lampen zijn aan als de deur open is of als de oven in een bereidingscyclus is. • De ovenlampen zijn niet aan tijdens de AUTOMATISCHE REINIGING.
- Page 269 29 - Kenmerken van uw kookplaat KOOKPLAAT 122 CM A - Roosters UITGANGSVERMOGEN BRANDER BTU/UUR Aardgas LPG (Propaan) MODEL 122 cm 13650 (Btu/uur) - 4000W/1200 (Btu/uur) 350W 13650 (Btu/uur) - 4000W/1200 (Btu/uur) 350W 1 DUBBELE KROON (brander & knop) 2 DUBBELE KROON (brander & knop) 13650 (Btu/uur) - 4000W/1200 (Btu/uur) 350W 13650 (Btu/uur) - 4000W/1200 (Btu/uur) 350W 13650 (Btu/uur) - 4000W/1200 (Btu/uur) 350W 13650 (Btu/uur) - 4000W/1200 (Btu/uur) 350W 3 DUBBELE KROON (brander &...
- Page 270 29 - Kenmerken van uw kookplaat GRILLPLAAT D - Grillplaat E - Kap brander F - Drager grillplaat...
- Page 271 30 - Werking gaskookplaat Instelling knop gasregeling Gasbranders Elektrische gasontsteking Bij het ontwerp van de gasbranders van deze modellen kookplaat is bijzondere zorg besteed aan comfort bij het De gasbrander gebruikt een elektrisch ontstekingsmechanisme koken met als primaire aandachtspunten de maat, het dat zicht naast elke brander bevindt en de ontsteking ervan vermogen en de functie voor sudderen.
- Page 272 30 - Werking gaskookplaat De vlammen van de branders Voor de reiniging van de gasbrander: Ontsteek de verschillende branders. De vlammen moeten BELANGRIJK blauw zijn, zonder sporen met een gele kleur. De vlammen van de brander mogen niet flakkeren of van de brander weg bewegen.
- Page 273 30 - Werking gaskookplaat Elektrische gasontsteking De brander uitschakelen De brander van de grillplaat gebruikt een elektrisch Draai de knop helemaal rechtsom naar de positie uit. ontstekingsmechanisme dat zich naast de brander bevindt Controleer of de vlam volledig dooft. en de ontsteking ervan verzekert. Dit mechanisme wordt thermostatisch geregeld voor het handhaven van een gelijkmatige temperatuur.
- Page 274 31 - Werking grillplaat gaskookplaat Tips voor koken • Verwarm de grillplaat ongeveer 20 minuten voor en stel EXPLOSIETEKENING VAN DE BRANDER VAN DE GRILLPLAAT dan de gewenste temperatuur in. • Gebruik vloeibare olie, oliespray of boter voor eieren, pannenkoeken, toast, vis en sandwiches. Dit voorkomt dat het voedsel vastplakt.
- Page 275 32 - Pannen BELANGRIJK: Laat nooit lege pannen en potten op een WAARSCHUWING heet oppervlak van het kookgebied, op een element of een oppervlaktebrander. Ideaal kookgerei heeft een platte bodem, rechte zijkanten, een goed passende deksel en moet van middeldik tot erg dik materiaal zijn gemaakt.
- Page 276 33 - Algemene verzorgen oven Gebruik van de tabel voor reiniging oven 1. Identificeer het nummer van het te reinigen onderdeel op de afbeelding van deze pagina. 2. Vind de naam van het onderdeel in de tabel. • Gebruik de in de linkerkolom aangegeven reinigingsmethode als de oven een gekleurde geëmailleerde afwerking heeft.
- Page 277 34 - Afwerking oven / Reinigingsmethoden De gehele oven kan veilig gereinigd worden met behulp van een spons en zeepsop; spoel vervolgens af en droog goed. Volg in geval van hardnekkig vuil de onderstaande reinigingsmethoden. • Gebruik altijd een voor het doel geschikt reinigingsmiddel dat zo mild mogelijk moet zijn. •...
- Page 278 35 - Reiniging van de kookplaat De gehele kookplaat kan veilig gereinigd worden REINIGING VAN DE KOOKPLAAT met een spons en zeepsop; spoel vervolgens af en droog goed. Volg in geval van hardnekkig vuil de onderstaande reinigingsmethoden. LET OP • Controleer voorafgaand aan de reiniging of de branders uit zijn en de roosters zijn afgekoeld.
- Page 279 35 - Reiniging van de kookplaat Onderdelen en Aanbevolen reinigingsmiddelen Suggesties/Geheugensteun materialen Niet-schurende reinigingsmiddelen: Heet Branderdeksel en De roosters zijn zwaar: wees voorzichtig bij het optillen. Plaats ze op een beschermde rooster water en reinigingsmiddel, Fantastic, Formula ondergrond. (Porseleinemail op 409.
- Page 280 36 - Operationele problemen oplossen Controleer het volgende, alvorens contact op te nemen met de technische dienst, om onnodige kosten te vermijden. Problemen van de oven Stappen voor probleemoplossing Foutcode F1030* or F2030* Er is een probleem met het vergrendelmechanisme. Schakel de stroom uit en verschijnt op het beeldscherm vervolgens na een paar seconden weer opnieuw in.
- Page 281 36 - Operationele problemen oplossen Problemen van de oven Stappen voor probleemoplossing De oppervlaktebranders functioneren niet Is dit de eerste keer dat de Draai alle knoppen van de oppervlaktebranders open om lucht uit de gasleidingen te oppervlaktebranders gebruikt verwijderen. worden? Is de regelknop correct ingesteld? Duw de knop in alvorens hem naar een instelling te draaien.
- Page 282 37 - Problemen van de bereidingen oplossen Of het nu om Bakken of Hetelucht Bakken gaat, slechte resultaten kunnen om vele redenen, anders dan een storing van de oven, voorkomen. Zie hieronder in de tabel de oorzaken voor de meeste voorkomende problemen. Omdat de grootte, de vorm en het materiaal van het bakgerei direct effect kunnen hebben op de bakresultaten, kan het een oplossing zijn om oud bakgerei dat verkleurd en door gebruik kromgetrokken is te vervangen.
- Page 283 38 - Technische bijstand Controleer eerst “Probleemoplossing” alvorens contact op te nemen met de technische dienst. Dit dit kan u gesprekskosten besparen. Volg onderstaande instructies, als u nog steeds hulp nodig heeft. Houd, wanneer u belt, de aankoopdatum, het modelnummer en het serienummer van het apparaat bij de hand.
- Page 286 09FL9580 ed 03/2020...
Need help?
Do you have a question about the SOFIA FSRC 4807 2P MK 2F X and is the answer not in the manual?
Questions and answers