Table of Contents
Advertisement
Quick Links
Bonanza F-33
The Beechcraft Bonanza was developed just after the end of WWII and first flown in 1947. Designed as a
low wing high performance private aircraft, the "V" tailed Bonanza combined performance and sleek looks
to deliver a very effective private airplane. However after years of utilizing the famous "V" tail design there
were numerous crashes mostly attributed to pilot error but the "V" tail design was recognized as a factor. In
the hands of inexperienced pilots the "V" tail could be difficult to master. The decision was made in the late
1950's to modify the Bonanza V-35 to use a redesigned conventional tail, rudder and elevator structure that
significantly change the looks of the Bonanza. This kit represents the "re-designed" Bonanza F-33 from
1966.
This new 1/48 scale kit features new tail tooling, and new markings with decals printed by Cartograf.
Standard features include detailed 6 cylinder air cooled engine, removable cowling, detailed interior and
position-able landing gear.
The following markings are included in this kit:
Beech F33A Bonanza, N5599P, Airline Training Center, Arizona, 1998
Beech F33A Bonanza, N5585Y, Airline Training Center, Arizona, 1998
Minicraft Models (US) LLC, 1501 Commerce Drive, Elgin IL 60123 USA
www.minicraftmodels.com
Printed in China
11670
Advertisement
Table of Contents

Summary of Contents for MINICRAFT Bonanza F-33
- Page 1 “V” tail could be difficult to master. The decision was made in the late 1950’s to modify the Bonanza V-35 to use a redesigned conventional tail, rudder and elevator structure that significantly change the looks of the Bonanza. This kit represents the “re-designed” Bonanza F-33 from 1966.
-
Page 2: Parts Layout Diagram
PARTS LAYOUT DIAGRAM 21 Optional Display Plate CLEAR Sprue (C) Lower Wing Right Fuselage Half Left Fuselage Half Left Upper Wing Right Upper Wing Display Stand 11670... -
Page 3: Cockpit Assembly
Cement DO NOT Cement Cut away Optional parts Repeat operation Symmetrical assembly Drill hole Coller Ne pas Coller Couper Choix RŽpeeter l' opŽration Kleben Nicht Kleben Scheiden Auswahlmoglichkeit Vorgang wiederholen Pegar No Pegar Cortar Eleccion Repitir la operacion Incollare Non Incollare Tagliere Scelta Ripetere... -
Page 4: Tail Assembly
TAIL ASSEMBLY Gently sand stabilizer mounting tabs as shown to assist alignment. All Parts Be sure to dy-fit parts before gluing. Note alignment diagram below. Note alignment ENGINE ASSEMBLY Crankcase DARK GRAY NOTE Cylinders ALUMINUM Oil pan (22) FLAT BLACK All Parts Exhausts BURNT METAL Assemble parts 6 with... -
Page 5: Final Assembly
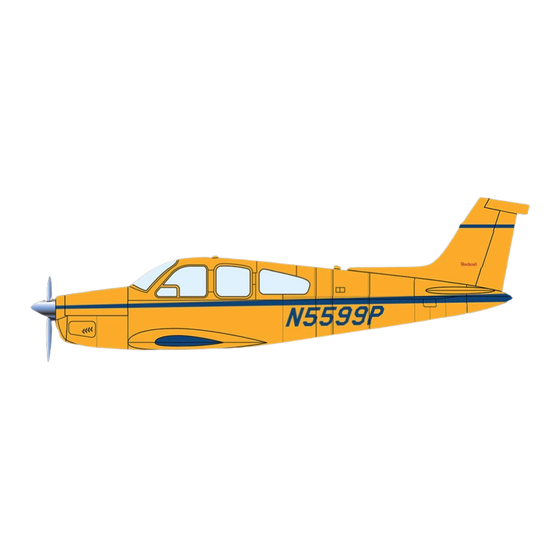
FINAL ASSEMBLY All Parts 41 (L/R) 10 LEFT 11 RIGHT 15 LEFT 36 (L/R) 16 RIGHT Stand Base Wheel hubs ALUMINUM Tires FLAT BLACK-GRAY Struts ALUMINUM Wheel hub ALUMINUM Tire FLAT BLACK-GRAY Strut ALUMINUM Exhausts BURNT METAL Propeller blades FLAT BLACK For retracted gear version, glue gear doors 10/11/23/24 in closed position. - Page 6 Beech F33A Bonanza, N5599P, Airline Training Center, Arizona, 1998 PAINTS A Aluminum (ModelMaster 1781, Acryl 4677) B Yellow (ModelMaster 1708, Acryl 4721) C Blue (ModelMaster 2727, Acryl 4661) D White (ModelMaster 1745, Acryl 4696) 11670 E Red (ModelMaster 2719, Acryl 4631)
- Page 7 Beech F33A Bonanza, N5585Y, Airline Training Center, Arizona, 1998 11670...
- Page 8 Your Minicraft model includes high-quality waterslide decals. These decals adhere best to a glossy surface; and it is recommended that you apply a clear gloss coat over your painted model. Use a sharp scissors or knife to cut individual decals from the carrier sheet. Do not cut into the clear film surrounding the individual decals.
Need help?
Do you have a question about the Bonanza F-33 and is the answer not in the manual?
Questions and answers