Advertisement
Quick Links
English
Please Note: Instructional images may vary
in style from the product you purchased.
BP1211GR_IM (May 2019)
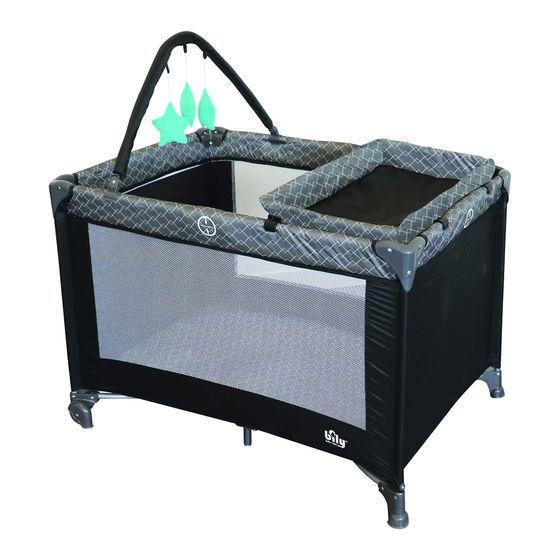
EASY-GO
PLAYARD
with Bassinet & Changer
ELFE JUVENILE PRODUCTS
2520 AVE MARIE-CURIE
1-800-667-8184
SAINT-LAURENT
(QC) H4S 1N1
service@elfe.ca
www.elfe.com
Advertisement

Related Manuals for bily EASY-GO PLAYARD


Summary of Contents for bily EASY-GO PLAYARD
- Page 1 EASY-GO PLAYARD with Bassinet & Changer English ELFE JUVENILE PRODUCTS 2520 AVE MARIE-CURIE SAINT-LAURENT (QC) H4S 1N1 1-800-667-8184 service@elfe.ca Please Note: Instructional images may vary www.elfe.com in style from the product you purchased. BP1211GR_IM (May 2019)
- Page 2 Parts List (B) Changer NOTE: clip position on tube C1, C2 and E should be facing outwards (A) Playard (C) Short Changer Tube C1 (D) Short Changer Tube C2 (G) Bassinet Attachment (E) Long Changer Tube D (H) Long Side Rails (X2) (F) Long Changer Tube E (I) Short Side Rails (X2) (L) Toy Bar...
- Page 3 Playard WARNING FAILURE TO FOLLOW THESE WARNINGS AND THE INSTRUCTIONS COULD RESULT IN SERIOUS INJURY OR DEATH. IF YOU CANNOT EXACTLY FOLLOW THE ACCOMPANYING INSTRUCTIONS, THEN DO NOT USE THIS PRODUCT. Setting Up the Playard • T HIS PRODUCT REQUIRES ADULT ASSEMBLY. • K eep fingers clear of top corners during setup. Be sure playard is completely set up before use.
- Page 4 • W hen child is able to pull to standing position, remove large toys and other objects that could serve as steps for climbing out. • D o not modify playard or add any attachments that are not listed in the owner’s manual, including an add-on bassinet. • C hild can become entrapped and die when improvised netting or covers are placed on top of a playard. Never add such items to confine child in playard. • N EVER leave child in product with side lowered. Be sure side is in raised and locked position whenever child is in product. • N EVER add a mattress, pillow, comforter or padding. Use ONLY mattress pad provided by BILY. • I f refinishing, use a nontoxic finish specified for children’s products. This product is not intended for commercial use.
- Page 5 Setting up the Playard 1. Unzip bag. Remove playard and stand unit upright. Separate the velcro tabs. 2. Remove mattress pad. 3. Separate the four corner posts.
- Page 6 Setting up the Playard 4. Lift the side rails upwards from the middle until each lock into position.(4A) Side rails must be raised above horizontal position before they lock.(4B) 5. Push down the centre support until it locks into position.
- Page 7 Setting up the Playard Parts Needed: (A) Playard (J) Mattress Pad 6. Lay mattress pad on floor of playard, softside up. 7. Pass the velcro tabs (x8) from the mattress pad through each slot in the playard and attach the velcro under the playard. 8. The playard is now ready for use.
- Page 8 Do not substitute parts. Contact the manufacturer if replacement parts or additional instructions are needed. • C hildren can suffocate on soft bedding. Do not place pillows, comforters or an additional mattress pad in this accessory. • D o not place this bassinet near a window or patio door where a child could reach the cord of a blind or curtain and be strangled. • U se only the mattress supplied by BILY with this bassinet. Do not add an additional mattress to this bassinet.
- Page 9 Assembling the Bassinet Attachment Parts Needed: (G) Bassinet Attachment (J) Mattress Pad (A) Playard (H) Long Side Rails (X2) (I) Short Side Rails (X2) 1. The bassinet is to be attached to the playard by a zipper and clip. Attach the zipper from the bassinet to the playard at the designated starting point.
- Page 10 Assembling the Bassinet Attachment 3. Slide the rails through the slats on the bottom of the bassinet attachment before connecting the bassinet rails into one another. 4. Connect the long rails to the short rails. 5. Place the mattress pad on top of the tubes and tuck the four corners in. Smooth out the surface of the mattress.
- Page 11 Changer WARNING • D o not use this accessory if you cannot exactly follow the instructions that come with it. • R emove this accessory when a child is in the playpen. • D o not use this accessory for a child who has reached 6.8 kg (15 lbs) • D o not leave a child unattended in or on this accessory. • D o not put a child to sleep or leave a sleeping child in or on this accessory.
- Page 12 Assembling the Changer Parts Needed: (C) Short Changer Tube C1 (B) Changer (A) Playard (D) Short Changer Tube C2 (F) Long Changer Tube E (E) Long Changer Tube D NOTE: clip position on tube C1, C2 and E should be facing outwards 1.
- Page 13 Assembling the Changer 5. Secure the changer on the playpen using the two plastic clips on the short side of top of playpen (picture 5). 6. Clip the 2 remaining plastic clips on the long side long side of the playpen (picture 6). 7. Fasten the changer’s clips onto playard. 8.
- Page 14 Assembling the Toybar Parts Needed: (L) Toy Bar (A) Playard 1. Place toy bar over the playard. 2. Press down on toybar handles to clip onto playard frame.
- Page 15 To Fold the Playard for Storage 1. Release the velcro tabs under the playard. 2. Remove mattress pad in order to release locking mechanism. 3. Pull up the handle on the bottom to release the lock. Then pull up the base about 25 cm (10”) high. 4.Press the buttons at the centre joint of each end rail and release downwards. Repeat for each side rail.
- Page 16 to Fold the Playard for Storage 5.Gather unit together. 6. Lay mattress pad on floor - soft side up - and lay playard on top. Wrap mattress pad around playard and fasten the velcro tabs. 7. Place playard into bag and zip together. 8. The playard is now ready for easy carrying or storage.
-
Page 17: Special Instructions
Cleaning You can spot clean the fabrics with a damp cloth and mild detergent. Do not bleach. Special Instructions -This playard is guaranteed to meet all federal and provincial standards and will provide many years of service provided you adhere to the guidelines provided for assembly, maintenance and operation. -For parts or assistance, do not return to retailer where playard was purchased. Call or write Elfe Juvenile Products. - Page 18 Important Information: Before you begin assembly, please read these directions. Store this instruction manual in the pocket located under the mattress pad, for future reference. If a part is missing or if you have any questions, call us. PLEASE DO NOT return product or parts to the store where they were purchased before calling us. Please call us toll free at: 1-800-667-8184 Our service is fast, free and easier than returning the product.
- Page 19 ELFE JUVENILE PRODUCTS 2520 AVE MARIE-CURIE SAINT-LAURENT (QC) H4S 1N1 service@elfe.ca www.elfe.com 1-800-667-8184...
Need help?
Do you have a question about the EASY-GO PLAYARD and is the answer not in the manual?
Questions and answers