
Related Manuals for Diamond XtremeTV PVR660 USB 2.0

Summary of Contents for Diamond XtremeTV PVR660 USB 2.0
- Page 1 XtremeTV PVR660 USB 2.0 Quick Start Guide ©2006 Diamond Multimedia. All rights reserved. p/n: 40036 version 2.0...
- Page 2 BLANK...
-
Page 3: Table Of Contents
Table of Contents Safety Notices Page 1 System Requirements Page 1 Package Contents Page 2 Introduction Page 3 Xtreme TV Hardware Installation Page 4 Xtreme TV Driver Installation Page 4 Xtreme TV Hardware Connections Page 6 Remote Control Installation Page 8 TotalMedia Installation Page 9 Using TotalMedia... -
Page 4: Safety Notices
XtremeTV PVR660/PVR660RC Safety Notices • The power cord to your computer must be connected to a properly wired and grounded receptacle. • Do not connect or disconnect any cables or perform installation, maintenance, or reconfiguration of this product during an electrical storm. •... -
Page 5: Package Contents
Package Contents Please verify your package contains the following items. PVR660 USB 2.0 Device Remote Control PVR660 Stand Installation CD USB power cable S-VIDEO Cable Quick Start Guide RCA Cables Warranty Card FM Radio Antenna PAGE 2... -
Page 6: Introduction
Introduction To The Diamond XtremeTV PVR660 Welcome to XtremeTV! The main purpose of XtremeTV is to act as a PVR (Personal Video Recorder). This means that you can program XtremeTV in advance to record multiple shows from different channels, each starting at different times. Once the shows are recorded you can easily view them at a later date. -
Page 7: Xtremetv Hardware Installation
XtremeTV Hardware Installation 1. With the computer booted up to the desktop first quit out of any pro- grams that may be running on your system. 2. Connect one end of the supplied USB cable an available USB port on your system. 3. - Page 8 2. Click Install the software automatically (Recommended) and click Next. 2. Click the Finish button. PAGE 5...
-
Page 9: Xtremetv Hardware Connections
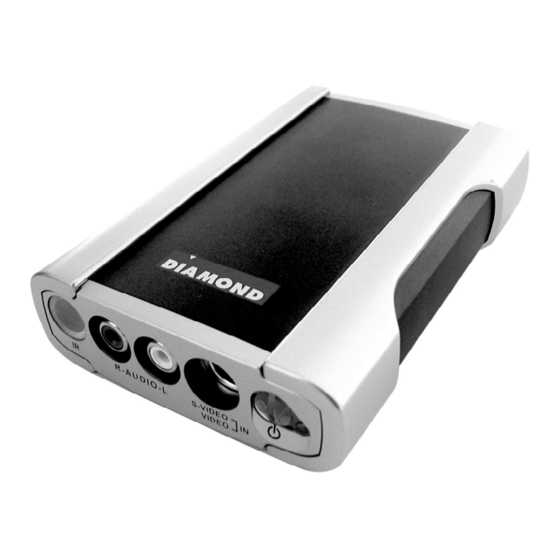
XtremeTV Hardware Connections Refer to the diagrams below for a description of all connections on the front of the PVR660. S-Video/ Audio Input Power Composite (not used) (Line in) Video Input PVR660 (front view) Audio Input (Line In) This is typically used for connecting the audio from a VCR, camcorder or other video device types to. - Page 10 XtremeTV Hardware Connections (continued) Refer to the diagrams below for a description of all connections on the back of the PVR660. DC Input TV Input (only use if plugged Antenna/ Antenna into non-powered Cable TV USB hub) PVR660 (back view) DC Input A USB >...
- Page 11 XtremeTV PVR660 Remote Control Instructions You will receive 1 of 2 types of remote controllers inside of the package. Please follow the instructions that match the type of remote control which was included inside your pack- age. Firefly Mini Installation Follow these instructions only if you received the Firefly Mini remote control inside of your package.
- Page 12 Arcsoft ® Total Media ® Arcsoft Total Media is a media center software with many built in ® ® features. This is where you can view live TV and schedule recordings of your favorite shows. Installation Instructions: Insert the XtremeTV installation CD into your CD-ROM drive and wait for the menu to appear.
- Page 13 3. Click Next to continue. 4. Click Yes to the license agreement. 5. Confirm the installation folder and click Next. PAGE 10...
- Page 14 6. Confirm the program folder and click Next. 7. Please wait while TotalMedia is being installed. 8. Click Finish to complete the installation. PAGE 11...
-
Page 15: Using Totalmedia
Using TotalMedia Launch TotalMedia by double clicking the TotalMedia icon located in the system tray. (highlighted with border, displayed below) The instructions for TotalMedia are broken down into 6 sections: Page 13 Photo Page 21 Music Page 27 Radio Page 33 Video Page 34 Setup... -
Page 16: First Time Setup
TotalMedia - TV Module To access the TV module click TV at the main menu. The following is a list of TV features and the pages they are on: First Time Setup Page 14 Watching TV Page 16 Electronic Program Guide Page 18 Recording TV Page 20... - Page 17 TotalMedia - TV Module - First Time Setup The following screens will appear the first time that the TV module has been launched. 1. Click Yes to continue. 2. Click Start to begin the scan. Please be patient while your channels are detected.
- Page 18 TotalMedia - TV Module - First Time Setup (continued) 3. Click OK after the channel scan results are displayed. 4. Click Save to preserve the channel lineup. PAGE 15...
- Page 19 TotalMedia - TV Module - Watching TV The above screen is displayed when you click TV from the main menu. The following controls are available: Full Screen Allows viewing the TV in full screen mode without any borders. Clicking EPG opens the electronic program guide (TV show listings) Channels This displays a listing of all of the channels that were detected...
- Page 20 TotalMedia - TV Module - Watching TV (continued) Schedule Use the schedule button to manually schedule a recording without using the information from the EPG (electronic program guide). Capture Frame Each time the Capture Frame button is clicked a .JPG file will be created within your My Documents / My Pictures folder.
- Page 21 TotalMedia - TV Module - Electronic Program Guide Click EPG from the TV module main menu to access the program guide. To access the guide the first time you must sign up with TitanTV. The service is completely free. 1. Click the Sign Up button to begin the first time setup. 2.
- Page 22 TotalMedia - TV Module - Electronic Program Guide (continued) 3. After you register with TitanTv you will see a screen similar to the one above. a. If you click a show you will be presented with the options to watch or record the show. If you choose to record the show it will be automatically scheduled.
- Page 23 TotalMedia - TV Module - Recording TV TotalMedia offers 3 ways to setup a program to record. On The Fly While watching live TV you can press the record button on your remote control or click the record button on the floating toolbar. Manually Schedule Click Schedule from the TV main menu.
-
Page 24: Photo Module
TotalMedia - Photo Module To access the Photo module click the Photo button at the main menu. Slideshow Settings Page 22 Print Pictures Page 23 Edit Pictures Page 24 Burn to Disc Page 25 The Pictures main menu appears. The following options are available:... - Page 25 TotalMedia - Photo Module - Slide Show Settings Interval Sets the display time for the slide show. Fit to Soundtrack Overrides the slide show interval setting and the slide show be timed to match the duration of your music soundtrack Transitions Choose the effect that you would like to see as one slide changes to the next.
- Page 26 TotalMedia - Photo Module - Print Pictures You can print your pictures with TotalMedia by clicking Print from the Photo module main menu. 1. Select the photos to print and click the Next button. 2. A print preview window will appear. Click print to print the picture. a.
- Page 27 TotalMedia - Photo Module - Edit Pictures When you click Edit from the main photo menu you can edit your pic- tures to remove red eye, crop, zoom, and rotate. Rotate the current picture 90 degrees left Rotate the current picture 90 degrees right Access zoom features Adjust brightness and contrast of current picture Remove red eye from current picture...
- Page 28 TotalMedia - Photo Module - Burn To Disc You can burn your saved pictures as a slide show DVD or as standard file format using the archive original pictures option. Click Burn To Disc from the photo module main menu. 1.
- Page 29 TotalMedia - Photo Module - Burn To Disc (continued) 3. When the burning is complete you will see a notification. You are also able to burn additional copies at this time. PAGE 26...
-
Page 30: Music Module
TotalMedia - Music Module Listen to your Audio CD’s, MP3’s, WAV’s and other sound files with the TotalMedia Music module. Click on Music from the main menu to access this module. My Playlists Page 28 Rip Music CD Page 31 Burn to Disc Page 32 From the music module you have access to the following functions:... - Page 31 TotalMedia - Music Module - My Playlists Click the My Playlists button from the musc module main menu. Creating a new playlist 1. Click the Create Playlist button. 2. Select which tracks you would like to burn and click Next to continue.
- Page 32 TotalMedia - Music Module - My Playlists (continued) Creating a new playlist (continued) 3. Click Add Music if there are more tracks that you would like to add to the compilation. Click Save when you are satisfied with the playlist. 4.
- Page 33 TotalMedia - Music Module - My Playlists (continued) Listening to a playlist 1. Highlight the name of the playlist and hit OK or ENTER on your remote control. 2. A list of the songs will appear. Highlight the song you would like to start listening from and press OK or ENTER on your remote control.
- Page 34 TotalMedia - Music Module - Rip Music CD Insert an Audio CD and click the Rip Music CD button from the music module main menu. 1. Select the tracks you would like to rip and click the Rip button. Additional Notes: A folder containing your ripped tracks will be created within your person- al My Music folder for easy access in the future.
- Page 35 TotalMedia - Music Module - Burn To Disc Click the Burn to Disc button at the music module main menu. The burn function will generate a Audio-CD compliant disc. 1. Select the tracks to burn and click Next to continue. 2.
-
Page 36: Radio Module
TotalMedia - Radio Module The radio module allows you to tune and listen to FM radio broadcasts. 1. Click Radio from the main menu to open the radio module. 2. Click Start to turn on the radio. a. Click the + or - tune buttons to manually tune a station. b. -
Page 37: Video Module
TotalMedia - Video Module The video module allows you to playback videos of filetypes that you have codecs installed for in your system (ex: .AVI, .MPG, etc). You also have the ability to edit scenes out of videos and then burn the videos to VCD or DVD discs. - Page 38 TotalMedia - Video Module - Capturing Video Capture video from a VCR or Camcorder. Click the Capture button at the Video module main menu. 1. Click Capture to begin capturing video. a. Provide a filename by typing with the keyboard or by clicking the “A”...
- Page 39 TotalMedia - Video Module - Playback Video Files Playback your videos and recorded shows. 1. Click on the name of a video and playback will begin in the preview window at the bottom left corner of the screen. During playback the following options are available: a.
- Page 40 TotalMedia - Video Module - Edit Video Files Capture video from a VCR or Camcorder. 1. Click the play button > to start the video playback. a. Use the << and >> to rewind and forward the video at speeds of 2x, 4x, and 10x the original speed for faster seeking.
- Page 41 TotalMedia - Video Module - Burn To Disc Burn your video files & recorded TV to VCD or DVD. The type of disc being burned is determined by the type of burner in your system. A CD burner will burn VCD discs. A DVD burner will burn DVD discs. 1.
- Page 42 TotalMedia - Video Module - Burn To Disc (continued) 3. The Disc Burning in Progress will appear once the actual burning has started. 4. When the burning is complete you will be notified. At this point you can choose to make another copy. PAGE 39...
-
Page 43: Music Settings
TotalMedia - Setup Module Click Setup from the main menu to access the setup screens. Music Settings Page 41 Rip CD Settings Page 42 Video Recording Storage Page 43 TV Settings Page 44 Video Settings Page 45 PAGE 40... - Page 44 TotalMedia - Setup - Music Settings Click Setup from the main menu then click the Music button. Shuffle Play your music files and CD’s in random order Repeat Repeats your playlist or selected tracks until stopped. Show music visualizations Like a screen saver - displays cool motion visual patterns and moves to the music.
-
Page 45: Rip Cd Settings
TotalMedia - Setup - Rip CD Settings Click Setup from the main menu then click the Music button. Click the Rip CD Settings button. The tracks being ripped from your audio CD’s will be saved in a WMA (Windows Media Audio) format (.WMA). Quality Select the quality you would like to rip to by using the - and + buttons to adjust the quality. -
Page 46: Tv Settings
TotalMedia - Setup - TV Settings Click Setup from the main menu then click the General button. Click TV Settings. Click Enable Time Shifting if you would like to be able to pause and rewind live TV. Click Scan/edit channel list to modify your channel lineup. Add channels that were not detected by the scan by clicking the Add Channel button. -
Page 47: Video Recording Storage
TotalMedia - Setup - Video Recording Storage Click Setup from the main menu then click General. Click Video Recording Storage. Select where your recorded shows are to be saved using the file browser. Select the quality of your recorded shows. When you select a quality the amount of Available recorded time will change according to the hard drive partition that you have selected within the file browser above. -
Page 48: Video Settings
TotalMedia - Setup - Video Settings The video settings allow you to change the input source independently for both live TV and video capturing. For viewing TV from the TV module 1. Click TV from the main menu. 2. Click Settings from the TV menu. 3. -
Page 49: Technical Support
Please provide us with an exact description of the problem including any error messages that occur. Please let us know what steps you have already taken to troubleshoot the problem. Diamond Technical Support Options Diamond Free Support Hours: Mon – Fri, 8am – 4:30pm Pacific Time... - Page 50 BLANK...
- Page 51 BLANK...
- Page 52 Diamond Multimedia 9650 DeSoto Ave. Chatsworth, CA. 91311 Phone: (818) 534-1414 www.diamondmm.com...
Need help?
Do you have a question about the XtremeTV PVR660 USB 2.0 and is the answer not in the manual?
Questions and answers