
Summary of Contents for Broyhill THORNWOOD A102004103
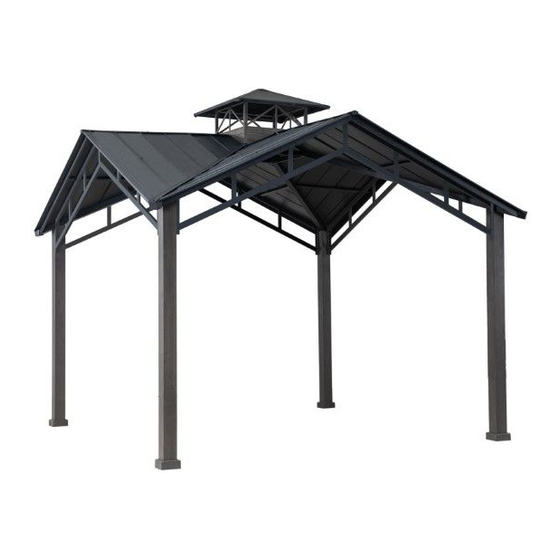
- Page 1 ASSEMBLY INSTRUCTIONS ITEM#: A102004103/A102004104/A102004105 SKU#: 810490210/810490381/810490382 THORNWOOD HARD TOP PAVILION...
-
Page 2: Warranty
GENERAL BEST PRACTICES FOR ASSEMBLY: • Please read and understand this entire manual before attempting to assemble or install the product. • Before beginning assembly of product, make sure all parts are present. Compare parts with package contents list and hardware contents list. -
Page 3: Exploded Drawing
EXPLODED DRAWING 3/31... - Page 4 EXPLODED DRAWING 4/31...
-
Page 5: Parts List
PARTS LIST Label Part Number Description Part Image 5/31... - Page 6 P005800001 6/31...
- Page 7 7/31...
-
Page 8: Hardware List
HARDWARE LIST Label Part Number Description Part Image rubber washer 8/31... -
Page 9: Helpful Hints
HELPFUL HINTS • Tools needed and not included: • How many people needed for the installation work • Estimate assemble time : 150~180 Minutes How many people needed for the installation work 9/31... - Page 10 Assembled View: Insert post (A) to base cover (B), secure base (C) to the post (A) using bolt (BB) and washer (CC), tighten with wrench (Z1). 10/31...
- Page 11 Assembled View: Connect beam 1 (D1) and beam 2 (D2) using bolt (FF), washer (JJ) and nut (KK), tighten with wrench (Z2). 11/31...
- Page 12 Assembled View: Secure assmebled beam (D1/D2) to post (A) using bolt (II), spring washer (EE) and flat washer (JJ), tighten with wrench (Z2). 12/31...
- Page 13 Assembled View: Connect Large top frames (H) in the direction shown using bolt (AA) and flat washer (CC), tighten with wrench (Z1). 13/31...
- Page 14 Assembled View: Connect top skew beam (F1) and bottom skew beam (F2) using bolt (AA) and flat washer (CC), tighten with wrench (Z1). 14/31...
- Page 15 Assembled View: Secure assembled skew beams (F1/F2) to post (A) using bolt (LL) and flat washer (CC). Connect assembled large top frames (H) to the assembled skew beams (F1/F2) using bolt (BB) and flat washer (CC), tighten with wrench (Z1). 15/31...
- Page 16 Assembled View: Connect middle beam (G), assembled large top frames (H) and assembled beam (D1/D2) using bolt (AA) and flat washer (CC), tighten with wrench (Z1). 16/31...
- Page 17 Assembled View: Secure lateral trabecula of the greater roof (P1/P2) to the bottom skew beam (F2) and the middle beam (G) using bolt (AA) and flat washer (CC), tighten with wrench (Z1). 17/31...
- Page 18 Assembled View: Connect small top connector (K) to small top skew beam (I) using push pin. Connect small top skew beam (I) to small top inclined beam support rod (J) using push pin. 18/31...
- Page 19 Assembled View: Lock the small roof decorative panel (M) to the small top inclined beam support rod (J) as shown. 19/31...
- Page 20 Assembled View: Secure dome decoration frame(L) to small top inclined beam support rod (J) and small roof decorative panel (M) using bolt (BB) and flat washer (CC), tighten with wrench (Z1). 20/31...
- Page 21 Assembled View: Lock the small roof panel (S) to small top skew beam (I). 21/31...
- Page 22 Assembled View: Secure small roof inclined beam cover plate (U) to small top skew beam (I) using bolt (BB) and flat washer (CC), then secure small top cover (R) to small top connector (K) using bolt (AA) and flat washer (CC), tighten with wrench (Z1).
- Page 23 Assembled View: Secure small roof to big top frame (H) using bolt (AA) and flat washer (CC), tighten with wrench (Z1). Screw hook (N) to the small top connector (K). 23/31...
- Page 24 Assembled View: Secure big roof top beams (O1/O2) to the top skew beam (F1), assembled beam (D1/ D2) and the lateral trabecula of the greater roof (P1/P2) using bolt (AA) and flat washer (CC), tighten with wrench (Z1). 24/31...
- Page 25 Assembled View: Secure Large top and small cover (T1/T2) to the top skew beam (F1) using bolt (AA) and flat washer (CC), tighten with wrench (Z1). 25/31...
- Page 26 Assembled View: Secure Large top and small cover (T1/T2) to the top skew beam (F1) using bolt (AA) and flat washer (CC), tighten with wrench (Z1). 26/31...
- Page 27 Assembled View: Secure big top and large cover (T5/T6) to the big roof top beam (O1/O2) using bolt (BB) ,rubber washer(MM) and flat washer (CC), tighten with wrench (Z1). 27/31...
- Page 28 Assembled View: Secure center beam cover plate(W) to the middle beam (G) using bolt (GG) and flat washer (CC), tighten with wrench (Z1). 28/31...
- Page 29 Assembled View: Insert inclined beam top cover (V1) to the small top inclined beam support rod (J), then connect inclined beam top cover (V1), inclined beam lower cover plate (V2) and skew beam (F1/F2) using bolt (GG) and flat washer (CC), tighten with wrench (Z1). 29/31...
- Page 30 Assembled View: Connect lower baffle of inclined beam (Q), inclined beam lower cover plate (V2) and bottom skew beam (F2) using bolt (GG) and flat washer (CC), tighten with wrench (Z1). 30/31...
- Page 31 STEP 22 Assembled View: Lift the base cover (B), secure the gazebo to the ground using stakes (HH). 31/31...
Need help?
Do you have a question about the THORNWOOD A102004103 and is the answer not in the manual?
Questions and answers