
Summary of Contents for Newport Vessels Pontoon Series
- Page 1 Electric Trolling Motor Pontoon Series User’s Manual Please read and retain this manual before using product REACH RoHS...
-
Page 2: Table Of Contents
Contents 1 General Information ........2 Specifications . - Page 3 7.3.4 Adjusting Motor Depth ......7.3.5 Adjusting Steering Tension ......8 How to Replace the Propeller .
-
Page 4: General Information
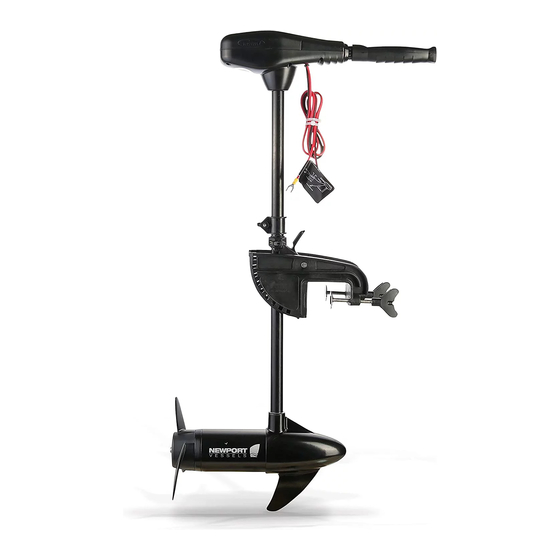
Newport Vessels trolling motors are designed and developed by profes- sional engineers and the design is continually honed and improved. There are a wide range of Newport Vessels outboard motors, from 36lbs to 86lbs, to suit every customer’s requirements and uses. -
Page 5: Wiring And Battery Recommendations
72 Inches (1.8m) of the battery(s). 3.3 Cable Size If extending the standard battery cable supplied with the product, Newport Vessels recommends the use of 8-gauge wire (13mm wire). Be sure all switches are in the OFF position before connecting to battery or batteries. -
Page 6: Safety Information
Safety Information • Do not allow children to operate the electric outboard motor. • Do not modify the unit in any way or add accessories not intended for this product. • Never fully submerse the unit. If unit is accidentally submersed, disconnect battery and leave to dry. -
Page 7: First Time Running
First Time Running 1. Place Electric Outboard onto the back of the vessel in the Stow away position. 2. Loosely tighten the Transom Mounting Screws until they grip the Transom Mount. 3. Press the Tilt Lever and slowly let the motor enter the water. 4. -
Page 8: Mounting Bracket Installation
Mounting Bracket Installation Deck of Pontoon Boat Keel We recommend installing the motor along the centerline or keel of the pontoon boat. Before the installation, remove the motor assembly first and place the mounting bracket at the desired position. Before installing the mounting bracket make sure the motor is disconnected to the battery or other power source. - Page 9 Loosen the steering tension adjusting handle and open the latch and door to remove the motor assembly from the mounting bracket. Motor Shaft Latch and Motor Depth Door Opened Adjusting Collar Deck of Pontoon Steering Tension Adjusting Handle Close the latch and door on the mounting bracket and loosely tighten the steering tension adjusting handle.
- Page 10 You can choose from two options to secure the mounting bracket. Option1: Drill holes on the deck of the pontoon boat through the mounting holes on the mounting bracket. Insert the M6 x 75 screws, washers, and nuts as indicated in the diagram below and tighten the screws to secure the mounting bracket.
- Page 11 Loosen the steering tension adjusting handle to open the latch and door, and replace the motor assembly inside as shown below, making sure the motor depth adjusting collar is above the mounting bracket. Motor Shaft Latch and Door Opened Motor Depth Adjusting Collar Deck of Pontoon Steering Tension...
-
Page 12: Motor Operation
Motor Operation This product does not include batteries; please choose a battery with 12V (24V for 86LBS motor output to fit this motor. The recommended type of battery is a deep cycle battery or marine battery, as they will last much longer and are specifically designed for this application. -
Page 13: Battery Connection Method (24 Volt Only)
7.2 Battery Connection Method (24 Volt only) 7.2.1 Connection With Two Batteries in Series (24V DC) The red wire should connect to positive; the black wire should connect to negative. (It is recommended to install circuit breaker in line with pos- itive lead.) Remember to always disconnect from the battery(s) once the motor leaves water as a rotating propeller can cause personal... -
Page 14: Adjust Handle Position
handle counter-clockwise for any of the 3 reverse speeds. To stop the motor from running, position the handle matching the arrow marker on level 0. 7.3.2 Adjust Handle Position To adjust the position of the handle, loosen the rotating tension adjusting knob, adjust to desired position, and then re-tighten. -
Page 15: How To Replace The Propeller
How to Replace the Propeller Drive Pin Motor Propeller Propeller Washer Motor Drive Shaft Propeller Nut Make sure that the motor has been disconnected from batteries before handling the propeller. Please visit https://newportvessels.com/propeller-installation- guide/ to get more details. Hold the propeller blade and loosen the propeller nut using the prop spanner supplied or a set of needle-nose pliers. -
Page 16: Daily Maintenance
Daily Maintenance 1. Check behind the propeller after each day for weeds, fishing line or other debris that may get wrapped behind the propeller. 2. Lubricate all the pivot points with a non-aerosol lubricant. Never use an aerosol lubricant as many types contain harmful propellants that can cause damage to various parts of your electric motor. -
Page 17: Trouble Shooting
10 Trouble Shooting 10.1 Loss of Power • Propeller may be damaged. Remove propeller, clean and replace. • Battery connections may be corroded. • Battery has low voltage. Recharge. • Battery may be faulty, recharge and check. • Insufficient wire size from battery to motor wiring. 6 gauge wire/ 13mm thickness recommended. -
Page 18: Motor Loses One Or More Speeds
• Total battery failure. Recharge and check voltage. • Propeller damaged. 10.4 Motor Loses One or More Speeds • Loose wire on rotary switch. Check wiring diagram. • Loose connection in top housing. • Rotary switch damaged. • Speed coils in lower unit may be burned. 11 About Circuit breaker During the usage of the electric outboard motor, the propeller can sometimes get stuck in weeds, fishing lines, or fishing nets. -
Page 19: Function Of The Circuit Breaker
motor. The circuit breaker has a reset button and is therefore reusable. To prevent the rotor coil damage from exceeding current, it is highly rec- ommended to use a circuit breaker to protect electric outboard motor. 11.1 Function of the circuit breaker During the usage of the electric outboard motor, when the propeller is stuck by the weeds, small stones, fishing lines, etc., the circuit breaker will cut off the power automatically to prevent the damage of... -
Page 20: Declaration Of Conformity For Recreational Craft
13 Customer Support If you have questions that are not answered in this manual or trouble- shooting is not successful, please contact Newport Vessels! Our Cali- fornia based customer service team is standing by to assist you. Customer Support Phone: (866)721-0002 Email: support@newportvessels.com...
Need help?
Do you have a question about the Pontoon Series and is the answer not in the manual?
Questions and answers
what are the bracket dimensions of the pontoon mounting bracket - length of where to bolts go thru