Advertisement
Quick Links
Advertisement

Related Manuals for Black Box FAS 200 / MFA

Summary of Contents for Black Box FAS 200 / MFA
- Page 1 FAS 200 / MFA Users Manual...
-
Page 2: Table Of Contents
Contents Safety Instruction --● ---● Getting Started ----● Parts Descriptions -----● Product Components ------● Installation -----● Functions ----● Program ---● Specifications... -
Page 3: Safety Instruction
Safety Instruction Because the safety instruction is for preventing the accident or danger by using the product safely and correctly, please keep the instructions invariably. We cannot be held responsible for what happens to our products when you did not keep this users manual. -
Page 4: Getting Started
Using high-technologies and equipment experience to top quality vehicle, there are the lane departure warning, the front car departure warning and the black box function that the frontal images and acceleration values are stored when a sudden stop or traffic accident is occurred. -
Page 5: Parts Descriptions
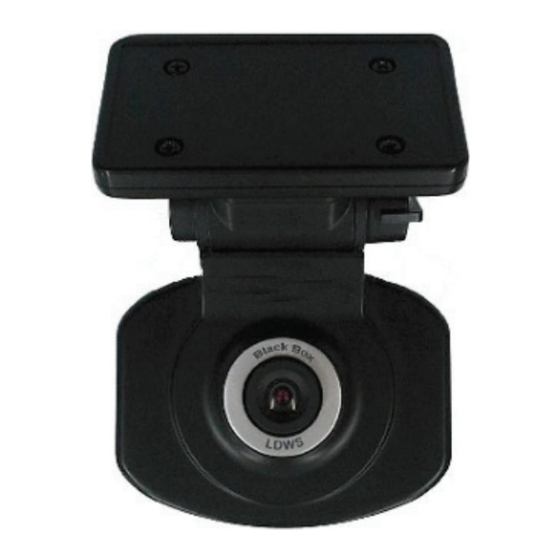
Parts Description Power Input (DC 5V) and PC download Camera sensor Horizontal bar Reset switch Power/Recording switch Press a while(5 seconds), power ON/OFF Press shortly (1 second), images are stored with click sound RC receiver USB output GPS input(option) Speaker Rotator(360 degrees) Tilt controller Mount... -
Page 6: Product Components
Components Product is composed of 8 components as shown in below figures. Please check all components prior to installation. Main Unit Cigar adapter USB download cable Remote control Software CD Cradle Both face tape Product decription * Above components may be modified without any notice according to the component supplies. -
Page 7: Installation
Installation Caution This product should be installed while the vehicle is parked on a level road or parking lot with engine off. All the components required for installation are contained in the product box. Please review the installation procedure prior to installation. This installation procedure is for installation in passenger cars and SUVs. - Page 8 Installation Installation (Passenger Car, SUV, Larger SUV) Confirm where to install the unit first. Prior to installation, clean the windshield where the unit is to be installed. It is recommended that the unit is installed on the windshield behind the rearview mirror in the area with anti-sun protection. Please confirm that the unit installation is not blocking not interfering with the driver’s view of the windshield.
- Page 9 Installation Installation (Passenger Car, SUV, Larger SUV) Press the car button , followed by the “Save” button of the remote controller for selecting the vehicle type. You will hear “Systems will select automobile types”. The 5 kinds of vehicle types are supported, passenger car, SUV, larger SUV, bus/truck type 1 and bus/truck type 2.
- Page 10 This product have an ability that can rotate 360 degrees. Thus, if you want to use for indoor image black box, rotate unit to the opposite side of front. When rotate the unit, please check cable connectivity carefully.
- Page 11 Installation Installation (Bus, Truck) Bus&Truck2 In case of truck, install the unit 10cm above the windshield Installation wipers so the wipers do not impede the camera lens. Especially, keep the bracket to horizontal level in the middle like the case of passenger car, and arrange the cables using the mounts to avoid the interference of driver’s view.
-
Page 12: Functions
It will also records the accident time and acceleration information(Max. 2G) at once. Black box video sequences can be recorded maximum 15 times. If more records happen, the first black box recording is deleted automatically in order. Thus, always the last 15 black box recordings and accident information remain in the camera and You should transfer the images to your PC or USB memory stick. - Page 13 Functions Lane Departure Warning This system helps you drive safer by obtaining the images of the road ahead with the internal camera, then analyzing the image in real time, and providing warnings on possible lane departure situations. This system helps ensure a safer driving experience. The system is using the video detecting software to calculate the actual driving speed as accurate as possible.
- Page 14 Functions Voice Notification of Front Car Departure When your car is stopped; such as traffic jam, and waiting for the traffic light, or entering the expressway, this system notifies you within 1-2 seconds after car ahead of you moves forward. The unit is always watching the road ahead for you.
- Page 15 Functions Remote Control Function Power on If you press the this power button, the starting announcement is introduced. Power off If you press this button while working, the system is turned off. Volume control 음량 조절 Turn down the volume. Turn up the volume.
- Page 16 Functions Remote Control Function Left Warning Time Control This button is used when left warning time control is needed. If you press the button, the voice Left warning time mode is played. The control of warning time can be controlled by using volume buttons. The default setting is normal mode.
- Page 17 Functions Remote Control Function Vehicle Speed Selection 음량 조절 The working speed of LDWS can be changed by using this button. If pressed, System will select a vehicle speed mode is sounded. The working speed is selected by using volume control buttons. If the vehicle’s speed is above to selected speed, the LDWS warning is provided.
- Page 18 Impact Sensitivity Control 음량 조절 The impact sensitivity for the black box function can be controlled using this button. System will adjust storage sensitivity is sounded. The sensitivity levels you can select are sensitive, normal and insensitive. It can be selected by volume buttons.
- Page 19 After you connect the USB memory to the USB output connector of unit, press this button to transfer the black box image. The file transmission was started is sounded. If file transfer is done, The file transmission has been completed is sounded. While file transfer is still working, any buttons cannot be work within this time period.
-
Page 20: Program
Program Driver Installation Connect enclosed Mini USB plug of the PC connector cable to the DC 5V/USB connector (Part Name ①), and connect the larger USB connector on opposite side of the cable to an USB port of PC, then the message window which requests the CD is popped up. - Page 21 If you want delete the program, click the Start → All Program → Car Black Box remove. When the removal message window is popped, click Y to remove a program.
- Page 22 Program Description of Program Play time display : before impact 8sec. after 5 sec. Rewind(2sec),Play(Pause), Stop, Forward(2sec) Play speed : 1/5X, 1/2X, 1X, 2X) 3 axis acceleration data : max. 2G Recording date and time Help(Manual), Back to File list, Exit File Delete File Delete File Open...
- Page 23 Program Execution Connect USB memory or unit to the USB port of PC. The black box viewer program will be executed by clicking the “Start” → “All Program” → “Car Black Box Viewer” as shown in below figure. If the LED explained in description of program ⑪ is turned green, the unit is connected...
-
Page 24: Specifications
Specification Voltage : DC12V ~ DC24V Power Consumption : Max. 3W Working Temperature : -20°C to +70°C Storage Temperature : -30°C to + 80°C Camera Type : Color CMOS Frames : 10 frames/sec. Resolution : 320 x 240 pixels Dimensions : 67 x 80 x 37 mm Weights : 110g OS : Windows 2000 / Windows XP The specification in manual may be modified for quality improvement without any notice.
Need help?
Do you have a question about the FAS 200 / MFA and is the answer not in the manual?
Questions and answers