Table of Contents
Advertisement
Advertisement
Table of Contents

Related Manuals for MTHTrains Digital Command System WIFI


Summary of Contents for MTHTrains Digital Command System WIFI
- Page 1 DCS WiFi Digital Command System User’s Guide...
- Page 2 Take Total Control SYSTEM REQUIREMENTS Maximum Power Input: AC Power Supply 0-22VAC, 190VA, 10.0 AMP DC Power Supply 24VDC, 10.0 AMP Auxiliary Power Supply 12-22VAC, 1.5 AMP Welcome to the world of digital command control! M.T.H. Electric Trains® has developed the most advanced and user-friendly layout control system available in model railroading today.
-
Page 3: Table Of Contents
Table of Contents Chapter 1: Introduction To DCS ....................5 The DCS WiFi Interface Unit (WIU) .................. 6 The Track Interface Unit (TIU) ................... 7 The Accessory Interface Unit (AIU) ................... 8 Recommended Wiring Methods ..................9 Chapter 2: Quick Start: Command Mode .................. 13 Overview ........................... - Page 4 Chapter 5: Menu Operations - Control..................37 Smoke Volume ........................38 Ditch Lights ........................39 Setting Maximum Engine Speed ..................40 Setting Acceleration Rate ....................40 Setting Deceleration Rate ....................40 Setting Direction Control ....................41 Chapter 6: Menu Operations - System ..................42 Engine Setup ........................
-
Page 5: Chapter 1: Introduction To Dcs
Introduction To DCS DCS WiFi DIGITAL COMMAND SYSTEM USER’S GUIDE... -
Page 6: The Dcs Wifi Interface Unit (Wiu)
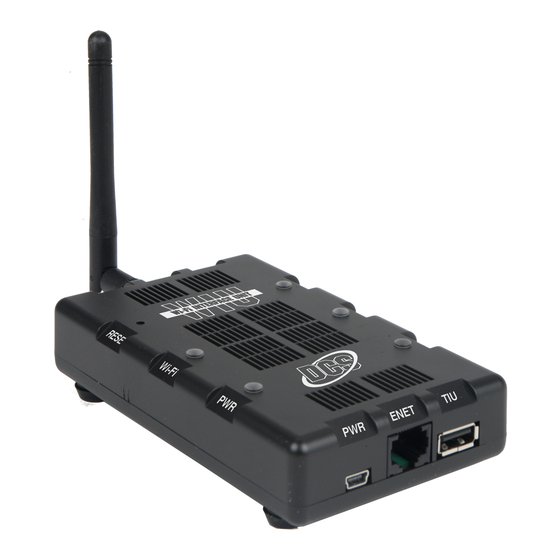
Introduction To DCS The DCS Wi-Fi Interface Unit Wi-Fi Connects to TIU Blue when Connect wall via USB cable Wi-Fi available adapter here ENET Ethernet port for wired LAN RESET Resets module to factory settings POWER Blue when ENET is Green when connected plugged in... -
Page 7: The Track Interface Unit (Tiu)
Introduction To DCS The Track Interface Unit Also known as the TIU, the Track Interface Unit is the brains behind the DCS system. Con- nected between the transformer and the track, the TIU receives signals from the DCS Applica- tion and relays those signals to each train you are controlling via the rails. The type of signal relayed to the train depends on the operating mode at the time. -
Page 8: The Accessory Interface Unit (Aiu)
Introduction To DCS The Accessory Interface Unit The Accessory Interface Unit, also known as the AIU, plugs into the TIU and controls any accessory or switch wired to it. Each AIU can control up to 10 switches and 10 accessories and features the ability to turn the accessory on or off, or activate it momentarily. -
Page 9: Recommended Wiring Methods
Introduction To DCS Recommended Wiring Method It is important for good operation to make the most efficient use of the power and digital sig- nal available on your track. Poor wiring and bad connections offer resistance and can interfere with receipt of the DCS signal and limit the number of engines and cars you can run on your track. - Page 10 Introduction To DCS Recommended Wiring Method Maximum Power Input 0-22VAC,190VAC, 10AMP 0-24VDC, 10AMP NOTE: This very quick wiring scheme (through the Fixed In 1 and Fixed Out 1 inputs) al- lows for operation of the connected loop of track in DCS command mode only. Please see the “Advanced Connection”...
- Page 11 Introduction To DCS Recommended Wiring Method Optional Additional Equipment Shown: M.T.H. Terminal Block (Item No. 50-1014) The screws in each terminal strip of this terminal block are electrically connected to one another, making it easy to wire the TIU’s output into the binding posts and then wire out to several lock-ons from different terminal pairs.
- Page 12 Introduction To DCS Recommended Wiring Method - Older Transformers Older transformers, like the Lionel postwar ZW or KW models employ a bi-metallic strip to act as a circuit breaker. The strip responds to heat as high current flows through the transformer. If enough heat is generated by the high current, the strip will open the circuit and prevent further current from flowing out of the Fuse...
-
Page 13: Chapter 2: Quick Start: Command Mode
Quick Start: Command Mode DCS WiFi DIGITAL COMMAND SYSTEM USER’S GUIDE... -
Page 14: Overview
Quick Start: Command Mode Setting Up And Using DCS - An Overview Setting up the DCS system for simple command mode operation is quick and easy. The eight steps below are all that is required to begin operating a single Proto-Sound 2.0 or later equipped engines in command mode on a simple layout. -
Page 15: Accessing A Locomotive
Quick Start: Command Mode Accessing the Locomotive When a Proto-Sound 2.0 or later engine is placed on a track connected to a TIU, the DCS sys- tem will bring it up in command mode by default. Because DCS command operation differs in some fundamental ways from conventional operation, please read this section in full before running your trains in command mode. - Page 16 Quick Start: Command Mode 3. Select Add Engine from the Engine List screen. 4. Select Add MTH Engine from the menu. 5. Select the engine you want from the available choices listed. DCS WiFi DIGITAL COMMAND SYSTEM USER’S GUIDE...
- Page 17 Quick Start: Command Mode A pop-up Success! screen will appear. Because M.T.H. features the SmartRead system, your engine tells the TIU its name and you do not need to enter any information in order to add the engine. This screen will show you the engine you have added. From this screen, you can choose to return to the Main Control screen and run your new engine immediately, or you can return to the Engine List screen and add additional engines.
-
Page 18: Selecting And Starting A Locomotive
Quick Start: Command Mode 1. When all Proto-Sound 2.0 or later engines are added, put the ones you want to run on the track and tap their name on the menu to put them on the active engine list. 2. Tap Start Up to activate the lights and smoke and initiate the engine start-up sounds. 4. - Page 19 Quick Start: Command Mode Active and Inactive Engines Once an engine is added to your system, it will remain in place and always appear on the engine list until you delete the engine. To make it easier to manage the engines being used in a given session, there are Active and Inactive engine lists.
-
Page 20: Making The Engine Go
Quick Start: Command Mode Making the Engine Go There is no neutral in DCS command mode; the default start-up direction is forward. There are several ways to control the speed of your locomotives. Speedometer: Tap once anywhere around the circular bezel once to set the speed. The engine will accelerate or decelerate at the default rate. -
Page 21: Activating Basic Sounds
Quick Start: Command Mode 2. Tap the bezel to 0 SMPH and wait for the engine to come to a complete stop. Then tap the new direction arrow and finally the desired speed. If you slow the engine to 0 SMPH and then resume motion without tapping the new direction arrow, the engine will remain in its current direction. -
Page 22: Jumping" Between Active Engines
Quick Start: Command Mode Moving Between Active Engines When more than one engine is addressed and operating, you can easily move among the dif- ferent engines and control each in turn. 1. Tap on the name of the active engine, which will bring you to the Engine List screen. 2. -
Page 23: Chapter 3: One-Touch Locomotive Control
One-Touch Locomotive Operation DCS WiFi DIGITAL COMMAND SYSTEM USER’S GUIDE... -
Page 24: Alternate Control Screen
One-Touch Locomotive Operation Alternate Control Screen From the Main Control Screen, tap the Down Arrows icon at the bottom to bring up the Alter- nate Control screen. The Alternate Control Screen provides quick access to features commonly used while running trains. Couplers F/R Tap the F Coupler icon to open the front coupler, if your locomotive is equipped with one. -
Page 25: Labor/Drift
One-Touch Locomotive Operation Labor/Rev Up - Drift/Rev Down Tap and hold the up or down arrow to activate labor or drift chuffing sounds in steam locomotives. Labor/Rev Up will see an increase of smoke output corresponding to the sounds of the engine working harder. Drift/Rev Down will see a decrease of smoke output corresponding to the sounds of the engine working less hard. -
Page 26: Doppler On/Off Control
One-Touch Locomotive Operation Doppler Press this button to activate the Proto-Doppler feature for one-time use (LCD will show Dop- pler = On” or “Doppler = Off”). Engine sounds will initially drop, then build to a peak before fading away. Press the DOPPLER button again after the effect has played to turn the feature off and return the locomotive to normal engine sounds. -
Page 27: Softkeys
One-Touch Locomotive Operation Softkeys Softkeys are designed to serve different functions with different engines rather than have a fixed function like the other One-Touch keys. This flexibility is important because the wide variety of M.T.H. engines has an equally wide range of appropriate operating features. For in- stance, a modern diesel has very different operational features than an early twentieth-century steamer. - Page 28 Menu Operation: Sound DCS WiFi DIGITAL COMMAND SYSTEM USER’S GUIDE...
-
Page 29: Chapter 4: Menu Operations - Sound
Menu Operations - Sound The DCS system has four primary screens for engine operations: Main Control Screen, Alternate Control Screen, Softkey Screen, and Settings Screen. As with all command mode controls, the menu sets engine-specific features only for the engine selected when the setting is made. -
Page 30: Volume Controls
Menu Operations - Sound Softkey Screen Settings Screen Volume Controls (Engine, Horn, Bell, Accent) Custom set the volume of the engine’s bell, horn, engine sounds, or accent sounds (e.g., pas- senger or freight sounds, cab chatter), independently of other engine sounds. The selected sound will play when this feature is selected (except for Accent Sounds), so you can hear it change volume as you make the adjustment. -
Page 31: Proto-Whistle
Menu Operations - Sound Proto-Whistle This feature allows you to use the thumbwheel to simulate the engineer’s feathering or “quill- ing” of the whistle/horn rope, producing a much more realistic whistle/horn sound. Proto-Whistle is not available on all DCS-equipped engines. This feature will only work on those engines whose hardware is capable of utilizing the software feature. -
Page 32: Chuff Rate
Menu Operations - Sound Chuff Rate Change the number of chuffs per wheel revolution in your steam locomotives. Most Proto- Sound 2.0 or later steam engines are set at two chuffs per revolution because that rate sounds good even at fast toy train speeds. However, most steam engines prototypically have four chuffs per revolution. -
Page 33: Proto-Chuff
Menu Operations - Sound Proto Chuff Tap to toggle the Proto Chuff sounds on or off. Proto Chuff automatically plays labor of drift chuffing sounds if you are under heavy acceleration or deceleration (steam engines only). Use of the one-touch Labor/Rev Up - Drift/Rev Down icon on the Alternate Control Screen overrides this menu setting. -
Page 34: Auto Coupler
Menu Operations - Sound Auto Coupler You can now elect to have the coupler slack sounds play automatically every time an engine pulls away from a stop. 1. Press the Settings icon. 2. Under the Sound settings, toggle the Auto Coupler Slack icon on or off. 3. -
Page 35: Doppler Loop
Menu Operations - Sound Doppler Loop This feature allows you to set the Doppler effect to play every time the programmed engine passes a certain point on your layout. M.T.H. sound engineers measured this for a scientifically accurate Doppler pitch change: the growing and fading of the sounds are exactly what a scale person would hear as a scale train passed by. - Page 36 Menu Operations - Sound DCS TIP: For small layouts: There may not be enough room for the Doppler effect to fade completely to silence between loops. You can turn down the master volume before running in Doppler mode so that the engine sounds will fade completely.
- Page 37 Menu Operation: Control DCS WiFi DIGITAL COMMAND SYSTEM USER’S GUIDE...
-
Page 38: Chapter 5: Menu Operations - Control
Menu Operations - Control Smoke Volume Adjust the output of the smoke unit. Go to the Settings Screen and scroll down to the Smoke settings. Tap on the desired smoke level: Low, Medium, or High. Most Proto-Sound 2.0 or later engines have the default set at High. -
Page 39: Ditch Lights
Menu Operations - Control Ditch Lights Set the engine’s ditch lights to one of four settings. The ditch light control softkey is only found on diesel engines that include this feature. 1. Tap the Softkey Screen icon and scroll down to the lights softkeys. 2. -
Page 40: Setting Maximum Engine Speed
Menu Operations - Control Maximum Speed You can set a maximum engine speed to keep your locomotive from derailing as it races through a tight curve. 1. Tap the Settings Screen icon and scroll down to the Speed Control settings. 2. -
Page 41: Setting Direction Control
Menu Operations - Control Direction Control Lock an engine into a direction by changing the direction cycle. Rather than the default Forward/Reverse (F/R) cycle, you can set it for a Forward or Reverse cycle. Remember, in command mode there is no neutral. Tap the direction cycle you want. -
Page 42: Chapter 6: Menu Operations - System
Menu Operation: Systems DCS WiFi DIGITAL COMMAND SYSTEM USER’S GUIDE... -
Page 43: Engine Setup
Menu Operations - Systems Engine List Screen On the Main Control Screen, tapping Choose or Add an Engine or the down arrow, takes you to the Engine List Screen. This screen is used to manage your engine roster. From here, engines can be added or deleted. - Page 44 Menu Operations - Systems If you want to add additional engines, remove the previously added engine from the track, place the new engine on the track, and Add MTH Engine. You need to complete these steps only once per engine/DCS Application, when you first add it to your system, not each time you place a previously added engine on the track.
-
Page 45: Deleting Engines
Menu Operations - Systems Delete Engine 1. Tap on Edit at the top of the Engine List Screen. A red circle X will appear next to the engine names. Tap on the red circle next to the engine you wish to delete. The engine will disappear from the engine list. -
Page 46: Editing Engines
Menu Operations - Systems Edit Engine Each Proto-Sound 2.0 or later engine comes with a pre-assigned engine name (such as M10000) and is added to the engine list in order, but you can choose to rename or renumber the engines if you choose. For instance, if you have two of the same engine type or run at a Club where other members have the same engine, you can rename them to distinguish one from the other. -
Page 47: Track Setup
Menu Operations - Systems Track Setup The Track Control Screen is used to manage conventional mode tracks that can be controlled via the DCS Application. The DCS system automatically assigns track addresses to the tracks wired to Variable channels 1 and 2 of TIU 1. You must enter and address Variable channel tracks from additional TIUs and Fixed channel tracks (controlled by a Z-4000 remote receiver) from any TIU manually, as described below. -
Page 48: Deleting Tracks
Menu Operations - Systems For instructions on running a conventional mode engine on a Variable track, please see the “Universal Locomotive Control: Conventional Mode” section of the “Universal Locomotive and Accessory Operation” chapter. 3. The App prompts you to name the track, and an alphanumeric character set is displayed. Click Save to signify that you are done with this step. -
Page 49: Editing Tracks
Menu Operations - Systems Edit Track Track Name 1. Tap on the Track Settings icon. 2. Tap Edit and an alphanumeric character set is displayed. You may give the track a name up to 16 characters long. Tap Save to signify that you are done with this step. DCS WiFi DIGITAL COMMAND SYSTEM USER’S GUIDE... -
Page 50: Switch Setup
Menu Operations - Systems Switch Setup This menu is used to manage switches (turnouts) that can be controlled via the DCS Applica- tion. An AIU (Accessory Interface Unit, Item No. 50-1004) is required for remote control of switches. Add Switch 1. - Page 51 Menu Operations - Systems 3. Select which TIU (if you are using more than one), and the previously connected AIU, to which the switch is added to. 3. Select which AIU the switch is added to. To determine the AIU’s number, simply count out from the TIU.
-
Page 52: Editing Switches
Menu Operations - Systems 5. The App prompts you to name the switch, and an alphanumeric character set is displayed. Click Save to signify that you are done with this step. Edit Switch Switch Name 1. The complete list of switches (for all TIUs and AIUs) appears on the Switch Screen. Tap on the one you want to rename and then tap the Edit icon. -
Page 53: Deleting Switches
Menu Operations - Systems pears. Tap on the name of the one you want to re-path. 3. Select which TIU the switch is added to. 4. Select which AIU the switch is added to. 5. Select the AIU port (SW1-SW10) the switch is wired into. Naming Tip: Because you may have several switches and accessories of the same type (mul- tiple O-72 switches, several block signals, etc.), you should choose their names carefully. -
Page 54: Chapter 7: Advanced Wiring
Advanced Wiring DCS WiFi DIGITAL COMMAND SYSTEM USER’S GUIDE... -
Page 55: Wiring Through A Variable Channel Only
Advanced Wiring Wiring Through a Variable Channel Only In order for the TIU to function, Fixed In 1 must be connected to the transformer. If Fixed In 1 is not required because Fixed Out 1 is not connected to any track, two additional methods are available for powering the TIU. -
Page 56: Connecting Tmcc To A Dcs Layout
Advanced Wiring Connecting the TMCC Command Base to a DCS Layout NOTE: While the TIU/TMCC Connector Cable (Item No. 50-1018) looks like a standard computer DB-9 cable, two of the pins have been reversed to allow the TIU and Command Base to communicate. - Page 57 Advanced Wiring Wiring with Z-4000 Remote Receiver for Conventional Control of Fixed Channels DCS WiFi DIGITAL COMMAND SYSTEM USER’S GUIDE...
- Page 58 Advanced Wiring One of the great features of the DCS system is that it is expandable and can be adapted to each layout. The installation of the system to each layout may differ as the size and complexity of the layout increase. Here are some general guidelines for installing DCS on larger more com- plex layouts.
- Page 59 Advanced Wiring Conventional, Command, or Both If you plan to run trains in conventional and command mode on the track at the same time you will need to use a Variable channel of the TIU. Using the Variable channel of the TIU, you can run conventional engines (vary the voltage to the track) and command engines (send digital commands) on the track at the same time to vary the speed of the engine for example.
-
Page 60: Track Signal Improvements
Advanced Wiring Track Signal Improvements A simple method has been discovered that improves DCS track signal quality on layouts wired according to the MTH DCS wiring recommendations. The method can be employed on any layout where track quality fails to exceed 8 when measured using the DCS Track Quality test found in DCS’s remote control features. - Page 61 Advanced Wiring By attaching an 18 volt bulb to the output ports (red and black) of the TIU Output Channels (Fixed or Variable) or onto the DCS Terminal Block input ports (red and black), the track signal quality measurements will increase. The solution does not boost the signal it simply cleans up signals reflected back into the TIU from the track.
-
Page 62: Setting Up A Programming Track
Advanced Wiring Setting up a Programming Track DCS WiFi DIGITAL COMMAND SYSTEM USER’S GUIDE... -
Page 63: Appendix
APPENDIX DCS WiFi DIGITAL COMMAND SYSTEM USER’S GUIDE... -
Page 64: Frequently Asked Questions
Frequently Asked Questions Do I have to have an M.T.H. Z-4000™ to use DCS? No. DCS and Proto-Sound 2.0 or later, whether in Command or Conventional Mode, will work with most UL-approved, AC hobby transformers, including any M.T.H. transformer, the Lionel®... - Page 65 Does Proto-Sound 2.0 or later with DCS really allow me to control Lionel® Trainmaster® engines? Yes. Proto-Sound 2.0 or later with DCS is the first train control system on the O Gauge market that allows individual control over TMCC and Proto-Sound 2.0 or later engines on the same track at the same time.
- Page 66 Can I use a Z-500 or Z-750 power supply to power the TIU through the Auxiliary Power port? Yes, but keep in mind that when the power supplies are plugged into the auxiliary power port, they are only providing power to the TIU, they are not sending power out to the track. How can I update to the latest DCS software? DCS updates are available online for free.
-
Page 67: Glossary
Glossary AIU: Accessory Interface Unit. Unit that receives digital command signals from a TIU for remote accessory and switch (turnout) control. Banana Plug: Male plug with bowed slats. Tension in the slats creates force that holds banana plug in place within a banana jack (female plug). Command Mode: Mode of operation in which digital signals, as opposed to track volt- age changes, control engines. - Page 68 Glossary SMPH: Scale Miles Per Hour. Scale representation of actual speed as a proportion rela- tive to a model’s size. O-gauge DCS models (including RailKing traditionally sized mod- els) are calibrated to operate at 1/48 prototypical speeds. RailKing 1-Gauge and Standard gauge DCS models are calibrated to operate at 1/32 prototypical speeds.
-
Page 69: Service & Warranty
First, e-mail, write, call or fax a M.T.H. Authorized Service Center (ASC) in your area to obtain Repair Authorization. You can find the list of ASCs on the M.T.H. Website, www.mthtrains.com. Authorized Service Centers are required to make warranty repairs on items sold only from that store; all other repairs may-- or may not be done at the store’s own discretion.
Need help?
Do you have a question about the Digital Command System WIFI and is the answer not in the manual?
Questions and answers
How do you move engines from inactive to active list
Will this connect to a 5G wifi?