Advertisement
Quick Links
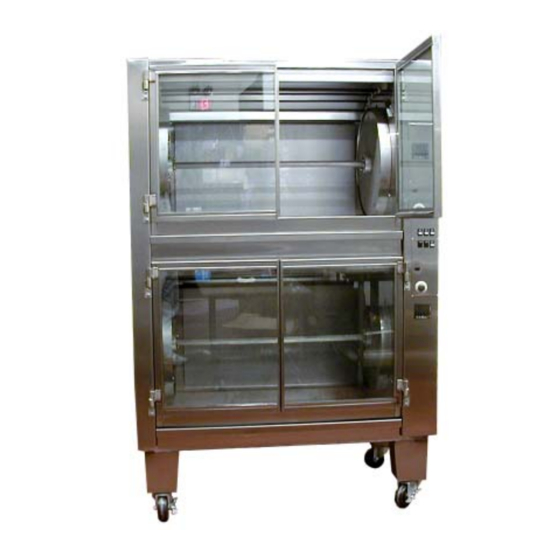
Installation & Operation Manual
Hickory Rotisseries
Models: N/7.5E
N/14.5E
4900 Westside Avenue, North Bergen, New Jersey 07047
(Shown)
Voltage: 208V, 3 phase, 5 Wire
Amperage Draw: Line 1 , Line 2 , Line 3 , Nueltral .
Elements:
Watts Per Element:
Total Cooking Wattage: 12,000
Lighting:
Lamps should be replaced with 120V, 25W, 300
only.
Minimum Installation Clearance:
3 Inches sides, 6 inches rear.
Specifications and manual subject to change without notice
Tel: [201] 223-0050 Fax: [201] 223-0950
Hickory Industries, Inc.
N/7.5E
N/14.5E
6
12
2000
2000
24,000
(2)25W
(4)W
°
C rated bulbs or equivalent
USA
N/14.5E - 6/15/04
Page 1 of 24
Advertisement

Related Manuals for Hickory Industries N/7.5E

Summary of Contents for Hickory Industries N/7.5E
- Page 1 Hickory Industries, Inc. Installation & Operation Manual Hickory Rotisseries Models: N/7.5E N/14.5E (Shown) Voltage: 208V, 3 phase, 5 Wire Amperage Draw: Line 1 , Line 2 , Line 3 , Nueltral . N/7.5E N/14.5E Elements: Watts Per Element: 2000 2000...
-
Page 2: Table Of Contents
Hickory Industries, Inc. Table of Contents Installation Tips ..........3 Overview Of The Unit ......... 4 Unpacking The Unit ..........5 Setting Up The Rotisserie ........5 Control Panel Overview ........5 Spit Preparation Using Angle Spits ....6 Spit Preparation Using Spits & Skewers .... 13 Daily Operation .......... -
Page 3: Installation Tips
Hickory Industries, Inc. Installation Tips When installing these units, it is important to comply with the most recently established rules and regulations as deemed pertinent by the local and national electrical, ventila- tion, sanitation, and fire codes. The Model 14.5E was tested for safety by Intertek Testing Services ETL Semko. -
Page 4: Unpacking The Unit
Hickory Industries, Inc. Unpacking the unit: After the unit is un-crated, roll the unit and all accessories into place. Remove all vinyl paper from the stainless steel surfaces Remove all tape from glass surfaces and metal surfaces Carefully remove and inspect parts that are inside the unit. Ensure that all materials... -
Page 5: Control Panel Overview
Hickory Industries, Inc. Timer (Upper) Thermostat (Upper) Fuse .5A (Protects Lights and motors) Switches Timer: Displays the time of day. Allows the unit to cook and can be used to shut the heat OFF at the end of a cook. - Page 6 Hickory Industries, Inc. Spitting Chickens The most important part in getting started with a rotisserie is knowing how to properly spit the product. This is quite easy, but it must be learned! As an operator, you will become an expert in spitting chickens within half an hour! There are two types of commonly used spits: the angle spit and the regular spit.
- Page 7 Hickory Industries, Inc. Figure 4. Trussing Legs While pulling on the tie, loop the strings over the legs of the chicken. Figure 5. Trussed Legs Make sure that both legs are securely held by the tie. Figure 6. Trussed wings Make sure that both wings are securely held by the tie against the breast of the chicken.
- Page 8 Hickory Industries, Inc. Figure 7. Pop-up Thermometer The only way to tell if a chicken is done is take the internal temperature. Since it can be difficult to probe the chickens while they are in the rotis- serie, we recommend the use of pop-up ther- mometer.
- Page 9 Hickory Industries, Inc. Figure 10. Using the Angle Spit Insert the bottom (square-end) of the spit into one of the holes in the Spit Holder. Figure 11. Spitting a Chicken Spit the chicken through the cavity. The chicken should be inserted through the “head” (or at least where the head used to be) first.
- Page 10 Hickory Industries, Inc. Figure 13. Incorrectly Spitted Chicken This picture shows a chicken with the legs improperly placed. Note how the chicken seems to hang to one side. When spitted this way, the chickens will tend to “bounce” up and down causing the chicken to breakup.
- Page 11 Hickory Industries, Inc. B. Using Regular Spits Figure 15. Inserting Single Bottom Skewer Attach a single skewer with a thumb screw at least 1/2" from the square end of the spit. The skewer must be on the round section of the spit.
- Page 12 Hickory Industries, Inc. Figure 18. Inserting Chicken Take the chicken, with the drumsticks in the direction of the attached skewer, and slide the spit through the cavity of the chicken. Figure 19. Tucking the Legs The legs must be tucked between the skewer prongs and the center spit.
- Page 13 Hickory Industries, Inc. Figure 21. Locking Wings The wings must be locked or tucked in place. When using the models N/5.5 and N/10.10, the locking method (pictured here) is only recommended with birds up to 2¾ lbs! With larger birds, the wings must be tucked under the breast, with elastic ties or “wing...
- Page 14 Hickory Industries, Inc. Figure 24. Inserting Double Skewers With the first chicken in place, insert a double skewer down the length of the spit into the shoulders of the first chicken. No thumb screw is required for the double skewers!
- Page 15 Hickory Industries, Inc. Figure 13. Completing the Load Slide a single skewer with a thumb screw into place from the top, Figure 14. Tightening Final Skewer Compress the chickens by exerting pressure on this last skewer, and tighten the thumb screw securely.
- Page 16 Hickory Industries, Inc. Hickory Timer Tips Timer 9: 00 Setting / Resetting the Time of Day In the event of a power failure the timer display will be flashing. To reset the Time of Day, press both buttons "B" & "C" simultaneously and while holding these buttons depressed;...
- Page 17 Hickory Industries, Inc. Cooking Preparations Morning Preparation: 1. Cover the center shaft with aluminum foil. 2. Add water into upper and lower drip pans (approximately one inch of water should be sufficient. If the unit will be in operation all day, you may need to add more water accordingly.).
-
Page 18: Cleaning
Hickory Industries, Inc. Cleaning: 1. Shut off all switches. 2. Allow oven cool down. Please note - if the lights are not shut off, the lamp guards may break when spraying the oven with cool water. 3. Remove the aluminum foil from the center shaft. -
Page 19: Thermometer Guidelines
Hickory Industries, Inc. Thermometer Guidelines When checking product temperature, ensure that you have a calibrated thermometer. A good thermometer should be 1/8" thick and about 6 inches long. The thermometer should not have a dimple. If it does, this is where the thermometer actually measures temperature. This dimple must be placed in the thigh area. -
Page 20: Temperature Chart
Hickory Industries, Inc. Temperature Chart Product Internal Temperature Poultry 185F Beef 135-140F Rare 150F Medium 160F Well Lamb 140F Rare 150F Medium 160F Well Pork 160F Medium 170F Well 4900 Westside Avenue, North Bergen, New Jersey 07047 N/14.5E - 6/15/04... - Page 21 Hickory Industries, Inc. Don'ts Do's Do Not use a powerwasher to clean the unit Do read the manual before operating this unit. Do Not use abrasives or razors on the glass Do clean the rotisserie every day. Do Not spray anything into the gas burners...
- Page 22 Hickory Industries, Inc. 1.18 Exploded diagram 4900 Westside Avenue, North Bergen, New Jersey 07047 N/14.5E - 6/15/04 Tel: [201] 223-0050 Fax: [201] 223-0950 Page 22 of 24...
- Page 23 Hickory Industries, Inc. Hickory Industries, Inc. 4900 Westside Avenue North Bergen, NJ 07047 Tel: 201−223−0050 Fax: 201−223−0950 Model 14.5E Elements: 2KW each Lights: 25W, 300C ea Fuse: .5A Fan: 30CFM Electrical: 208V, 3PH, N & Ground 50/60HZ Relay Contactor Motor...
-
Page 24: Warranty
Hickory Industries, Inc. WARRANTY HICKORY INDUSTRIES, INC., WILL WARRANTY ALL ROTISSERIES FOR ONE YEAR FROM THE DATE OF ORIGINAL INVOICE. WARRANTY INCLUDES ALL PARTS EXCEPT BULBS AND GLASS. WARRANTY CONDITION IS THAT ALL WARRANTY DOCUMENTS MUST BE SIGNED AND MUST BE RETURNED TO HICKORY BY THE USER AFTER RECEIPT OF THE ROTISSERIE.
Need help?
Do you have a question about the N/7.5E and is the answer not in the manual?
Questions and answers