Table of Contents
Advertisement
Available languages
Available languages
Quick Links
Original-Bedienungsanleitung –
Translation of the Original Instruction Manual –
Traduzione del manuale di istruzioni per l'uso originale –
Montante per foratura BST 420
Traduction du mode d'emploi original –
Support pour carotteuse BST 420
Oversættelse af den originale betjeningsvejledning –
Tłumaczenie oryginalnej instrukcji obsługi –
BAIER
BST 420
Bohrständer BST 420
Drill stand BST 420
Borestander BST 420
Stojak wiertarski BST 420
Maschinenfabrik
OTTO BAIER GmbH
DE
Heckenwiesen 26
EN
71679 Asperg
Deutschland
IT
Tel. +49 (0) 7141 30 32-0
FR
Fax +49 (0) 7141 30 32-43
DA
info@baier-tools.com
PL
www.baier-tools.com
Advertisement
Chapters
Table of Contents

Subscribe to Our Youtube Channel
Summary of Contents for Baier Elektrowerkzeuge BST 420
- Page 1 71679 Asperg Drill stand BST 420 Deutschland Traduzione del manuale di istruzioni per l’uso originale – Montante per foratura BST 420 Traduction du mode d‘emploi original – Tel. +49 (0) 7141 30 32-0 Support pour carotteuse BST 420 Fax +49 (0) 7141 30 32-43 Oversættelse af den originale betjeningsvejledning –...
- Page 2 16 – 25 Drill stand BST 420 Traduzione del manuale di istruzioni per l’uso originale – 26 – 35 Montante per foratura BST 420 Traduction du mode d‘emploi original – 36 – 45 Support pour carotteuse BST 420 Oversættelse af den originale betjeningsvejledning –...
- Page 3 | 3 |...
- Page 4 | 4 |...
- Page 5 | 5 |...
-
Page 6: Table Of Contents
Inhalt Impressum Über diese Bedienungs anleitung ..7 Version V01 / 2020-07 Wichtige Informationen ......7 Copyright: In der Bedienungsanleitung verwendete Symbole ........ 7 Maschinenfabrik OTTO BAIER GmbH Sicherheitshinweise ......7 Heckenwiesen 26 Anforderungen an das Bedienpersonal ... 7 71679 Asperg Arbeitsplatzsicherheit ....... -
Page 7: Über Diese Bedienungs Anleitung
Über diese Bedienungs VORSICHT anleitung „VORSICHT“ weist auf eine drohende Gefährdung Diese Bedienungsanleitung enthält alle wichtigen hin, die leichte oder mittlere Körperverletzungen Informationen für einen sicheren Umgang mit dem zur Folge haben kann. Bohrständer. Der Bohrständer wird in dieser Be- Î... -
Page 8: Arbeitsplatzsicherheit
c) Seien Sie aufmerksam, achten Sie darauf, b) Vermeiden Sie eine abnormale Körperhal was Sie tun, und gehen Sie mit Vernunft an tung. Sorgen Sie für einen sicheren Stand die Arbeit mit diesem Gerät. Benutzen Sie und halten Sie jederzeit das Gleichgewicht. das Gerät nicht, wenn Sie müde sind oder Dadurch können Sie das Gerät in unerwarteten unter dem Einfluss von Drogen, Alkohol... - Page 9 c) Ziehen Sie den Stecker der Bohrmaschi ne bzw. Antriebseinheit aus der Steckdose, HINWEIS bevor Sie die Bohrmaschine bzw. Antriebs einheit am Bohrständer montieren, Geräte Der obenstehende Sicherheitshinweis gilt nur, einstellungen vornehmen oder Zubehörtei wenn die Benutzung des Werkzeugs mit einer le wechseln.
-
Page 10: 2.5.1 Service / Wartung / Reparatur
2.5.1 Service / Wartung / Reparatur 2.5.2 Erklärung der Piktogramme auf dem Bohrständer a) Pflegen Sie das Gerät mit Sorgfalt gemäß den Bestimmungen der Bedienungsan Die CE-Kennzeichnung an einem Produkt leitung. Kontrollieren Sie, ob bewegliche Ge bedeutet, dass das Produkt allen gelten- räteteile einwandfrei funktionieren und nicht den europäischen Vorschriften entspricht klemmen, ob Teile gebrochen oder so be... -
Page 11: Technische Merkmale
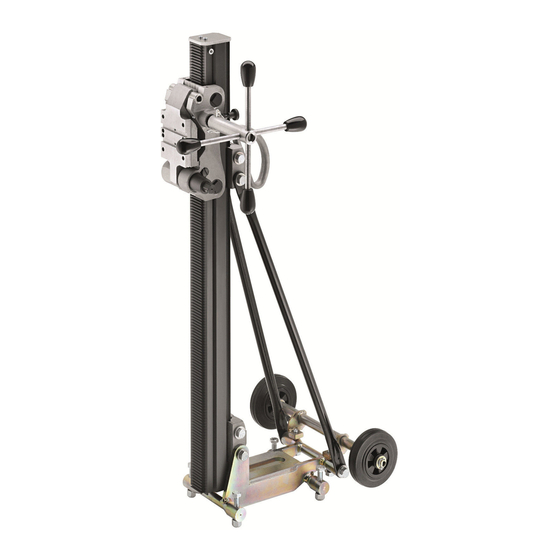
500 mm Gewicht 19 kg Befestigung Antriebseinheit / Bohrmaschine über Befestigungsplatte am Vorschubschlitten EUKonformitätserklärung Bedienteile Wir erklären in alleiniger Verantwortung, Bohrständer BST 420 dass diese Produkte den Bestimmungen Vorschubschlitten der Richtlinien entsprechen: Rastbolzen 2006/42/EG (Maschinenrichtlinie) Rohrsperre 2011/65/EU (RoHS-Richtlinie) Sechskantschraube M12x110... -
Page 12: Vor Beginn Der Arbeit
Betrieb und Bedienung HINWEIS Der Bohrständer kann am Boden oder an der Wand Für die Befestigung an Wänden sind RAWL-Anker mit einer Befestigungsschraube befestigt werden. mit Durchmesser 20 mm / M12 zu verwenden. Beachten Sie die in Ihrem Land gültigen Vor Befestigung des Bohrständers schriften für die zu bearbeitenden Materialien am Boden... -
Page 13: Befestigung Des Bohrständers Mit Vakuumset (Zubehör)
• Vorschubschlitten (1) mit dem Rastbolzen (2) Befestigung des Bohrständers sichern. mit Vakuumset (Zubehör) Den Rastbolzen (2) am Vorschubschlit- ten (1) herausziehen, um 90° drehen und in die Vorschubwelle (5) einrasten lassen. Evtl. muss Wenn die Befestigung des Bohrständers mit einer der Vorschubschlitten (1) dazu mit dem Dreh- Befestigungsschraube nicht möglich ist, kann der kreuz (4) etwas auf oder ab bewegt werden. -
Page 14: Verzahnung Und Führung An Bohrsäule Reinigen
Tuch abreiben um den Bohrstaub zu entfernen. Den Lieferumfang für die Basisausführungen ent- nehmen Sie bitte der nachfolgenden Aufzählung. Exzenterwelle reinigen und Lieferumfang: • fetten Bohrständer BST 420 • Betriebsanleitung • Exzenterwelle (3) mit einem Gabelschlüs- Bei fehlenden oder beschädigten Teilen wenden Sie sel lösen. -
Page 15: Garantie
Garantie 4. Verwendung von Original BAIER Bei den von der Maschinenfabrik OTTO BAIER GmbH in Verkehr gebrachten Produkten sind die Ersatzteilen Vorschriften des zum Schutz gegen Gefahren für Es ist sicherzustellen, dass nur Original- BAIER- Leben und Gesundheit dienenden Gesetzes über Ersatzteile und - BAIER-Zubehör verwendet wer- technische Arbeitsmittel berücksichtigt. - Page 16 Imprint Contents About this instruction manual ... 17 Version V01 / 2020-07 Copyright: Important information ......17 Symbols used in the instruction manual 17 Maschinenfabrik Safety Instructions ......17 OTTO BAIER GmbH Operating personnel requirements ..17 Heckenwiesen 26 Workplace safety ........18 71679 Asperg Electrical safety ........
-
Page 17: About This Instruction Manual
About this instruction CAUTION manual “CAUTION” indicates an imminent hazard, which This instruction manual contains all important can result in minor or moderate physical injuries. information necessary for safe handling of the drill Î This arrow indicates appropriate measures to stand. -
Page 18: Workplace Safety
c) Always work carefully, attentively and sensi b) Avoid abnormal postures when working. bly when using this tool. Do not use the unit Ensure you are standing firmly and maintain if you are tired or are under the influence of your balance at all times. - Page 19 c) Disconnect the plug of the drill or drive unit from the socket before mounting the drill or NOTE drive unit on the drill stand, make any unit settings or change accessory parts. The above safety instruction only applies if it is Unintentional starting of drills or drive units planned to use the tool with a vacuum plate.
-
Page 20: 2.5.1 Service / Maintenance / Repair
2.5.1 Service / Maintenance / Repair 2.5.2 Explanation of the pictograms on the drill stand a) Maintain the unit with care in accordance with the stipulations of the instruction The CE mark on a product means that the manual. Check whether moving unit parts product conforms with all the applicable are in proper working order and do not jam, European regulations and has been... -
Page 21: Technical Characteristics
Fastening drive unit/drill on the feed slide via the mounting plate EU Declaration of Conformity Controls We confirm with sole responsibility that Drill stand BST 420 these products comply with provisions of Feed slide the Directives: Locking pin 2006/42/EC (Machinery Directive) -
Page 22: Before Starting Work
Operation and Control NOTE The drill stand can be fixed onto the floor or wall Use RAWL anchors with diameter 20 mm / M12 for using a retaining screw. fixing onto walls. Observe the relevant regulations in your coun Fixing the drill stand on the floor try for the materials to be machined and extraction. -
Page 23: Fixing The Drill Stand With Vacuum Kit (Accessory)
• Secure the feed slide (1) with the locking Fixing the drill stand with pin (2). vacuum kit (accessory) Pull out the locking pin (2) in the feed slide (1), turn through 90° and allow it to latch into the feed shaft (5). To do this, it may be If it is not possible to fix the drill stand with a necessary to move the feed slide (1) up or down retaining screw, the drill stand can be fixed on the... -
Page 24: Cleaning The Teeth And Guide On The Drill Stand Pillar
Please refer to the following list for the scope of supply of the basic models. Cleaning and greasing the Scope of supply: • eccentric shaft Drill stand BST 420 • Instruction Manual • Use an open-ended spanner to undo the Please contact your dealer if parts are missing or eccentric shaft (3). -
Page 25: Warranty
Warranty 4. Use of original BAIER spare parts The products placed on the market and distributed by Maschinenfabrik OTTO BAIER GmbH take into Ensure that original BAIER spare parts and account the regulations of the laws concerning engi- BAIER accessories only are used. They are neering tools and equipment to protect against risks available from authorised dealers. - Page 26 Informazioni editoriali Indice Informazioni sul manuale di Versione V01 / 2020-07 istruzioni per l'uso ........27 Copyright: Informazioni importanti ......27 Maschinenfabrik Simboli utilizzati nel manuale di OTTO BAIER GmbH istruzioni per l'uso ........27 Heckenwiesen 26 Indicazioni di sicurezza ......27 71679 Asperg Requisiti del personale di comando ..
-
Page 27: Informazioni Sul Manuale Di Istruzioni Per L'uso
Informazioni sul manuale di ATTENZIONE istruzioni per l'uso “ATTENZIONE” indica un pericolo imminente che Il presente manuale di istruzioni per l'uso contiene tut- può causare lesioni fisiche lievi o moderate. te le informazioni importanti per un utilizzo sicuro del Î Questa freccia indica i provvedimenti da adottare montante per foratura. -
Page 28: Sicurezza Sul Posto Di Lavoro
c) Quando si lavora con questo dispositivo, b) Evitare posture scorrette. Lavorare sempre in procedere con raziocinio e con la massima una posizione stabile, mantenendo un buon cautela. Non usare il dispositivo quando ci si equilibrio. sente stanchi o dopo l’assunzione di droghe, In questo modo è... - Page 29 c) Prima di fissare al montante la perforatrice e/o l’unità motrice, sfilare la spina dalla presa AVVISO elettrica e procedere con la configurazione del dispositivo o la sostituzione degli accessori. Le indicazioni di sicurezza riportare sopra valgono Un avvio accidentale della perforatrice o delle solo se è...
-
Page 30: Assistenza / Manutenzione / Riparazione
2.5.1 Assistenza / Manutenzione / 2.5.2 Spiegazione dei pittogrammi Riparazione apposti sul montante per foratura Il simbolo CE applicato su un prodotto in- a) Eseguire regolarmente la manutenzione del dica che tale prodotto è conforme a tutte le dispositivo, come indicato nel manuale di norme europee vigenti, e che è... -
Page 31: Caratteristiche Tecniche
Dichiarazione di conformità CE Elementi di comando Noi dichiariamo, sotto la nostra responsa- Montante per foratura BST 420 bilità, che questi prodotti sono conformi alle Slitta di avanzamento seguenti norme e direttive:... -
Page 32: Prima Di Iniziare I Lavori
Funzionamento e comando AVVISO Il montante per foratura può essere fissato al pavi- Per il fissaggio a parete utilizzare tasselli RAWL con mento o alla parete con una vite di fissaggio. un diametro di 20 mm/M12. Rispettare le norme nazionali vigenti, relative ai Fissaggio del montante al materiali da perforare e all'aspirazione. -
Page 33: Fissaggio Del Montante Per Foratura Con Sistema A Depressione (Accessorio)
• Fissare la slitta di avanzamento (1) con il perno Fissaggio del montante di arresto (2). per foratura con sistema a Estrarre il perno di arresto (2) dalla slitta di depressione (accessorio) avanzamento (1), ruotarlo di 90° e farlo scattare in posizione nell’albero di avanzamento (5). -
Page 34: Pulizia Della Dentatura E Della Guida Del Montante Per Foratura
Il volume di fornitura per i modelli base è riportato nel- la lista sottostante. Pulizia e lubrificazione dell’albero Volume di fornitura: • eccentrico Montante per foratura BST 420 • Manuale operativo • Svitare l’albero eccentrico (3) con una chiave Rivolgersi al proprio rivenditore in caso di componenti fissa. -
Page 35: Garanzia
Garanzia 4. Uso di pezzi di ricambio originali BAIER I prodotti messi in commercio dall'azienda OTTO BA- IER GmbH sono stati progettati e costruiti nel rispet- È importante garantire che vengano usati esclu- to delle norme di legge sugli strumenti tecnici di lavo- sivamente pezzi di ricambio originali BAIER e ac- ro, in materia di protezione da pericoli di morte e per cessori BAIER. - Page 36 Mentions légales Sommaire Au sujet de ce mode d'emploi ....37 Version V01 / 2020-07 Droits d’auteur : Informations importantes ......37 Pictogrammes utilisés dans ce mode Maschinenfabrik d'emploi ............37 OTTO BAIER GmbH Notices de sécurité ......... 37 Heckenwiesen 26 Qualification des utilisateurs .....
-
Page 37: Au Sujet De Ce Mode D'emploi
Au sujet de ce mode d'emploi ATTENTION Le présent mode d'emploi contient toutes les infor- Le pictogramme « ATTENTION » attire l'attention mations importantes pour une utilisation fiable du sur une menace imminente susceptible de causer support pour carotteuse. Le support pour carotteuse des blessures légères ou moyennes. -
Page 38: Sécurité Du Poste De Travail
c) Soyez attentif, faites bien attention à ce que b) Évitez toute posture anormale. Veillez à ne pas vous faites et servezvous toujours de cet perdre l'équilibre et à adopter une position appareil de manière raisonnable. stable à tout moment. N’utilisez pas l’appareil si vous êtes fatigué... - Page 39 c) Retirez la fiche de la prise au secteur de la carotteuse et/ou de l’unité d'entraînement OBSERVATION avant de monter la carotteuse et/ou l’unité d'entraînement au support pour carotteuse, La consigne de sécurité ci-dessus est uniquement de procéder à des réglages de l’appareil ou de valable s’il est prévu d’utiliser l’outil avec une plaque changer d’accessoires.
-
Page 40: Service / Maintenance / Réparation
2.5.1 Service / Maintenance / 2.5.2 Explication des pictogrammes sur Réparation le support pour carotteuse La marque CE sur un produit signifie que a) Entretenez l’appareil avec soin aux termes celui-ci correspond à toutes les prescrip- des dispositions du présent mode d'emploi. tions européennes en vigueur et qu’il a été... -
Page 41: Caractéristiques Techniques
Fixation de l’unité d'entraînement / de la carotteuse via la plaque de fixation au chariot d’avance Déclaration de conformité Pièces de commande européenne Support pour carotteuse BST 420 Nous déclarons sous notre propre responsa- Chariot d’avance bilité que les produits objet du présent mode Boulon d’arrêt d’emploi répondent aux directives et normes... -
Page 42: Avant De Commencer Le Travail
Fonctionnement et commande OBSERVATION La fixation du support pour carotteuse au sol ou au Utiliser des ancres RAWL d’un diamètre de 20 mm / mur est possible avec une vis de fixation. M12 pour la fixation aux murs. Respectez les dispositions applicables aux maté Fixation du support pour riaux à... -
Page 43: Fixation Du Support Pour Carotteuse Avec La Plaque De Mise À Vide (Accessoires)
• Immobiliser le chariot d’avance (1) avec le Fixation du support pour boulon d’arrêt (2). carotteuse avec la plaque de mise Retirer le boulon d’arrêt (2) du chariot à vide (accessoires) d’avance (1), le tourner de 90° et lui faire prendre l’encoche dans l’arbre d’avancement (5). -
Page 44: Nettoyage De L'endentement Et Du Guidage De La Colonne De Carottage
Les fournitures des versions de base figurent sur la comprimé et frotter avec un chiffon pour éliminer liste ci-dessous. les poussières de carottage. Fournitures : • Support pour carotteuse BST 420 • Nettoyage et graissage de l’arbre Mode d'emploi excentrique Adressez-vous à votre revendeur en cas de pièces •... -
Page 45: Garantie
Garantie 4. Utilisation de pièces de rechange d’origine Les produits commercialisés par la société Maschinenfabrik OTTO BAIER GmbH répondent aux BAIER prescriptions de prévention des dangers mortels et Veillez à l'utilisation exclusive d'accessoires et de protection de la santé prévues par la Loi sur les de pièces de rechange d’origine BAIER. - Page 46 Kolofon Indhold Om denne betjeningsvejledning ..47 Version V01 / 2020-07 Copyright: Vigtige oplysninger ......... 47 Anvendte symboler i Maschinenfabrik betjeningsvejledningen ......47 OTTO BAIER GmbH Sikkerhedshenvisninger ..... 47 Heckenwiesen 26 Krav til betjeningspersonalet ....47 71679 Asperg Arbejdspladssikkerhed ......48 Tyskland Elektrisk sikkerhed .........
-
Page 47: Om Denne Betjeningsvejledning
Om denne FORSIGTIG betjeningsvejledning ”FORSIGTIG” henviser til en overhængende fare, Denne betjeningsvejledning indeholder alle vigtige som kan medføre let eller middel tilskadekomst oplysninger for sikker omgang med borestanderen. eller materielle skader. I denne betjeningsvejledning kaldes borestanderen Î Denne pil viser den tilhørende forholdsregel til også... -
Page 48: Arbejdspladssikkerhed
c) Vær opmærksom, se efter, hvad du laver, og b) Undgå unormale kropsstillinger. Stå sikkert, arbejd fornuftigt med et dette apparat. Brug og hold hele tiden ligevægten. ikke apparatet, hvis du er træt eller påvirket Dermed kan du bedre styre apparatet, hvis der af stoffer, alkohol eller medicin. - Page 49 c) Tag boremaskinens eller drivenhedens stik ud af stikdåsen, før du monterer bore HENVISNING maskinen eller drivenheden på borestan deren, foretager indstillinger eller skifter Ovenstående sikkerhedshenvisning gælder kun, tilbehør. hvis brugen af værktøjet er forbundet med en En utilsigtet start af boremaskiner eller drivenhe- vakuumplade.
-
Page 50: Service / Vedligeholdelse / Reparation
2.5.1 Service / vedligeholdelse / 2.5.2 Forklaring på piktogrammerne reparation på borestanderen CE-mærkningen på et produkt betyder, a) Vedligehold omhyggeligt apparatet i at produktet opfylder alle gældende overensstemmelse med bestemmelserne europæiske forskrifter, og at det har været i betjeningsvejledningen. Kontroller, at underkastet de foreskrevne procedurer for bevægelige dele fungerer upåklageligt og overensstemmelsesvurdering. -
Page 51: Tekniske Egenskaber
Dybde 500 mm Vægt 19 kg Fastgørelse drivenhed/boremaskine vha. fastgørel- sesplade på tilspændingsslæden EUoverensstemmelseserklæring Betjeningsdele Vi erklærer under eneansvar, at disse Borestander BST 420 produkter opfylder bestemmelserne i Tilspændingsslæde direktiverne: Låsebolt 2006/42/EG (Maskindirektivet) Rørspærre 2011/65/EU (RoHS-direktivet) Sekskantskrue M12x110 i forbindelse med de sikkerhedshenvisnin-... -
Page 52: Før Arbejdet Påbegyndes
Drift og betjening HENVISNING Borestanderen kan fastgøres i gulv eller væg med Til fastgørelse på vægge skal der anvendes en fastgørelsesskrue. RAWL-ankre med en diameter på 20 mm / M12. Overhold de nationale, gældende forskrifter for Fastgørelse af borestanderen de materialer, der bearbejdes, og udsugning. i gulvet •... -
Page 53: Fastgørelse Af Borestanderen Med Vakuumsættet (Tilbehør)
• Fastgør tilspændingsslæden (1) med Fastgørelse af borestanderen låsebolten (2). med vakuumsættet (tilbehør) Træk låsebolten (2) på tilspændingsslæ- den (1) ud, drej den 90°, og lad tilspændingsaks- len (5) gå i indgreb. Tilspændingsslæden (1) skal Hvis det ikke er muligt at gøre borestanderen fast evt. -
Page 54: Rengøring Af Boresøjlens Fortanding Og Føring
Leveringsomfanget for basisudførelserne fremgår af fjerne borestøvet. nedenstående liste. Leveringsomfang: Rengøring og smøring af • Borestander BST 420 • excenteraksel Betjeningsvejledning • Løsn excenterakslen (3) med en gaffelnøgle. Hvis der mangler dele, eller de er beskadigede, skal •... -
Page 55: Garanti
Garanti 4. Anvendelse af originale BAIERreservedele I forbindelse med de af Maschinenfabrik OTTO BAIER GmbH markedsførte produkter er forskrifter- Brug altid kun originale BAIER-reservedele og ne i loven om tekniske arbejdsmidler, der tjener til BAIER-tilbehør. Disse dele fås hos autorise- beskyttelse mod farer for liv og helbred, opfyldt. - Page 56 Stopka Spis treści Informacje na temat niniejszej Wersja V01 / 2020-07 instrukcji obsługi ......... 57 Copyright: Ważne informacje ........57 Maschinenfabrik Symbole stosowane w instrukcji obsługi 57 OTTO BAIER GmbH Zasady bezpieczeństwa ...... 57 Heckenwiesen 26 Wymagania względem personelu 71679 Asperg obsługi ............
-
Page 57: Informacje Na Temat Niniejszej Instrukcji Obsługi
Informacje na temat OSTROŻNIE niniejszej instrukcji obsługi Hasło „OSTROŻNIE” wskazuje na zagrożenie, Niniejsza instrukcja obsługi zawiera wszystkie waż- którego skutkiem mogą być lekkie lub średnio ne informacje dotyczące bezpiecznego obcho- ciężkie obrażenia ciała. dzenia się ze stojakiem wiertarskim. W tej instruk- Î... -
Page 58: Bezpieczeństwo Na Stanowisku Pracy
c) Zachować ostrożność, kontrolować wyko b) Nie przyjmować nietypowych pozycji ciała. nywane czynności i zachować rozsądek pod Zadbać o stabilność i przez cały czas utrzy czas prac z tym urządzeniem. Nie korzystać mywać równowagę. z urządzenia w przypadku zmęczenia lub W ten sposób można lepiej kontrolować... - Page 59 c) Przed zamontowaniem wiertnicy bądź zespołu napędowego na stojaku wiertar WSKAZÓWKA skim, przed przystąpieniem do nastawiania urządzenia lub wymiany osprzętu odłączyć Powyższa zasada bezpieczeństwa obowiązuje wtyczkę wiertnicy i zespołu napędowego od tylko, gdy przewidziane jest użycie narzędzia gniazda wtykowego. z płytą próżniową. Przypadkowe uruchomienie wiertnicy bądź...
-
Page 60: Serwisowanie / Konserwacja / Naprawa
2.5.1 Serwisowanie / konserwacja / 2.5.2 Objaśnienie piktogramów na naprawa stojaku wiertarskim Znak CE umieszczony na wyrobie ozna- a) Starannie utrzymywać urządzenie w należy cza, że wyrób jest zgodny ze wszystkimi tym stanie, zgodnie z informacjami poda obowiązującymi przepisami europejskimi nymi w instrukcji obsługi. -
Page 61: Cechy Techniczne
Zamocowanie zespołu napędowego / wiertnicy przez płytę mocującą na wózku posuwu Deklaracja zgodności UE Elementy obsługowe Niniejszym oświadczamy na naszą wyłącz- Stojak wiertarski BST 420 ną odpowiedzialność, że niniejsze produk- Wózek posuwu ty są zgodne z postanowieniami dyrektyw: Trzpień ustalający... -
Page 62: Przed Przystąpieniem Do Pracy
Eksploatacja i obsługa WSKAZÓWKA Stojak wiertarski można przymocować na posadzce Do zamocowania na ścianach zastosować kotwy lub na ścianie za pomocą wkrętu mocującego. RAWL o średnicy 20 mm / M12. Przestrzegać przepisów obowiązujących w kra Mocowanie stojaka ju użytkowania dotyczących obrabianych mate wiertarskiego na posadzce riałów i odsysania. -
Page 63: Mocowanie Stojaka Wiertarskiego Za Pomocą Zestawu Próżniowego (Osprzęt)
• Skręcić wiertnicę diamentową / zespół napę- Mocowanie stojaka wiertarskiego dowy (4) za pomocą 4 wkrętów mocujących (2) za pomocą zestawu próżniowego z płytą silnika (1). • (osprzęt) Unieruchomić wózek posuwu (1) za pomocą trzpienia ustalającego (2). Wyciągnąć trzpień ustalający (2) z wózka Jeśli mocowanie stojaka wiertarskiego za pomocą... -
Page 64: Czyszczenie Zębatki I Prowadnicy Na Kolumnie Wiertarskiej
Zakres dostawy wersji podstawowych podany jest stępnie zetrzeć z nich szmatką pył wiertarski. w poniższej liście. Zakres dostawy: • Czyszczenie i smarowanie wałka Stojak wiertarski BST 420 • mimośrodowego Instrukcja obsługi • W razie braku lub uszkodzenia części należy skon- Odkręcić... -
Page 65: Gwarancja
Gwarancja 4. Stosowanie oryginalnych części zamiennych Wyroby wprowadzone do obrotu przez firmę Ma- schinenfabrik OTTO BAIER GmbH spełniają wy- BAIER magania ochrony przed zagrożeniami dla ży- Upewnić się, że stosowane są wyłącznie orygi- cia i zdrowia przepisów w sprawie wyposażenia nalne części zamienne BAIER oraz oryginalny technicznego. - Page 68 Maschinenfabrik OTTO BAIER GmbH Heckenwiesen 26, 71679 Asperg, Deutschland Tel. +49 (0) 7141 30 32-0 Fax +49 (0) 7141 30 32-43 info@baier-tools.com www.baier-tools.com BAIER S.A.R.L. OTTO BAIER Italiana S.r.l. BAIER Scandinavia Aps 19, rue Nicéphore Niépce Via Benaco, 12 Topstykket 29 14120 Mondeville 20098 San Giuliano Milanese 3460 Birkerød...
Need help?
Do you have a question about the BST 420 and is the answer not in the manual?
Questions and answers