MELAG MELAseal 200 User Manual
Sealing device
Hide thumbs
Also See for MELAseal 200:
- Operating manual (42 pages) ,
- Operating manual (34 pages) ,
- User manual (40 pages)
Table of Contents
Advertisement
Quick Links
User Manual
MELAseal
Sealing device
from software version 2.28
EN
Dear customer,
We thank you for your confidence demonstrated by the purchase of this MELAG product. As an owner-run and operated
family concern founded in 1951, we have a long history of successful specialization in hygiene products for practice-
based use. Our focus on innovation, quality and the highest standards of operational reliability has established MELAG
as the world's leading manufacturer in the instrument treatment and hygiene field.
You, our customer are justified in your demand for the best products, quality and reliability. Providing
hygiene"
and
"Quality – made in
agement system is subject to close monitoring: one instrument to this end is our annual multi-day audit conducted in ac-
cordance with EN ISO 13485. This guarantees that all MELAG products are manufactured and tested in accordance with
strict quality criteria.
The MELAG management and team.
®
200
Germany", we guarantee that these demands will be met. Our certified quality man-
"competence in
Advertisement
Table of Contents

Related Manuals for MELAG MELAseal 200


Summary of Contents for MELAG MELAseal 200
- Page 1 2.28 Dear customer, We thank you for your confidence demonstrated by the purchase of this MELAG product. As an owner-run and operated family concern founded in 1951, we have a long history of successful specialization in hygiene products for practice- based use.
-
Page 3: Table Of Contents
Using the USB flash drive as an output medium........................ 18 Computer as output medium.............................. 19 Structure of the log files .............................. 19 7 Function tests .................................. 21 Function test with MELAG Seal Check .......................... 21 8 Settings .................................... 23 Access settings menu ................................ 23 Time .................................... 23 Date.................................... 24 Sealing temperature................................ 24... - Page 4 Roll dispenser “Deluxe”.............................. 32 Wall-mounted roll dispenser............................... 32 12 Malfunctions .................................. 33 13 Manufacturer's recommendation for routine operation .................... 35 Performing the peel test .............................. 36 MELAG seal seam stability test ............................ 36 14 Standard specifications .............................. 37 15 Technical Data .................................. 39 16 Accessories and spare parts ............................ 40...
-
Page 5: General Guidelines
Store this user manual carefully and in close proximity to your device. It represents a component of the product. Should the user manual no longer be legible, damaged or lost, obtain a new copy from MELAG. State the device type and your address in an e-mail. -
Page 6: Safety
Never open the device housing. Incorrect opening and repair can compromise electrical safety and pose a danger to the user. The guarantee and warranty are forfeited as soon as the device is opened by anyone other than a MELAG-authorized technician. -
Page 7: Description Of The Device
It was developed especially for the heat sealing of instruments in sterilization packaging and complies with the standard EN ISO 11607-2 and the German standard DIN 58953-7 The bar sealing device MELAseal 200 is not a medical device as defined by the Medical Device Regula- tion. -
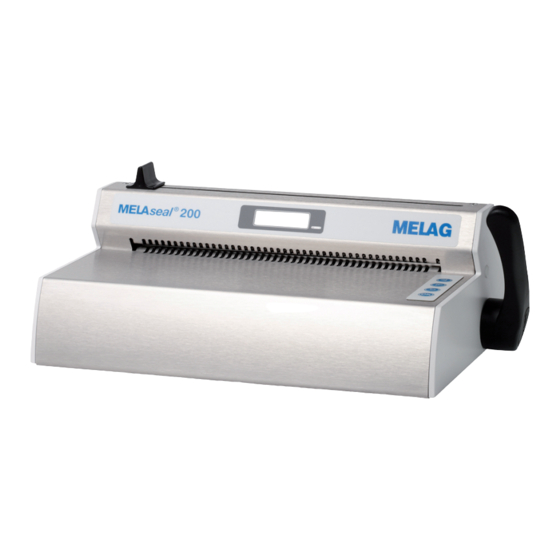
Page 8: Views Of The Device
3 Description of the device Views of the device View from front 1 Knife handle 2 Display with control lamp View from rear 3.1 Bracket for roll dispenser 3.2 Bracket for roll dispenser 4 Power cable connection 5 USB port (type B) for connection to a computer View from the left 6 USB port for USB flash drive... -
Page 9: Symbols On The Device
3 Description of the device View from the right 8 Power switch 9 Sealing lever 10 Operating keys Symbols on the device Manufacturer of the product Date of manufacture of the product Product serial number from the manufacturer Article number of the product Electrical connection of the device: AC current The user manual includes important safety information. -
Page 10: Menu Structure
User 02 ├ ├ User... User... │ └ User 10 User 10 ├ Seal chk Function test with MELAG seal check │ ├ Approve? Performing function test with seal check │ └ Reminder Activate reminder for seal check │ ├... -
Page 11: Status Display And Acoustic Signals
3 Description of the device Status display and acoustic signals Control lamp / Possible cause Measure acoustic signal The sealing device is in the Wait until the pre-set sealing temperature heating or cooling phase. has been reached. LED illuminates orange The sealing lever is depressed Acknowledge the display message with during the heating phase. -
Page 12: Commissioning
Ensure that the sealing device is located away from direct sunshine and outside the range of other sources of heat. Set-up the device protected against blows or vibrations. Space requirements Fig. 1: View from the front and right Dimensions MELAseal 200 Width 36.5 cm Width including lever 41.5 cm Height... -
Page 13: Connecting The Sealing Device
4 Commissioning Connecting the sealing device ü The sealing device has been switched off. ü Use the power cable included in the scope of delivery. Connect the rubber connector of the power cable to the rear side of the sealing device and connect the power plug in the mains socket. -
Page 14: Sealing
5 Sealing 5 Sealing Video tutorial See also “Wrapping Instruments”. Sealing procedure with pre-finished film bags CAUTION Danger of burns from hot metal parts. The sealing rail is heated continuously when the sealing device is switched on. Never touch the metal surfaces on the sealing rail and in the area of the rear and fore paper guide directly. -
Page 15: Sealing Procedure For Film Rolls
5 Sealing Leave the sealing lever depressed as long as the progress bar in the display completes and the control lamp flashes green at short intervals (approx. 3 s). If the display switches to Open and the control lamp is continuously illuminated green, return the sealing lever upwards to its starting position. - Page 16 5 Sealing Press the sealing lever down until it latches. Leave the sealing lever depressed as long as the progress bar in the display completes and the control lamp flashes green at short intervals (approx. 3 s). Cut of the film roll during the sealing procedure. To this end, leave the sealing lever depressed and move the handle of the knife to the other end of the sealing device quickly.
- Page 17 5 Sealing Slide the open side of the film bag into the paper guide from the front. Press the sealing lever down until it latches. Leave the sealing lever depressed as long as the progress bar in the display completes and the control lamp flashes green at short intervals (approx.
-
Page 18: Logging
6 Logging 6 Logging Documenting the sealing process Video tutorial See also “Documentation and User Administration”. EN ISO 11607-2 requires that the sealing procedure be monitored and documented in order to demon- strate that it corresponds with the requirements of part 2 of the standard. As a result, you are able to re- cord the logs of the seal runs, output them on the following output media and archive them accordingly: ▪... -
Page 19: Computer As Output Medium
Firmware 1.12 requires MELAview Doku/MELAtrace version 3.0.15.1. ü Firmware 2.10 and above requires MELAview Doku/MELAtrace from version 3.6.2.1. Install the MELAseal 200 PC driver on your computer. The driver can be downloaded from the MELAG website (Service/Download Center). Connect the type B USB cable to the rear panel of the sealing device and connect the other end to the computer. - Page 20 6 Logging Example of a log of multiple sealing procedures Key: Row 10 – Description of the sealing device Row 15 – Date of sealing procedure Row 20 – Serial number of the sealing device Row 25 – Installed software version Row 30 –...
-
Page 21: Function Tests
7 Function tests Function test with MELAG Seal Check The MELAG Seal Check serves to check the function of the seal seam produced by your sealing device. Given daily operation, we recommend performing a function test on a weekly basis. - Page 22 Confirm the display with the key Ê The display changes to seal chk and flashes. Prepare the MELAG Seal Check test strips with the transparent sterilization packaging in accordance with the applicable operating manual and perform a test seal. Ê...
-
Page 23: Settings
8 Settings 8 Settings Access settings menu Proceed as follows to reach the settings menu and the desired submenu: Switch on the sealing device and wait until the temperature is issued on the display. Press repeatedly in order to navigate to Settings. Press to navigate to the Settings menu. -
Page 24: Date
8 Settings Press to navigate to the Auto DST option. Press to confirm. Ê The display changes to On and flashes. Press , to change between On and Off. Ê On = The time is automatically changed to summer or winter time (CET). Ê... -
Page 25: Signal Tones
8 Settings Press repeatedly in order to leave the menu. PLEASE NOTE The extent to which individual components in the sealing device expand is altered upon temperature changes. This also influences the sealing force. To this end, the sealing force thresholds are automatically adapted to the changed sealing temperature. Signal tones In order to switch off the signal tones where necessary, proceed as follows: ü... -
Page 26: Eco Mode And Standby
8 Settings Eco Mode and Standby Video tutorial See also “Sealing Temperature and Eco Mode”. The sealing device is equipped with a two-stage energy-saving function. 1. Waiting time: Eco Mode If, given an activated sealing device (Ready mode) the sealing lever or keys are not actuated within a cer- tain time, Eco Mode will be activated, i.e. -
Page 27: Force Calibration
8 Settings Press to confirm. Ê The display flashes. Press to switch the Eco mode on or off. Press to save the settings. Press repeatedly in order to leave the menu. Ê The display returns to the initial state. Force calibration Before contacting the service technician upon display of the malfunction messages Err_05/Force_Lo or Err_06/Force_Hi, first try to remedy the problem via a force calibration. -
Page 28: Maintenance
The instructions can be downloaded from the MELAG website (Products/Sealing devices/ MELAseal 200). The most important working steps lead you through the validation process step by step. The checks using technical measurement equipment may only be performed by trained personnel using the intended test equipment. - Page 29 9 Maintenance Switch on the sealing device. Ê The following display will appear after only a few seconds: Update? If you wish to perform an update, confirm with Ê The update will then be started, the display will extinguish and the LED control lamp flashes yellow.
-
Page 30: Pause Times
10 Pause times 10 Pause times Pause times The sealing device can remained switched on over longer operating pauses of many hours. The sealing device switches into Eco mode (= energy-saving mode) after a user-defined time and then into Standby following a further waiting time, see Eco Mode and Standby [} page 26]. -
Page 31: Optional Accessories
11 Optional accessories 11 Optional accessories Roll dispenser “standard” The roll dispenser “standard” is placed directly behind the sealing device. The rolls of film are placed into the cavity and held in position using additional spacers located to the left and right. This prevents them from slipping. Hook the roll dispenser “standard”... -
Page 32: Roll Dispenser "Deluxe
11 Optional accessories Roll dispenser “Deluxe” In the roll dispenser “Deluxe”, the rolls of film are stored above the sealing device, thus saving space. The integrated feeding device enables easy feeding of the film via a hand wheel. Further information regarding assembly and operation is specified in the appendent operating manual. -
Page 33: Malfunctions
Improper opening of the housing cover brings the danger of an electric shock. Never open the sealing device housing cover without authorization. The sealing device may only be repaired by a service technician authorized by MELAG. The warning and malfunction messages are generally confirmed with... - Page 34 (FAT 32, no quick formatting). Rename the USB flash drive on the computer. If necessary, replace the USB flash drive. MELAG recommends the use of a MELAG USB flash drive. There is no connection between the Working in the device manager of your comput- sealing device and the computer.
-
Page 35: Manufacturer's Recommendation For Routine Operation
▪ Check for dryness and integrity once again, before using the instruments. Weekly Check the seal seam with Perform a visual control using MELAG Seal Check resources and document the results (e.g. using the MELAconnect app) – for criteria and further information, see the MELAG Seal Check operating manual. -
Page 36: Performing The Peel Test
Document the results. MELAG seal seam stability test For validating your sealing processes MELAG provides a seal seam stability test for a cost price of 125.00 € plus V.A.T. (state 01/2020). After the film test strips have been tested successfully, MELAG will issue a certificate. -
Page 37: Standard Specifications
Maintain the clearance between seal seam and cutting edge as prescribed in the standard: DIN 58953-7 requires the maintenance of a sufficient overhang between the seal seam and the cutting edge when working with transparent bags on the removal side. This ensures aseptic removal. MELAG recommends a minimum overhang of 10 mm. - Page 38 14 Standard specifications Guidelines for the storage duration of sterile medical devices in accordance with DIN 58953-8 This standard applies to the delivery, storage, commissioning, transport and provision (including the packaging and labelling of sterile medical devices to be used in healthcare institutions such as hospitals and dental and medical practices).
-
Page 39: Technical Data
15 Technical Data 15 Technical Data Device type MELAseal 200 Device dimensions (W x D x H) 41.5 x 24 x 15 cm Weight 5.4 kg Electrical connection Power supply 200-240 V, 50/60 Hz Electrical power max. 300 W, average 100 W... -
Page 40: Accessories And Spare Parts
Suspension scales with calibration certificate 87500 Thermometer with calibration certificate 87580 MELAG Seal Check 01079 MELAink Test 01089 MELAG USB flash drive (8 GB) for documentation 19901 USB cable, 1.8 m 19902 MELAtrace documentation software 21138 Spare parts Lever, black (sealing lever) - Page 42 MELAG Medizintechnik GmbH & Co. KG Geneststraße 6-10 10829 Berlin Germany Email: info@melag.com Web: www.melag.com Original instructions Responsible for content: MELAG Medizintechnik GmbH & Co. KG We reserve the right to technical alterations Your stockist...
Need help?
Do you have a question about the MELAseal 200 and is the answer not in the manual?
Questions and answers