
Subscribe to Our Youtube Channel
Summary of Contents for AV Portable Studio
- Page 1 Portable Studio Battle Creek Area Community Television 70 West Michigan Ave., Suite 112 • Battle Creek, MI 49017 • (269) 968-3633 • http://accessvision.tv...
- Page 3 1. Choose Your Positions If possible, do a site survey ahead of time. The portable studio can accommodate 1 - 4 cameras. Think about camera positions, power availability, location of the studio and where sound will come from - microphones or sound system feed? Place the studio: •...
-
Page 4: Attaching The Battery
Attaching the battery Remaining battery life is shown as a percentage on the top left corner of the camera screen. Removing the lens cap Press the latches on both sides of the lens cap and remove it. -
Page 5: Setting Exposure
Setting exposure Tip: Use the ND FILTER only when shooting outside, if necessary. The iris should not have to be higher than F8; if it is, use the ND filter. NEVER USE THE ND FILTER INDOORS. If “ND OFF” flashes on the screen, turn the ND filter OFF. -
Page 6: Adjusting Focus
Adjusting Focus Adjusting Color To set the White Balance, which adjusts the color in the cameras: 1. Set the AUTO/MANUAL switch to MANUAL. 2. Press the WHT BAL button 3. Press MENU > CAMERA SET > WB SET > (execute). 4. - Page 7 3. Set up the studio 1. Unpack. Remove the covers from the rack case. Remove the rack case from the wheels and set it on top of the empty camera case. PREVIEW 2. Connect power. Turn on the master power PROGRAM switch and wait for the switcher to start up.
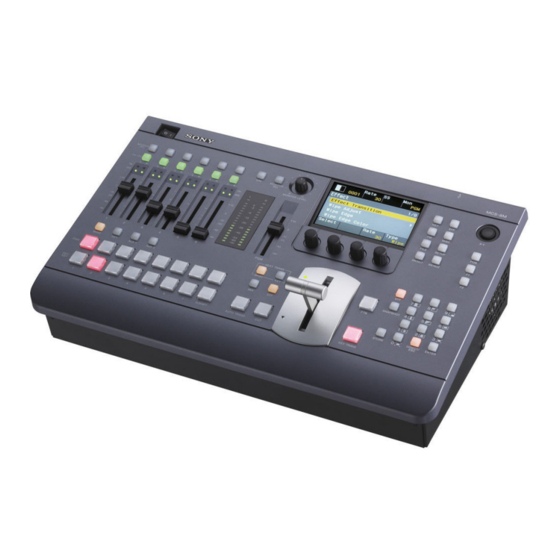
- Page 8 4. Switcher Block 1 is the audio mixer, where you control the volume for any sound sources. Block 3 is the video switcher. The top row of buttons is called the PROGRAM BUS (PGM). Whichever input is selected to be recorded (or “live”...
- Page 9 Block 4 is the transition control block. Use the fader bar or AUTO TRANS button to gradually transition between sources. Use the CUT but- ton to cut from the PGM bus to the PST bus. Use the FTB (Fade To Black) button to fade from the PGM bus into black.
- Page 10 Switching with Mix 1. Press the PGM cross-point button of the video for program output. 2. Press the PST/KEY cross-point button for the next video for output. 3. Press the MIX button in the transition control block - the button lights up orange.
- Page 11 Setting Audio Levels After connecting your sound sources, press the CH ON button so that it lights up and raise the fader to set the level. Check the audio meters - a good signal should peak between -12 and -6. Plug head- phones into the monitor and listen.
- Page 12 (in mono), and the rest are empty. Simply disregard the extra tracks or turn them off when you edit. Recordings made on the portable studio are in high definition. Once you’ve finished editing in Final Cut Pro, Share the project using the ProRes LT for HD preset, then copy the resulting...
- Page 13 6. Directing The Director will give commands to be carried out by all camera operators. The director will give a pre- paratory “Ready to . . .” command followed by the “Do it” command (e.g.: “Take”, “Fade”, etc. . . ). Do not execute the operation until the command is given by the director.
- Page 14 • Limit of one advance reservation per month for each organization. No limit on walk-in reservations. • No overnight use without special permission. In order to keep the portable studio overnight, you need to supply a letter writen on your organization’s letterhead. This letter should be signed by someone in an official financial capacity (finance person on the board of trustees, for example) indicating that the organization will take fiscal responsibility for the equipment.
Need help?
Do you have a question about the Portable Studio and is the answer not in the manual?
Questions and answers