Advertisement
Quick Links
Advertisement

Summary of Contents for Drop DROP PISARA
- Page 1 I N S T A L L A T I O N A N D O P E R A T I N G I N S T R U C T I O N S D R O P P I S A R A...
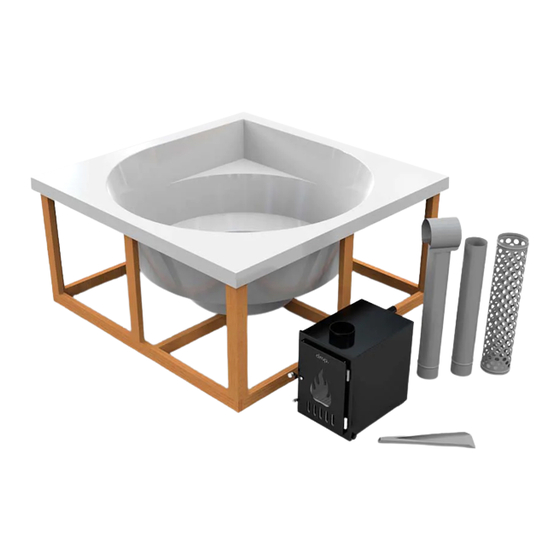
- Page 2 Keep the instructions for later use. If you are unsure about anything, do not hesitate to contact Drop’s customer service. C O N T E N T S O F T H E P O O L •...
- Page 3 D R O P P I S A R A S A F E T Y The use of the pool requires you to follow the safety guidelines provided in these instructions. Be alert, use common sense and make sensible decisions in all water- related activities.
- Page 4 D R O P P I S A R A The stove’s safety distances If the stove is placed near buildings, for example, at the edge of a terrace, make sure that the chimney and stove are far enough from any flammable structures/materials. The minimum distance from the mouth of the chimney to any flammable structures/ materials must be at least 3 metres. You must leave sufficient space around an external stove as well. Do not keep flammable materials in front of the firebox. The stove will not heat up more than the temperature of the water because the stove is surrounded by a water jacket.
- Page 5 D R O P P I S A R A B E F O R E T H E P O O L A R R I V E S The placement of the pool should be planned as carefully as possible to ensure comfort of use and safety.
- Page 6 D R O P P I S A R A Foundation of the pool The placement of each pool must be planned according to the situation and place. The foundation must be even, load-bearing and horizontal. The best foundation is concrete, gravel, wood or some other hard foundation material. The foundation must endure a weight of 2,500 kg without sinking or changing.
- Page 7 D R O P P I S A R A...
- Page 8 If the delivered product has any flaws or defects, the seller will either implement the requested alterations to the product or deliver a replacement to the customer.
- Page 9 D R O P P I S A R A I N S T A L L A T I O N O F T H E P O O L Approximately 4 people are needed to move the pool. Please be extremely careful when moving the pool to avoid accidents.
- Page 10 D R O P P I S A R A Phase 2. Installation of the stove’s hoses Before you connect the stove to the hoses, twist the clamps at the ends of the hoses to open them a little and then firmly push the hoses on the pipes at the back of the stove. You can use liquid soap or some other lubricant to connect the hoses without the use of excessive force.
- Page 11 D R O P P I S R A Phase 3. Installation of the chimney Connect the chimney pipes to each other and slide the stove’s protective grille to the bottom of the chimney. Place the chimney on the collar on top of the stove. Make sure that the chimney’s joint has been pushed all the way through.
- Page 12 D R O P P I S A R A O T H E R P O O L E Q U I P M E N T LED pool light A remote-controlled RGB LED light is situated under the pool’s transparent dome. The light’s colour and brightness can be adjusted with a remote control.
- Page 13 D R O P P I S A R A Pairing the remote control with the control unit • Turn on the pool light from the control unit’s power button or remote control. • When the pool light is on, one or more lights should be on in the control unit.
- Page 14 Filling and heating the pool The first time you use the pool, clean any potential trash and machining residues from the bottom of the pool. Make sure that the drain plug is in place. The Drop Original pool’s capacity is approximately 1,500 litres. Please note that the water level rises with the number of bathers. In general, keep the water level approximately 10–15 cm below the pool’s edge. The pool is filled with, for example, a garden hose.
- Page 15 D R O P P I S A R A insulation between the combustion chamber and water and weakens the efficiency of the stove. We recommend using the insulation cover when you heat the water. Thanks to the cover, the water will heat up significantly faster. The water is layered when heated. Mixing it during the heating ensures an even temperature. Emptying the pool and stove Remember to empty both the pool and the stove.
- Page 16 O F T H E P O O L Drop tolerates sub-zero temperatures extremely well when empty. The most important thing in maintaining the Drop pool in the winter time is to make sure the pipes never freeze. Regularly remove any snow that has accumulated on top of the cover. At worst, a heavy layer of snow can even cause the cover to break.
-
Page 17: Warranty
Requirements for the validity of the warranty For the warranty to be valid, the Drop pool must have been installed according to the pool’s user instructions, the pool must be used according to the user instructions and only for its purpose of use and the pool must be used solely for private use. - Page 18 Design Pool Oy, neglect to follow the user instructions, not maintaining or cleaning the pool, or repairs done by someone other than a repair shop authorised by Drop Design Pool Oy. The warranty does not cover damage caused by extreme weather conditions (hail, storm, earthquake etc.).
- Page 19 D R O P P I S A R A Warranty measures The buyer must immediately notify the seller of a faulty Drop pool or its part. When making the error notification, mention the following information: the name/model of the pool, purchase and installation date, the type of defect, photographs of the defect and conditions when the defect was first detected.
- Page 20 S H O W R O O M T U R K U Linnankatu 35a 20100 Turku S H O W R O O M V A N T A A Riihitontuntie 1 01720 Vantaa C O N T A C T www.drop.fi drop@drop.fi 010 339 1900 Facebook & Instagram @dropdesignspa...
- Page 21 D R O P P I S A R A drop.fi...
Need help?
Do you have a question about the DROP PISARA and is the answer not in the manual?
Questions and answers