Table of Contents
Advertisement
Available languages
Available languages
Advertisement
Table of Contents

Related Manuals for Anglepoise 90 Mini Mini


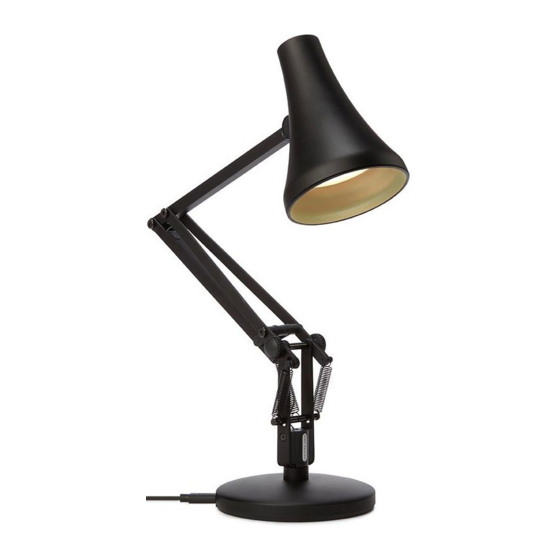
Summary of Contents for Anglepoise 90 Mini Mini
- Page 2 90 Mini Mini Desk Lamp ASSEMBLY You will find everything you need to assemble your lamp included in the box. UK: 101278 1 x 101280 2 x 100612 2 x 100797 EU: 101705 Hex Key USB to Micro Side Spring...
- Page 3 “Click” “Click” Attach two outer springs to the lamp, With base on flat surface, attach arm and stretching slightly as necessary. shade to connectors. Press down to engage. Connect one end of cable to USB port on Plug adaptor into a suitable power socket. lamp base, the other to plug adaptor.
-
Page 4: Lamp Operation
LAMP OPERATION SWITCH ON/OFF Press switch at the top of the shade to turn on/off. DIMMING To dim the light source, press and hold the button at the top of the shade. Release when desired light level is reached. TECHNICAL SPECIFICATION Rated Voltage: 5V DC 5V DC 5W LED... -
Page 5: Adjustment & Maintenance
Please Note: This luminaire contains built-in LED lamps, the lamps cannot be changed in the luminaire. Repairs and the replacement of damaged cables or electrical parts should only be carried out by a qualified electrician, an authorised distributor or by Anglepoise Ltd. -
Page 6: Montage
AJUSTEMENT ET ENTRETIEN 1. Fixez les deux ressorts extérieurs à la lampe, en les étirant légèrement si nécessaire. 6/7. Votre lampe Anglepoise® est un produit 2. En posant la base sur une surface plane, finement équilibré. Pour ajuster l’équilibre, attachez le bras et l’abat-jour aux connecteurs. - Page 7 WARTUNG Lampe und strecken Sie sie nach Bedarf leicht. 2. Befestigen Sie, mit dem Sockel auf einer 6/7. Ihre Anglepoise®-Lampe ist ein fein ebenen Fläche, den Arm und den Schirm an ausbalanciertes Produkt. Um die Balance den Anschlüssen. Zum Einrasten bitte nach einzurichten, stellen Sie die Lampe auf eine unten drücken.
-
Page 8: Montaje
AJUSTE Y MANTENIMIENTO 1. Fije dos muelles exteriores a la lámpara, estirando ligeramente según sea necesario. 6/7. Su lámpara Anglepoise® es un producto 2. Con la base en una superficie llana, fije el cuidadosamente equilibrado. Para ajustar el brazo y la pantalla a los conectores. Pulse equilibrio, coloque la lámpara en una superficie... - Page 9 Rilasciarlo una Gli interventi di riparazione o di sostituzione volta raggiunto il livello di luce desiderato. di cavi danneggiati devono essere effettuati esclusivamente da un elettricista qualificato, da Anglepoise Ltd o da un suo rappresentante autorizzato.
-
Page 10: Safety Instructions
SAFETY INSTRUCTIONS IMPORTANT: TO REDUCE THE RISK OF FIRE, ELECTRIC SHOCK OR INJURY TO PERSONS. - Indoor use only. - Do not look directly at the illuminated LED. - Keep lamp away from materials that may be flammable. CONSIGNES DE SÉCURITÉ IMPORTANTES POUR RÉDUIRE LE RISQUE D’INCENDIE, DE DÉCHARGE ÉLECTRIQUE OU DE BLESSURE. -
Page 11: Product Warranty
A10 Railway Triangle Walton Road www.anglepoise.com Farlington hello@anglepoise.com Hampshire, PO6 1TN United Kingdom @Anglepoise Find @Anglepoise On PRODUCT WARRANTY For warranty information, please visit anglepoise.com NEWSLETTER Sign up to the Anglepoise newsletter for the latest news and updates at anglepoise.com ® UKEU-V3... - Page 12 est. 1932...
Need help?
Do you have a question about the 90 Mini Mini and is the answer not in the manual?
Questions and answers