Advertisement
Quick Links
REMOTE TRANSMITTER OPERATION:
System Function
Arm & Lock Doors
Silent Arm & Lock Doors
Press and hold for 3 seconds to Activate or Deactivate
Panic Function
-
Arm and Warn-Away Bypass
-
Arm and Warn-Away & Shock Sensor
Press
-
Bypass
-
Arm and Tilt Sensor Bypass
-
Press
Arm and All Sensors Bypass
2 sec.
-
1 sec.
Press and hold
Arm and Hidden Alarm Function
Disarm & Unlock Doors
Press the Unlock button for a half second
Silent Disarm & Unlock Doors
Passive Arming Bypass
Disarm & Two Steps
-
Door Unlock (optional)
Trunk Release (Aux 1)
Press and hold
-
1 sec.
Car Finder
Activate or Deactivate
the Remote Start
Press
Runtime Reset
-
Timer Start
+
Turbo Mode
+
Aux 2 Timer Output
Switch Code for 2
nd
+
Car Operation
+
Shutdown Diagnostic
ALARM OPERATING CONDITION
LED On Duty
Sir en / Hor n
Par king Light
LED
Arming
1 or 3 Chirps
1 Flash
Slow Flash
Disarming
2 or 4 Chirps
2 or 3 Flashes
OFF
Trigger
Alarming
Flashes
Flashes Pause
Hidden Alarm
Flashes
Slow Flash
Passive Arming
Fast Flash
Panic
Alarming
Flashes
Car Finder
6 Chirps
12 Flashes
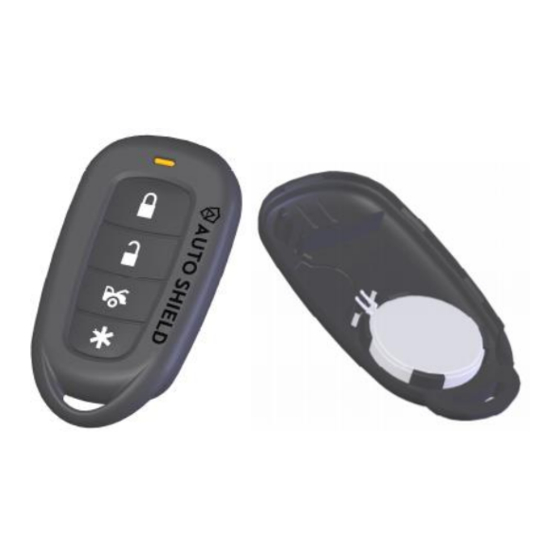
CHANGING THE BATTERY
The One-w ay remote is powered by one CR2032 Battery. To replace battery use a coi n or smal l flat blade screwdri v er t o
carefully pry apart case
Remark
Press the Lock button for a half second
Press and hold for 1.0 seconds
ACTIVE ARMING – LOCK & ARM
panic function
1. Press the
button on the transmitter.
2. The alarm arms, doors lock (if connected), and the siren chirps and parking lights flash once.
Press
Twice within 3 seconds.
3. If Valet Mode* is ON, the doors lock Exit Valet Mode to arm the alarm normally.
button 3 times within 3 seconds.
DEFECTIVE SENSOR REMINDER: If the siren sounds 3 chirps and the defective then you have left a door, trunk, or hood lid ajar.
(See feature bank 1-06)
Press the
button first then press
button
SILENT ARMING: Press and hold the transmitter
will be heard and the arm confirmation will be through the vehicles parking lights only.
2 times and hold the second times for 2
seconds
WARN-AWAY BY-PASS: Press
button for 1 sec. first then press and
release
button
Note: The bypass feature is programmed to activate for one arming cycle only. The security system will return to normal operation
during the next arming cycle.
SHOCK SENSOR BY-PASS: Press the
Press and hold for 1.0 seconds
sensor.
Press and hold for 3 seconds
TILT SENSOR BY-PASS: Press the
Press twice within 3 seconds
pass the tilt sensor
ALL SENSORS BYPASS: Press
Press and hold for 3 seconds
confirms then release the button. It will arm the security system and bypass all sensors.
button for 1 sec. first then press &
HIDDEN ALARM FUNCTION: The security system will arm and with " Hidden Alarm Function", the siren / horn wil l be silenced
release
button.
even if the sensor is triggered in the armed mode. Press and hold the
Press
button once.
press the
button will Arm the security system and activate the hidden alarm function.
button twice if set to start safety mode.
PASSIVE ARMING:
Press and hold for 2 seconds
Press the
button first then
Active arming / disarming is controlled by your security system via the remote transmitter. This security system is equipped wit h an
press
button.
optional Passive Arming feature which allows the security system to arm 30 seconds after the last door is closed. Operation i s as
follows:
Press and hold for 2 seconds
1. Turn the ignition to the "OFF" position and exit the vehicle.
Press together & release.
2. After all entrances are closed, the security system LED will flash fast for 30 seconds. If you reopen any door / hood / trunk, the
security system LED will stop flashing. It will begin flashing again once all vehicle entrances are closed.
3. After the 30-second time has elapsed, the security system will automatically " ARM" .
Press and hold for 2 seconds
4. The siren will chirp [1] time and the parking lights will flash [1] time.
Press and hold for 2 seconds
PASSIVE ARMING WITH PASSIVE DOOR LOCKING: The vehicle doors will automatically lock after the passive arming cycle has
been completed.
PASSIVE ARMING BY-PASS: While the system is disarmed, press and hold the
Door s
Star ter
Dome Light
confirms and then release the button. The system will respond with [1] chi r p and the LED stop to flashes. The security system will
remain in this temporary state for as long as you wish.
Locking
Disable
Turns on for 30-
Unlocking
To exit Passive arming by-pass, press the transmitter
Seconds
Disable
Flashes
1. Press the
button on the transmitter, and beeps pl a y to confirm.
2. The siren will chirp twice and the parking lights will flash twice indicating that the security
Disable
Flashes
system is now disarmed. The vehicle's doors will unlock and the dome light will turn on
for 30 seconds upon disarming.
Flashes
Locking
Note: Power door locks and dome light must be installed with the security system.
buttons for 1.0 second. This will arm your securi t y system. No chirp sound
button twice will arm the security system and by-pass the warn-away.
button 3 times within 3 seconds, it will arm the security system and bypass the shock
button first then press
button within 3 Seconds. It will arm the security system and by-
button 2 times within 3 seconds and hold on second time for 2 seconds until the beep
button for 1 second until the back light turns on then
(See feature bank 1-08)
button for 3 seconds until the beep
or
button and the system will return to normal status.
ACTIVE DISARMING – UNLOCK & DISARM
SILENT
DISARMING: Press and hold the transmitter
buttons for 1.0 second. This will disarm your security system.
sound will be heard and the disarm confirmation will be through the vehi c les parking lights only,
TAMPER DISARMING: If the alarm has been triggered, upon disarm the system's siren will chirp 4 times and the parki n g lights
will flash 3 times telling you the alarm has been triggered during the last armed state
AUTOMATIC RE-ARM: If this feature is selected, the security system will automatically re-arm itself in 60 seconds after
disarming with remote transmitter. Automatic rearm will cancel if any door is opened before the 60 seconds timer has el a psed.
(See the feature bank 1-09).
TRIGGER THE SYSTEM: When armed, your vehicle is protected as follows: Light impact will trigger the warn-away signal. Heavy
impacts / Doors open / Trunk open / Hood open / Turn on the ignition key / lift the vehicle wil l trigger the programmed sequence.
The starter disable relay (if installed) prevents the vehicle' s starter from cranking. The siren, horn, parking lights, and dome light
will turn on for 30 seconds, alerting of an intrusi o n. It will then stop, automatic reset and re-arm. If any one of the sensors or
detectors are still active, the alarm system will sound a maximum of 3 cycles. Each cycle is a 30 seconds alert.
NOISE ABATEMENT CIRCUIT: Your system has a "Noise Abatement Circuit". It prevents annoying repetitive trigger sequences
due to faulty door pin switches or environmental conditions such as thunder, jackhammers airport noise, etc.
Here's how "Noise Abatement Circuit" works: The alarm triggers five times. Each time, it's all shock sensor triggers the alarm;
the " Noise Abatement Circuit" wil l interpret this pattern of triggers as a false alarm. After the fifth trigger, the "Noi s e Abatement
Circuit" ignores, or bypasses the shock sensor until a different sensor or switch is triggered.
"Noise Abatement Circuit" covers doors (Trunk / Hood / Tilt Sensor / Ignition Switch) differently: If the alarm is triggered by an
open door for three full cycles, the doors will be bypassed until the trigger ceases.
Press and hold the
button for 3 seconds until the beep confirms and then release the button to
PANIC FUNCTION:
activate the personal protection alarm The alarm Arms (or Locks in Valet) and, sounds the siren and flashes the parking lights
for 30 seconds. Press the
button for 3 seconds to stop the output.
(See feature bank
1-10)
DISARMING WITHOUT A TRANSMITTER
Number of presses ___
1. Turn the ignition on.
2. Press and release the button on the valet switch the correct number of times (the default is one press).
3. After a few seconds, the siren output ceases, and the system is disarmed.
VALET MODE:
When servicing or loaning your vehicle to others, the system should be placed in Valet Mode. Valet Mode
prevents the system from remote starting and disables all alarm functions.
Enter Valet Mode:
1.
Under disarmed, turn the ignition to ON position.
2. Press and hold valet switch for 2 seconds until the LED turns "ON" solid
The LED will remain on as long as the system is in Valet Mode.
Exit Valet Mode:
1.
Turn the ignition switch to ON.
2.
Push and hold the valet switch for 2 seconds. The LED will turn off indicating the system is exiting the Valet Mode.
No chirp
Advertisement

Related Manuals for AUTO SHIELD AS-675

Summary of Contents for AUTO SHIELD AS-675
- Page 1 CHANGING THE BATTERY ACTIVE DISARMING – UNLOCK & DISARM The One-w ay remote is powered by one CR2032 Battery. To replace battery use a coi n or smal l flat blade screwdri v er t o SILENT DISARMING: Press and hold the transmitter buttons for 1.0 second.
- Page 2 TEMPORARY STOP MODE: Rem ote Valet SHUTDOWN DIAGNOSTIC: This mode allows the vehicle to remain running after the key has been removed from the ignition. This feature is useful for The unit has the ability to report the cause of the last shutdown of the remote start system. Under disarmed.
Need help?
Do you have a question about the AS-675 and is the answer not in the manual?
Questions and answers