Table of Contents
Advertisement
Quick Links
Advertisement
Table of Contents

Related Manuals for Asus PG191


Summary of Contents for Asus PG191
-
Page 1: User Guide
PG191 LCD Monitor User Guide... - Page 2 Product warranty or service will not be extended if: (1) the product is repaired, modified or altered, unless such repair, modification of alteration is authorized in writing by ASUS; or (2) the serial number of the product is defaced or missing.
-
Page 3: Table Of Contents
Table of contents Notices ... v Safety information ... vi Care and cleaning ... vii Package contents ... ix Chapter 1: Chapter 1: Product introduction Product introduction Chapter 1: Chapter 1: Chapter 1: Product introduction Product introduction Product introduction Welcome! ... 1-2 Features ... - Page 4 Chapter 4: Appendix Appendix Appendix I SRS TruSurround XT™ ... 4-2 Appendix II Troubleshooting (FAQ) ... 4-3 Appendix III PG191 specification summary ... 4-4 Appendix IV Supported operating modes ... 4-6 i v i v i v i v i v...
-
Page 5: Notices
Notices Federal Communications Commission Statement Federal Communications Commission Statement Federal Communications Commission Statement Federal Communications Commission Statement Federal Communications Commission Statement This device complies with Part 15 of the FCC Rules. Operation is subject to the following two conditions: • This device may not cause harmful interference, and •... -
Page 6: Safety Information
Safety information • Before setting up the monitor, carefully read all the documentation that came with the package. • To prevent fire or shock hazard, never expose the monitor to rain or moisture. • Never try to open the monitor cabinet. The dangerous high voltages inside the monitor may result in serious physical injury. -
Page 7: Care And Cleaning
Care and cleaning • Before you lift or reposition your monitor, it is better to disconnect the cables and power cord. Follow the correct lifting techniques when positioning the monitor. When lifting or carrying the monitor, grasp the edges of the monitor. Do not lift the display by the stand or the cord. •... -
Page 8: Where To Find More Information
A S U S w e b s i t e s A S U S w e b s i t e s The ASUS websites worldwide provide updated information on ASUS hardware and software products. Refer to http://www.asus.com 2 . -
Page 9: Package Contents
Package contents Check your PG191 LCD package for the following items: LCD monitor Quick Start Guide Support CD 1 x Power cord 1 x VGA-Audio-Microphone-USB 4-in-1 cable 1 x DVI cable If any of the above items is damaged or missing, contact your retailer immediately. - Page 10 x x x x x...
- Page 11 Chapter 1 This chapter gives a general description of This chapter gives a g the ASUS PG191 LCD monitor. The chapter lists the monitor features including introduction on the front/rear panels as well as the side view.
-
Page 12: Chapter 1: Product Introduction
Thank you for purchasing the ASUS The LCD monitor features high-quality audio technology, including a detachable 15W ASUS Power Bass System and the most advanced SRS TruSurround XT™ sound effect which help provide vivid melody, enhancing your audio enjoyment while you watch movies, play games, or listen to music! The built-in 1.3 megapixel webcam on top of the LCD panel has both... -
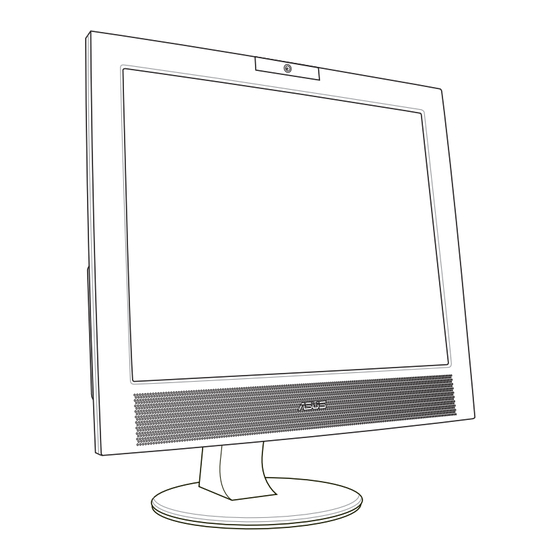
Page 13: Monitor Introduction
Monitor introduction Front view Front view Front view Front view Front view S t e r e o s p e a k e r s S t e r e o s p e a k e r s S t e r e o s p e a k e r s S t e r e o s p e a k e r s S t e r e o s p e a k e r s... - Page 14 S e n s o r : S e n s o r : S e n s o r : S e n s o r : S e n s o r : • • • • • Touch this sensor to decrease the value of the function selected or move to the previous function.
-
Page 15: Sound Effect
Side view Side view Side view Side view Side view S R S O n / O f f b u t t o n . Press this button to turn on/off the SRS S R S O n / O f f b u t t o n . S R S O n / O f f b u t t o n . -
Page 16: Rear View
Rear view Rear view Rear view Rear view Rear view K e n s i n g t o n l o c k K e n s i n g t o n l o c k K e n s i n g t o n l o c k K e n s i n g t o n l o c k K e n s i n g t o n l o c k 1. - Page 17 Chapter 2 This chapter provides setup instruction on how to correctly connect cables and properly adjust the monitor to a comfortable viewing angle via tilt and swivel functions.
-
Page 18: Connecting The Cables
Connecting the cables Connect the cables as shown: • To connect the USB cable: To connect the USB cable: connect one end of the To connect the USB cable: To connect the USB cable: To connect the USB cable: USB cable to the monitor’s USB port (as the above drawing shows), the other end to the computer’s. -
Page 19: Adjusting The Monitor
Turning the monitor on Gently touch the power sensor power sensor. The power indicator monitor is ON. Adjusting the monitor This monitor can be adjusted within the angles as shown: We recommend that you adjust the viewing angle of the monitor based on the height of your desk and chair to prevent the light from reflecting to your eyes. - Page 20 2 - 4 2 - 4 2 - 4 2 - 4 2 - 4 C h a p t e r 2 : S e t u p C h a p t e r 2 : S e t u p C h a p t e r 2 : S e t u p C h a p t e r 2 : S e t u p C h a p t e r 2 : S e t u p...
- Page 21 Chapter 3 This chapter introduces the general instruction, including how to use the OSD (On-Screen Display) menu and activate the LifeFrame utility.
-
Page 22: Chapter 3: General Instruction
OSD (On-Screen Display) menu 3.1.1 3.1.1 3.1.1 3.1.1 3.1.1 How to reconfigure How to reconfigure How to reconfigure How to reconfigure How to reconfigure Touch the Touch activate the desired function by touching the function selected has a sub-menu, touch navigate through the sub-menu functions. - Page 23 O S D O S D m e n u t a b l e : m e n u t a b l e : O S D m e n u t a b l e : O S D O S D m e n u t a b l e : m e n u t a b l e :...
-
Page 24: Using The Built-In Webcam
Using the built-in webcam This built-in webcam allows you to take photos and make videos; while talking to friends via Internet-based communication tools, you can use the webcam to show your vivid image. 3.2.1 3.2.1 3.2.1 Hardware Hardware Hardware 3.2.1 3.2.1 Hardware Hardware... -
Page 25: Lifeframe Software
Introduction and installation instructions Introduction and installation instructions Introduction and installation instructions To capture snapshots or video clips, ASUS PG191 provides an easy-to-use LifeFrame that can work with the built-in webcam, allowing users to create their own photos or video clips. -
Page 26: Main Screen
3.3.2 3.3.2 3.3.2 Main screen Main screen Main screen 3.3.2 3.3.2 Main screen Main screen The main screen shows the following function areas: 3 3 3 3 3 3 3 3 3 3 C l i c k t h e t o p m i n i m i z e / m a x i m i z e b u t t o n t o s w i t c h m o d e s C l i c k t h e t o p m i n i m i z e / m a x i m i z e b u t t o n t o s w i t c h m o d e s C l i c k t h e t o p m i n i m i z e / m a x i m i z e b u t t o n t o s w i t c h m o d e s C l i c k t h e t o p m i n i m i z e / m a x i m i z e b u t t o n t o s w i t c h m o d e s... -
Page 27: Preview Mode
S w i t c h m o d e S w i t c h m o d e S w i t c h m o d e- click to switch between playback/capture S w i t c h m o d e S w i t c h m o d e modes. -
Page 28: Operating Area
3.3.5 3.3.5 3.3.5 Operating area Operating area Operating area 3.3.5 3.3.5 Operating area Operating area Side section Side section Side section Side section Side section - Enhance - Effects - Setup Bottom section Bottom section Bottom section Bottom section Bottom section W h i l e W h i l e W h i l e... -
Page 29: Enhance
3 . 3 . 6 3 . 3 . 6 Enhance Enhance 3 . 3 . 6 3 . 3 . 6 3 . 3 . 6 Enhance Enhance Enhance There are several options to enhance the quality of your captures. C h e c k o n e C h e c k o n e C h e c k o n e... -
Page 30: Effects
3.3.7 3.3.7 3.3.7 Effects Effects Effects 3.3.7 3.3.7 Effects Effects Enrich your images with special effects. P h o t o F r a m e . P h o t o F r a m e . P h o t o F r a m e . P h o t o F r a m e . -
Page 31: Setup - Basic Setup
C a m e r a S e l e c t i o n . C a m e r a S e l e c t i o n . The priority camera is set as ASUS USB2.0 webcam. -
Page 32: Setup - Capture Format
3.3.9 3.3.9 3.3.9 Setup - capture format Setup - capture format Setup - capture format 3.3.9 3.3.9 Setup - capture format Setup - capture format Many options for output size, image format/quality, and video format/quality. O u t p u t S i z e . O u t p u t S i z e . -
Page 33: Setup - Capture Mode
3.3.10 Setup - capture mode 3.3.10 3.3.10 Setup - capture mode Setup - capture mode Setup - capture mode 3.3.10 3.3.10 Setup - capture mode You can adjust the capture mode with the following three items: recording time limited, auto capture sensitivity, and capture interval setting. - Page 34 3 - 1 4 3 - 1 4 3 - 1 4 3 - 1 4 3 - 1 4 C h a p t e r 3 : G e n e r a l I n s t r u c t i o n C h a p t e r 3 : G e n e r a l I n s t r u c t i o n C h a p t e r 3 : G e n e r a l I n s t r u c t i o n C h a p t e r 3 : G e n e r a l I n s t r u c t i o n...
- Page 35 Chapter 4 This appendix provides the introduction of SRS TruSurround XT™, troubleshooting (FAQ), specification summary, and supported operating modes.
- Page 36 Appendix I. SRS TruSurround XT is a novel audio technology which provides an enhanced listening experience. Utilizing proprietary algorithms from SRS Labs, TruSurround is intended to regenerate a realistic audio environment, where users feel like being surrounded by sound. TruSurround XT is a combination of four distinct and patented processing techniques from SRS Labs: •...
-
Page 37: Troubleshooting (Faq)
• Check with your PC manufacturer whether your PC supports • If your PC only supports USB1.1, the image transmission is ASUS Power Bass • Make sure that the woofer cable is securely connected to the System is not... - Page 38 Appendix III. PG191 specification summary P a n e l t y p e P a n e l t y p e P a n e l t y p e P a n e l t y p e...
- Page 39 V E S A w a l l m o u n t V E S A w a l l m o u n t V E S A w a l l m o u n t V E S A w a l l m o u n t V E S A w a l l m o u n t K e n s i n g t o n l o c k K e n s i n g t o n l o c k...
-
Page 40: Supported Operating Modes
Appendix IV. S t a n d a r d S t a n d a r d S t a n d a r d S t a n d a r d S t a n d a r d R e s o l u t i o n R e s o l u t i o n R e s o l u t i o n...
Need help?
Do you have a question about the PG191 and is the answer not in the manual?
Questions and answers