
Summary of Contents for Reimo 70663
- Page 1 GAS-BACKOFEN MIT 2-FLAMM-KOCHER GAS OVEN AND STOVE WITH 2 FLAME BURNER Betriebsanleitung / Instructions 50 MBAR # 70669 30 MBAR # 70663...
-
Page 3: Allgemeine Hinweise
NUR ZUM GEBRAUCH IM FREIEN Wir danken Ihnen, dass Sie sich für unseren Campingkocher/Ofen entschieden haben. Wenn Sie die Gebrauchsanweisung sorgfältig lesen, werden Sie mit dem Campingkocher / Ofen viel Freude haben. Lesen Sie diese Anleitung, bevor Sie das Gerät in Betrieb nehmen. Sobald Sie Ihr Gerät installiert haben empfehlen wir Ihnen, dieses Handbuch als zukünftige Referenz zu behalten. - Page 4 19. Bewegen Sie das Gerät NICHT wenn Sie es im Einsatz haben. Lassen Sie es bis auf 45°C vor einem Transport oder einer Lagerung abkühlen. 20. Dieses Gerät wird während und nach dem Gebrauch sehr heiß. Verwenden Sie isolierte Ofenhand- schuhe zum Schutz vor heißen Oberflächen oder Spritzern von kochenden Flüssigkeiten.
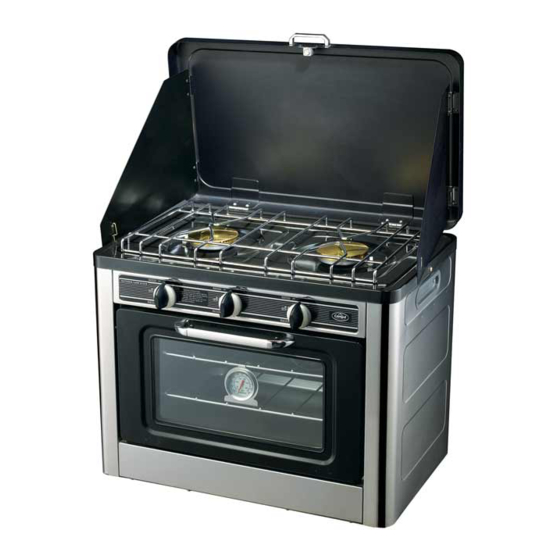
- Page 5 LIEFERUMFANG Wenn Sie den Karton mit dem Campingkocher öffnen, finden Sie folgende wichtigen Teile: • Campingkocher Gehäuse 1 Stück • Rost für die Kochstelle 1 Stück • Backofenrost 2 Teile • Backblech 1 Stück Zur Beachtung: 1. Der Rost für die Kochstelle kommt auf den oberen Brenner. 2.
- Page 6 Überprüfung der Ventile, Schläuche und Regler 1. Schalten Sie alle Bedienknöpfe auf OFF. 2. Stellen Sie sichera dass der Regler fest mit dem Gastank verbunden ist. 3. Öffnen Sie das offene Tankventil, indem Sie das manuelle Ventil aufdrehen. Wenn Sie ein Rauschen hören, schalten Sie das Gas sofort ab.
- Page 7 Anweisung zum Anzünden des Backofens Beugen Sie sich nicht über den Backofen während des Anzündens 1. Entfernen Sie alle Geräte vom Ofen, um eine freie Luftzufuhr zu erzeugen. 2. Öffnen Sie die Backofentür. Versuchen Sie nicht den Backofen bei geschlossener Tür anzuzünden. 3.
- Page 8 Entfernen des Gastanks • Drehen Sie alle Bedienknöpfe auf OFF und schließen Sie das Gasflaschenventil. • Trennen Sie den Schlauch vom Campingkocher durch Drehen der Wurfmutter gegen den Uhrzeigersinn, trennen Sie den Regler vom Gastank wie vom Hersteller des Tanks angegeben. •...
- Page 9 Person für eine Reparatur und Ersatzteile in Verbindung. Reparieren Sie nicht selbst. Gewährleistung Der Gewährleistungszeitraum beträgt 36 Monate. Reimo behält sich das Recht vor, mögliche Fehler zu beseitigen. Die Garantie wird für alle Schäden ausgeschlossen, die durch fehlerhafte Verwendung oder unsachgemäße Handhabung entstanden sind.
- Page 10 BESTANDTEILE Gitterrost Gasbrenner Thermometer Piezozündung Rohrreiniger Gasrohr Kocher Gasventil Kocher Drehknopf Ofenventil Gasrohr Ofen Wärmefühler Ofen Türglas Ofen-Piezozündung Grillrost Backofenbrenner Backblech Alle Patentrecht sind dem Hersteller vorbehalten...
-
Page 11: Outdoor Use Only
OUTDOOR USE ONLY Dear Buyer, we thank you for your choice of our camp stove/oven. By reading the Instructions carefully, you will be satisfied with the stove/oven. Please read this manual before you light your appliance. Once you have installed your appliance, we recommend you to retain this manual for future reference. GENERAL CAUTIONS 1. - Page 12 22. Use only accessories, such as cooking vessels recommended by the seller, to allow safe and proper performance of the product. Never use a cooking vessel larger than the capacity an diameter recom- mended by the seller. 23. The Max Pot Diameter is 25cm, the Min Pot Diameter is 7 cm. 24.
- Page 13 Parts list When you open the box of camp stove, you may find two important parts: • The camp stove body 1pc • The wire pan-grate 1pc • The oven rack 2pcs • The oven tray 1pc Notice 1. The wire pan-grate is on the top burner. 2.
- Page 14 Leak Testing Valves, Hoses and Regulator 1. Turn all control knob(s) to OFF 2. Be sure regulator is tighly connected to gas tank. 3. Completely open tank valve by turning manual valve. If you hear a rushing sound, turn gas off immediately. There is a major leak at the connection. Correct before proceeding. 4.
-
Page 15: Operation
Lighting Oven Instruction Do not lean over the oven while lighting 1. Remove all appliances from the oven to create a free flow of air. 2. Open oven door. Do not attempt to light the oven with the door closed. 3. - Page 16 Disconnect gas tank • Turn OFF all control knob(s) and gas tank valve. • Disconnect the hose from camp stove by turning coupling nut counterclockwise, disconnect the regulator from the gas tank as tankmanufacturer specified. • Do not store gas tank in an area where children play. •...
- Page 17 Do not repair it by yourself Warranty The warranty period is 36 months. Reimo reserves the right to rectify eventual defaults. The guarantee is excluded for all damages caused by faulty use or improper handling. Liability limitations: In no case Reimo will be reliable for collateral-, secondary- or indirect damages, costs, expenditure, missed benefits or missed earnings.
- Page 18 COMPONETS LIST All patents right reserved by the producer...
- Page 20 REIMO REISEMOBIL-CENTER GMBH BOSCHRING 10 · 63329 EGELSBACH · GERMANY · WWW.REIMO.COM · MADE IN CHINA...
Need help?
Do you have a question about the 70663 and is the answer not in the manual?
Questions and answers