
Subscribe to Our Youtube Channel
Summary of Contents for e-Joe ONYX
- Page 1 ONYX USER MANUAL Please, read the manual in its entirety before operating your new e-JOE electric bicycle...
- Page 2 INTRODUCTION Congratulations on the purchase of your new e-JOE electric bicycle! We want to make you happy and believe your new bicycle will bring you lots of fun. We ask that you read this manual thoroughly, paying special attention to the safety warnings.
- Page 3 ● Battery keys (2) After unpacking, do not discard the box and protective material until you test the bike and make sure it operates properly. Should you discover missing items, concealed loss, or damage, report it to your dealer or e-JOE immediately.
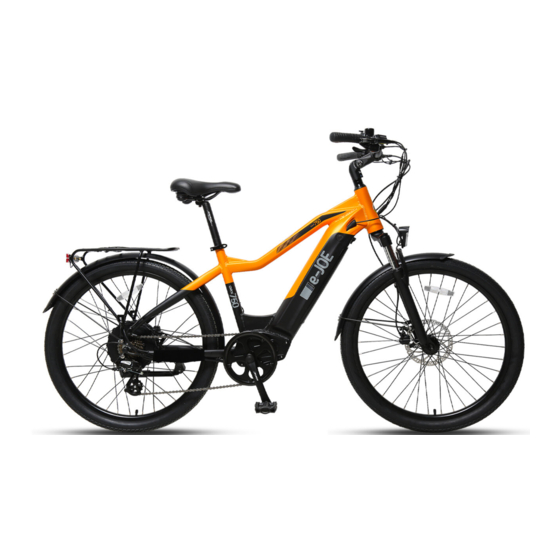
- Page 4 STRUCTURE OF YOUR E-BIKE...
- Page 5 SIZING...
-
Page 6: Main Specifications
MAIN SPECIFICATIONS BIKE Weight (with battery) 60 lbs. Max Capacity 300 lbs. Dimension 68” x 28” x 41” Max Speed 25 mph Full Charge Distance up to 45 miles (depending on terrain and rider’s weight) Climbing Grade ≤ 10% Pedal Assist System Thumb Throttle Control, KD58C LCD Display with 5-Level Pedal Assistance Frame 6061 Aluminum Alloy with Hidden Battery (Step-Thru Design) -
Page 7: Step 2: Handlebar Installation
ASSEMBLY NOTICE: The following assembly steps are only a general guide to assist in the assembly of your e-JOE Bike and are not a complete or comprehensive manual of all aspects of the assembly, maintenance, and repair. We recommend you consult a certified bicycle mechanic to assist in the assembly, repair, and maintenance of your bicycle. - Page 8 We urge you to consult your dealer before the first use and have your dealer check your work before you ride the bike. If you have even the slightest doubt about your knowledge or bike’s assembly, talk to your dealer or e-JOE Support Team.
-
Page 9: Display Content
Pedal Assist System (PAS) – Level selection ONYX comes with 5 levels of pedal assistance. To change the PAS level, click (+) or (-) buttons to increase or decrease the levels. To avoid accidental use of the PAS or throttle, make sure to keep the LCD turned off at all times when the bike is not in use. - Page 10 For more information about the display and its advanced settings, refer to the official LCD manual. THROTTLE ONYX Sports Class Commuter is equipped with a throttle that allows you to speed up to 25 mph without pedaling at all. The thumb throttle is mounted on the left side of the handlebar.
-
Page 11: Battery And Charger
NOTE: The keys provided are used to lock and unlock the battery. Turning the key DOES NOT act as an ignition for the battery or motor. Please, keep in mind that e-JOE does not carry copies of the keys. It is recommended to store one key in a safe location in case the first key is misplaced or lost. -
Page 12: Charging Procedure
6 hours. As the battery ages after 2-3 years of use, you may notice increased charging times and decreased range. If the battery does not seem to be charging as usual, discontinue charging/using it and contact e-JOE or dealer for assistance. - Page 13 BRAKES ONYX has a hydraulic disk brake system installed on both wheels, front and rear, to control the braking of the bicycle. The system has an electrical cut-off function, an important safety feature of all e-JOE bikes. It disengages the motor when the brake levers are squeezed.
- Page 14 SEAT Appropriate adjustments can be made to seat (or saddle) & handlebar height according to personal preference. QUICK-RELEASE CLAMP The clamps that hold handlebar or seat posts in place are called quick-release clamps. If you need to tighten or loosen the clamp, use an adjustment knob located on the opposite side from the quick-release lever.
- Page 15 • Always follow the instructions described throughout this manual and abide by local regulations. • If you have the slightest doubt about your knowledge about the bicycle, its assembly or operation, visit the local dealer. • Have the bike inspected by a professional mechanic after the first 60 miles of riding and every 300 miles. •...
-
Page 16: Standard Limited Warranty
10% of the product price in case the original product is returned in a bad manner, with the insufficient protective material, not by the instructions provided by e-JOE, or shows signs of excessive use, neglect, dirt, dust. - Page 17 Step 3 If the issue is deemed as manufacture defect in materials and workmanship, fill out the warranty claim form below. e-JOE shall repair or replace parts that are found by e-JOE to be defective and covered by the limited warranty.
-
Page 18: Simple Troubleshooting
1. Connect charger to outlet first. When indicator lights come on, connect charger to battery. the battery, it sparks 2. If sparks again, stop charging and contact e-JOE technical support K. When plugging in the charger into an outlet 1. The battery is full or not charging. Check LCD indicator if the battery is fully charged and then into the battery, the green light stays 2. - Page 19 CONTACT US We hope you enjoy your new e-JOE Bike! If you have any questions/comments/concerns or would like to share your e-JOE bike experience, please contact us at: Telephone: 855-888-1891 Email: sales@ejoebike.com Website: www.ejoebike.net Follow us on social media! @ejoebike #ejoebikes #simplyelectrifying...
Need help?
Do you have a question about the ONYX and is the answer not in the manual?
Questions and answers