
Subscribe to Our Youtube Channel
Related Manuals for CUES MPlus+

Summary of Contents for CUES MPlus+
- Page 1 CUES MPlus+ Portable Lateral & Mini-Mainline Push System OPERATION & MAINTENANCE MANUAL P/N CH905, Revision: 020921 MPlus+ XL Configuration...
-
Page 2: Table Of Contents
DVR Controls Diagram and Functions ........32 Keypad Functions ..............33 Digital Video Recorder Instructions ........35 DPad Controls Diagram and Functions ........36 Qwerty Keyboard Instructions ..........38 Main System Menu Functions ..........40 System Menu ................40 Advanced Configuration ............45 www.cuesinc.com, | salesinfo@cuesinc.com CUES Inc., MPlus+ User Manual | CH905... - Page 3 Appendix A - List of Status Messages ........82 Appendix B - MPlus+ Field Firmware Updates ......86 Warranty Information .............92 CUES Safety Precautions ............93 CUES Material Return Policy ..........94 CUES Parts & Service ............96 Record of Revisions ..............97 www.cuesinc.com, | salesinfo@cuesinc.com CUES Inc.,MPlus+ User Manual | CH905...
- Page 4 C/O Operator’s Manuals: ® Corporate Office 3600 Rio Vista Avenue Orlando, Florida 32805 More locations to serve you! CUES ® Corporate Office CUES ® Atlanta CUES West CUES ® Northern California 1943 S. Augusta Ct.
-
Page 5: Chapter 1 - Introduction
• A third reel, the CUES IGGY reel with up to 500 feet of cable, is also available. • Operate in extreme conditions with the heavy duty construction and weather / water resistant, injection-molded control unit. -
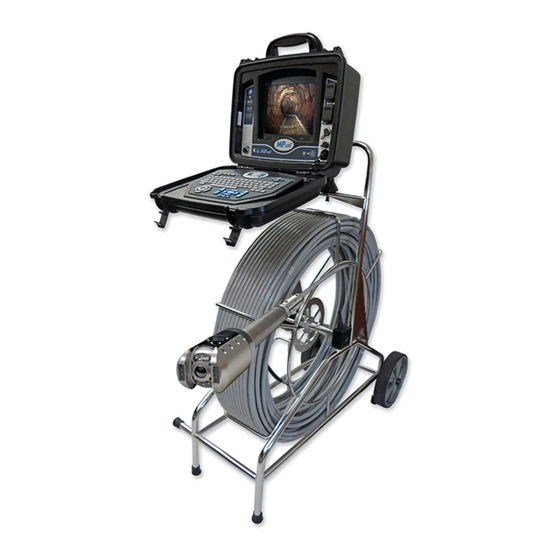
Page 6: Equipment Overview
EQUIPMENT OVERVIEW STANDARD MPLUS+ SYSTEM www.cuesinc.com, | salesinfo@cuesinc.com CUES Inc., MPlus+ User Manual | CH905... - Page 7 CX-1 connector. • 1 ½” diameter Stainless Steel camera head designed for 2” to 12” pipelines • 512 Hz integral sonde • 12 high intensity LED’s www.cuesinc.com, | salesinfo@cuesinc.com CUES Inc., MPlus+ User Manual | CH905...
- Page 8 CH347 - xx, 100 FOOT PUSH CABLE WEIGHT = 8.5 LBS. SR320 SERIES, SELF-UPRIGHT CAMERA = .55 LBS CH900, ACCESSORY KIT = 1 LBS (not shown) INCLUDED ACCESSORIES Sun Shade OPTIONAL EQUIPMENT Accessory Bag Line Trace Debris Bag www.cuesinc.com, | salesinfo@cuesinc.com CUES Inc., MPlus+ User Manual | CH905...
- Page 9 Cable to operate MP+PLUS with Multi Conductor Truck system CH352 Granite-Net Translator with video and footage counter interface CH309 Granite Net Basic Decision Support Software GN502 Granite Net Advanced Decision Support Software GN501 www.cuesinc.com, | salesinfo@cuesinc.com CUES Inc., MPlus+ User Manual | CH905...
- Page 10 EQUIPMENT OVERVIEW MPLUS+ XL LARGE CONFIGURATION SYSTEM www.cuesinc.com, | salesinfo@cuesinc.com CUES Inc., MPlus+ User Manual | CH905...
- Page 11 • Lens wiper • 1/3” Interline Transfer CCD with a pixel resolution of 768(H) x 494(V) • 512 Hz and 8kHz integral sonde • 6 Spot and 6 Flood LED’s www.cuesinc.com, | salesinfo@cuesinc.com CUES Inc., MPlus+ User Manual | CH905...
- Page 12 LL300, P/T CAMERA ASSY = 1.85 LBS. CH341, SPRING END ASSY FOR LL300 = 1.25 LBS. CH900, ACCESSORY KIT = 1 LB. Sun Shade INCLUDED ACCESSORIES OPTIONAL EQUIPMENT Accessory Bag Line Trace www.cuesinc.com, | salesinfo@cuesinc.com CUES Inc., MPlus+ User Manual | CH905...
- Page 13 Cable – 12 pin to 5 pin CH343 Granite-Net Translator with video and footage counter interface CH309 Granite Net Basic Decision Support Software GN902 Granite Net Advanced Decision Support Software GN901 www.cuesinc.com, | salesinfo@cuesinc.com CUES Inc., MPlus+ User Manual | CH905...
-
Page 14: Electrical & Physical Connections
MPlus+ per the instructions in this chapter. Monitor (Standard or “XL” System): Ensure that the Control Unit cable is connected as shown in this chapter. www.cuesinc.com, | salesinfo@cuesinc.com CUES Inc., MPlus+ User Manual | CH905... - Page 15 Two (2) wheeled runners are provided for adjustability. The smaller wheeled runner is designed for 6” and 8” pipelines. The larger wheeled runner is designed for 10” and 12” pipelines. www.cuesinc.com, | salesinfo@cuesinc.com CUES Inc., MPlus+ User Manual | CH905...
-
Page 16: Installing The Self Upright Mini Camera And Centering Ball On The Mplus
To install the self upright camera and centering ball on the MPlus+, perform the following: Remove the orange cap that is covering the end of the CX-1 connector as shown. www.cuesinc.com, | salesinfo@cuesinc.com CUES Inc., MPlus+ User Manual | CH905... - Page 17 CX-1 connector as shown. Place the top piece of the centering ball onto the camera as shown. Twist the top and bottom pieces of the centering ball together until secure. www.cuesinc.com, | salesinfo@cuesinc.com CUES Inc., MPlus+ User Manual | CH905...
-
Page 18: Installing The Lateral Pan & Tilt Camera On The Mplus+ Xl
Align the pin on the push cable with the mating hole on the spring assembly and insert the push cable into the spring assembly. Turn the knurled locknut on the spring assembly until the spring assembly is securely seated on the push cable. www.cuesinc.com, | salesinfo@cuesinc.com CUES Inc., MPlus+ User Manual | CH905... -
Page 19: Installing The Self Upright Mini Camera On The Mplus+ Xl
Align the pin on the push cable with the mating hole on the spring assembly and insert the push cable into the spring assembly. Turn the knurled locknut on the spring assembly until the spring assembly is securely seated on the push cable. www.cuesinc.com, | salesinfo@cuesinc.com CUES Inc., MPlus+ User Manual | CH905... -
Page 20: Adjusting The Handle Height
To adjust the height of the handle, open the cam locks on each side of the handle. Extend/retract the handle to the desired position. To secure, engage the cam locks on both sides of the handle as shown. www.cuesinc.com, | salesinfo@cuesinc.com CUES Inc., MPlus+ User Manual | CH905... -
Page 21: Adjusting The Cable Guide
To adjust the cable guide, loosen the bolt located on the coiler, then adjust the cable guide height up/down. Secure the bolt to hold into place. Replacement cable guides, P/N CH006, are available, if needed. Cable Guide, P/N CH006 www.cuesinc.com, | salesinfo@cuesinc.com CUES Inc., MPlus+ User Manual | CH905... -
Page 22: Installing The Debris Bag
Wrap the bag around the coiler / cable as shown below. Continue wrapping around the coiler and then loop it through the bottom of the unit. Attach the velcro ends together to secure in place. www.cuesinc.com, | salesinfo@cuesinc.com CUES Inc., MPlus+ User Manual | CH905... -
Page 23: Installing The Accessory Bag
Press together to ensure good adhesion. (3) velcro flaps located on the accessory bag For the XL version only: Route the right velcro strap through the slot in the coiler and secure. www.cuesinc.com, | salesinfo@cuesinc.com CUES Inc., MPlus+ User Manual | CH905... -
Page 24: Installing The Control Unit
To remove/release the control unit, pull the locking pin while simultaneously lifting up on the control unit. www.cuesinc.com, | salesinfo@cuesinc.com CUES Inc., MPlus+ User Manual | CH905... - Page 25 Swivel/rotate the unit vertically and left-to-right to place the unit in differing viewing angles. Once the desired position is determined, secure the unit by turning the hand knobs. www.cuesinc.com, | salesinfo@cuesinc.com CUES Inc., MPlus+ User Manual | CH905...
-
Page 26: Installing The Sunshade
To install the sunshade, ensure the magnetic flap is attached at the top of the LCD screen and place the sunshade on the control unit as shown. www.cuesinc.com, | salesinfo@cuesinc.com CUES Inc., MPlus+ User Manual | CH905... -
Page 27: Connecting The Coiler To The Pcu
Connect the AC power cord to the control unit as shown. Confirm the Battery “Charging” Yellow Light or “Charged” Green Light indication appears on control unit. www.cuesinc.com, | salesinfo@cuesinc.com CUES Inc., MPlus+ User Manual | CH905... -
Page 28: Configuring The Coiler And Push Cable
COILER TYPE COILER TYPE WARNING: ALL CABLE MUST BE IN BEFORE PROCEEDING! STANDARD BASKET XL BASKET AUXILIARY REEL www.cuesinc.com, | salesinfo@cuesinc.com CUES Inc., MPlus+ User Manual | CH905... - Page 29 <ENTER> or <ESC>. COUNT DIRECTION COUNT DIRECTION DOWN Count direction refers to whether the footage counts up or down when the cable is pulled out. www.cuesinc.com, | salesinfo@cuesinc.com CUES Inc., MPlus+ User Manual | CH905...
-
Page 30: Operation & Maintenance Instructions
6. Refer to the additional SYSTEM OPERATION – SYSTEM INTERFACE section for additional functionality including Video/Audio Recording, Text Writing, Observation Coding, etc. 7. It is recommended to start with a standard inspection in LIVE MODE. 8. Perform push inspection operations. www.cuesinc.com, | salesinfo@cuesinc.com CUES Inc., MPlus+ User Manual | CH905... -
Page 31: Pcu Features
OPERATING THE SYSTEM www.cuesinc.com, | salesinfo@cuesinc.com CUES Inc.,MPlus+ User Manual | CH905... - Page 32 I/O port that features Video out, Video in, Audio Out, distance counter quadrature out and auxiliary 12vdc out. The following are interconnecting options available for your MPlus+ system. Please contact CUES for a recommended or full list of available options.
-
Page 33: Line Trace
An optional line trace is available to provide a connection point for a line transmitter. It is compatible with multiple frequencies, including 128 Hz, 1 kHz, 8 Hz, and 33 kHz. Maximum 10 watts. Please contact CUES for recommended transmitter options. BRAKE TENSION (STANDARD OR XL VERSION) A brake tension adjustment handle is provided to freely rotate the basket. -
Page 34: System Interface
• GREEN indicates the battery is fully charged. • RED indicates battery charging fault. If this occurs, reset the power and verify. If RED is still displayed after resetting, contact CUES for service. • RED/YELLOW/GREEN LED indicators will be displayed while the system is being charged, even if the system is OFF. - Page 35 • Press twice quickly to reset the distance counter to zero. After pressing once, a message is displayed indicating that a second press is required for the reset to take place www.cuesinc.com, | salesinfo@cuesinc.com CUES Inc.,MPlus+ User Manual | CH905...
-
Page 36: Dvr Controls Diagram And Functions
OPERATING THE SYSTEM www.cuesinc.com, | salesinfo@cuesinc.com CUES Inc., MPlus+ User Manual | CH905... -
Page 37: Keypad Functions
8. SPEAKER ON/OFF/LOUDNESS BUTTON • Press to toggle from OFF to LOUD in 6 total steps • The SPEAKER LOUDNESS indicator is displayed on-screen • Speaker will only work when playing back a video www.cuesinc.com, | salesinfo@cuesinc.com CUES Inc.,MPlus+ User Manual | CH905... - Page 38 For example, the first snapshot made on October 17, 2017 will be named 20171017- 00 (00 is the first number in the sequence). All snapshots will have the file extension .jpg when shown in lists. www.cuesinc.com, | salesinfo@cuesinc.com CUES Inc., MPlus+ User Manual | CH905...
-
Page 39: Digital Video Recorder Instructions
OPERATING THE SYSTEM This page intentionally left blank. www.cuesinc.com, | salesinfo@cuesinc.com CUES Inc.,MPlus+ User Manual | CH905... -
Page 40: Dpad Controls Diagram And Functions
OPERATING THE SYSTEM www.cuesinc.com, | salesinfo@cuesinc.com CUES Inc., MPlus+ User Manual | CH905... - Page 41 2 O’clock on the DPad will cause the Pan & Tilt camera to both rotate clockwise and pan to the right. However, if the Simultaneous Pan/Tilt option is set to NO, only one will occur at a time. www.cuesinc.com, | salesinfo@cuesinc.com CUES Inc.,MPlus+ User Manual | CH905...
-
Page 42: Qwerty Keyboard Instructions
• Will function with Titler Pages: “CLIENT PAGE”, “USER PAGE”, “OWNER PAGE”, “FREE FORM”, “ARROW MODE”, “OBSERVATION CODES” • Will function with the System Menu if required for data entry www.cuesinc.com, | salesinfo@cuesinc.com CUES Inc., MPlus+ User Manual | CH905... - Page 43 • BackSpace Key – Press to go back up one menu level • Arrows Up, Down, Right, Left – duplicate function per above arrow descriptions • ESC - Press to go back up one menu level www.cuesinc.com, | salesinfo@cuesinc.com CUES Inc.,MPlus+ User Manual | CH905...
-
Page 44: Main System Menu Functions
Use the Left Arrow and Right Arrow keys to move within the field. The value is changed upon exiting from the field by pressing <ENTER> or <ESC>. www.cuesinc.com, | salesinfo@cuesinc.com CUES Inc., MPlus+ User Manual | CH905... - Page 45 COUNT DIRECTION COUNT DIRECTION DOWN Count direction refers to whether the footage counts up or down when the cable is pulled out. www.cuesinc.com, | salesinfo@cuesinc.com CUES Inc.,MPlus+ User Manual | CH905...
- Page 46 MINI PAN & TILT SETTINGS CAMERA HEAD TYPE CAMERA HEAD TYPE SR3 SERIES PS3 SERIES MINI PAN & TILT VIDEO FORMAT VIDEO FORMAT WARNING: THE SYSTEM WILL POWER DOWN AUTOMATICALLY! NTSC www.cuesinc.com, | salesinfo@cuesinc.com CUES Inc., MPlus+ User Manual | CH905...
- Page 47 Selecting READ PRESSSURE will read the camera’s relative pressure and display it in PSI with one decimal point, e.g. 1.3 in place of the XXXXX. SONDE POWER SONDE POWER SONDE FREQUENCY SONDE FREQUENCY 512 Hz 8 KHz www.cuesinc.com, | salesinfo@cuesinc.com CUES Inc.,MPlus+ User Manual | CH905...
- Page 48 This is useful if the operator wants to have the wireless transmitter on until he specifically wants it off or alternately, wants to have the wireless transmitter off until he specifically wants it on. www.cuesinc.com, | salesinfo@cuesinc.com CUES Inc., MPlus+ User Manual | CH905...
-
Page 49: Advanced Configuration
WVT PAIRING WVT PAIRING ** PAIRING NOT REQUIRED ** ON | | | | OFF | | 1 2 3 4 UNITS SYSTEM UNITS SYSTEM U.S./IMPERIAL METRIC www.cuesinc.com, | salesinfo@cuesinc.com CUES Inc.,MPlus+ User Manual | CH905... -
Page 50: Granite Mode
GraniteNet because it has the ability to not only use the video from the MPlus+, but also the footage information – See Cues Part # CH309 for connecting the two. If using Granite XP, only the video from the MPlus+ will be transferred. - Page 51 COUNTER is set to be displayed on the CENTER of the screen. It gets moved to the bottom right on anything other than the LIVE MODE screen so that it doesn’t obscure information displayed in that area of the display. BATTERY GAUGE BATTERY GAUGE www.cuesinc.com, | salesinfo@cuesinc.com CUES Inc.,MPlus+ User Manual | CH905...
- Page 52 CUSTOMIZE TEXT WRITNG SCRNS SELECT OBSERVTION CODE TYPE EDIT CUSTOM CODES RESTORE FACTORY DEFAULTS CUSTOMIZE TEXT WRITNG SCRNS CUSTOMIZE TEXT WRITNG SCRNS CLIENT PAGE USER PAGE OWNER PAGE FREE FORM PAGE www.cuesinc.com, | salesinfo@cuesinc.com CUES Inc., MPlus+ User Manual | CH905...
- Page 53 (ON). Setting the background to ON may be useful for recording purposes in order to get all the information to be displayed without having the video image obscure anything. CUSTOMIZE USER PAGE CUSTOMIZE USER PAGE TEXT BACKGROUND www.cuesinc.com, | salesinfo@cuesinc.com CUES Inc.,MPlus+ User Manual | CH905...
- Page 54 (ON). Setting the background to ON may be useful for recording purposes in order to get all the information to be displayed without having the video image obscure anything. CUSTOMIZE OWNER PAGE CUSTOMIZE OWNER PAGE TEXT BACKGROUND www.cuesinc.com, | salesinfo@cuesinc.com CUES Inc., MPlus+ User Manual | CH905...
- Page 55 (ON). Setting the background to ON may be useful for recording purposes in order to get all the information to be displayed without having the video image obscure anything. CUSTOMIZE FREE FORM PAGE CUSTOMIZE FREE FORM PAGE TEXT BACKGROUND www.cuesinc.com, | salesinfo@cuesinc.com CUES Inc.,MPlus+ User Manual | CH905...
- Page 56 (ON). Setting the background to ON may be useful for recording purposes in order to get all the information to be displayed without having the video image obscure anything. www.cuesinc.com, | salesinfo@cuesinc.com CUES Inc., MPlus+ User Manual | CH905...
- Page 57 Similarly, while pressing <BACKSPACE> on the top line it will not wrap around to the bottom line. However, using the arrow keys will wrap around between the bottom/top and top/bottom of the screen. www.cuesinc.com, | salesinfo@cuesinc.com CUES Inc.,MPlus+ User Manual | CH905...
- Page 58 OPERATING THE SYSTEM SELECT OBSERVATION CODE TYPE SELECT OBSERVATION CODE TYPE CUES CODES OTHER CODES CUSTOM CODES The observation code type selected through this menu affects which set of codes is displayed when the operator presses the OBSERVATION CODES button.
- Page 59 At which point, pressing <ENTER> will remove that entry from the custom code list. RESTORE FACTORY DEFAULTS RESTORE FACTORY DEFAULTS ARE YOU SURE YOU WANT TO PROCEED? WARNING: THE SYSTEM WILL POWER DOWN AUTOMATICALLY! DIAGNOSTICS DIAGNOSTICS SYSTEM STATUS MINI PAN & TILT STATUS www.cuesinc.com, | salesinfo@cuesinc.com CUES Inc.,MPlus+ User Manual | CH905...
-
Page 60: System Status
+12V, battery, and keyboard for diagnostics purposes. Voltage is given with one decimal place whereas amperage is given with two decimal places. It also displays the temperature of the battery in whatever units system is chosen (shown here in Celsius). www.cuesinc.com, | salesinfo@cuesinc.com CUES Inc., MPlus+ User Manual | CH905... -
Page 61: Mpt Status
If the system is unable to read the MPT camera, the values for these fields will be set to their initial values ‘UNKNOWN’. www.cuesinc.com, | salesinfo@cuesinc.com CUES Inc.,MPlus+ User Manual | CH905... -
Page 62: Copyright
SYSTEM TOTAL USAGE TIME SYSTEM TOTAL USAGE TIME Hours: Minutes: NOTE: The System Total Usage Time is maintained through firmware updates. COPYRIGHT COPYRIGHT CUES, INC. 3600 RIO VISTA AVENUE ORLANDO, FLORIDA 32805 PHONE 800-327-7791 407-425-1569 WWW.CUESINC.COM The copyright screen contains contact information for the vendor. -
Page 63: Preconfigured Text Writing Screens
On the editable screen a blinking cursor indicates where the next character will be inserted. www.cuesinc.com, | salesinfo@cuesinc.com CUES Inc.,MPlus+ User Manual | CH905... - Page 64 (or the nearest letter prior to that letter). In the CUES CODES list items that are followed by ‘…’ have a secondary list from which to select.
- Page 65 ARROW MODE with an arrow already displayed removes the former arrow), or exits entirely to the SYSTEM MENU, LIVE MODE, or one of the CLIENT, USER, OWNER or FREE FORM PAGES. www.cuesinc.com, | salesinfo@cuesinc.com CUES Inc.,MPlus+ User Manual | CH905...
-
Page 66: Other Codes
Fitting Sweep Bend Right Crack Longitudinal FBESRD Fitting Sweep Bend Right Down Crack Multiple FBESRU Fitting Sweep Bend Right Up Crack Spiral FBESU Fitting Sweep Bend Up Deformed Fracture Circumferential Deposits Attached Encrustation www.cuesinc.com, | salesinfo@cuesinc.com CUES Inc., MPlus+ User Manual | CH905... - Page 67 Lining Failure Defective End Infil Stain LFDL Lining Failure Delaminating ISGT Intruding Sealing Grout LFOC Lining Failure Overcut Connection ISSR Intruding Sealing Ring LFPH Lining Failure Pinhole ISSRB Intruding Sealing Ring Broken www.cuesinc.com, | salesinfo@cuesinc.com CUES Inc.,MPlus+ User Manual | CH905...
- Page 68 Dye Test Visible Repair Other Obstacle Brick RPZD Repair Other Defective Obstacle Thru Connection Roots Tap Barrel Obstacle Intruding Thru Wall Roots Tap Connection Obstacle In Joint Roots Tap Joint www.cuesinc.com, | salesinfo@cuesinc.com CUES Inc., MPlus+ User Manual | CH905...
- Page 69 Visible Mechanical Chemical SRVZ Surface Reinforcement SMWM Surface Missing Wall Visible Unknown Mechanical Surface Spalling SMWZ Surface Missing Wall Unknown SSSC Surface Spalling Chemical Surface Reinforcement SSSM Surface Spalling Corroded Mechanical www.cuesinc.com, | salesinfo@cuesinc.com CUES Inc.,MPlus+ User Manual | CH905...
- Page 70 Tap Break-in Defective Tap Break-in Intruding Vermin Cockroach Vermin Rat Vermin Other Weld Failure Circumferential Weld Failure Longitudinal Weld Failure Multiple Weld Failure Spiral Weld Failure Other Collapse Pipe Sewer www.cuesinc.com, | salesinfo@cuesinc.com CUES Inc., MPlus+ User Manual | CH905...
- Page 71 OPERATING THE SYSTEM CUES BASE CODES Abandoned Survey Bricks Missing Severe Medium Light Broken Hole Void Visible - Large Void Visible - Medium Void Visible - Small Soil Visible - Large Soil Visible - Medium Soil Visible - Small Camera Under Water...
- Page 72 OPERATING THE SYSTEM CUES BASE CODES Crack Multiple - Narrow Longitudinal - Narrow Circular - Narrow Spiral - Wider Multiple - Wider Longitudinal - Wider Circular - Wider Spiral - Narrow Dead End Debris >30% <=30% <=20% <=10% Deformed >10% <=10%...
- Page 73 OPERATING THE SYSTEM CUES BASE CODES Grease Severe Medium Light Grouted Infiltration Severe Medium Light Intruding Sealing Grout Hanging Gasket >30% Hanging Gasket <=30% Hanging Gasket <=20% Hanging Gasket <=10% Intruding Sealing Ring Hanging Gasket >30% Hanging Gasket <=30% Hanging Gasket <=20% Hanging Gasket <=10%...
- Page 74 OPERATING THE SYSTEM CUES BASE CODES Joint - Separated Large Medium Small Junction Box Lateral Capped Live Connection Lateral Abandoned -Unsealed Lateral Blocked Lateral Connection Prblm Blocked Protruding Pipe Damaged Factory Defective Pipe Lining Failure Other Undercut connection Overcut connection...
- Page 75 OPERATING THE SYSTEM CUES BASE CODES Pipe Type Root Heavy Medium Light Root-in-Joint Light Medium Heavy Root-in-Lateral Light Medium Heavy Severe Medium Light Satisfactory Start Against Flow Start Lateral Inspection Start With Flow Status - Stop Surface Damage Sev Mat Damg- Mechan Problm...
- Page 76 OPERATING THE SYSTEM CUES BASE CODES Tee Connection Vermin Other Mice Cockroach Water Level 100% >=75% >=50% >=25% < 25% Water Mark >=75% >=50% Wet Well www.cuesinc.com, | salesinfo@cuesinc.com CUES Inc., MPlus+ User Manual | CH905...
-
Page 77: Boms And Drawings
EXPLODED VIEW DRAWINGS & BOM’S Figure 1a. MPlus+ System Interface, CH950-INST, Rev. D www.cuesinc.com, | salesinfo@cuesinc.com CUES Inc., MPlus+ User Manual | CH905... - Page 78 EXPLODED VIEW DRAWINGS & BOM’S Figure 1b. MPlus+ System Interface, CH950-INST, Rev. D www.cuesinc.com, | salesinfo@cuesinc.com CUES Inc., MPlus+ User Manual | CH905...
- Page 79 EXPLODED VIEW DRAWINGS & BOM’S Figure 2a. Lateral Push System Coiler Assembly, CH300, Rev. H www.cuesinc.com, | salesinfo@cuesinc.com CUES Inc., MPlus+ User Manual | CH905...
- Page 80 EXPLODED VIEW DRAWINGS & BOM’S Figure 2b. Lateral Push System Coiler Assembly, CH300, Rev. H www.cuesinc.com, | salesinfo@cuesinc.com CUES Inc., MPlus+ User Manual | CH905...
- Page 81 FRAME ASSY,LATERAL PUSH SYS, MPLUS CH302 0032 TERMINAL,SOLDER LUG,LOCKWASHER #6 HW2641 0033 TUBE,SHRINK,BLACK 1/8” 712789 0034 SCREW,CAP,SKT HD,1/4-20X5/8,SST 101024 0035 WASHER,SPLIT LOCK,1/4”SST 101740 0036 WALKER TIP, .875 DIA, RUBBER, BLK HW2971 0037 WASHER,FLAT,1/4”SST 101736 www.cuesinc.com, | salesinfo@cuesinc.com CUES Inc., MPlus+ User Manual | CH905...
- Page 82 MRO-GREASE,SUPERLUBE 21060 - 3 OZ HW039 0066 WASHER,SPLIT #6 SST 100150 0067 WASHER,SPLIT LOCK,#8 SST 101738 0068 NUT,LOCK NYLON INS,SST,8-32 112532 0069 SCREW,CAP,SKT HD,1/4-20X1,SST 101065 0070 NUT,LOCK W/NYL INS 1/4-20 SST HW030 www.cuesinc.com, | salesinfo@cuesinc.com CUES Inc., MPlus+ User Manual | CH905...
- Page 83 EXPLODED VIEW DRAWINGS & BOM’S Figure 3. Lateral Push System Accessory Bag, CH061, Rev. - www.cuesinc.com, | salesinfo@cuesinc.com CUES Inc., MPlus+ User Manual | CH905...
- Page 84 EXPLODED VIEW DRAWINGS & BOM’S Figure 4. Cable Assembly, Controller>Coiler, 10’, MPlus+, CH070, Rev. C www.cuesinc.com, | salesinfo@cuesinc.com CUES Inc., MPlus+ User Manual | CH905...
- Page 85 EXPLODED VIEW DRAWINGS & BOM’S Figure 5. Push Cable Assembly 10PE-40PE, MPlus+, CH347, Rev. - www.cuesinc.com, | salesinfo@cuesinc.com CUES Inc., MPlus+ User Manual | CH905...
-
Page 86: Appendix A - List Of Status Messages
FREE FORM PAGE BACKGROND ON FUNCTION UNAVAILABLE GAUGE ON DUE TO LOW BATTERY KEYBOARD POWER FAULT: HIGH I LIGHTS POWER FAULT: LOW V LIGHTS POWER FAULT: HIGH I LIGHTS POWER FAULT: HIGH V www.cuesinc.com, | salesinfo@cuesinc.com CUES Inc., MPlus+ User Manual | CH905... - Page 87 APPENDIX A LIST OF STATUS MESSAGES MINI PAN & TILT RECONNECTED NO MORE ROOM IN LIST NO TRANSMITTER PRESENT OBSERVATION CODES NOW CUES OBSERVATION CODES NOW OTHER OBSERVATION CODES NOW CUSTOM OWNER PAGE BACKGROUND OFF OWNER PAGE BACKGROUND ON PAIRING UNSUCCESSFUL...
- Page 88 LIGHTS POWER FAULT: HIGH I: If the lights power being drawn was measured at more than 1.125 amps, the lights power supply is shut down and this message will be displayed. www.cuesinc.com, | salesinfo@cuesinc.com CUES Inc., MPlus+ User Manual | CH905...
- Page 89 If the battery current is measured at more than 8.0 A, this message will be displayed. WARNING: INTERNAL +5VB ERROR: If the internal CH412 board’s ‘+5VB’ supply is measured at more than 3% away from 5.0 Volts, this message will be displayed. www.cuesinc.com, | salesinfo@cuesinc.com CUES Inc., MPlus+ User Manual | CH905...
-
Page 90: Appendix B - Mplus+ Field Firmware Updates
‘A’, of the partitions on the drive. To obtain the MPlus+ firmware update file, please contact CUES Customer Service at 1-800-327-7791. 2. Power-down the MPlus+, if necessary, by pressing the power button. - Page 91 Insert the USB Flash drive into the USB port, J4, on top of this circuit board. 5. Move the sliding switch, S1, on the circuit board to the ‘UPD’ position. www.cuesinc.com, | salesinfo@cuesinc.com CUES Inc., MPlus+ User Manual | CH905...
- Page 92 11. Set the keyboard panel back in place into the fold-down portion of the MPlus+ Control Unit, and, using the Phillips screwdriver, reinstall the 14 screws to secure it. Be careful to not over-tighten the screws. www.cuesinc.com, | salesinfo@cuesinc.com CUES Inc., MPlus+ User Manual | CH905...
- Page 93 The number of ‘Logical Blocks’ reported by the USB Flash drive exceeds the maximum number supported by the MPlus+ firmware update program. o If the drive’s ‘Logical Block Length’ is the standard 512 bytes, this equates to approximately 2TB of memory capacity. www.cuesinc.com, | salesinfo@cuesinc.com CUES Inc., MPlus+ User Manual | CH905...
- Page 94 Try re-loading the firmware update file onto the USB Flash drive. o Try obtaining a fresh copy of the firmware update file, either by re-downloading the original file you received or by requesting a new copy from CUES Customer Service. •...
- Page 95 APPENDIX B This page intentionally left blank. www.cuesinc.com, | salesinfo@cuesinc.com CUES Inc., MPlus+ User Manual | CH905...
-
Page 96: Warranty Information
Expendable parts, such as light bulbs, fuses, connectors, etc., are excluded from this warranty. Purchaser must notify CUES of a breach of warranty not later than the last day of the warranty period; otherwise, such claims shall be deemed waived. -
Page 97: Cues Safety Precautions
CUES Customer Service at 1-800-327-7791. PERSONAL SAFETY EQUIPMENT & TRAINING CUES stresses the use of appropriate safety equipment while working in and around manholes and during system operation. Safety should constantly remain the utmost priority. NOTE: The user of CUES products is responsible for all training and operation under federal, state and local guidelines and regulations for both confined space entry and traffic control. -
Page 98: Cues Material Return Policy
CUES, at its’ option, may credit freight charges both ways. 10. The parts must be returned to CUES within 5 days of receipt of the MRA for credit to be granted. Under normal circumstances, a warranty determination can be made within 30 days, and if under warranty, the part will be replaced at no charge. - Page 99 PARTS WILL BE RETURNED TO CUSTOMER AT CUSTOMER EXPENSE WITHOUT AN MRA NUMBER DOCUMENTED ON BOX. CUES IS NOT RESPONSIBLE FOR SHIPMENT FROM CUSTOMER TO CUES. Use this section as a Packing Slip.
-
Page 100: Cues Parts & Service
24 hours after receipt of the order. Whether you need a camera or a fuse, CUES will quickly process and ship your order in accordance with your schedule requirements! Our experienced parts professionals can help you with parts identification, shipping... -
Page 101: Record Of Revisions
Manufacturing level to which the manual is written. As engineering changes to the hardware and/or software are made at CUES, necessary information in the manual will be revised to reflect those changes. The latest change level and the rationale for any change(s) will be explained in tabular format on this page to allow the manual user to be better equipped should the need arise to call CUES regarding technical information. - Page 102 Pipe profiling is accomplished via Laser for Sonar based systems. CUES has the most locations and dealers available to serve you! To find a local CUES facility, find the operating hours for a particular location, or to contact us at your most convenient stocking location, please log onto our website at www.cuesinc.com...
Need help?
Do you have a question about the MPlus+ and is the answer not in the manual?
Questions and answers
I need 2 of the latches that you close the monitor case with. Its a Cues MPlus+ push camera system.