Table of Contents
Advertisement
Quick Links
Advertisement
Table of Contents

Related Manuals for SubC Imaging RAYFIN


Summary of Contents for SubC Imaging RAYFIN
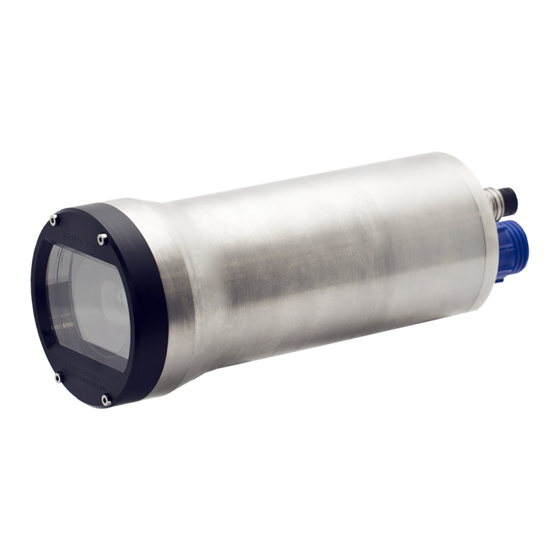
- Page 1 Version 2.13 2020-07-16 RAYFIN User Manual...
- Page 2 Support Engineered in Canada Contact support Installing TeamViewer for remote support Telephone Ensure the LAN functionality in TeamViewer is enabled (go to Extras > Options > General > Incoming LAN connections). Using TeamViewer over LAN allows +1 (709) 702-0395 for much faster operation and better quality. SubC recommends using a LAN connection whenever possible.
-
Page 3: Precautions And Maintenance
Precautions and Maintenance Please read this manual carefully before setting-up and using your unit. The electronic version of this document is the controlled copy. Therefore, all printed versions of this document are uncontrolled. SubC equipment is designed to work at various depth ratings on unmanned vehicles. Designs are tested to their full pressure rating. Production units are pressure-tested to a nominal rating to ensure no leaks. - Page 4 O-Ring Lubricant Best practices for assembling your system Greasing the Connector/Dummy Plug (ABOVE WATER - DRY MATE ONLY) Connectors must be greased with Molykote 44 Medium (or equivalent) before every mating. Check the MSDS for your type of o-ring lubricant before use.
-
Page 5: System Hookup
System Hookup Best practices for assembling your system For the fundamentals of how to capture excellent underwater photos and detailed video, check out our Underwater Photography Guide: http:/ /ftp.subcimaging.com/docs/manuals/SubC_Underwater_Photography_Guide.pdf SubC products are designed to run in water. There is built-in thermal protection in our equipment, however, we cannot guarantee performance in air. -
Page 6: Quickstart And Setup
QUICKSTART AND SETUP... - Page 7 Packaging and Quality Control Included with your shipment: 1. Impact resistant shipping case with designed foam insert 2. Rayfin camera 3. Lasers, calibrated delrin mount and for attachment 4. Aquorea LED(s) 5. Component compartment: 3m straight LED cable to plug into camera. 0.5m Y-splice laser cable to plug into camera 2x Titanium hose clamps for attachment of lasers to the camera High pressure dummy plugs for camera Aux0 &...
- Page 8 APPROVED: 2019-11-21 HDE: Ethernet Quickstart Software: AR Electrical: CC Production: JMH Bench testing the camera Follow the Rayfin manual instructions for “Software Install and Required Components Connect” Rayfin Interface cable Plug the 13-pin interface cable into camera. Windows PC or laptop AC-DC power supply (24VDC) Connect interface box Ethernet cable to the network or a router with DHCP.
- Page 9 AC cable Immediately after powering on the Rayfin camera, the bootup screen should be visible on the HD-SDI monitor. It will say “RAYFIN” then a few seconds later HD-SDI cable it will show the SubC logo followed by live video.
- Page 10 Immediately after powering on the Rayfin camera, the bootup screen AC-DC power Interface cable supply should be visible on the HDMI monitor. It will say “RAYFIN” then a few seconds later it will show the SubC logo followed by live video PC or laptop (for control) Cat5e...
-
Page 11: Troubleshooting
TROUBLESHOOTING... - Page 12 Troubleshooting Issue Mitigation JPEG noise filtering Take pictures in RAW mode to avoid noise filtering. There could be a noise filter applied to JPEG images which cause textures to be blended. If you have a lot of light, there may not be an issue.
- Page 13 Troubleshooting Issue Mitigation Camera is returning a loopback IP Make sure camera is connected to a device that assigns IP’s (router or modem) and not a (127.0.0.1) switch. The camera focuses on foreground Autofocus is enabled by default. Change it to manual focus under the Auto/Manual Focus silt in the water column icon.
- Page 14 Media Reviewing Stills and Video - Troubleshooting (Windows 10) Click Windows button If you click on the Gallery icon and receive Type Features the error message below, you must set up Select Turn Windows features on or off SMB 1.0 (Windows 10). This is required to Enable SMB 1.0/CIFS File Sharing Support interface with the Rayfin's storage over Ethernet.
- Page 15 Media Reviewing Stills and Video - Troubleshooting (Windows 10) Open File Explorer A window will open showing the contents of the network share. You Click Network should see: logs, media, NAS, Scripts, and Settings. If the Rayfin is properly configured, your videos/stills will be saved to the media folder. From the list of connected network devices, double-click the name of your device If you receive a Network Error:...
- Page 16 SOFTWARE INSTALL & CONNECT...
-
Page 17: System Requirements
System Requirements Page 17 Minimum: Operating system: Windows 10 ● Processor: 2.6 GHz or faster processor ● Memory: 4GB of RAM or greater ● Video: DirectX 9 graphics device with WDDM 1.0 or higher driver ● Hard disk space: 1.5 GB available hard disk space (*) ●... -
Page 18: Establishing Connectivity
Updated: Establishing Connectivity All software and manuals are supplied on the USB Drive that was Select Launch SubC Rayfin Control checkbox shipped with your camera. If you lose the USB Drive, please contact team@subcimaging.com Note: Ensure you have administration access and are running Windows 7 or higher before installing software. - Page 19 Updating Update Rayfin Version/ROM and Firmware Open Windows Explorer to C:\SubC Rayfin Control\AdditionalPackages\RayfinUpdater To update firmware: locate files update_firmware.hex and RayfinUpdater.exe To update Version/ROM: locate files update.zip and RayfinUpdater.exe To start the updater, drag and drop the update_firmware.hex or update.zip file into RayfinUpdater.exe A command prompt like the one in the image will open Enter the Index number that matches your Rayfin (eg.
-
Page 20: Ethernet Communication
Ethernet Communication Establishing connectivity with your camera Click on the Settings icon in the top right-hand corner of your main screen then click the Communications icon. AUTO DETECTION Ethernet: Camera should have been auto-detected and appear under Detected Cameras (eg. SubCRayfin18812). MANUAL CONNECTION There is a short period of time where a camera is available but has not yet been auto-detected. -
Page 21: Static Ip Setup
Networking Static IP By default the Rayfin will use DHCP, but you can also set a Static IP. Click on the Settings icon in the top right-hand corner of your main screen then click the Communications icon. STATIC IP SETUP Click on the first box next to IP Address and type in your static IP address Click Assign Static IP button The system will prompt that the Rayfin needs to be reset... -
Page 22: Serial Communication
Serial Communication Establishing Connectivity with your Camera Click on the Settings icon in the top right-hand corner of your main screen then click the Communications icon. SERIAL TAB To connect over serial, go to Serial tab ● Under ComPort, click the Disconnect/Refresh dropdown menu. ●... -
Page 23: Video Input And Output
Video Input and Output Establishing Video Connection with your Camera INPUT: Click on the Settings icon in the top right-hand corner of OUTPUT: Click on the Settings icon in the top your main screen then click the Video icon. right-hand corner of your main screen then click the Camera Settings icon. -
Page 24: Network Time
Time Zone and Network Time How to Set Time Zone and Sync with an online NTP server Click on the Settings icon in the top right-hand corner of your main screen then click the Camera Settings icon. TIME/LOCALE Configure the time zone on the Rayfin Select the region and time zone ●... - Page 25 Local Date and Time (on Camera) How to Set Local Date/Time on Camera Click on the Settings icon in the top right-hand corner of your main screen then click on the Camera Settings icon. TIME/LOCALE (on camera) Configure the local date and time on the Rayfin Click calendar icon From the calendar, choose year, month and day Click the clock icon...
-
Page 26: Aux Ports
Aux Ports Controlling Peripheral Devices from the Camera Click on the Settings icon in the top right-hand corner of your main screen then click on the Aux Devices icon. The Rayfin will autodetect LEDs that are connected during startup and configure itself to use them automatically. -
Page 27: Device Type Configuration
Aux Ports Controlling Peripheral Devices from the Camera INPUT TYPE CONFIGURATION DEVICE TYPE CONFIGURATION (ROS Pan & Tilt, Serial Controller and Pan-Tilt Emulator) Select the device you would like to configure and Select the device you would like to drag it to the Aux0 or Aux1 slot. You can also select configure and drag it into the Aux0 or Aux1 a device from the drop-down menu. - Page 28 Reboot and Communication preview Click on the Settings icon in the top right-hand corner of your main screen the click the Advanced icon. REBOOT RAYFIN Restarts Rayfin and returns to original settings COMMUNICATIONS PREVIEW Displays the communication between Windows platform and Rayfin.
- Page 29 Real-time Streaming Protocol Stream video using RTSP protocol Stream low-latency video over ethernet using RTSP. To connect to the RTSP stream from the camera: Open VLC media player (https:/ /www.videolan.org/vlc/index.html) Enter the IP of the camera you wish to connect to (eg. rtsp:/ /192.168.2.34:5540/ch0) If you need a certain configuration, you can change the stream settings from RCS.
-
Page 30: Nmea Data Logging
Updated: NMEA Data Logging The camera can also operate as a NMEA data logger so you can pipe in live data from other sensors. NMEA formatted data can be sent to the camera via Serial or Ethernet. TCP or UDP port: 8889 ●... -
Page 31: Software Details
SOFTWARE DETAILS... - Page 32 Intuitive and Easy to Use Software RCS overview tutorial Strobe toggle Auto/manual exposure toggle Auto exposure value Shutter Speed ISO Value Auto/manual focus Manual focus slider Internal temperature indicator Disconnect from camera Settings button Thumbnails Digital pan/tilt/zoom control Record video Take still Focus reticle Media storage remaining...
-
Page 33: Recording Video
Recording Video Record and Save 4K, HD and SD Video Name: Choose a descriptive name. Video files will not be overwritten so you To start recording, press can use the same name for multiple videos. The software will append a _1, record button on bottom _2, etc., to the end of the filename. - Page 34 Taking Stills JPEG or RAW Images Name: Choose a descriptive name for your images. You can use the same name for multiple stills, no stills will be overwritten. The software will append a _1, _2, etc., to the end of the name. Directory: Enter the directory where you want your stills to be stored.
-
Page 35: Color Settings
Color Settings Presets PRE-LOADED PRESETS CREATE/SAVE PRESETS The Rayfin comes preloaded with the SubC Aquorea LED Select Add New Preset option in dropdown box preset, among others. Name your preset in Enter Preset Name Here box Click green checkmark to save or the red x to delete Change the color settings to your desired balance Click Save button... - Page 36 View Video and Stills Gallery and Thumbnails GALLERY Click Gallery icon (S4) ● Thumbnails will appear on the top right-hand side of the ● screen (13). Click the image you wish to view Note: In order to view RAW images using thumbnails, a RAW image viewer is required (eg Picasa https:/ /picasa.en.uptodown.com/windows) Once you select an image, a window will open displaying...
-
Page 37: Networking: Modes
Networking: Modes Reviewing Stills and Video Depending on usage in the network, the Rayfin can be configured and Example configuration: used in three networking modes: Rayfin -> 192.168.10.10 with a subnet of 255.255.255.0 PC -> 192.168.10.5 with a subnet of 255.255.255.0 1. -
Page 38: Network Attached Storage (Nas)
Network Attached Storage (NAS) External storage NAS allows you to connect to external storage to increase the space available on a Rayfin. It currently supports Network File System (NFS v3), tested on a NFS share that is hosted on Linux (Ubuntu 16.04). To use this you will need a NFS server that is sharing a mount. -
Page 39: Lamp Controls
Lamp and Strobe Settings LED and Strobe Compensation STROBE AND STROBE COMPENSATION LAMP CONTROLS When you turn on the strobe (lighting bolt icon at the top of the Slide bars main screen), the Strobe Compensation feature will appear. Lamp Brightness: Select LED brightness (0-100%) ●... - Page 40 PAN-TILT METHODS...
-
Page 41: Digital Pan-Tilt-Zoom
Digital Pan-Tilt-Zoom Preview Images with PTZ **Only displays on screen when using JPEG Stills, not RAW** Allows the camera to zoom in and pan around to any part of the preview image without having to physically move the camera. It also supports connection of control hardware and can translate its commands into digital PTZ commands. - Page 42 ROS Pan & Tilt Control Camera connected to pan-tilt Under the Aux Devices tab, connect to Remote Once connected, the Pan-tilt icon will appear on the left-hand side of the Ocean Systems (ROS) Pan & Tilt main screen. ROS PAN & TILT CONTROL Click Connect to Pan Tilt button Up, down, left, and right: Move the pan-tilt device one increment in that direction...
- Page 43 Kongsberg Pan & Tilt Control Camera connected to pan-tilt Under the Aux Devices tab: Once connected, the pan-tilt icon will appear on the left-hand Connect to Kongsberg Pan & Tilt side of the main screen. ● Click Connect to Pan Tilt button ●...
- Page 44 Pan-Tilt Emulation Via RS232/RS485 Ensure your Rayfin is configured so the aux1 port is set to Pan and Tilt Emulator The pan-tilt serial controls originate topside from the joystick (1). The joystick controls go to the ROVs computer (2) and are converted to serial comms The pan-tilt serial comms enter the topside multiplexer (3).
- Page 45 STREAMING The Rayfin Control Software has the capability to live stream audio and video remotely over the cloud. See the Streaming Manual below for more information: http:/ /ftp.subcimaging.com/docs/manuals/Streaming_Manual.pdf...
- Page 46 SCRIPTING Automated functions utilizing the Rayfin API Creating script files that the Rayfin executes Please follow link to SubC technical support portal to view the API (the API document is also included with your Rayfin Control Software)
- Page 47 Autonomous Scripting The Rayfin supports the ability to write scripting files to program your camera to perform complex tasks. Scripts are written in the Rayfin Scripting Language (RSL) which utilizes SubC's existing Command API. Flexible, real-time programs can be created that utilize all of the camera’s features. Events that can be based on specific or relative date and time For full API reference see: http:/ /api.subcservices.com/...
- Page 48 How to Script Create, save, and execute scripts Click on the Settings icon in the top right-hand corner of your main screen then click Scripting icon. New Script: To create a new script, click the green plus (+) button. A text box will appear where you can enter the name of your script.
- Page 49 Scripting Example Commands API commands specifically for scripting *Note: Time duration is in milliseconds / / Record 20 seconds of video every 20 When command seconds, take a picture every 5 seconds. When:String command / / Record for 1 minute Repeat indefinitely GetWhenCommands StartRecording...
-
Page 50: Specifications
SPECIFICATIONS... -
Page 51: Sensor Properties
Sensor Properties Sensor Spectral Sensitivity Sensor Type: Back-illuminated and stacked-type CMOS ensor spectral sensitivity image sensor with Exmor RS™ Includes neither lens characteristics nor light source characteristics Sensor size: 1/2.4" Shutter: Rolling Pixel count: 21MP RAW bit depth: 10 bit Aspect ratio: 4:3 Resolution: 5344 (H) x 4016 (V) 21 megapixels Pixel size: 1.12 µm (7.216mm x 5.497mm) - Page 52 Electrical Power Profile Test setup 1: No LED connected. Ethernet control. Video over composite Example of peak vs average power: Condition Average Power (W) Peak Power (W) Peak Current (A) @ 24v Idle 7.80 0.38 Internal bat. charging +0.4 +0.4 +0.016 Recording 7.91...
- Page 53 Storage Available storage is shown in the top left of the control software. The Rayfin ships with 512GB of storage ● The recording bitrate and image format directly affects the recording time ● The camera defaults to 25Mbps recording bitrate ●...
- Page 54 OPTIONS...
-
Page 55: Video Icon
HDC (High Definition over Coax) Modify Resolution of Camera Output **This option is chosen at time of purchase. VIDEO ICON Changes the resolution of the output on the camera. Most useful for Rayfin-HDC models that have HD-SDI output. VIDEO INPUT: Select your capture device from the Manual dropdown ●... - Page 56 Expansion Input Board Custom Analog Voltage Triggered Controls **This option is chosen at time of purchase. The expansion bay input board allows tristate or single-ended voltages, such as +12V or +-24V, to be utilized from underwater systems to control camera functions. Common functions include ZoomIn/ZoomOut, TakeStill, and StartRecording/StopRecording.
- Page 57 Expansion Output Board Resettable circuit breaker with fault detection **This option is chosen at time of purchase. It enables the camera to control system power to the aux ports, up to a maximum of four ports. There is a current limit of 2.5A per port. It will also detect under-voltage, over-voltage, short circuit and overcurrent conditions and generate a resettable fault.
- Page 58 Far-Red Option For Natural Marine Behavior Surveys SubC Imaging has created a system that incorporates our field-proven smart cameras and the Red Aquorea lighting to create a toolset that can view underwater life without disturbing their natural patterns and behavior.
Need help?
Do you have a question about the RAYFIN and is the answer not in the manual?
Questions and answers