Table of Contents
Advertisement
Quick Links
Enabling Australia's Field Technicians to build, troubleshoot
and maintain better communications networks.
This reference material is provided by TMG Test Equipment,
VIAVI's only Master Distributor for Contractors in Australia
Industry Best Pricing
Short to Medium Project-Based Rental Solutions
Dedicated Technical & After-Sales Support
In-house Diagnostics, Repair & NATA Calibration Laboratory
FREECALL
Finance Available
1800 680 680
Advertisement
Chapters
Table of Contents
Troubleshooting

Summary of Contents for TTC T-BERD 107A
- Page 1 Enabling Australia’s Field Technicians to build, troubleshoot and maintain better communications networks. This reference material is provided by TMG Test Equipment, VIAVI’s only Master Distributor for Contractors in Australia Industry Best Pricing Finance Available Short to Medium Project-Based Rental Solutions Dedicated Technical &...
- Page 2 50-12741-01 Rev. C T-BERD 107A T-CARRIER ANALYZER REFERENCE MANUAL DECEMBER 1994 ©1993 TELECOMMUNICATIONS TECHNIQUES CORPORATION® 20400 Observation Drive Germantown, Maryland 20876 (800) 638-2049 OR (301) 353-1550 (MD) • FAX (301) 353-0731 WWW Address: http://www.ttc.com...
- Page 3 BRIDGTAP is a trademark and MULTIPAT is a registered trademark of Telecommunications Techniques Corporation (TTC), A Dynatech Company. SLC is a registered trademark of AT&T Technologies, Inc. Specs., terms, and conditions are subject to change without notice.
-
Page 4: Table Of Contents
SECTION TABLE OF CONTENTS TABLE OF CONTENTS SECTION PAGE GENERAL INFORMATION 1.1 INTRODUCTION ........1-1 1.2 INSTRUMENT OVERVIEW ....1-1 1.3 STANDARD FEATURES ......1-2 1.4 OPTIONS ..........1-4 1.5 ACCESSORIES ........1-5 1.6 CABLES ..........1-7 1.7 ORDERING INFORMATION ....1-8 INSTRUMENT CHECKOUT AND MAINTENANCE 2.1 UNPACKING AND INITIAL... -
Page 5: Section Page
SECTION TABLE OF CONTENTS SECTION PAGE 3.7 SLC DATALINK DECODE OPTION — INTRODUCTION .... 3-35 3.8 SLC DATALINK DECODE OPTION — TEST SETUP ......... 3-35 3.9 SLC DATALINK DECODE OPTION — TEST RESULTS ......3-36 3.10 ADVANCED STRESS PATTERNS OPTION — INTRODUCTION ..... 3-39 3.11 ADVANCED STRESS PATTERNS OPTION —... - Page 6 SECTION TABLE OF CONTENTS SECTION PAGE AUXILIARY FUNCTIONS 4.1 INTRODUCTION ........4-1 4.2 AUXILIARY FUNCTIONS ....... 4-3 TEST RESULTS 5.1 TEST RESULTS ........5-1 5.2 SUMMARY CATEGORY ......5-4 5.3 ERRORS CATEGORY ......5-12 5.4 SIGNAL CATEGORY ......5-15 5.5 TIME CATEGORY ........ 5-19 5.6 DATALINK CATEGORY .......
- Page 7 SECTION TABLE OF CONTENTS SECTION PAGE FIGURES 2-1 T-BERD 107A TOP PANEL ....2-3 3-1 T-BERD 107A FRONT PANEL ....3-2 3-2 FRONT-PANEL DISPLAY AND SETUP SWITCHES ......3-4 3-3 TOP PANEL TEST CONNECTIONS ..3-17 3-4 TEST CONNECTIONS RELATED SWITCHES ........
-
Page 8: General Information
Analyzer. In addition to this manual, a T-BERD 107A User’s Guide provides information on setting up and operating the T-BERD 107A in a number of in- service and out-of-service applications. 1.2 INSTRUMENT OVERVIEW The T-BERD 107A is a full-featured, hand-held T1 test set designed for outside plant testing. -
Page 9: Standard Features
Bit-Patterned Message (BPM) recognition ables the T-BERD 107A to identify and display BPMs from the ESF datalink in accordance with ANSI T1.403. In addition, the T-BERD 107A can... - Page 10 AUTO mode to the proper framing, coding, and pattern. No setup is required when monitoring live circuits. Logic error and bipolar violation (BPV) insertion enables the T-BERD 107A to simulate span and equipment errors. add troubleshooting Line Build-Out selections capability to uncover marginal problems such as cable crosstalk and bridge taps.
-
Page 11: Options
SUMMARY categories. on the T1 Generates and transmits PRMs signal. that enables the Adds a SMARTNIU mode T-BERD 107A to query, retrieve, store, and clear T1 circuit statistics obtained by the per- formance monitor feature of the Westell NIU/Performance Monitor. -
Page 12: Accessories
INFORMATION Smart Loopback/Command Codes Option (107A-4) that en- Adds intelligent repeater loop codes able the T-BERD 107A to control intelligent network equipment, such as office repeaters, line repeaters, and maintenance switches. that enable the Adds HDSL loop codes T-BERD 107A to control PAIRGAIN or equiva- lent HDSL circuit repeaters. - Page 13 GENERAL SECTION 1 INFORMATION work in conjunction with a T-BERD T-Carrier Ana- lyzer to perform out-of-service testing or monitoring of T1 signals along repeatered spans. The T-BERD T1 Repeater Extender enables the user to monitor T1 signals at repeater inputs and outputs without dis- rupting the span current loop.
-
Page 14: Cables
A replacement lead-acid battery can be ordered for the T-BERD 107A. Battery replacement instruc- tions are provided in Section 2.7 Battery Replacement. 1.6 CABLES The following cables provide an interconnec- tion between the T-BERD 107A, other test sets, and the network. Model Description 10559... -
Page 15: Ordering Information
GENERAL SECTION 1 INFORMATION 1.7 ORDERING INFORMATION Contact TTC Customer Service Department at (800) 638-2049 for information on ordering options or accessories. -
Page 16: Instrument Checkout And Maintenance
Procedures for checking the electrical performance of the instrument are given in Section 2.5 Instrument Self-Test/Checkout. If the contents are incomplete, or if the T-BERD 107A does not pass the Instrument Self-Test/Checkout, notify TTC at (800) 638-2049. If the shipping container is dam- aged, notify the carrier as well as TTC, and keep the shipping container and materials for the carrier’s... -
Page 17: Warnings And Cautions
AC power supply (115 VAC) or an internal rechargeable battery. The AC ADAPTER connector is located on the top panel of the T-BERD 107A. The battery is located inside the lid panel of the T-BERD 107A. Complete AC power specifications are pro- vided in Section 7 Specifications. -
Page 18: T-Berd 107A Top Panel
Figure 2-1 T-BERD 107A Top Panel — The T-BERD 107A AC Power Adapter T-BERD 107A is equipped with an AC power adapter. The T-BERD 107A AC power adapter must be plugged into an approved two-contact electrical outlet. — This switch is located on the... - Page 19 AUTO POWER OFF in by contact with the front panel and turns off the T-BERD 107A. If the lid is opened after the T-BERD 107A was turned off by the AUTO switch, the T-BERD 107A turns POWER OFF on again.
-
Page 20: Instrument Self-Test
AND MAINTENANCE 2.5 INSTRUMENT SELF-TEST/ CHECKOUT Perform the following checkout procedure to verify the operation of the T-BERD 107A. Perform the option checkout procedure(s) for each installed option and skip the option checkout procedure(s) for the option(s) not installed. Instrument Checkout Basic Setup... - Page 21 NOVRAM LOST RE- LOAD NOVRAM is displayed. The fac- tory default settings are listed in Appendix A. The T-BERD 107A remains fully func- tional even though the switch settings may not be saved during the power cycle.
- Page 22 INSTRUMENT CHECKOUT SECTION 2 AND MAINTENANCE • The T-BERD 107A conducts a dynamic calibration of various measurement func- tions. During dynamic calibration, the message CALIBRATING…is displayed. If there is a problem, the message CALIB ERROR is displayed. In such instances, contact the TTC Customer Service Department at (800) 638-2049.
- Page 23 INSTRUMENT CHECKOUT SECTION 2 AND MAINTENANCE Mainframe Instrument Checkout CATEGORY and RESULTS switches Select the SIGNAL category RX LEVEL result in the RESULTS display. The value for this result should be 0 dBdsx ±0.5 dB. RX LEVEL MODE ALL ONES PATT +0.0 dBdsx CATG...
- Page 24 RX FREQ Hz MODE PATT ALL ONES 1544000 CATG SIGNAL MODE PATTERN CATEGORY RESULTS Configure the T-BERD 107A switches T1 D4 MODE PATTERN SIGNAL CATEGORY DATA BITS RESULTS Signal verification Verify that the T1 Pulses, Frame Sync, and Pattern Sync LEDs illuminate.
- Page 25 INSTRUMENT CHECKOUT SECTION 2 AND MAINTENANCE PATTERN switch Select the ALL ONES pattern. Verify that the Pattern Sync LED illuminates. Press the RESTART switch to restart the test CATEGORY switch Select the SUMMARY category. The mes- sage ALL RESULTS OK should appear in the RESULTS display.
- Page 26 PATTERN CATEGORY RESULTS POWER switch Press to turn the T-BERD 107A off. Leave the T-BERD 107A AC power adapter con- nected to the instrument and recharge the battery for a minimum of eight hours before operating the test set from the battery. A fully charged battery will typically provide four hours of continuous operation.
- Page 27 Installation Verification If the SLC Datalink Decode Option is installed, perform the following procedure to verify its operation. Test setup Prepare the T-BERD 107A for testing in accordance with the Instrument Checkout Basic Setup procedure. MODE switch Verify that the SLC-M1 and SLC-M2 modes are available.
- Page 28 If the Advanced Stress Patterns Option is in- stalled, perform the following procedure to verify its operation. Test setup Prepare the T-BERD 107A for testing in accordance with the Instrument Checkout Basic Setup procedure. PATTERN switch Select the T1 DALY pattern.
- Page 29 Enhanced ESF Option (107A-3) If the Enhanced ESF Option is installed, per- form the following procedure to verify its operation. Test setup Prepare the T-BERD 107A for testing in accordance with the Instrument Checkout Basic Setup procedure. AUX and PATTERN switch...
- Page 30 SMARTNIU mode is available. PATTERN switch Press the switch to verify the PATTERN RESULTS and SETUP functions are available. MODE SMARTNIU CLOCK CLEAR PATT SETUP CATG MODE PATTERN CATEGORY RESULTS POWER switch Press to turn the T-BERD 107A off. 2-15...
- Page 31 If the Smart Loopback/Command Codes Op- tion is installed, perform the following procedure to verify its operation. Test setup Prepare the T-BERD 107A for testing in accordance with the Instrument Checkout Basic Setup procedure. AUX and PATTERN switch Press the switch to activate the auxiliary functions.
- Page 32 Functions for additional information on allowable address ranges for various intelli- gent repeaters. SELECT MODE LOOPCODE PATT (PROG) CATG MODE PATTERN CATEGORY RESULTS AUX switch Press the switch to exit the auxiliary functions. POWER switch Press to turn the T-BERD 107A off. 2-17...
- Page 33 Fractional T1 (FT1) Option (107A-5) If the Fractional T1 (FT1) Option is installed, perform the following procedure to verify its operation. Test setup Prepare the T-BERD 107A for testing in accordance with the Instrument Checkout Basic Setup procedure. MODE switch Verify the FT1 D4, FT1 D1D, and FT1 ESF modes are available.
-
Page 34: Maintenance
AND MAINTENANCE POWER switch Press to turn the T-BERD 107A off. 2.6 MAINTENANCE If the T-BERD 107A fails to operate and no front panel indicators are illuminated: • Check the T-BERD 107A AC power adapter to ensure that it is securely connected to the T-BERD 107A. -
Page 35: Battery Replacement
Turn off the unit and remove AC power Press the switch to turn off the POWER T-BERD 107A and remove the T-BERD 107A AC power adapter from the AC ADAPTER connector. Disconnect all cables Disconnect all cables from the connectors on the top panel of the T-BERD 107A. - Page 36 L-shaped frame. Replace the lid panel Replace the lid panel over the battery and install the six screws removed in Step 3. Connect AC power Connect AC power to the T-BERD 107A and charge the replacement battery for eight hours. 2-21...
-
Page 37: Warranty
This warranty applies only to the original purchaser and is non-transferable unless express written autho- rization of the warranty transfer is granted by TTC. No other warranty is expressed or implied. TTC is not liable for consequential damages. - Page 38 INSTRUMENT CHECKOUT SECTION 2 AND MAINTENANCE After the equipment is repaired by TTC, it will be tested to applicable specifications, burned-in for at least 24 hours, retested, and returned to the customer with shipping prepaid. A brief description of the...
-
Page 39: Instructions
It is recommended that all switches be left in the positions they were in when the problem occurred. This is requested so that the TTC repair group can analyze the switch positions along with a detailed description of the problem or of the service requested. -
Page 40: Instrument Description
This section may be used as a reference during testing and as a guide to understanding the functions of the T-BERD 107A (see Figure 3-1). The controls, indicators, and connectors of the mainframe and of each of the options are discussed in detail in the following order. -
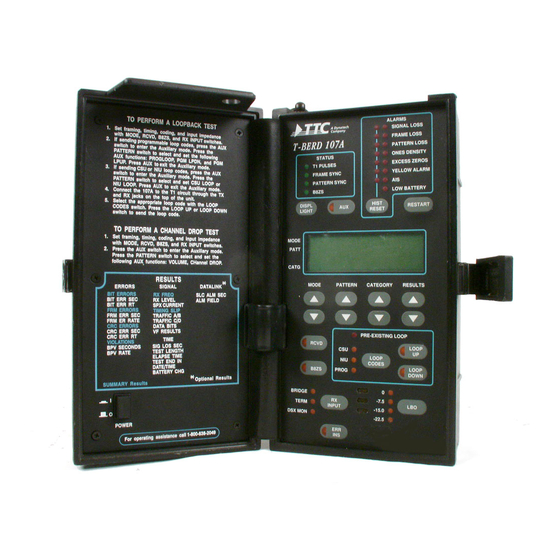
Page 41: T-Berd 107A Front Panel
PATTERN SYNC B8ZS LOW BATTERY DISPL HIST RESTART LIGHT RESET MODE PATT CATG MODE PATTERN CATEGORY RESULTS PRE-EXISTING LOOP RCVD LOOP LOOP CODES LOOP PROG B8ZS DOWN BRIDGE -7.5 TERM INPUT -15.0 DSX MON -22.5 Figure 3-1 T-BERD 107A Front Panel... -
Page 42: Mainframe - Test Setup
3.2 MAINFRAME — TEST SETUP The following controls and indicators (see Figure 3-2) are described in the order that you would normally use them to set up the T-BERD 107A to test a circuit from a DS1 access point: •... -
Page 43: Front-Panel Display And
B8ZS DOWN Figure 3-2 Front-Panel Display and Setup Switches Help Panel The T-BERD 107A features a help panel in the lid of the instrument. It provides a quick reference of: • Test setup for sending loop codes • Test setup for dropping a channel •... - Page 44 This switch selects the transmitted framing format (e.g., T1 D4 or T1 ESF) and configures the receiver for the selected framing format. It also configures the T-BERD 107A for Test and Line Loopback modes to emulate a CSU or repeater loopback. The MODE...
- Page 45 When monitoring test patterns for an end-to-end test, the AUTO mode config- ures the T-BERD 107A to the received framing format and pattern. While attempting to identify the received signal’s...
- Page 46 T1 circuits with proprietary framing formats. — T1 D4 superframe mode configures T1 D4 the T-BERD 107A to transmit and receive D4 framed T1 data for testing D4 framed circuits. The T1 D4 mode is compatible with all superframe framing formats including: D1D, D2, and D3.
- Page 47 — T1 test loopback mode configures T1 TLB the T-BERD 107A to echo the received data and framing. This mode allows the T-BERD 107A to emulate a CSU in loopback. The T-BERD 107A configures itself to the received framing (or unframed) mode.
- Page 48 250 ms of an ESF out-of-band loop-up code. If the T-BERD 107A is set to T1 LLB or T1 TLB mode, it will not respond to the received loop codes. The AUTO LLB mode is exited by...
- Page 49 INSTRUMENT SECTION 3 DESCRIPTION PATTERN Switch This switch selects the transmitted test pattern and configures the receiver for the selected test pattern. Press either the up arrow or down arrow to scroll through the available selections. Release the switch when the desired selection appears in the PATTERN display.
- Page 50 21 test patterns that have a variety of ones and zeros densities. The T-BERD 107A monitors the re- ceived test pattern for bit errors, BPVs, and frame errors. If signal errors are not detected, the span does not have a bridge tap connected to it.
-
Page 51: Bridgtap Patterns
INSTRUMENT SECTION 3 DESCRIPTION Table 3-1 BRIDGTAP Patterns Pattern Bit Pattern Name (F = Framing bit) ALL ONES F 1111 F 1010 F 0100 F 0100 00 F 0100 000 F 0100 0000 F 1100 0000 00 F 1100 0000 000 2:10 F 1100 0000 0000 2:11... -
Page 52: Multipat Patterns
— The MULTIPAT pattern con- MULTIPAT sists of five commonly used test patterns that allow the T-BERD 107A to test a T1 span without having to select each test pattern indi- vidually. The T-BERD 107A monitors the re- ceived test patterns for bit errors, BPVs, and frame errors. - Page 53 The ALL ZERO pattern allows ALL ZERO — the T-BERD 107A to test T1 circuits for B8ZS clear channel capability. The pattern can be transmitted framed or unframed, and should always be transmitted with B8ZS coding se- lected.
- Page 54 INSTRUMENT SECTION 3 DESCRIPTION received ALL ZERO pattern can occur at a multiplexer or DCS with an improperly set coding option; the coding option would be set for AMI instead of B8ZS. B8ZS Switch This LED switch determines whether the T-BERD 107A transmits data with AMI coding or B8ZS coding.
- Page 55 In recovered tim- ing, the transmit timing source is taken from the clock recovered from the received data. In T1 LLB, T1 TLB, or AUTO LLB modes, the T-BERD 107A is automatically set to recovered timing. AUX Switch...
-
Page 56: Mainframe
DESCRIPTION 3.3 MAINFRAME — TEST CONNECTIONS The following connections and switches are used to connect the T-BERD 107A to the circuit being tested. Figure 3-3 illustrates the switches asso- ciated with connecting the T-BERD 107A to a cir- cuit. Figure 3-3 illustrates the T-BERD 107A top panel test connections. -
Page 57: Top Panel Test Connections
INSTRUMENT SECTION 3 DESCRIPTION • • • • • • • • PRINTER ADAPTER BATTERY CHARGING Figure 3-4 Top Panel Test Connections RX INPUT Switch This three-position switch selects the input imped- ance and signal conditioning for the RX jack. A configurable input impedance allows the T-BERD 107A to accommodate signals attenuated by cable loss or resistive circuits. -
Page 58: Lbo Switch
100 Ω. The TERM setting provides compen- sation for cable losses of up to 35 dB for T1 lines. This is useful for terminating a circuit with the T-BERD 107A. Provides a nominal 100 Ω of DSX-MON — input impedance and compensates for resistive loss. -
Page 59: Test Connections
RX INPUT connection. TX Jack This bantam jack connects the T-BERD 107A trans- mit output to the circuit under test. Use the switch to set the output level. This connector also provides the simplex current path to the RX jack. -
Page 60: Mainframe - Test Results
SECTION 3 DESCRIPTION 3.4 MAINFRAME — TEST RESULTS Once the T-BERD 107A is configured and connected to the circuit, use the following switches and indicators to initiate the test and collect the test results. Figure 3-5 illustrates the switches and indica- tors required to verify the results. - Page 61 INSTRUMENT SECTION 3 DESCRIPTION RESTART Switch This switch causes a test restart that affects all functions related to the test in progress, such as test results, Status LEDs, and History LEDs. Pressing and holding this switch during power-up clears non- volatile RAM (NOVRAM).
- Page 62 INSTRUMENT SECTION 3 DESCRIPTION RESULTS Switch This switch selects the test result displayed within the selected category. The switch consists of RESULTS up-arrow and down-arrow switches, which allow the operator to scroll through and display the test results within the selected category. The test results are discussed in detail in Section 5 Test Results.
- Page 63 INSTRUMENT SECTION 3 DESCRIPTION ERRORS Category BIT ERRORS Bit Errors BIT ERR SEC Bit Errored Seconds BIT ERR RT Bit Error Rate CRC ERRORS Cyclic Redundancy Check (CRC) Errors CRC ERR SEC CRC Errored Seconds CRC ERR RT CRC Error Rate FRM ERRORS Frame Errors FRM ERR SEC...
- Page 64 (i.e., T1 D4, T1 ESF, T1 SLC, T1 D1D, T1 TLB, or T1 LLB). In T1 TLB and T1 LLB modes, the T-BERD 107A auto- matically determines the framing type and con- figures itself to accept either unframed data, D4-framed data, ESF-framed data, or SLC-framed data.
- Page 65 INSTRUMENT SECTION 3 DESCRIPTION — Illuminates when B8ZS clear channel B8ZS coding is detected in the received T1 signal. If switch is set to AMI coding and B8ZS B8ZS coding is detected, the message B8ZS DE- TECTED is displayed in the SUMMARY cat- egory.
- Page 66 INSTRUMENT SECTION 3 DESCRIPTION Illuminates when 250 bit errors Pattern Loss — are detected in 1000 or fewer bits in a pseudo- random pattern, or if 100 bit errors are detected in 1000 or fewer bits for a fixed pattern. After a loss of pattern synchronization, bit errors and errored seconds are halted.
- Page 67 INSTRUMENT SECTION 3 DESCRIPTION Illuminates when 2048 consecutive ones AIS — are detected in an unframed format. Illuminates approximately 15 Low Battery — minutes before the battery is completely drained of power. The battery is recharged as necessary anytime AC power is applied. For a full charge, recharge the battery for approximately eight hours with the instrument turned off.
-
Page 68: Mainframe - Troubleshooting
INSTRUMENT SECTION 3 DESCRIPTION During initial acquisition of the received signal, the SUMMARY category should be displayed. The fol- lowing messages can appear during signal acquisition: — Message appears when ALL RESULTS OK all summary results are error-free or meet speci- fication boundaries. -
Page 69: Troubleshooting Controls
Figure 3-6 Troubleshooting Controls and Indicators LOOP CODES Switch This switch selects the type of loop code transmitted and responded to by the T-BERD 107A: CSU, NIU, or PROG. The T-BERD 107A can transmit loop-up and loop-down codes ( LOOP UP... - Page 70 • The loop code is continuously transmitted until an appropriate response is detected at the T-BERD 107A receiver, a pre-existing loop is detected, a pre-determined time-out interval of three seconds (out-of-band pay- load only) is exceeded, any major switch is...
- Page 71 • The loop code is continuously transmitted until an appropriate response is detected at the T-BERD 107A receiver, a pre-deter- mined time-out interval (three seconds for out-of-band payload, 250 milliseconds for out-of-band line) is exceeded, any major switch is pressed, or the LOOP DOWN switch is pressed again.
-
Page 72: Err Ins
INSTRUMENT SECTION 3 DESCRIPTION Pre-Existing Loop LED This red LED illuminates when a pre-existing loop is detected. The Pre-Existing Loop LED illumi- nates and remains illuminated for five seconds during an in-band loop-up attempt when an in-band loop-up code is detected within one and a half seconds from the start of loop-up code transmis- sion. -
Page 73: Mainframe - Printer Control
PRINTER Connector This female, 8-pin DIN-type connector serves as the RS-232 printer interface connector. It is configured with DCE pinouts to connect the T-BERD 107A to the PR-40A or compatible printer. The connector interface is configured with the following auxiliary functions (see Section 4 Auxiliary Functions): —... -
Page 74: Slc Datalink Decode
3.7 SLC DATALINK DECODE OPTION — INTRODUCTION The SLC Datalink Decode Option (107A-1) provides the T-BERD 107A with the ability to moni- tor and report on the SLC Mode 1 and SLC Mode 2 datalink. This option adds the DATALINK category with two SLC datalink alarm results. -
Page 75: Test Results
INSTRUMENT SECTION 3 DESCRIPTION 3.9 SLC DATALINK DECODE OPTION — TEST RESULTS CATEGORY Switch In addition to the four standard mainframe catego- ries, the following category is added to the switch selections. — The DATALINK category in- DATALINK cludes the SLC Alarm Seconds and Alarm Field Size test results that are taken from the SLC datalink signal. - Page 76 INSTRUMENT SECTION 3 DESCRIPTION 3-37...
- Page 77 INSTRUMENT SECTION 3 DESCRIPTION 3-38...
-
Page 78: Advanced Stress Patterns
3.10 ADVANCED STRESS PATTERNS OPTION — INTRODUCTION The Advanced Stress Patterns Option (107A-2) adds seven T1 stress patterns to the T-BERD 107A. The seven T1 stress patterns are designed to stress test the timing recovery circuits and span-line re- peater ALBO circuitry. - Page 79 INSTRUMENT SECTION 3 DESCRIPTION density octets followed by quick changes from average ones density to low ones density octets. When the pattern is frame aligned, it provides a SUmaximum of 15 zeros and meets the ones density criteria. This pattern causes false frame synchronization on D4-type framed circuits.
- Page 80 INSTRUMENT SECTION 3 DESCRIPTION This 55-octet pattern can be 55 OCTET — used to stress test repeater timing recovery and ALBO circuitry. The pattern consists of rapid transitions from high ones density octets to low ones density octets. When the pattern is frame aligned, it violates the maximum zeros and ones density criteria.
- Page 81 INSTRUMENT SECTION 3 DESCRIPTION 3-42...
-
Page 82: Enhanced Esf Option
MODE Switch In addition to the standard mainframe operating modes, the following modes are added to the switch selections: — Smart NIU/Performance Moni- SMARTNIU tor mode configures the T-BERD 107A to query the Performance Monitor portion of the Westell 3-43... - Page 83 T-BERD 107A to either clear the recorded statistics from the NIU/Performance Monitor or set the NIU/Performance Monitor time and date to match the T-BERD 107A’s time and date. The Clear Results function is performed after the results are retrieved using the CLEAR NIU selection.
-
Page 84: Enhanced Esf Option
PRM transmit emulation mode and to determine whether or not the T-BERD 107A will display PRMs, as well as to determine whether or not the T-BERD 107A will display BPMs and to program eight-bit BPM commands. 3.14 ENHANCED ESF OPTION —... - Page 85 INSTRUMENT SECTION 3 DESCRIPTION When the Query function stops, the T-BERD 107A displays the PIR result for both directions (AZ and ZA) and periodically flashes one of the following messages to indicate the results: QUERY COMPLETE/ALL DATA OK — indi- cates Query function is complete with no errors reported.
- Page 86 T1 circuit connections and try again. CLOCK SET — indicates the Set Clock func- tion has set the NIU/Performance Monitor time and date to match the T-BERD 107A’s time and date. RESULTS Switch When the T-BERD 107A is in the SMARTNIU...
- Page 87 INSTRUMENT SECTION 3 DESCRIPTION NIU CLEARED — indicates all results are cleared from the NIU/Performance Monitor. SHELF x Alarm (x = A, B, C, or D) Collecting Test Results When in the T1 ESF or FT1 ESF modes, the ESF datalink far-end PRM results enable the T-BERD 107A to monitor and report on the status of the ESF datalink PRM as described in the ANSI T1.403-1989...
- Page 88 INSTRUMENT SECTION 3 DESCRIPTION The far-end PRM results are available when the ESF operating mode is selected and the AUX DATALINK function PRM RCVR is ON. The far- end PRM results are also available in the AUTO LLB and T1 LLB modes. In the SMARTNIU mode, the NIU/Performance Monitor stored statistics can be retrieved, but they can not be displayed in the RESULTS display.
- Page 89 INSTRUMENT SECTION 3 DESCRIPTION — Line Severely Errored Seconds is a SESL count of seconds in which 1544 or more CVLs have occurred (corresponds to a bit error rate of 10E-3). — Line Unavailable Seconds is a count UASL of seconds that a line was unavailable. A line is unavailable when ten or more consecutive SESLs occur.
-
Page 90: Enhanced Esf Option
INSTRUMENT SECTION 3 DESCRIPTION — Monitored Seconds is a count of MSEC seconds in which valid performance informa- tion is recorded. — Status Register is an eight-bit register STAT with the following bits: Bit 1 - Loopback Re- quest, Bit 2 - Data Incomplete Indicator, Bit 3 - Loss of Signal Indicator, Bit 5 - Loss of Power, Bit 6 - Alarm Indication Signal (AIS), Bit 7 - Yellow Alarm, and Bit 8 - Out-of-Frame. - Page 91 INSTRUMENT SECTION 3 DESCRIPTION SMART NIU RESULTS DATA COLLECTED 13:14 08-27-93 Key for STAT res. - - - - - - - - - - 1 = Looped Back 2 = Data Incomplet 3 = Loss of Signal 4 = Unused 5 = Power Loss 6 = AIS 7 = Yellow Alarm...
-
Page 92: Smart Loopback/Command
DESCRIPTION 3.16 SMART LOOPBACK/COMMAND CODES OPTIONS — INTRODUCTION The Intelligent Network Support Option (107A-4) enables the T-BERD 107A to loop up and loop down intelligent T1 repeaters. 3.17 SMART LOOPBACK/COMMAND CODES OPTIONS — TEST SETUP AUX Switch The Intelligent Network Support Option adds the... -
Page 93: Smart Loopback/Command
INSTRUMENT SECTION 3 DESCRIPTION 3.18 SMART LOOPBACK/COMMAND CODES OPTIONS — TROUBLESHOOTING LOOP CODES Switch In the PROG position, this switch enables you to send user-programmable loop codes to loop up or loop down intelligent repeaters. The loop code is deter- mined by the AUX LOOPCODE and AUX SMARTNET functions. -
Page 94: Fractional T1 Option
T-BERD 107A to transmit and receive D4 framed FT1 data. The FT1 D4 mode is compatible with the D4 superframe format. Extended Superframe Fractional FT1 ESF — T1 mode configures the T-BERD 107A to trans- mit and receive ESF framed FT1 data. 3-55... - Page 95 When operating in the AUX AUTORESP — FT1 modes and AUTO RESPONSE is enabled, the T-BERD 107A does not respond to in-band loop codes. However, the T-BERD 107A does respond to ESF out-of-band loop codes when configured for FT1 ESF operation. The AUTO RESPONSE mode establishes a full bandwidth loopback and bit error rate test.
- Page 96 SECTION 3 DESCRIPTION When FT1 modes are AUX LOOPCODE — selected, the T-BERD 107A sends in-band loop codes within the selected FT1 channel bandwidth. However, the T-BERD 107A does not respond to FT1 in-band loop codes. Out- of-band loop codes are not affected by the FT1 Option.
-
Page 97: Troubleshooting
FT1 testing. 3.21 FRACTIONAL T1 (FT1) OPTION — TROUBLESHOOTING LOOP UP and LOOP DOWN Switches When testing FT1 circuits, the T-BERD 107A in- band loop codes are transmitted within the selected FT1 channel bandwidth or in the ESF datalink. 3-58... -
Page 98: Auxiliary Functions
AUXILIARY SECTION 4 FUNCTIONS AUXILIARY FUNCTIONS 4.1 INTRODUCTION Auxiliary functions allow access to parameters that are less frequently used and do not have dedi- cated switches. When the switch is pressed, the LED within the switch illuminates and the character display changes as follows: •... -
Page 99: T-Berd 107A Auxiliary
AUXILIARY SECTION 4 FUNCTIONS Table 4-1 T-BERD 107A Auxiliary Functions Auxiliary Function Description AUX USER1 User 1 Programmable Test Pattern AUX USER2 User 2 Programmable Test Pattern AUX USER3 User 3 Programmable Test Pattern AUX MULTIPAT MULTIPAT Pattern Selection and Duration... -
Page 100: Printer Interface
AUXILIARY SECTION 4 FUNCTIONS Table 4-1 (Continued) T-BERD 107A Auxiliary Functions Auxiliary Function Description AUX PRNTPORT Printer Interface Setup AUX CLOCK Time and Date AUX FT1 IDLE Fractional T1 Idle Channel Code** AUX FT1 RATE Fractional T1 Rate Select** AUX FT1 CHAN... - Page 101 AUXILIARY SECTION 4 FUNCTIONS The AUX USER1, AUX USER2, and AUX USER3 functions allow three user-defined 3- to 24-bit patterns to be programmed. These patterns are trans- mitted when USER1, USER2, or USER3 is selected with the switch. Each pattern is transmit- PATTERN ted from left to right as it is displayed.
- Page 102 AUXILIARY SECTION 4 FUNCTIONS RESULTS switch Press the down arrow to END the pattern at the current bit (blinking digit). Any bits dis- played to the right of this bit are deleted. AUX switch Press the switch to return to the operat- ing mode ( switch LED extinguished).
- Page 103 AUXILIARY SECTION 4 FUNCTIONS — Press the switch to set the TIME RESULTS duration of the selected test pattern. The setting 0:00 turns the selected pattern off. For the range 0:00 to 1:00, the duration is set in 15 second steps.
- Page 104 Ones Density alarm LEDs for the 55 OCTET and 3 in 24 patterns in the framed modes on the T-BERD 107A. When the AUX DENSITY function for a pattern is set to ON, the current and history Ones Density LEDs for that pattern function normally.
- Page 105 AUXILIARY SECTION 4 FUNCTIONS Use the following procedure to set the Ones Density alarm status. AUX and PATTERN switch Press the switch to activate the auxiliary functions. Press the switch to PATTERN select the AUX DENSITY function. CATEGORY switch Press to select either 55OCT or 3 in 24. RESULTS switch Press to set the Ones Density LEDs ON or OFF.
- Page 106 AUX CSU LOOP function or AUX NIU LOOP func- tion. If the T-BERD 107A is set to T1 TLB or T1 LLB mode, the instrument does not respond to the received loop codes.
- Page 107 1100_ _ _ _ MODE PATTERN CATEGORY RESULTS The AUX PGM LPUP function enables a 3- to 8-bit user-defined loop-up code to be programmed. This allows the T-BERD 107A to transmit and respond to non-standard loop codes. The loop code is 4-10...
- Page 108 AUXILIARY SECTION 4 FUNCTIONS transmitted from left to right as displayed. The pro- grammed loop-up code is transmitted when the LOOP switch is set to PROG and the CODES LOOP UP switch is pressed. When the T1, T1 D4, T1 D1D, or T1 SLC mode is selected, the loop code is transmitted as an in-band loop code.
- Page 109 AUXILIARY SECTION 4 FUNCTIONS RESULTS switch Press the down arrow to END the loop code at the current bit (blinking digit), thereby setting the loop code’s length. Any bits dis- played after this last bit are deleted. AUX switch Press the switch to return to the operat- ing mode ( switch LED extinguished).
- Page 110 The AUX PGM LPDN function enables a 3- to 8-bit user-defined loop-down code to be programmed. This allows the T-BERD 107A to transmit and respond to non-standard loop codes. The loop code is transmitted from left to right as displayed. The pro-...
- Page 111 AUXILIARY SECTION 4 FUNCTIONS CATEGORY and RESULTS switches Repeat Steps 2 and 3 until the desired loop code is complete. Move to the end of the programmed loop code. RESULTS switch Press the down arrow to END the loop code at the current bit (blinking digit), thereby setting the loop code’s length.
- Page 112 ESF datalink. They do not overwrite the data or test pattern. The out-of- band line loop code allows the T-BERD 107A to establish a loopback with a compatible terminal. The loopback affects all data and framing bits.
- Page 113 — Out-of-band payload loop ESF PAYLOAD codes are transmitted in the ESF datalink. The T-BERD 107A does not respond to an out-of- band payload loop code. The loopback affects only data bits; framing bits are not affected. The out-of-band payload loop-up code is 1111 1111 0010 1000.
- Page 114 CATEGORY USER, one of the intelligent network equipment codes (Smart Loopback/Command Codes Option required), or ESF DL. The T-BERD 107A does not respond to intelligent network equipment loop codes. The availability of intelligent network equip- ment loop codes is determined by the AUX SMARTNET function.
- Page 115 SECTION 4 FUNCTIONS The intelligent office repeater loop codes IOR — allow the T-BERD 107A to establish a loopback of an intelligent office repeater. If the intelligent repeater type (see AUX SMARTNET function) has office repeaters that are addressable, the switch is used to program the address.
- Page 116 FUNCTIONS The intelligent line repeater loca- ILR LOC — tion code is used in conjunction with the ex- change code to allow the T-BERD 107A to establish a loopback of an XEL model 7853-000 intelligent line repeater. The switch RESULTS is used to program the location code.
- Page 117 AUXILIARY SECTION 4 FUNCTIONS — Enables the T-BERD 107A Auto Learn to reassign addresses to line repeaters. Press- ing the switch LOOP UP LOOP DOWN transmits the Auto Learn loop code, which clears all current addresses from the span repeaters. Then, each repeater is automati- cally assigned a new address based on its position on the span.
- Page 118 AUXILIARY SECTION 4 FUNCTIONS — Sets an office repeater on an Clear FT1 FT1 span to full T1 mode temporarily. Either the switch or LOOP UP LOOP switch can be used to transmit the DOWN Clear FT1 loop code. CPE Arm —...
- Page 119 LOOP UP the option query code. The repeater in loopback first returns its address or an address code, which the T-BERD 107A displays. Then, it returns the status for the repeater options as follows: Framing Mode — Auto, Dual, or ESF Loopback Code Detection —...
- Page 120 AUXILIARY SECTION 4 FUNCTIONS AIS — Enabled or Disabled CPE Arming Code Block — Enabled or Disabled Automatic Loopback Timeout — En- abled or Disabled Repeater Status — Programmed or Original Settings — Removes the power from Power Down the line past the office receiver while the loop code is being transmitted plus an addi- tional five seconds after the loop code trans- mission is stopped.
- Page 121 — Selects IOR PGM ADDR/ILR PGM ADDR the address change command, which allows the T-BERD 107A to assign an address for the intelligent repeater. Press the switch RESULTS to assign the address in the range from 0 to 1999.
- Page 122 — En- ARM CDE NIU/ARM CDE CPE ables the T-BERD 107A to select the arm- ing code the repeater in loopback recognizes, the NIU or the Customer Premises Equip- ment (CPE) arming codes.
- Page 123 BLK CPE ON/BLK CPE OFF — Enables the T-BERD 107A to enable or disable the CPE arming code block, which prevents further arming of the span and its elements from the CPE side when the repeater is in loopback.
- Page 124 DS1 maintenance switches. The CATEGORY switch is used to select the function: — The maintenance switch DS1MSWITCH code is used to allow the T-BERD 107A to establish a loopback. The switch RESULTS is used to program the address, if applicable.
- Page 125 MODE PATTERN CATEGORY RESULTS The DS1 maintenance switch DS1MS CMD — commands are used to allow the T-BERD 107A to change the configuration. The RESULTS switch is used to select the DS1 maintenance switch command. Arm/Disarm — Selects the maintenance switch arming/disarming code.
- Page 126 RESULTS used to select between HTU-C (Central office) and HTU-R (Remote - customer premises). — The ESF datalink codes determine ESF DL which ESF BPMs the T-BERD 107A transmits. Pressing the switch LOOP UP LOOP DOWN transmits the selected BPM. When a BPM is being transmitted, its name appears while trans- mitting in the PATTERN display.
- Page 127 AUXILIARY SECTION 4 FUNCTIONS — Synchronization qual- SYNC UNKNWN ity unknown. USER — User-programmable BPM. SELECT MODE LOOPCODE PATT (PROG) ESF DL CATG STRATUM 1 MODE PATTERN CATEGORY RESULTS The Smart Loopback/Command Codes Option currently supports the following intelligent network equipment: •...
- Page 128 AUXILIARY SECTION 4 FUNCTIONS • Teltrend Model IOR7231LS/ ILR7239LS Intelligent Repeaters • Teltrend Model IOR7231LW/ ILR7239LW Intelligent Repeaters • Teltrend DS1 Maintenance Switch System • TxPORT Model 231-OR/239-SR Intel- ligent Repeaters • Wescom Smart Span T1 Span Line Sys- tem with Addressable Bi-Directional Loopback (F-Series) •...
- Page 129 AUXILIARY SECTION 4 FUNCTIONS • Westell 3171 T1 Network Interface and Maintenance System-28 (NIMS - 12 bit) • Westell 3171 T1 Network Interface and Maintenance System-60 (NIMS - 16 bit) • Westell 3224-00/01 HDSL Central Of- fice Terminal Unit (HTU-C) •...
- Page 130 AUXILIARY SECTION 4 FUNCTIONS Consider the following functions and modes when sending and receiving loop codes: • AUX DATALINK function • AUX PGM LPUP function • AUX PGM LPDN function • AUX RESPONSE function • AUX SMARTNET function • switch LOOP CODES •...
- Page 131 AUXILIARY SECTION 4 FUNCTIONS When the AUX SMARTNET function is dis- played, the switch is used to select the CATEGORY intelligent network equipment type, while the switch is used to select the make/model. All SULTS equipment types have a NONE selection for make/ model to indicate the equipment is not installed in the network being tested.
- Page 132 — When the BPM receiver is on, BPM RCVR the T-BERD 107A decodes the BPM, displays the message in the RESULTS display, and adds the BPM results to the Alarms printout. If the BPM receiver is off, the results are not available for display or printout.
- Page 133 AUXILIARY SECTION 4 FUNCTIONS — The USER BPM position dis- USER BPM plays an eight-bit number string in the RE- SULTS II display. The six inner bits can be changed, but the two end bits are always zeros. Press the switch up arrow to high- RESULTS light the desired bit.
- Page 134 PRM RCVR RESULTS toggle the PRM receiver on or off. When the PRM receiver is on, the T-BERD 107A reports on the PRM status in the RESULTS display, and the PRM results appear in the Results printout. If the PRM receiver is off, the results are not available for display or printout.
- Page 135 AUXILIARY SECTION 4 FUNCTIONS CATEGORY switch Press either the up or down arrow to scroll through the selections (BPM RCVR, USER BPM, PRM TRAN, PRM RCVR). Release the switch when the desired selection is displayed. RESULTS switch Press the appropriate switch (up or down arrow) to select and set the parameters.
- Page 136 AUXILIARY SECTION 4 FUNCTIONS previously selected channel appears in the RESULTS display. The channel selections are described as follows: No DS0 channel will be accessed. NONE — Indicates the channel number CHANNEL nn — (nn is a number from 01 to 24) that will be accessed and available at the RESULTS dis- play, the speaker, and the VF OUT jack, as well as available for insertion.
- Page 137 AUXILIARY SECTION 4 FUNCTIONS AUX VOLUME — Speaker Volume MODE VOLUME DOWN PATT CATG MODE PATTERN CATEGORY RESULTS The AUX VOLUME function sets the audible output level for the speaker, which also controls the volume of the VF output. A six-box, bar-graph in the RESULTS display shows the relative volume by filling in the boxes.
- Page 138 CATEGORY RESULTS The AUX TIME TST function selects either timed or continuous testing, as follows: — The T-BERD 107A tests for a limited TIMED time determined by the AUX TEST LEN func- tion. Changing from continuous to timed testing clears the test results and causes a test restart.
- Page 139 AUXILIARY SECTION 4 FUNCTIONS — The T-BERD 107A tests CONTINUOUS continuously. Changing from timed testing to continuous testing during a timed test allows the test to continue (i.e., test results continue to accumulate). Use the following procedure to select timed or continuous testing.
- Page 140 AUXILIARY SECTION FUNCTIONS AUX TEST LEN — Timed Test Length Duration MODE TEST LEN PATT CATG 200 : 17 MODE PATTERN CATEGORY RESULTS The AUX TEST LEN function sets the length of a timed test. The maximum test length setting is 200 HRS 59 MIN, and the minimum is 0 HRS 1 MIN.
- Page 141 AUXILIARY SECTION 4 FUNCTIONS AUX switch Press the switch to return to the operat- ing mode ( switch LED extinguished). Consider the following auxiliary functions and TIME category results when changing the AUX TEST LEN function: • AUX PRI INTV function •...
- Page 142 AUXILIARY SECTION FUNCTIONS Use the following procedure to generate the desired printout. AUX and PATTERN switch Press the switch to activate the auxiliary functions. Press the switch to PATTERN select the AUX PRINT function. CATEGORY switch Press to initiate a controls printout. CTRL PRNT flashes once to acknowledge the re- quest.
- Page 143 AUXILIARY SECTION 4 FUNCTIONS AUX BUF CLR — Clear Print Buffer CLEAR MODE BUF CLR PATT PRINT BUFFER NOT EMPTY CATG MODE PATTERN CATEGORY RESULTS The AUX BUF CLR function terminates any printouts in progress and clears the print buffer. When the AUX BUF CLR function is selected and the print buffer contains stored results, the message PRINT BUFFER NOT EMPTY appears in the RE-...
- Page 144 Press the switch to select one of the following: SULTS — T-BERD 107A generates a results ERROR printout once a second when any of the follow- ing events occur: bit errors, CRC errors, frame errors, or BPVs.
- Page 145 AUXILIARY SECTION 4 FUNCTIONS — T-BERD 107A automatically generates TIMED a results printout after the specified time interval defined by the AUX PRI INTV function. — This setting prevents all automatic results printout generation, but it does not dis- able manual printout generation via the AUX PRINT function.
- Page 146 AUXILIARY SECTION FUNCTIONS AUX PRI INTV — Print Interval Time MODE PRI INTV PATT CATG 20 : 17 MODE PATTERN CATEGORY RESULTS The AUX PRI INTV function sets the print interval time that determines how often a results printout is generated when the AUX PRI EVNT function is set to TIMED.
- Page 147 AUXILIARY SECTION 4 FUNCTIONS RESULTS switch Press the up arrow (increase) or the down arrow (decrease) to change the print interval minutes from 0 MIN to 59 MIN. AUX switch Press the switch to return to the operat- ing mode ( switch LED extinguished).
- Page 148 AUXILIARY SECTION FUNCTIONS Press the switch to BAUD RATE — RESULTS scroll through the baud rate selections of 300, 1200, 2400, 4800, and 9600. Press the switch to scroll PARITY — RESULTS through the parity selections of NONE, ODD, and EVEN. When parity is set to NONE, the data output is automatically set for eight data bits.
- Page 149 The AUX CLOCK function sets the time (in 24-hour HH:MM format) and date (in MMM DD YY format). The clock time and date appears on all printouts generated by the T-BERD 107A. The time and date are displayed in the TIME category, DATE/ TIME result.
- Page 150 AUXILIARY SECTION FUNCTIONS Use the following procedure to set the time and date. AUX and PATTERN switch Press the switch to activate the auxiliary functions. Press the switch to PATTERN select the AUX CLOCK function. CATEGORY switch Press the up arrow to move the highlight from left to right through the five parameters, HH, MM, MMM, DD, and YY.
- Page 151 AUXILIARY SECTION 4 FUNCTIONS AUX switch Press the switch to return to the operat- ing mode. Consider the following functions and modes when setting the RS-232 interface parameters: • SMARTNIU mode Set Clock function • Printer operation AUX FT1 IDLE —...
- Page 152 AUXILIARY SECTION FUNCTIONS Use the following procedure to set the idle code. AUX and PATTERN switch Press the switch to activate the auxiliary functions. Press the switch to PATTERN select the AUX FTI IDLE function. CATEGORY switch Press the up arrow to move from left to right. Press the down arrow to move from right to left.
- Page 153 AUXILIARY SECTION 4 FUNCTIONS AUX FT1 RATE — Fractional T1 Channel Rate Select FTI Option Required MODE FT1 RATE PATT CHAN RATE CATG 64KxN MODE PATTERN CATEGORY RESULTS The AUX FT1 RATE function sets the FT1 channel rate for either 56KxN or 64KxN. If the channel rate is set to 56KxN, the bandwidth on the selected FT1 channels is reduced to seven bits, and the Least Significant Bit (LSB) is set to one in the...
- Page 154 AUXILIARY SECTION FUNCTIONS AUX switch Press the switch to return to the operat- ing mode. Consider the following functions and modes when setting the FT1 channel rate: • AUX FT1 CHAN function • AUX FT1 IDLE function • AUX VF TONE function AUX FT1 CHAN —...
- Page 155 AUXILIARY SECTION 4 FUNCTIONS CATEGORY switch Pressing the switch up arrow CATEGORY moves from left to right and from top row to bottom row. Pressing the switch CATEGORY down arrow moves the cursor from right to left and from bottom row to top row. Pressing either arrow after it has reached the end of its range wraps around to the beginning.
- Page 156 AUXILIARY SECTION FUNCTIONS AUX VF TONE — VF Tone Select FTI Option Required MODE VF TONE PATT CATG 1004 -13.0 MODE PATTERN CATEGORY RESULTS The AUX VF TONE function sets the transmit- ted VF tone frequency and level for the selected channel.
- Page 157 AUXILIARY SECTION 4 FUNCTIONS Use the following procedure to set the VF tone frequency and level. AUX and PATTERN switch Press the switch to activate the auxiliary functions. Press the switch to PATTERN select the AUX VF TONE function. CATEGORY switch Press to select the VF tone frequency: 404 Hz, 1004 Hz, 2713 Hz (at 0.0 dBm only), or 2804 Hz.
-
Page 158: Test Results
SECTION 5 TEST RESULTS TEST RESULTS 5.1 TEST RESULTS The T-BERD 107A T-Carrier Analyzer performs a variety of measurements and provides a number of performance results. The measurements and test re- sults are displayed in the RESULTS display. The test results are divided into five categories. - Page 159 SECTION 5 TEST RESULTS ERRORS Category Mainframe BIT ERRORS BIT ERR SEC BIT ERR RT CRC ERRORS CRC ERR SEC CRC ERR RT FRM ERRORS FRM ERR SEC FRM ER RATE VIOLATIONS BPV SECONDS BPV RATE SIGNAL Category Mainframe RX FREQ, Hz RX LEVEL SPX CURRENT TIMING SLIP...
- Page 160 SECTION 5 TEST RESULTS DATALINK Category SLC Datalink SLC Datalink Decode Option Decode Option History Alarm Messages SLC ALM SEC MAJOR ALARM SHELF x ALM FIELD MAJOR ALARM NO SHELF ALARM SHELF x FE LOOP SHELF x FE LOOP PROTECT SHELF x ON PROT MINOR ALARM PWR/MISC ALARM...
-
Page 161: Summary Category
SECTION 5 TEST RESULTS 5.2 SUMMARY CATEGORY The SUMMARY category displays the follow- ing key non-zero or out-of-specification test results without having to scroll through all of the categories to find them. BIT ERRORS — A count of received bits which Bit Errors have a value opposite that of the corresponding transmitted bits (one or zero) after pattern... - Page 162 SECTION 5 TEST RESULTS RX FREQ, Hz Received Frequency in Hz — The frequency of the clock measured from the received data. The valid range for received frequency is from 1539000 Hz to 1549000 Hz. If the RX FREQ, Hz result exceeds the maximum value >1549000 is displayed.
- Page 163 SECTION 5 TEST RESULTS This message is displayed when SIGNAL LOSS — the received signal has been lost. The RESULTS display alternates between the selected test result and SIGNAL LOSS until the signal returns. B8ZS DETECTED — This message is displayed when the switch is set to the AMI position and B8ZS...
- Page 164 SECTION 5 TEST RESULTS NOT FOR SYNC Not For Synchronization — A received BPM stating timing source is not suitable for synchro- nization. SONET SONET Clock Traceable — A received BPM stating timing is recognized as a SONET clock. STRATUM 1 —...
-
Page 165: Major Alarm Shelf X
SECTION 5 TEST RESULTS USER User BPM Detected — A received BPM stat- ing the signal is recognized as an eight-bit user-programmable BPM. The following SUMMARY category alarm and maintenance messages act as a current indication of the messages that are received from the SLC-96 datalink. -
Page 166: Shelf X On Prot
SECTION 5 TEST RESULTS SHELF x ON PROT Shelf x on Protection Line — This message is displayed when the indicated shelf (x = A, B, C, or D) has been switched to the protection shelf. Three consecutive datalink frames must indi- cate that a shelf has been switched to the protec- tion shelf before this alarm message is displayed. -
Page 167: Maint Test Alarm
NO DATALINK SYNC This mes- No Datalink Synchronization — sage is displayed when the T-BERD 107A has failed to obtain SLC datalink synchronization. The following SUMMARY category PRM test results are received from the ESF datalink. The Enhanced ESF Option is required for these test results. - Page 168 SECTION 5 TEST RESULTS FAR FRM SES Far-End Severely Errored Framing Sec- onds — A count of the seconds in which two or more frame errors occurred in less than 3 ms in the received signal at the far end. This result reports on the PRM Severely-Errored Framing Event Bit (SE = 1) status.
-
Page 169: Errors Category
SECTION 5 TEST RESULTS 5.3 ERRORS CATEGORY BIT ERRORS — A count of received bits which Bit Errors have a value opposite that of the corresponding transmitted bits (one or zero) after pattern syn- chronization is achieved. BIT ERR SEC —... - Page 170 SECTION 5 TEST RESULTS FRM ERRORS Frame Errors — A count of the frame errors detected since the start of the test and after frame synchronization was achieved. For T1 D1D and T1 D4 framing, frame errors are counted if either an F or an F frame bit is in error.
- Page 171 SECTION 5 TEST RESULTS 5-14...
-
Page 172: Signal Category
SECTION 5 TEST RESULTS 5.4 SIGNAL CATEGORY RX FREQ, Hz — The Received Frequency in Hertz (Hz) frequency of the clock measured from the re- ceived data. The valid range for received fre- quency is from 1539000 Hz to 1549000 Hz. If the RX FREQ, HZ is greater than the valid range of values, the message >1549000 is displayed. - Page 173 SECTION 5 TEST RESULTS SPX CURRENT — The magnitude of the sim- Simplex Current plex current flowing between the transmit output tip and ring and the receive input tip and ring. Simplex current is displayed as a number from 10 to 200 followed by the label mA for milliam- peres.
- Page 174 SECTION 5 TEST RESULTS TRAFFIC C/D BITS Traffic C/D Bits — The RESULTS display shows the C and D signaling bits for all 24 DS0 channels (see below). This result is only avail- able with ESF framing. T1 ESF TRAFFIC MODE C/D BITS PATT...
- Page 175 SECTION 5 TEST RESULTS MODE T1 D4 DATA BITS PATT CH ZZ CATG SIGNAL 10101010 MODE PATTERN CATEGORY RESULTS VF RESULTS — The RESULTS display shows VF RESULTS the VF signal level (in dBm) and frequency (in Hz) for the selected channel. The VF RESULTS are displayed as shown, where ZZ is the number of the selected drop channel, +/-##.# dBm is the signal level with a range from +3.0 to -40.0 dBm,...
-
Page 176: Time Category
SECTION 5 TEST RESULTS 5.5 TIME CATEGORY SIG LOS SEC — A count of test Signal Loss Seconds seconds since the signal has been lost or during which one or more signal losses occurred. TEST LENGTH — The current test Length of a Timed Test length for a timed test, in HHH:MM format. -
Page 177: Datalink Category
SECTION 5 TEST RESULTS BATTERY CHG Battery Charge Level — Relative level of battery power remaining. This value is dis- played using five boxes. The far left is marked by an E for empty, and the far right is marked by an F for fully charged. - Page 178 SECTION 5 TEST RESULTS STRATUM 2 Stratum 2 Clock Traceable — A received BPM stating timing is recognized as a Stratum 2 clock. STRATUM 3 Stratum 3 Clock Traceable — A received BPM stating timing is recognized as a Stratum 3 clock.
- Page 179 SECTION 5 TEST RESULTS ALM FIELD SLC Alarm Field Size — This is the detected size of the SLC alarm field. ALM FIELD is displayed as shown below, where XX is the number of bits in the alarm field (XX = 13 or 16). The following DATALINK category alarm and maintenance messages are displayed as a historical record when they are no longer displayed in the...
- Page 180 SECTION 5 TEST RESULTS SHELF x ON PROT Shelf x on Protection Line — This message is displayed when the indicated shelf (x = A, B, C, or D) has been switched to the protection shelf. Three consecutive datalink frames must indi- cate that a shelf has been switched to the protec- tion shelf before this alarm message is displayed.
- Page 181 SECTION 5 TEST RESULTS FAR BPV SEC — A count of the Far-End BPV Seconds seconds in which one or more BPVs occurred in the received signal at the far end. This result reports on the PRM Line-Code Violation Event Bit (LV = 1) status.
- Page 182 SECTION 5 TEST RESULTS FCRC 6-10 Far-End CRC 6 to 10 Bin — A count of the seconds with six to ten CRC errors reported in the received signal at the far end. This result reports on the third PRM CRC Error Event Bit (G3 = 1) status.
- Page 183 SECTION 5 TEST RESULTS PAY SRC — Iden- Far-End Payload Source/Loopback tifies the direction of the PRM according to the PRM Command/Response Bit (C/R) and the Payload Loopback Activated Bit (LB). In end- to-end applications, a customer generated PRM is indicated as CUST (C/R = 0 and LB = 0) and a carrier generated PRM is indicated as CARR (C/R = 1 and LB = 0).
-
Page 184: Printer Operation
SECTION 6 OPERATION PRINTER OPERATION 6.1 COMPATIBLE PRINTERS This T-BERD 107A can generate printouts to an RS-232 serial printer such as the TTC PR-40A Thermal Printer. The T-BERD 107A RS-232 inter- face is configured to operate with the PR-40A Ther- mal Printer without having to change any of the settings on either device. - Page 185 PR-40A Thermal Printer parameters, so no changes are needed to operate with the PR-40A Thermal Printer. Perform the following procedure to set the T-BERD 107A printer interface parameters in the auxiliary function. Apply power to the T-BERD 107A Press the switch on the lid panel.
- Page 186 PRINTER SECTION 6 OPERATION...
-
Page 187: Connecting The Printer
6.3 CONNECTING THE PRINTER Perform the following procedure to connect the TTC PR-40A Thermal Printer to the T-BERD 107A. Printer interface parameters verification Before connecting the printer to the T-BERD 107A verify that the PRINTER... -
Page 188: Generating A Printout
PRINTER SECTION 6 OPERATION Apply power to the T-BERD 107A and printer Turn the T-BERD 107A on first, then the PR-40A. If this step is reversed, the first printout can be garbled. When connecting a compatible NOTE: printer other than the PR-40A to... - Page 189 Results printouts are fully described in Sec- tion 6.5.1 Results Printout. — Make this selection to CTRL PRNT generate a printout of the T-BERD 107A current switch settings and auxiliary func- tions. Controls printouts are fully described in Section 6.5.2 Controls Printout.
-
Page 190: Types Of Printouts
PRINTER SECTION 6 OPERATION 6.5 TYPES OF PRINTOUTS The T-BERD 107A generates three types of printouts: controls, results, and messages. Each print- out is identified by a header and is time- and date- stamped. If the operator attempts to store a printout when the print buffer is full, the printout does not overwrite a previous printout, and the data is not stored. -
Page 191: Results Printout
PRINTER SECTION 6 OPERATION Standard Results Printouts The standard results printout is a hard-copy listing of the current test results. The format includes all available results and any Alarm LEDs that are illumi- nated at the time the printout is initiated. Figure 6-1 is an example of a standard results printout. - Page 192 PRINTER SECTION 6 OPERATION BRIDGTAP Test Results Printouts The BRIDGTAP results printout includes the bit errors (BIT ERR), errored seconds (ERR SEC), and pattern synchronization seconds (SYNC SEC) for each of the 21 patterns in the BRIGDTAP test pattern (see Figure 6-2). When bit errors are not detected, BIT ERR and ERR SEC remain at zero and SYNC SEC indicates the number of seconds the synchronized pattern was...
-
Page 193: Simulated Bridgtap Results
PRINTER SECTION 6 OPERATION RESULTS PRINT 18:04:50 JAN 01 T1 D4 BRIDGTAP BIT ERR 225423 ASYN E SEC **3.91E-06 SLIPS BPV ERR 2411 BPV ER SEC BPV RATE 17E-05 FRA ER SEC FRA ERR 22 F E RATE 12E-05 CRC ERR 99 CRC ER SEC CRC E RT 2E-04 FREQ Hz... -
Page 194: Simulated Multipattern
PRINTER SECTION 6 OPERATION MULTIPAT Test Results Printouts The MULTIPAT results printout includes the bit errors (BIT ERR), errored seconds (ERR SEC), and pattern synchronization seconds (SYNC SEC) for each of the five patterns in the MULTIPAT test pattern (see Figure 6-3). RESULTS PRINT 18:04:50 JAN 01... - Page 195 PRINTER SECTION 6 OPERATION When bit errors are not detected, BIT ERR and ERR SEC results remain at zero and SYNC SEC indicates the number of seconds the synchronized pattern was received and monitored for errors. Each synchronized pattern is monitored for 175 seconds during each cycle of the MULTIPAT test.
-
Page 196: Smart Niu Results Printout
PRINTER SECTION 6 OPERATION SMART NIU RESULTS DATA COLLECTED AT: 13:14 08-27-93 Key for STAT res. - - - - - - - - - - 1 = Looped Back 2 = Data Incomplet 3 = Loss of Signal 4 = Unused 5 = Power Loss 6 = AIS 7 = Yellow Alarm... -
Page 197: Overflow Results Printout
PRINTER SECTION 6 OPERATION Test Results Overflow A results printout is automatically initiated when a result counter overflows. Labeled OVER- FLOW PRINT, the printout also describes the reason for the overflow (see Figure 6-5). Each time a result counter overflows, the test result is pre- ceded by a double OVERFLOW PRINT 12:58:16... - Page 198 PRINTER SECTION 6 OPERATION asterisk (**) on the printout, indicating an immedi- ate overflow condition (i.e., the results counter overflowed during the last second). Subsequent printouts of the overflowed result are preceded by a single asterisk (*) to indicate a previous overflow condition.
-
Page 199: Controls Printout
PRINTER SECTION 6 OPERATION 6.5.2 Controls Printout The controls printout lists the current setting of all front-panel switches and auxiliary functions. A controls printout is initiated manually using the AUX PRINT function. Figure 6-6 is an example of a controls printout. CONTROLS PRINT 12:55:34 JAN 05... - Page 200 PRINTER SECTION 6 OPERATION Possible messages are: Alarm Messages SIG LOSS XX — Loss of valid T1 pulses, where XX is a running count of signal losses since the last test restart. FRAM LOSS XX — Loss of frame synchroniza- tion, where XX is a running count of frame sync losses since the last test restart.
- Page 201 PRINTER SECTION 6 OPERATION — Alarm Indication Signal (AIS) indi- cates an unframed T1 signal consisting of 2048 consecutive ones has been received. Status Messages SIGNAL DETECT — T1 pulses of valid fre- quency and level are present. — The framing pat- FRA SYNC ACQUIRED tern has been detected and synchronization is acquired.
- Page 202 PRINTER SECTION 6 OPERATION — More than 20 PRINTER SQUELCH ON alarm or status prints have been generated within one minute. The printer squelch feature is en- abled and no more messages or automatic ERR SEC results prints will print. PRINTER SQUELCH OFF —...
- Page 203 PRINTER SECTION 6 OPERATION 6-20...
-
Page 204: Specifications
SECTION 7 SPECIFICATIONS SPECIFICATIONS 7.1 INTRODUCTION This section lists the specifications for the T-BERD 107A mainframe and options. 7.2 GENERAL SPECIFICATIONS 7.2.1 Physical Size: 8.5"H x 4.25"W x 3.25"D (21.6 cm x 10.8 cm x 8.3 cm). Weight: 4.5 pounds (2.1 kg). -
Page 205: Input Specifications
SECTION 7 SPECIFICATIONS 7.3 INPUT SPECIFICATIONS 7.3.1 Receive Input (RX Jack) Input Connector: Bantam jack. 1,544,000 Hz ±4000 Hz. Input Frequency: Input Impedance 1000 Ω or greater (with BRIDGE: ALBO). 100 Ω ±5% (with ALBO). TERM: 100 Ω ±5% (with AGC). DSX-MON: Operating Range BRIDGE/TERM: +6 to -35 dBdsx. -
Page 206: Output Specifications
SECTION 7 SPECIFICATIONS 7.4 OUTPUT SPECIFICATIONS 7.4.1 Transmit Output (TX Jack) Output Connector: Selectable line build-out (LBO) of 0, -7.5, -15.0, and -22.5 dB of cable loss at 772 Hz is provided on a bantam jack. Output LBO ±1 dB at 772 kHz. Tolerance: Internal Oscillator ±5 ppm. -
Page 207: Measurements
SECTION 7 SPECIFICATIONS 7.4.2 600 Ohm VF Output (VF OUT Jack) Output Connector: Bantam jack. Output Frequency: Voice frequency at 600 ohms impedance. 7.5 MEASUREMENTS 7.5.1 Frequency ±5 ppm. Accuracy: Resolution: 1 Hz. 1,544,000 ±5000 Hz. Range: 7.5.2 Level The designation dBdsx is a voltage measure- ment;... - Page 208 SECTION 7 SPECIFICATIONS dBdsx Resolution: 0.1 dB between +6 dBdsx and -6 dBdsx. 0.5 dB between -6 dBdsx and -40 dBdsx. Vp-p Range: 60 mV to 12.0 V. Vp-p Resolution: 0.1 V. 7.5.3 Simplex Current Range: 10 mA to 180 mA. Resolution: 1 mA.
- Page 209 SECTION 7 SPECIFICATIONS 7.5.5 VF Frequency Range: 60 to 3904 Hz (+3.0 to -26.0 dBm). 60 to 3400 Hz (-27.0 to -40.0 dBm). Resolution: 1 Hz. ±1 Hz. Accuracy: 7.5.6 VF Level Range: +3.0 to -40 dBm. Resolution: 0.1 dBm. ±0.5 dBm.
- Page 210 SECTION 7 SPECIFICATIONS...
-
Page 211: Connectors
SECTION 7 SPECIFICATIONS 7.6 CONNECTORS 7.6.1 PRINTER Connector Output Connector: 9-pin DIN-type. Connector Pin Configuration: See Table 7-1. 7.7 ALARM CRITERIA Signal Loss: 150 ms without input pulses after valid frequency and level are detected. Frame Loss Mainframe Without Options: D1D - 2 out of 5 F bits in error. - Page 212 SECTION 7 SPECIFICATIONS Pattern Loss: QRSS — 250 errors de- tected in 1000 or fewer bits. Fixed pattern — 100 errors in 1000 or fewer bits. Ones Density: QRSS — LED illumina- tion is suppressed. Other patterns — received data contains less than n ones in 8(n+1) bits, where n = 1 to 23.
-
Page 213: Pattern Specifications
SECTION 7 SPECIFICATIONS Low Battery: Battery has approximately 15 minutes of power re- maining. 7.8 PATTERN SPECIFICATIONS 7.8.1 Pattern Definition ALL ONES: All ones. 1:1: Alternating ones and zeros. 1:7: F01000000 — Pattern is aligned with framing (F) patterns as in- dicated. - Page 214 SECTION 7 SPECIFICATIONS MULTIPAT: Automated 5-pattern sequence that includes: ALL ONES, 1:7, 2 IN 8, 3 IN 24, and QRSS (see Section 3.2 Mainframe — Test Setup). ALL ZERO: AMI coding - all zeros, no pulses except framing. B8ZS coding - B8ZS BPV se- quence 000V 10V1 (V = bipolar violation).
-
Page 215: Loop Codes
SECTION 7 SPECIFICATIONS 7.8.2 Pattern Sync Detection Criteria Fixed Patterns: 30 consecutive error-free bits. QRSS: 30 + n consecutive error-free bits for a pattern length of 2 7.9 LOOP CODES 7.9.1 Generation and Detection Patterns CSU Loop Codes IN BAND: Loop up: 10000;... -
Page 216: Grounding
SECTION 7 SPECIFICATIONS PGM LPDN: 3- to 8-bit repeating code. Fac- tory default (FAC1): loop down - 1110. Generated codes may be sent unframed or NOTE: framed. When framed is selected, in-band loop codes are overwritten by the framing bit. 7.9.2 Loop Detect Criteria In-Band Loop Codes:... -
Page 217: Battery
SECTION 7 SPECIFICATIONS 7.11 BATTERY Type: 12 V, lead-acid electrolyte. Operating Period: Typically provides four hours of continuous operation on a full charge. Storage Period: @ 68°F, holds 85% of charge after six months. Requires re- charging every six months. Recharging Period: Minimum of eight hours from full discharge if test set is turned off. - Page 218 A.1 DEFAULT SETTINGS This appendix contains the factory default set- tings (see Table A-1) that are stored in nonvolatile RAM (NOVRAM). The T-BERD 107A controls can be forced to their default settings by pressing and holding down the switch while the unit is RESTART being powered-up.
-
Page 219: A Factory Default Settings
FACTORY DEFAULT APPENDIX A SETTINGS Table A-1 Factory Default Settings (Continued) Parameter Default AUX MULTIPAT PATTERN ALL ONES TIME 3:00 (all patterns) AUX PGM LPUP 1100 (FAC1) AUX PGM LPDN 1110 (FAC1) AUX AUTORESP NO RESPONSE AUX LOOPCODE (CSU) IN BAND (NIU) FAC2 (PROG) -
Page 220: Channel Time Slot Assignments
Since the T-BERD 107A selects the dropped channel based on the primary usage of D4 and ESF framing, the time slots for other D1D and SLC framing drop different data channels than the user may expect. - Page 221 CHANNEL TIME APPENDIX B SLOT ASSIGNMENTS Table B-1 Channel Time Slot Assignments D4 & ESF Channel Channel Channel Time Slot Number Number Number...
- Page 222 APPENDIX C STRESS PATTERNS STRESS PATTERNS The stress patterns are represented in a right- to-left format. When the pattern is transmitted in binary form the least significant bit is transmitted first. This requires that the binary representation be turned over for transmission. Example: The binary representation of the hexadecimal value 01 would be 0000 0001.
- Page 223 Min/Max Stress Pattern 1000 0000 1000 0000 1000 0000 1000 0000 0000 0001 0000 0000 0000 0001 0000 0001 0000 0001 0000 0011 1000 0000 0000 0001 1000 0000 0000 0001 0000 0001 1000 0000 0000 0001 0010 0010 0000 0000 0010 0000 0010 0010 0000 0000 0010 0000 1010 1010 1010 1010 1010 1010 1010 1010 1010 1010 0101 0101 0101 0101 0101 0101 0101 0101 1010 1010 1010 1010 1010 1010 1010 1010 0101 0101 1010 1010 1010 1010 0101 0101...
- Page 224 Min/Max Stress Pattern (Continued) 0101 0101 0101 0101 1000 0000 1000 0000 1111 1111 1111 1111 1111 1111 1111 1111 1111 1111 1111 1111 1111 1111 1111 1110 1111 1111 1111 1111 0010 0100 0100 1001 1001 0010 1000 1000 1000 1000 1000 1000 0001 0000 0100 0010 0000 1000 0010 0001 1000 0100 0010 0000 0000 1000 1000 0010 0100 0000 0010 0000 0001 0000 1000 0000...
- Page 225 T1-2 Stress Pattern 1111 1111 1111 1111 1111 1111 1111 1111 1111 1111 1111 1111 1111 1111 1111 1111 1111 1111 1111 1111 1111 1111 1111 1111 1111 1111 1111 1111 1111 1111 1111 1111 1111 1111 1111 1111 1111 1111 1111 1111 1111 1111 1111 1111 1111 1111 1111 1111 1111 1111 1111 1111 1111 1111 1111 1111 1111 1111 1111 1111 1111 1111 1111 1111 1111 1111 1111 1111 1111 1111 1111 1111 1111 1111 1111 1111 1111 1111 1111 1111...
- Page 226 T1-2 Stress Pattern (Continued) 1111 1111 1111 1111 1111 1111 1111 1111 1111 1111 1111 1111 1111 1111 1111 1111 1010 1010 1010 1010 1010 1010 1010 1010 1000 0000 0000 0001 1000 0000 0000 0001 1000 0000 0000 0001 1000 0000 0000 0001 1000 0000 0000 0001 1000 0000 0000 0001 1000 0000 0000 0001 1000 0000 0000 0001 1000 0000 0000 0001 1000 0000 0000 0001 1010 1010 1010 1010 1010 1010 1010 1010 1000 0000 0000 0001 1000 0000 0000 0001...
- Page 227 T1-2 Stress Pattern (Continued) 1000 0000 0000 0001 1000 0000 0000 0001 1000 0000 0000 0001 1000 0000 0000 0001 1000 0000 0000 0001 1000 0000 0000 0001 1000 0000 0000 0001 1000 0000 0000 0001...
- Page 228 T1-3 Stress Pattern 0000 0001 0000 0001 0000 0001 0000 0001 0000 0001 0000 0001 0000 0000 0000 0001 0000 0001 0000 0001 1000 0000 0000 0001 0000 0001 0000 0011 0000 0001 0000 0001 0000 0001 0000 0001 0000 0111 0000 0001 0000 0001 0000 0001 0000 0001 0101 0101 0101 0101 0101 0101 0101 0101 1010 1010 1010 1010 1010 1010 1010 1010 0000 0001 0000 0001 0000 0001 0000 0001 0000 0001 0000 0001 1111 1111 1111 1111 1111 1111...
- Page 229 T1-3 Stress Pattern 1111 1111 1111 1111 1111 1111 1000 0000 0000 0001 1000 0000 0000 0001 1000 0000 0000 0001 1000 0000 0000 0001 1000 0000 0000 0001 1000 0000...
- Page 230 T1-4 Stress Pattern 1111 1111 1111 1111 1111 1111 1111 1111 1111 1111 1111 1111 1111 1111 1111 1111 1111 1111 1111 1111 1111 1111 1111 1111 1111 1111 1111 1111 1111 1111 1111 1111 1111 1111 1111 1111 1111 1111 1111 1111 1111 1111 1111 1111 1111 1111 1111 1111 1111 1111 1111 1111 1111 1111 1111 1111 1111 1111 1111 1111 1111 1111 1111 1111 1111 1111 1111 1111 1111 1111 1111 1111 1111 1111 1111 1111 1111 1111 1111 1111...
- Page 231 T1-4 Stress Pattern (Continued) 1111 1111 1111 1111 1111 1111 1111 1111 1111 1111 1111 1111 1111 1111 1111 1111 1111 1111 1111 1111 1111 1111 1111 1111 1111 1111 1111 1111 1111 1111 1111 1111 1111 1111 1111 1111 1111 1111 1111 1111 1111 1111 1111 1111 1111 1111 1111 1111 1111 1111 1111 1111 1111 1111 1111 1111 1111 1111 1111 1111 1111 1111 1111 1111 1010 1010 1010 1010 1010 1010 1010 1010 0001 0000 0001 0000 0001 0000 0001 0000...
- Page 232 T1-4 Stress Pattern (Continued) 0001 0000 0001 0000 0001 0000 0001 0000 0001 0000 0001 0000 0001 0000 0001 0000 0001 0000 0001 0000 0001 0000 0001 0000 0001 0000 0001 0000 0001 0000 0001 0000 1010 1010 1010 1010 1010 1010 1010 1010 0001 0000 0001 0000 0001 0000 0001 0000 0001 0000 0001 0000 0001 0000 0001 0000 0001 0000 0001 0000 0001 0000 0001 0000 0001 0000 0001 0000 0001 0000 0001 0000 0001 0000 0001 0000 0001 0000 0001 0000...
- Page 233 T1-5 Stress Pattern 1000 0000 0000 0001 1000 0000 0000 0001 1000 0000 0000 0001 1000 0000 0000 0001 1000 0000 0000 0001 1000 0000 0000 0001 1000 0000 0000 0001 1000 0000 0000 0001 1000 0000 0000 0001 1000 0000 0000 0001 1000 0000 0000 0001 1000 0000 0000 0001 1000 0000 0000 0001 1000 0000 0000 0001 1000 0000 0000 0001...
- Page 234 T1-5 Stress Pattern (Continued) 0000 0001 1010 1111 1010 1010 1010 1111 0000 0001 0000 0001 0000 0001 0000 0001 1111 1111 1111 1111 1111 1111 1111 1111 0000 0001 0000 0001 0000 0001 0000 0001 1111 1111 1111 1111 1111 1111 1111 1111 1111 1111 1111 1111 1100 1011...
- Page 235 T1-6 Stress Pattern 0000 0001 0000 0001 0000 0001 0000 0001 0000 0001 0000 0001 0000 0000 0000 0001 0000 0001 0000 0001 0000 0001 0000 0001 0000 0001 0000 0011 0000 0001 0000 0001 0000 0001 0000 0001 0000 0111 0000 0001 0000 0001 0000 0001 0000 0001 0101 0101 0101 0101 0101 0101 0101 0101 1010 1010 1010 1010 1010 1010 1010 1010 0000 0001 0000 0001 0000 0001 0000 0001 0000 0001 0000 0001 1111 1111 1111 1111 1111 1111...
- Page 236 T1-6 Stress Pattern (Continued) 1111 1111 1111 1111 1111 1111 1000 0000 0000 0001 1000 0000 0000 0001 1000 0000 0000 0001 1000 0000 0000 0001 1000 0000 0000 0001 1000 0000 0000 0001...
- Page 237 T1-DALY Stress Pattern 0000 0001 0000 0001 0000 0001 0000 0001 0000 0001 0000 0001 1000 0000 0000 0001 0000 0001 0000 0001 0000 0001 0000 0001 0000 0001 0000 0011 0000 0001 0000 0001 0000 0001 0000 0001 0000 0111 0000 0001 0000 0001 0000 0001 0000 0001 0101 0101 0101 0101 0101 0101 0101 0101 1010 1010 1010 1010 1010 1010 1010 1010 0000 0001 0000 0001 0000 0001 0000 0001 0000 0001 0000 0001 1111 1111 1111 1111 1111 1111...
- Page 238 T1-DALY Stress Pattern (Continued) 1111 1111 1111 1111 1111 1111 1000 0000 0000 0001 1000 0000 0000 0001 1000 0000 0000 0001 1000 0000 0000 0001 1000 0000 0000 0001 1000 0000 0000 0001...
-
Page 240: Intelligent Network Equipment
INTELLIGENT APPENDIX D NETWORK EQUIPMENT Intelligent Network Equipment INTRODUCTION This appendix shows the intelligent network equipment addresses (see Table D-1) and avail- able commands (see Table D-2) currently supported by the T-BERD 107A Smart Loopback/ Command Codes Option. - Page 241 INTELLIGENT APPENDIX D NETWORK EQUIPMENT...
- Page 242 INTELLIGENT APPENDIX D NETWORK EQUIPMENT...
- Page 243 INTELLIGENT APPENDIX D NETWORK EQUIPMENT...
- Page 244 INTELLIGENT APPENDIX D NETWORK EQUIPMENT...
- Page 245 INTELLIGENT APPENDIX D NETWORK EQUIPMENT...
- Page 246 INTELLIGENT APPENDIX D NETWORK EQUIPMENT...
- Page 247 INTELLIGENT APPENDIX D NETWORK EQUIPMENT...
- Page 248 INTELLIGENT APPENDIX D NETWORK EQUIPMENT...
- Page 249 INTELLIGENT APPENDIX D NETWORK EQUIPMENT D-10...
- Page 250 INDEX T-BERD 107A INDEX Symbols 1:1 Test Pattern 3-10 1:7 Test Pattern 3-10 120-Octet Pattern 3-40 2 IN 8 Test Pattern 3-10 2047-Bit Test Pattern 3-57 3 IN 24 Test Pattern 3-11 511-Bit Test Pattern 3-57 53-Octet Pattern 3-40 54-Octet Pattern 3-40...
- Page 251 INDEX T-BERD 107A Minor 5-9, 5-23 Power/Miscellaneous 5-9, 5-23 Shelf 5-8, 5-22 Alarm LEDs 3-26, 7-8 History 3-26 ALL ONES Test Pattern 3-10 ALL ZERO Test Pattern 3-14 AMI Coding 3-15 ANSI T1.403 ESF Circuits 3-43 AUTO LLB Mode 3-9, 4-9...
- Page 252 INDEX T-BERD 107A AUX TIME TST Function 4-41 AUX USER Function 4-4 AUX VF CHAN Function 4-38 AUX VF TONE Function 4-59 AUX VOLUME Function 4-40 Auxiliary Functions FT1 Option 3-56 B8ZS Coding 3-15, 3-26 LED 3-15, 3-26 Switch 3-15...
- Page 253 INDEX T-BERD 107A CRC ERR SEC Test Results 5-12 CRC ERRORS Test Results 5-4, 5-12 D4 Superframe FT1 Mode 3-55 Data Communications Equipment (DCE) 6-1 Data Terminal Equipment (DTE) 6-1 Datalink Alarm Field 5-22 Alarm Seconds 5-21 DATALINK Category 3-36, 5-3, 5-20...
- Page 254 INDEX T-BERD 107A Factory Default Settings. See Default Settings 1 Factory Defaults 1, 2 FAR BPV SEC Test Results 5-11 FAR CRC ERR Test Results 5-11, 5-24 FAR FRM ES Test Results 5-10 FAR FRM SES Test Results 5-11 FAR SLP SEC Test Results 5-11, 5-24 FCRC >319 Test Results 5-25...
- Page 255 INDEX T-BERD 107A LBO Switch 3-19 Loop Code Switches 3-30, 3-54 LOOP CODES Switch 3-30 LOOP DOWN Switch 3-32, 3-58 LOOP UP Switch 3-31, 3-58 Loop Codes Addressable Repeater Loop Codes 7-13 Auxiliary Functions 3-30 DS2 Maintenance Switch Commands 4-28...
- Page 256 INDEX T-BERD 107A NOT FOR SYNC Test Results 5-7, 5-20 Ones Density LED 3-27 Operating Modes 3-6 AUTO LLB Mode 4-9, 4-42, 4-48 FT1 Option 3-55 Options Advanced Stress Patterns 1-4 Channel Monitor Option 7-6 Enhanced ESF 1-4, 2-14, 3-43...
- Page 257 INDEX T-BERD 107A T1 DALY Pattern 3-15, 7-11 T1-2 (96-Octet) 4 T1-3 (54-Octet) 7 T1-4 (120-Octet) 9 T1-5 (53-Octet) 12 T1-6 (55-Octet) 14 T1-DALY 16 PAY SRC Test Results 5-26 PR-40A Thermal Printer 1-6, 1-7, 6-4 Pre-Existing Loop LED 3-33 Print Buffer 4-46 Print Event Functions.
- Page 258 INDEX T-BERD 107A QRSS Test Pattern. See T1-QRSS Test Pattern RCVD Switch 3-16 REF Jack 3-20 Repair 2-24 RESTART Switch 3-22, 3-45 Results Printouts. See Printouts RESULTS Switch 3-23 RS-232 Printer Interface. See PRINTER Connector RX INPUT Switch 3-18 RX Jack 3-20 SELF TST Mode 3-6 Shelf Alarm.
- Page 259 INDEX T-BERD 107A SONET Test Results 5-7, 5-20 Speaker 4-40 Status LEDs 3-25 STRATUM 1 Test Results 5-7, 5-20 STRATUM 2 Test Results 5-7, 5-21 STRATUM 3 Test Results 5-7, 5-21 STRATUM 4 Test Results 5-7, 5-21 SUMMARY Category 3-23, 5-1, 5-4 SUMMARY Category Messages.
- Page 260 INDEX T-BERD 107A TEST LENGTH Test Results 5-19 Test Patterns. See Pgs. 3-9 — 3-13 Advanced Stress Patterns Option. See Pgs. 3-39 — 3-41 Test Results 3-48 DATALINK Category 3-38, 5-3, 5-20 ERRORS Category 3-24, 5-12 SIGNAL Category 3-24, 5-2, 5-15...
- Page 261 INDEX T-BERD 107A INDEX-12...
Need help?
Do you have a question about the T-BERD 107A and is the answer not in the manual?
Questions and answers