Table of Contents
Advertisement
Available languages
Available languages
Quick Links
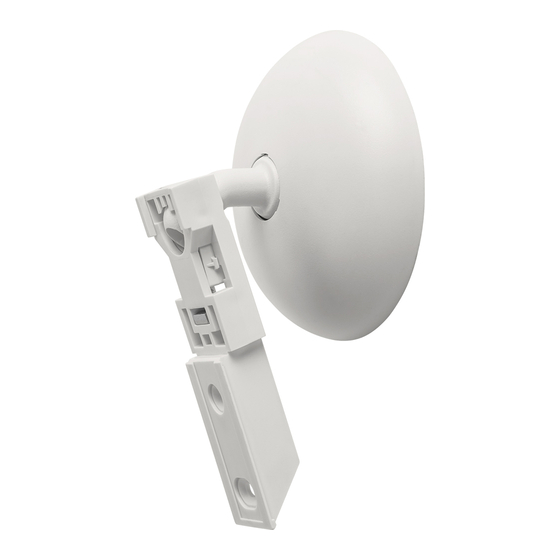
Flexible Armature Mounting Kit
LRF-ARM-WH
P/N 041428 Rev. A 07/2014
Mounts a standard wall-, corner-,
or hall-mount Lutron
sensor (see
®
image below) to a ceiling, wall, or
other right-angle surface.
The ball-and-clamp design supports
accurate directional positioning and
greater viewing range of each sensor.
The mounting bracket allows sensors to
be mounted at greater heights to increase
coverage area, creating a perfect mounting
option for large areas (e.g., warehouses,
loading docks, long hallways).
(Sensor not included)
Important Notes
Please read before installing.
1. When selecting armature mounting site(s), remember that
sensor(s) will require an unobstructed view of the room and
line-of-sight to detect motion.
Additionally, hot objects or moving air currents can affect the
performance of the sensor. Do not mount within 6 ft (1.8 m) of
heating, ventilation, and air conditioning (HVAC) equipment.
2. Install in accordance with all national and local electrical codes.
3. For indoor use only. Operate between 32 °F and 104 °F (0 °C and
40 °C).
4. Clean with a soft damp cloth only. DO NOT use any chemical
cleaners.
Limited Warranty (Valid only in U.S.A., Canada, Puerto Rico, and the Caribbean). Lutron will, at its option, repair or replace any unit that is defective
in materials or manufacture within five years after purchase. For warranty service, return unit to place of purchase or mail to Lutron at 7200 Suter Rd.,
Coopersburg, PA 18036-1299, postage pre-paid. This warranty is in lieu of all other express warranties, and the implied warranty of merchantability
is limited to FIVE years from purchase. This warranty does not cover the cost of installation, removal or reinstallation, or damage resulting from
misuse, abuse, or damage from improper wiring or installation. This warranty does not cover incidental or consequential damages. Lutron's liability
on any claim for damages arising out of or in connection with the manufacture, sale, installation, delivery, or use of the unit shall never exceed the
purchase price of the unit. This warranty gives you specific legal rights, and you may have other rights which vary from state to state. Some states
do not allow the exclusion or limitation of incidental or consequential damages, or limitation on how long an implied warranty may last, so the above
limitations may not apply to you.
Lutron is a registered trademark of Lutron Electronics Co., Inc.
© 2014 Lutron Electronics Co., Inc.
Lutron Electronics Co., Inc.
7200 Suter Road
Coopersburg, PA 18036-1299
USA
www.lutron.com
Flexible Armature Mounting
Kit Components
®
For Suspended Ceiling Applications Only
Mounting Nut
Mounting Washer
Threaded Mounting Stud
For All Mounting Applications
Mounting Base
Decorative Dome
Sensor Mounting Bracket
3/32" Hex Key
Installation
1
Install Mounting Base
A. Ceiling-Mount
Suspended Ceiling
(for conventional ceiling installation, follow Wall-Mount instructions below)
1. Insert larger end of threaded mounting stud into mounting base. Firmly press and twist stud clockwise 1/4 turn to lock it into base.
2. Position mounting washer with tabs facing up toward ceiling tile and with center tab aligned to groove on threaded mounting stud. Slide washer onto
stud.
3. Screw self-cutting, threaded mounting stud through ceiling tile until mounting washer tabs penetrate bottom of ceiling tile.
4. With mounting nut teeth pointing down toward ceiling tile, thread or screw onto threaded mounting stud until teeth penetrate top of ceiling tile.
1
2
OR
B. Wall-Mount or other Vertical Surface Mount
1. If necessary, unsnap and remove decorative dome from mounting base.
2. Position mounting base against surface and orient ball in the intended sensing direction (see examples a, b, and c).
3. Depending on surface composition, attach mounting base with four screws or anchors (not provided).
4. Snap decorative dome onto mounting base.
2
a. Ball orientation to the
b. Ball orientation to the
left at approximately 0°
left at approximately 30°
2
Install Sensor Mounting Bracket
1. Using 3/32" hex key, slightly loosen set screw holding ball clamp in
place in sensor mounting bracket.
2. Place sensor mounting bracket over ball on mounting base.
3. Tighten set screw until ball clamp holds ball firmly.
1
2, 3
Technical Assistance: www.lutron.com
|
USA, Canada, Caribbean: 1.800.523.9466
®
3
4
3
c. Ball orientation to the
right at approximately 45°
3
Install Lutron
Sensor
®
1. Slide back of sensor down over rails on sensor mounting bracket.
2. Adjust sensor to desired position.
1
|
Mexico: +1.888.235.2910
English
4
2
|
Others: +1.610.282.3800
Advertisement
Table of Contents

Subscribe to Our Youtube Channel
Related Manuals for Lutron Electronics LRF-ARM-WH

Summary of Contents for Lutron Electronics LRF-ARM-WH
- Page 1 Lutron is a registered trademark of Lutron Electronics Co., Inc. © 2014 Lutron Electronics Co., Inc.
- Page 2 Lutron es una marca registrada de Lutron Electronics Co., Inc. © 2014 Lutron Electronics Co., Inc.
- Page 3 États permettent l’exclusion ou la limitation des dommages accessoires ou indirects, ou la limitation de la durée d'une garantie implicite, de sorte que les limitations ci-dessus peuvent ne pas s'appliquer à vous. Lutron est une marque déposée de Lutron Electronics Co., Inc. © 2014 Lutron Electronics Co., Inc.
Need help?
Do you have a question about the LRF-ARM-WH and is the answer not in the manual?
Questions and answers