Table of Contents
Advertisement
Quick Links
IMPORTANT
OPERATING INSTRUCTIONS
MANUAL
"NSF CERTIFIED TO THE ASTM SAFETY SPECIFICATION F 2208"
HELPFUL HINTS & TIPS
"SAFETY BUOY"
ABOVE GROUND POOL ALARM MODEL PGRM-SB
85dB Horn at 10 Feet
READ THOROUGHLY BEFORE USING ALARM
This product has been designed to aid in the detection of unwanted intrusions into
unsupervised pools. POOLGUARD IS A SAFETY ALARM SYSTEM AND NOT A LIFE
SAVING DEVICE. "This device is not intended to replace any other safety consideration
- i.e., adult supervision, lifeguards, fences, gates, pool covers, locks, etc., and some
devices may not detect gradual entry."
Advertisement
Table of Contents

Subscribe to Our Youtube Channel
Related Manuals for Poolguard PGRM-SB


Summary of Contents for Poolguard PGRM-SB
- Page 1 READ THOROUGHLY BEFORE USING ALARM This product has been designed to aid in the detection of unwanted intrusions into unsupervised pools. POOLGUARD IS A SAFETY ALARM SYSTEM AND NOT A LIFE SAVING DEVICE. “This device is not intended to replace any other safety consideration - i.e., adult supervision, lifeguards, fences, gates, pool covers, locks, etc., and some...
- Page 2 CERTIFICATION NSF International Certifies that the POOLGUARD Pool Alarm model PGRM-SB conforms to the requirements of ASTM F2208—Standard Safety Specification for Residential Pool alarms. 1. Certified to ASTM F2208-2008 for performance. 2. Certified to NSF/ANSI Standard 50 for material safety.
-
Page 3: Care And Handling
The POOLGUARD system will sound an alarm (Horn will sound) when you install or remove the pool unit from your pool. If you would like the POOLGUARD system not to sound (Horn will not sound) when you install or remove the pool unit from your pool. - Page 4 STAND. IF THE POOL UNIT WAS NOT REMOVED FROM YOUR POOL, IT WILL CONTINUE TO MONITOR YOUR POOL FOR AN INTRUSION. 3. POOLGUARD has designed this feature for “ONLY” those who have the responsibility of removing the alarm from the pool! STORING YOUR ALARM (See Figure 1) Always use the Red “Safety Buoy”...
- Page 5 FIGURE 1 Green LED Red Buoy Housing Reset/Sleep Decal Black Nut Black Screw Mounting Base Floating Platform Sensor Probe Red Alarm Storage Stand Sensor Assembly Sensor Clip...
-
Page 6: Battery Installation/Replacement
BATTERY INSTALLATION/ REPLACEMENT (Battery not included) POOLGUARD “Safety Buoy” is powered by a standard 9 volt alkaline battery. POOLGUARD recommends Energizer Brand No. 522 standard 9 volt battery. Follow these steps to install or replace the battery: 1. Place the ‘Safety Buoy” on its Storage Stand and remove the four (4) black screws/nuts holding the red buoy housing to the mounting base. - Page 7 FIGURE 2 ON/OFF INDICATOR – GREEN LED When POOLGUARD is installed and monitoring your pool for an intrusion, the green LED will flash once approximately every 10 seconds to indicate that the alarm is ON and OPERATING. When POOLGUARD is installed in your pool and the alarm is sounding, the green LED will flash approximately 2 times per second.
- Page 8 Figure 3 illustrates locations best suited for detecting intru- sions from any area of the pool. POOLGUARD “SAFETY BUOY” model PGRM-SB is designed to work with Above Ground pools up to 30’ in diameter and up to 18’X36’, and is ideal for Spas.
- Page 9 INSTALLING YOUR ALARM DO NOT ATTACH THE RED TETHER STRING TO A POOL LADDER. The Red Tether String is factory installed on the “Safety Buoy” pool unit. The Tether clip has an adhesive backing that is designed to be used on smooth surfaces like metal, plastic or vinyl.
- Page 10 FIGURE 3 DETAIL Tether Clip Red Tether String 5” Max Pool Wall SAFETY BUOY Floating Platform ROUND RECTANGLE OVAL Pool Filter Pool Filter & Return & Return Pool Filter & Return TEST BEFORE USING To ensure effectiveness, test “Safety Buoy” every time you place it into the pool by performing the following procedure: •...
- Page 11 • To test your alarm, push an object of appropriate volume and weight off the top edge/rail at the farthest location from the alarm. (A four (4) gallon jug of water or 3-one (1) gallon jugs of water tied together are ideal for testing.) The alarm should sound when the water action caused by the intrusion reaches the unit.
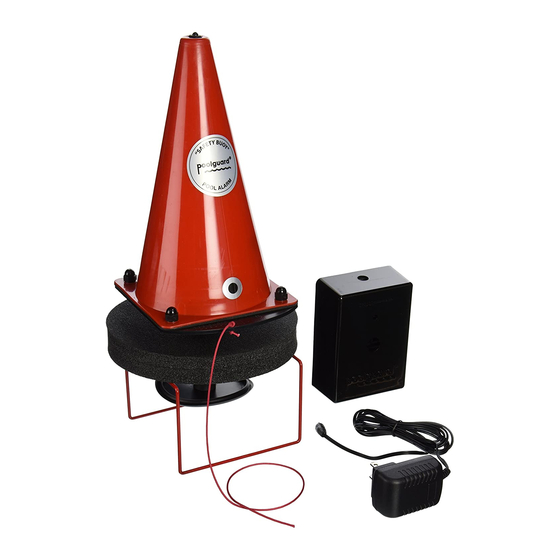
- Page 12 200 feet. The POOLGUARD REMOTE RECEIVER sounds an alarm in the house when the POOLGUARD unit is activated at the pool. The remote system consists of the following functional elements: •...
-
Page 13: Power Supply
120V, electrical outlet and insert the jack into the receiver. Check that indicator light is on. Your REMOTE RECEIVER unit is now ready to receive a transmission from your POOLGUARD unit. DO NOT USE YOUR REMOTE RECEIVER OUTDOORS. NOTE: THE MANUFACTURER IS NOT RESPONSIBLE FOR ANY RADIO OR TV INTERFERENCE CAUSED BY UNAUTHORIZED MODIFICATIONS TO THIS EQUIPMENT. - Page 14 SWIMMING POOL SAFETY TIPS • Supervise children at all times. • Never permit swimming alone. Never leave a child alone, even to answer the telephone. • Always remove the entire solar cover from a pool before swimming. • Remember that alcohol and water safety do not mix.
-
Page 15: Warranty And Repairs
WARRANTY AND REPAIRS POOLGUARD is sold with a limited warranty to cover defects in parts and workmanship for one year from date of purchase, (retain proof of purchase). If POOLGUARD exhibits a defect, please call Customer Service at 1-800-242-7163. Unauthorized returns will not be accepted. -
Page 16: False Alarms
Certain automatic cleaners may set the POOLGUARD unit off in some cases. If the cleaner head or the cleaner hose hits the POOLGUARD alarm it may cause it to false alarm. Solutions to this problem are to use your cleaner at night and your alarm during the day. - Page 17 WILL NOT SET THE POOLGUARD ALARM OFF! Testing is very important and should be done correctly. BE SURE YOUR RETURN LINE EYEBALL FITTING IS POINTING DOWN.
- Page 18 NOTES...
- Page 19 QUICK DO’S AND DON’TS • Do read the manual carefully • Do install a 9 volt battery • Do untie the bow on the power supply • Do test the alarm properly • Do turn your return line eyeball fittings towards the bottom of the pool •...
Need help?
Do you have a question about the PGRM-SB and is the answer not in the manual?
Questions and answers